background image

23

In this interface, you can also take the Rotate and Zoom function.

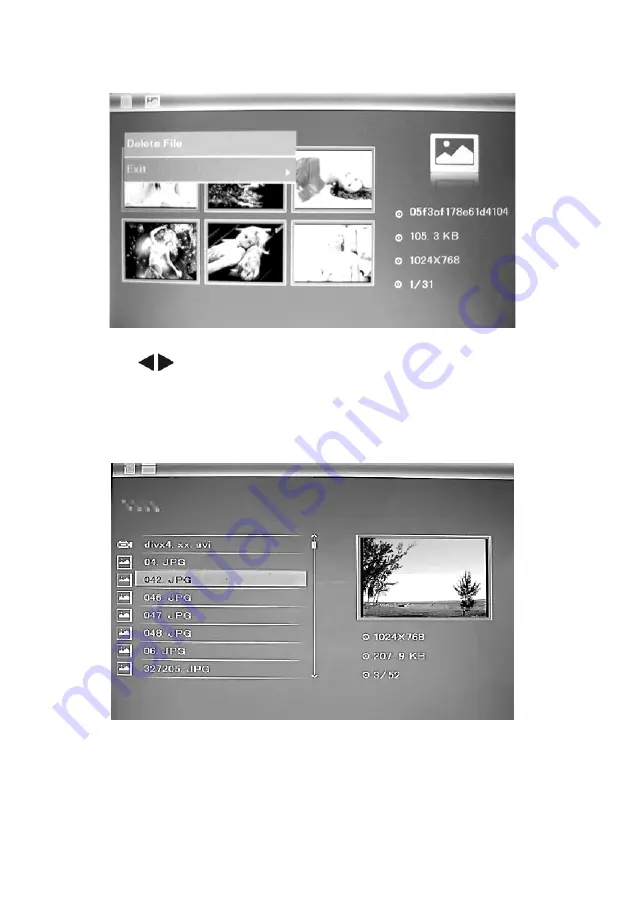
Delete pictures in built-in memory or memory card: In six-picture 

mode, use       to select the picture you want to delete in the built-

in memory or card device, then press 

MENU 

to enter delete interface, 

press 

OK

 to confirm.

4. FILE 


Press 

EXIT

  to  choose  «

MEMORY CARD

»  or  “

USB”

  in  the  Card 

choose inferface. Select

 File

, then press 

OK

 to access to file interface. 

You can browse all the files in the memory card in this mode, and press 

MENU

 to delete file in built-in memory or external devices.

Summary of Contents for DejaView SL880

Page 1: ......

Page 2: ...1 DEJA VIEW SL880...

Page 3: ...2 SD USB USB...

Page 4: ...3 1 JPEG 2 USB USB 2 0 HOST 3 SD SDHC MMC 4 5 6 7 8 10 9 10 11 1 7 1 2 1 3 AC DC 1...

Page 5: ...4 1 5 1 1 5 2 6 3 6 3 1 USB 7 3 2 7 3 3 8 4 9 5 10 6 10 8 12 9 12...

Page 6: ...5 1 1 1 1 SD MMC MS 2 USB 3 1 2 3 OK 4 5 6...

Page 7: ...6 2 1 110 240 DC IN 2 3 EXIT 3 5 3 3...

Page 8: ...7 3 1 USB SD MMC SDHC USB 2 0 USB USB 3 2...

Page 9: ...8 OK OK OK 3 3...

Page 10: ...9 OK 4 SD USB...

Page 11: ...10 OK 5 OK 6 OK...

Page 12: ...11 OK OK 1 2 3 4 3 5 15 30 1 5 15 30 1 5 6 7 8 OK 00 40 OK 00 40 OK 00 40 OK 00 40 9 OK OK 10 12 24 OK...

Page 13: ...12 11 OK 12 OK 13 7 Input AC 100 240V 50 60HZ 350mA Output DC 5V 1A JPEG SD SDHC MMC USB USB 2 0 8 800 3 RGB 600 300 1 4 3 300 2 120 140 0 40 10 85 8 USB...

Page 14: ...13 USB...

Page 15: ...14...

Page 16: ...15 DEJA VIEW SL880 USER MANUAL Thank you for your purchase of the Digital Photo Frame Please read this User Manual carefully to learn the correct way to use the Digital Photo Frame...

Page 17: ...ll void your warranty CLEANING THE LCD SCREEN Treat the screen carefully Because the screen of the Digital Photo Frame is made of glass and it would easily be broken or scratched If fingerprints or du...

Page 18: ...nnection USB 2 0 HOST 3 Support Memory Card SD SDHC MMC 4 Support viewing pictures in thumbnail mode 5 Auto Slideshow when insert Memory Card 6 Built in Clock and calendar with slideshow 7 Image displ...

Page 19: ...1 1 Bottom of Frame 19 2 Getting Started 20 3 Operating Instruction 20 3 1 Card and USB 21 3 2 Picture Mode 21 3 3 Copy Delete function 22 4 File 23 5 Calendar 24 6 Setup 24 7 Technical Specification...

Page 20: ...19 1 PRODUCT DIAGRAM 1 1 BOTTOM OF FRAME 1 SD MMC MS 2 USB 3 DC IN 1 Power on off 2 Menu 3 Play pause OK 4 Left Up 5 Right Down 6 Return Exit...

Page 21: ...into the right side the frame Then it will power on automatically Note There are different positions for the digital photo frame stand Please refer to Stand Instruction 2 2 Remove the protective film...

Page 22: ...Photo File Calendar and Set up icon on this interface Press OK to confirm your selection Note Make sure there are supported picture files in the Card or USB device 3 2 PICTURE MODE Press EXIT to choo...

Page 23: ...ne time to start single win dow slideshow 3 3 COPY DELETE FUNCTION Copy pictures to built in memory In one picture mode use to select the picture you want to copy to the built in memory then press MEN...

Page 24: ...t to delete in the built in memory or card device then press MENU to enter delete interface press OK to confirm 4 FILE Press EXIT to choose MEMORY CARD or USB in the Card choose inferface Select File...

Page 25: ...24 5 CALENDAR Select Calendar from the main menu press OK to enter the calen dar is displayed and slideshow will play automatically in the left win dow Adjust the date by using 6 SETUP...

Page 26: ...From Up To Down Brick 6 6 Photo Effect Color Mono Sepia 6 7 Photo mode Auto Fit Optimal full 6 8 Display Contrast Press OK to select Use to select from 00 lowest to 40 highest Brightness Press OK to...

Page 27: ...se consult both this guide and manual If you need further assistance please contact Tech nical Support No power Please check whether the plug is inserted correctly Remote control no function Please ch...

Page 28: ...27 The color is light or no color Please adjust the color and contrast setup...

Reviews: