background image

20

Important note to the use of power supply

Please only use the power supply included in the delivery. Use of any other 

power supply will void the warranty!

Operation of rechargeable battery

(mezzo with battery operation only)

Attention:

 In order to assure a long life span of the rechargeable battery you must 

follow the instructions for charging and operating the battery:


 The yellow battery indicator LED on the device does not expire until the charging 

process has finished.


 If the device is not used for a longer period (more than 1 month), the battery 

must be fully charged. Even if the device is switched OFF, the battery can dis

-

charge until deep discharge. This should be avoided, as the rechargeable battery 

can be damaged.

Use of battery


Plug-in power supply is not connected.


 Keep pressing the ON/OFF button for approx. 1 second; device is ready to be 

used.


 Directly after switching ON, the battery charging status appears briefly on the 

screen.


 As soon as the battery charging status on the screen starts blinking, the battery 

must be charged immediately. Only a few minutes remain before the unit switch-

es OFF automatically.


 If the device continues to run on battery mode, the battery must first be fully 

charged.

Charging of battery


The battery charge indicator is blinking or the device has switched OFF.


Please connect plug-in-power supply.


The yellow battery control LED at the unit lights up - the battery is charging.


When the battery is fully charged, the battery control LED will turn OFF.


The device is ready again for battery operation.


 While charging the battery, the device can be used without restriction. In this 

way, the battery can be charged during operation.

Operating time once the battery had been fully charged


With 16" class monitor: approx. 5,0 hours (depending on the illumination used)


With 19" class monitor: approx. 3,5 hours (depending on the illumination used)


Charging time is approx. 5,0 hours, when the unit is turned OFF.

Summary of Contents for mezzo

Page 1: ...mezzo EN User manual Please read this user manual carefully prior to installation use and maintenance for your own safety and in order to avoid damages on your system ...

Page 2: ...2 ...

Page 3: ...2011 65 EU Council directive 93 42 EEC of 14th June 1993 concerning medical devices risk class I according to Annex IX standard 12 CE conformity of Annex VII and RoHS II Council directive 2011 65 EEC Die CE Kennzeichnung auf dem Gerät dokumentiert diese Übereinstimmung The CE mark on the system points out this accordance Alsbach Hähnlein Ort und Datum der Ausstellung Place and date of issue M Rein...

Page 4: ... Power supply 8 Safety of batteries 8 Safety instructions to avoid damage 9 II Instructions for the reading system mezzo 10 Delivery content 10 Overview of all available mezzo models 10 Available options 10 The mezzo cameras 10 Installation of the system 11 Connection of the unit mains and battery operation 12 Alignment of monitor 13 Alignment of the XY table mezzo 14 Description of the control el...

Page 5: ...19 Power ON 19 Power OFF 19 Automatic saving of device settings 19 Replacement of lighting 19 Important note to the use of power supply 20 Operation of rechargeable battery 20 Use of battery 20 Charging of battery 20 Operating time once the battery had been fully charged 20 Description of the menu settings mezzo Vario 21 Menu selection 21 Adjust menu settings 21 Explanation of the menu content 22 ...

Page 6: ...the performance of the system to control the conventional use of the system in the chosen set up Electronic devices are sensitive towards electric discharge and towards high frequency electromagnetic fields Attention In order to avoid high frequency disturbances the operator should respect a mini mum distance of one meter to portable and mobile HF telecommunication devices Please also see chapter ...

Page 7: ...ication on when the product might be obsolete and substitution might be recommended due to new product developments Safety advice mezzo has to be installed in closed and dry rooms only Do not plug mezzo into an electrical circuit that is also being used for any life sustaining or support systems The device may not be used in the patients environment This device should not be operated in explosion ...

Page 8: ...osed rooms in the original packing The following conditions for transport and storage have to be respected Air pressure 700 1000 hPa Temperature range 5 C to 50 C Relative air humidity 30 to 80 Disposal of the unit according to EU directive 2002 96 EEC mezzo contains of electronic components To avoid damage to the environment the country specific rules have to be respected Power supply Only use th...

Page 9: ...ery hot or cold environment as this would harm the picture quality 6 Do not operate this device below 5 C or above 40 C 7 No liquids must reach the interior of the system Only operate the device in a dry environment 8 The device may not be operated next to medical devices patients environment 9 Do not lean on the screen touch the screen with any object or lay heavy objects on the device This may c...

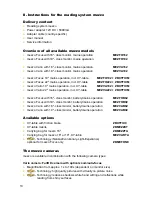
Page 10: ... ZBXTFIXM mezzo Focus with 16 class monitor battery mains operation MEZFOB62 mezzo Focus with 19 class monitor battery mains operation MEZFOB92 mezzo Vario with 16 class monitor battery mains operation MEZVAB62 mezzo Vario with 19 class monitor battery mains operation MEZVAB92 Available options XY table with friction brake ZBXTFIX0 XY table mobile ZBMEZZXT Carrying bag for mezzo 16 ZBMEZZTA Carryi...

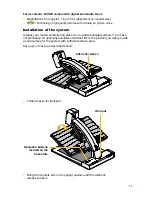
Page 11: ...zo carefully and place it on a solid horizontal surface If you have not purchased an optionally available stand that fits to the product you must provide a solid surface for the system with sufficient surface area Set up your mezzo as described below Interlock release Bring the monitors arm in the upright position until the interlock release snaps in Folded mezzo for transport Operation buttons lo...

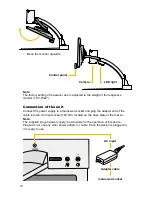
Page 12: ...adapter end of the cable into the AC input socket 12V DC located on the base plate of the mezzo Note The supplied plug in power supply is exclusively for the operation of this device Please do not use any other power adaptor or cable Once the device is plugged in it is ready to use Control panel Camera LED light Move the monitor upwards mains wall socket 0 II I ON OFF AC input Adapter cable ...

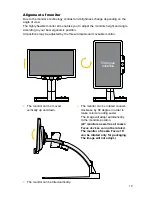
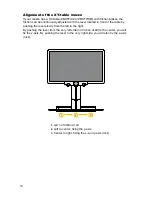
Page 13: ...adjusted by the three dimensional moveable monitor The monitor can be rotated counter clockwise by 90 degree in order to make column reading easier The image will adapt automatically to the monitors position 22 monitors as well as all mezzo Focus devices can not be rotated The monitor of mezzo Focus 16 can be rotated only for packaging The image will not adopt The monitor can be moved vertically u...

Page 14: ... in front of the table by pushing the lever slowly from the left to the right By pushing the lever from the very left side no friction at all to the center you will fix the y axis By pushing the lever to the very right side you will also fix the x axis lock 1 Left no friction at all 2 Left to center fixing the y axis 3 Center to right fixing the x and y axis lock 1 2 3 ...

Page 15: ...automatically When switching ON again the latest used settings are reactivated Attention If the reading table is not lit up after switching ON the device please check if the LED light is ON please see next paragraph Light adjustment 50 OFF 100 Press the toggle switch to adjust the LED lighting accordingly I LED light min 50 0 LED light OFF II LED light max 100 General note on using the LED light W...

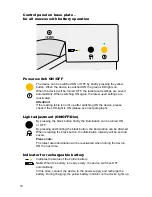
Page 16: ...se see next paragraph Light adjustment ON OFF Dim By pressing the black button briefly the illumination can be turned ON or OFF By pressing and holding the black button the illumination can be dimmed When releasing the black button the illumination intensity will be set and saved Please note The latest used illumination will be reactivated when turning the device ON the next time Indicator for rec...

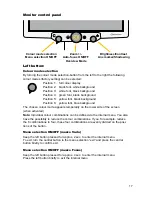
Page 17: ...ions can be defined via the internal menu You also have the possibility to reduce the colour combinations If you for example reduce the 6 combinations to four these four combinations are evenly divided on the posi tions of the button Menu selection ON OFF mezzo Vario Keep the left button pressed for approx 2 sec to enter the internal menu To exit turn the central button to the menu selection exit ...

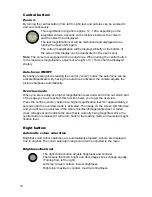
Page 18: ...atically Overview mode When you are reading at a higher magnification level and want to find out which part of the page you have reached this function helps you to get the overview Press the central zoom button at a higher magnification level for approximately 2 seconds until the overview mode is activated The image on the screen will minimise and you will see an overview of the whole document ima...

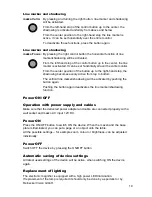
Page 19: ...omes evenly active from top to bottom The vertical line marker shadowing will be activated by pushing the button again Pushing the button again deactivates the line marker shadowing function Power ON OFF Operation with power supply and cables Make sure that the delivered power adapter and cable are connected properly with a wall socket and mezzo AC input 12V DC Power ON Press the ON OFF button to ...

Page 20: ...y after switching ON the battery charging status appears briefly on the screen As soon as the battery charging status on the screen starts blinking the battery must be charged immediately Only a few minutes remain before the unit switch es OFF automatically If the device continues to run on battery mode the battery must first be fully charged Charging of battery The battery charge indicator is bli...

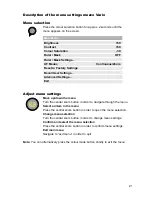
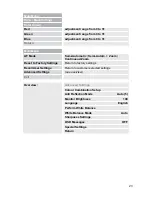
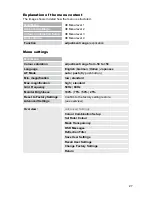
Page 21: ...o open the menu selection Change menu selection Turn the central zoom button in order to change menu settings Confirm and select the menu selection Press the central zoom button in order to confirm menu settings Exit main menu Navigate to exit menu in order to quit Note You can alternatively press the colour mode button shortly to exit the menu Main Menu Brightness 50 Contrast 50 Colour Saturation...

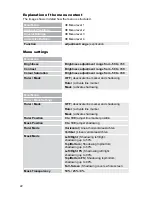
Page 22: ...r activate line marker Mask activate shadowing Ruler Position 0 to 100 adjust line marker position Mask Position 0 to 100 adjust shadowing Ruler Mode Horizontal Lineal horizontal ausrichten Vertikal Lineal vertikal ausrichten Mask Mode Left Right Shadowing left right shadowing up to 50 Top Bottom Shadowing top bottom shadowing up to 50 Left Right FS Shadowing left right shadowing up to 90 Top Bott...

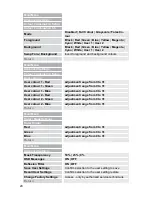
Page 23: ...utom Zoom Continuous Zoom Reset to Factory Settings Return to factory settings Recall User Settings Return to customer selected settings Advanced Settings see overview Exit Overview Advanced Settings Colour Combination Setup Anti Reflection Mode Auto 5 Monitor Brightness 100 Language English Perform White Balance White Balance Mode Auto Sharpness Settings OSD Messages OFF Special Settings Return ...

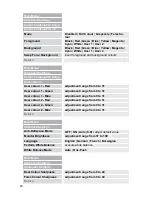
Page 24: ... colour 1 Green adjustment range from 0 to 31 User colour 1 Blue adjustment range from 0 to 31 User colour 2 Red adjustment range from 0 to 31 User colour 2 Green adjustment range from 0 to 31 User colour 2 Blue adjustment range from 0 to 31 Return Main Menu Advanced Settings Anti Reflection Mode OFF ON Auto 0 9 adjust default value Monitor Brightness adjustment range from 37 to 100 Language Engli...

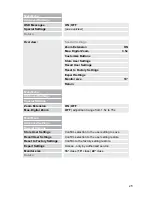
Page 25: ...9 Return Main Menu Advanced Settings Special Settings Zoom Extension ON OFF Max Digital Zoom OFF adjustment range from 1 5x to 15x Main Menu Advanced Settings Special Settings Store User Settings Confirm selection to the user setting to save Recall User Settings Confirm selection to the user setting restore Reset to Factory Settings Confirm to the factory setting restore Expert Settings Access onl...

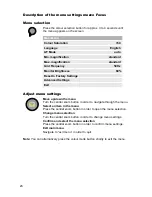
Page 26: ...the menu selection Change menu selection Turn the central zoom button in order to change menu settings Confirm and select the menu selection Press the central zoom button in order to confirm menu settings Exit main menu Navigate to exit menu in order to quit Note You can alternatively press the colour mode button shortly to exit the menu Main Menu Colour Saturation 50 Language English AF Mode auto...

Page 27: ... Grid Frequency 50Hz 60Hz Monitor Brightness 100 75 50 25 Reset to Factory Settings Confirm to the factory setting restore Advanced Settings see overview Overview Advanced Settings Colour Combination Setup Set Ruler Colour Mask Transparency OSD Messages Reflection Filter Save User Settings Recall User Settings Change Factory Settings Return Main Menu Menu level 1 Advanced Settings Menu level 2 Col...

Page 28: ...nt range from 0 to 31 User colour 1 Blue adjustment range from 0 to 31 User colour 2 Red adjustment range from 0 to 31 User colour 2 Green adjustment range from 0 to 31 User colour 2 Blue adjustment range from 0 to 31 Return Main Menu Ruler Mask Settings Ruler Colour Red adjustment range from 0 to 31 Green adjustment range from 0 to 31 Blue adjustment range from 0 to 31 Return Main Menu Advanced S...

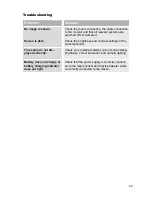
Page 29: ...the brightness and contrast settings of the camera monitor True colour is not dis played correctly Check your reading material colour mode setting brightness colour saturation and camera lighting Battery does not charge or battery charging indicator does not light Check that the power supply is correctly connect ed to the mains socket and that the adapter cable is correctly connected to the mezzo ...

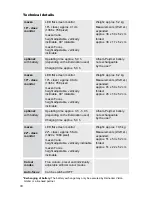
Page 30: ...mezzo Focus height adjustable vertically inclinable Weight approx 6 2 kg Measurements WxHxL expanded approx 45 x 50 x 52 cm folded approx 45 x 18 x 52 cm optional with battery Operating time approx 3 5 5 0 h depending on the illumination used Charging time approx 5 0 h Lithium Polymer battery not exchangeable by the user mezzo 22 class monitor LED flat screen monitor 22 class approx 56cm 1920 x 10...

Page 31: ...nvalidation of the warranty 4 Interventions from persons other than Reinecker Vision GmbH authorised specialists may lead to invalidity of warranty 5 Partial warranty is valid for light sources serving to illuminate the reading object batteries and other parts subject to wear and tear 6 If a warranty claim is necessary the system has to be returned to the manufac turer in Alsbach Hähnlein or to yo...

Page 32: ...Notes ...

Page 33: ......

Page 34: ......

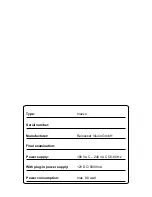
Page 35: ...Type mezzo Serial number Manufacturer Reinecker Vision GmbH Final examination Power supply 100 VAC 240 VAC 50 60 Hz With plug in power supply 12V DC 5000mA Power consumption max 80 watt ...

Page 36: ...all direkt an unser Hauptwerk in Alsbach Hähnlein oder an eine unserer Niederlassungen Bei im Ausland erworbenen Produkten kontaktieren Sie im Servicefall bitte Ihren dort ansässigen Händler Reinecker Vision GmbH International Contact sales department customer relations Sandwiesenstraße 19 DE 64665 Alsbach Hähnlein customer service Erlenweg 3 DE 64665 Alsbach Hähnlein Tel 49 6257 9311 0 Fax 49 625...

Reviews:

Related manuals for mezzo