

3
ENGLISH
Installing a bulb of a higher wattage could create a fire hazard. Use of higher
wattage bulb will void the warranty. Only use a 120 Volt bulb.
• Never touch the bulb with your bare hands. Oil from your skin can cause premature
failure. Always handle the bulb with gloves or a soft cloth.
• Disassembly of your fixture will void the warranty.
• This fixture should never be operated without the lens cover or glass lens in place.
• If lens is replaced, use only tempered safety glass of equal thickness.
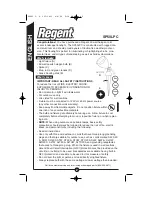
Installing the bulb
NOTE: Fixture must be unplugged prior to installing lamp.
Step 1:
Remove the lens cover by twisting it one-half turn counter-clockwise.
Step 2:
Using gloves or a soft cloth, gently plug bulb into housing.
NOTE:
Align two
pins located at the end of the bulb with two small holes in the center of
housing, and press until firmly seated.
Step 3:
Replace the lens (making sure the gasket is in place) by aligning the notch-
es on the housing with the cover and pressing until seated. Twist one-half
turn clockwise until tight.
NOTE:
Replace only with a 120 Volt, 50 watt (or lower wattage) GY8.6 base bi-pin
capsule halogen bulb.
Changing the glass lens
NOTE: Make sure fixture has cooled before installing glass lens.
Step 1:
Remove the glass lens cover by twisting it one-half turn counter-clockwise.
Step 2:
Remove the black rubber o-ring gasket that holds the clear glass lens in
place, in the lens cover, and carefully remove the tempered clear glass lens.
Step 3:
Replace the clear glass lens with the blue, green or red tempered glass lens
included with the fixture. Install the black rubber o-ring over the glass lens
with "v" side facing glass being careful to seat it properly into the lens-cover.
NOTE: Do not use any other glass lenses or add or use any color altering mate-
rials to the lens cover or lenses provided with this fixture, as they could present
a fire hazard.
How to use
Step 1:
To position fixture in the ground, hold the fixture by the cone shaped section
of housing located between the spike and the fixture head and push spike
straight down into the ground.
NOTE:
Be sure to aim the light in the desired
direction (left or right) before inserting the spike into the ground. When plac-
ing the floodlight in grass, slip the enclosed “grass blocking disk” over the
spike and slide the disk up to the bottom of the light. The disk will stop
grass or other vegetation from blocking light into the photo control, which
otherwise could cause the floodlight to come on all day as well as night.
When placing the floodlight in dirt, mulch or bark, it may not be necessary to
use this disk.
Step 2:
Plug power cord into grounded three-prong receptacle or into three-prong
grounded extension cord (see
“What to know”
section for approved types
of extension cords).
Step 3:
At dusk (when it starts to become dark outside), the fixture will turn on auto-
matically, and it will turn off automatically at dawn (when it starts to get light
outside).
WARNING:
Risk of burn. Disconnect power and allow fixture to cool
before changing bulb or handling fixture.
SP50L I. S. 325-1431 6/4/04 9:36 AM Page 3