


Regency
®
U39E-11 ULTIMATE™ Freestanding Gas Stove
| 31
installation
Conversion from NG to LP
THIS CONVERSION MUST BE DONE BY A QUALIFIED GAS FITTER
IF IN DOUBT DO NOT DO THIS CONVERSION !!
920-050
01.30.19
1
U39
Conversion from NG to LPG
THIS CONVERSION MUST BE DONE BY A QUALIFIED GAS FITTER
IF IN DOUBT DO NOT DO THIS CONVERSION !!
1.
Shut off the gas and electrical supply.
2.
Remove the safety screen, open the
front door and carefully remove the logs
and lava rock.
Pilot assembly is now accessible .
Each Kit contains one LPG
Conversion Kit #733-977
LPG Conversion Kit Contains:
Qty. Part #
Description
1
904-529
5/32" Allen Key
1
904-645
Burner Orifice #51
1
918-590
Label "Converted to
LPG"
1
908-528
Red "LPG" label
1
910-037
LPG Injector
(Pilot Orifice)
1
911-011
Stepper motor
1
920-050
Instruction Sheet
Note: Use a magnetic type screwdriver
if possible.
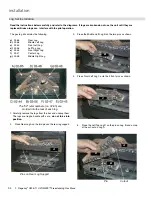
4.
Open pedestal door and remove the
chain from door which will allow door to
fall.
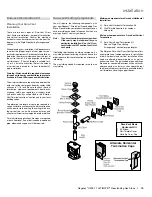
3.
Remove burner. See diagram below.
7.
Turn control knob to the “OFF” position.
8
. Remove NG stepper motor by removing 2
screws in locations shown below–replace
with LP stepper motor, secure in place
with 2 screws.
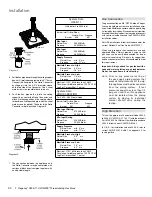
9.
Pull off the pilot cap to expose the pilot
orifice.
10.
Unscrew the pilot orifice with the allen
key and replace with the LPG pilot
orifice in the kit.
11.
Reinstall new burner orifice LPG
stamped #50 and tighten.
13.
Check for gas leaks with a proper soapy
solution or leak detector.
14.
Check for proper spark between the
ignitor and pilot cap. Refer to "Lighting
Procedure" section of the manual for
lighting sequence.
15.
Check pilot flames. Correct flame pat
-
tern has 3 strong blue flames. Adjust
-
ment can be made by turning the slotted
screw at the top right corner of the
valve. Refer to "Maintenance Instruc
-
tions" section of the manual for correct
flame patterns.
16.
Reverse Steps 9-1.
17.
Attach the label "This unit has been
converted to LPG" near or on top of the
Serial # decal.
18.
Replace yellow "NG" label with red
"LPG" label.
19.
Check operation of flame control.
20.
The burner aeration should be set to
1/2" open for LP.
See aeration adjustment details in the
manual.
21.
Check for proper flame appearance and
glow on logs.
Burner Orifice
12.
Remove burner orifice with a 1/2"
wrench while using a 9/16" wrench to
hold onto the elbow behind the orifice,
then discard the orifice.
Installer Notice:
These instructions must be left
with the appliance.
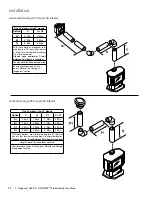
6
. Remove four screws to remove the ac
-
cess panel (in locations shown below)
and the chain attached to the front door
and the unit.
Remove chain
here
5.
Remove 2 screws that secure the front
door to the unit. One screw is on the left
hand side and the other on the right hand
side. (Left side shown).


