background image

Regency GF900C Gas Fireplace

33

INSTALLATION

1. 

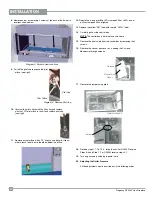
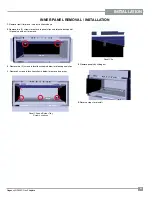
Remove front trim piece - see instructions above.

2

. Remove two (2) screws to remove to panel clips and release back panel, 

lift panel up and out to remove.

4

. Remove panels by sliding out.

5.

 Reverse steps to reinstall.

Panel Clip and Burner Tray 

Screw Locations

Panel Clip

INNER PANEL REMOVAL / INSTALLATION

3

. Remove two (2) screws in locations shown below to release panel clips.

4. Remove 3 screws in locations shown below to remove burner tray.

Summary of Contents for GF900C-LPG1

Page 1: ...rom a neighbour s phone Follow the gas supplier s instructions If you cannot reach your gas supplier call the fire department 919 500 Regency GF900C Gas Fireplace 10 December 2014 Owners Installation Manual www regency fire com au Installer Please complete the details on the back cover and leave this manual with the homeowner Homeowner Please keep these instructions for future reference MODELS GF9...

Page 2: ...mth and charm of a wood fireplace at the flick of a switch The model GF900C has been approved by AGA for both safety and efficiency As it also bears our own mark it promises to provide you with economy comfort and security for many trouble free years to follow Please take a moment now to acquaint yourself with these instructions and the many features of your Regency Fireplace GF900C Video ...

Page 3: ...rrangement for Vertical Terminations 23 Unit Installation with Horizontal Termination 24 4 x 6 5 8 102mm x 175mm venting 24 Unit Installation with Horizontal Termination 25 Unit installation with Vertical Termination 26 4 x 6 5 8 102mm x 175mm Venting 26 High Elevation 27 Gas Line Installation 27 Pilot Adjustment 27 Gas Pipe Pressure Testing 27 845 S I T Valve Description 27 Aeration Adjustment 27...

Page 4: ... Updated consumption s Dec 23 13 Updated E Aus address Serial Number Regency Gas Fireplace 418 Distributed by To be installed by an authorised person in accordance with installation instructions provided with the appliance Western Australia Air Group Australia 28 Division St Welshpool WA 6106 Eastern Australia Fireplace Products Australia Pty Ltd 1 Conquest Way Hallam VIC 3803 Electrical 240V 50 H...

Page 5: ...as Fireplace 5 DIMENSIONS 39 3 16 996 21 1 8 537 42 15 16 1091 13 1 16 332 35 890 4 7 16 113 10 3 16 258 19 11 16 500 3 76 28 9 16 726 42 5 8 1082 22 1 16 560 20 9 16 522 31 5 16 796 6 5 16 160 9 16 14 UNIT DIMENSIONS ...

Page 6: ...ical wiring locations in walls and ceilings when cutting holes for termination THIS UNIT MUST ALWAYS TERMINATE VENT DIRECTLY TO THE OUTDOORS IMPORTANT MESSAGE SAVE THESE INSTRUCTIONS The GF900 Direct Vent Fireplace must be installed in accordance with these instructions Carefully read all the instructions in this manual first Consult the authority having jurisdiction to determinetheneedforapermitp...

Page 7: ...l features Refer to the following sections a Crystal Stone Install b Faceplate Door Frame Overlay c Remote Control or Wall Thermostat 9 Final check Before leaving this unit with the customer the installer must ensure that the appliance is firing correctly and operation fully explained to customer INSTALLATION CHECKLIST 1 Locate appliance a Room location Refer to Locating Your Gas fireplace section...

Page 8: ...eatest importance that this fireplace and vent system be installed only in accordance with these instructions Clearance Dimension Measured From A Mantel Height min 17 1 4 438mm Top of Fireplace Opening B Sidewall on one side 5 3 4 146mm Side of Fireplace Opening C Ceiling room and or alcove 39 1 2 1003mm Top of Fireplace Opening D Mantel Depth max 12 305mm 26 1 4 Above Fireplace Opening E Alcove W...

Page 9: ...acing is high quality or the paint may discolour MANTEL LEG CLEARANCES Combustible mantel leg clearances as per diagram Combustible Material 12 6 152mm 12 305mm 0 Non combustible Facing To Unit Base 26 1 4 667mm 24 610mm 10 254mm 26 660mm Top of Fireplace Opening 20 508mm 305mm 23 7 8 606mm 17 1 4 438mm Combustible Stud On Edge 1 25mm 19 3 4 502mm 4 Allowable mantel leg projection 7 1 8 181mm 10 2...

Page 10: ...ible The nailing strips can be adjusted back up to 1 1 2 to allow for varying thicknesses in non combustible material wall finishes Nailing Strips INSTALLATION ACCESS PANEL The unit is equipped with a removable access panel for pre finish installation of optional components this panel is located on the lower front face 1 Remove 4 screws to remove access panel 2 Easier access to gas connection with...

Page 11: ...g height 19 483mm I Gas Connection Opening Height 1 1 2 38mm J Gas Connection Height 2 5 8 67mm K Gas Connection Inset 1 3 4 44mm L Gas Connection Opening Width 3 1 2 89mm Framing depth measurement is noted with the nailing strips set as far forward on the firebox as possible The nailing strips can be adjusted back up to 1 to allow for varying thicknesses in non combustible material wall finishes ...

Page 12: ...bustible materials See Clearances section Combustible materials can be laid against the side and back standoffs and the stove base 4 Non combustible material ie tile slate etc may be brought up to and overlap the unit top and bottom ensuring that the maximum thickness does not go beyond the 1 1 2 as shown in the diagram below The faceplate will not be able to be mounted if finished material is bey...

Page 13: ...1 1 2 38mm edge of the flange Finished Material Nailing Strip Position 1 2 13mm 1 25mm 1 25mm 1 2 12 7mm 1 1 2 38mm 0 flush Unit Nailing Strip 1 Forward Unit Nailing Strip Forward Unit Nailing Strip Flush w unit Factory Set 43 5 8 1108mm 3 1 4 83mm 23 7 8 606mm 19 3 4 502mm 45 7 8 1165mm Non combustible Material Non combustible Non combustible Non combustible Header on edge Timber Stud Timber Stud...

Page 14: ... window door or non mechanical air inlet or any other opening into a building with the exception of sub floor ventilation see also Note I Appliances up to 150 MJ h input 500 Appliances over 150 MJ h input 1500 k Vertically below an openable window door or non mechanical air inlet or any other opening into a building with the exception of sub floor ventilation I For mechanical air inlets including ...

Page 15: ...h 3 10 Black N A N A N A 4DALB N A TC 4DLTB Adjustable Length 7 Galvanized N A N A 4D7A N A N A N A Adjustable Length 7 Black N A N A 4D7AB N A N A N A Extension Pipe 8 1 2 Galvanized 46DVA 08A N A N A N A N A N A Extension Pipe 8 1 2 Black 46DVA 08AB N A N A N A N A N A Adjustable Length 12 Galvanized N A N A 4D12A N A SV4LA12 N A Adjustable Length 12 Black N A N A 4D12A N A SV4LBA12 N A Extensio...

Page 16: ...KA 4DHTK2 4DHTKA SV SHK N A Horizontal Termination Kit B 46DVA KHA Changed Components 4DT HKB 4DHTK1 4DHTKB SV HK N A Vertical Termination Kit Disc 4DT VKC 4DHTK 4DHTK SV FK N A FPI 946 506 P Vent Guard Optional for AstroCap 946 205 Vinyl Siding Shield for Riser Vent Terminal 510 994 Rigid Pipe Adaptor Must use with all rigid piping 946 208 P Vent Guard Optional for Riser Vent Terminal 640 530 P R...

Page 17: ...ents diagrams refer to the following instructions 1 Remove the glass door and inner panels see instructions in this manual 2 Remove 6 screws 3 front 3 back to remove heat baffle to access restrictor plate VENT RESTRICTOR POSITION Set 0 64mm Open Set 2 18mm open Set 1 26mm open Set 3 15mm open Heat Baffle 3 Remove the screws that hold the vent restrictor in place 4 Adjust the vent restrictor plate ...

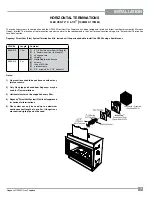
Page 18: ...0o elbow Note Must use optional rigid pipe adapter Part 510 994 when using Rigid Pipe Venting Systems Maintain clearances to combustibles as listed in Clearances section Horizontal vent must be supported every 0 9m Firestops are required at each floor level and whenever passing through a wall A vent guard should be used whenever the termination is lower than the specified minimum or as per local c...

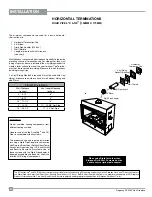
Page 19: ...NT 4 X 6 7 8 102MM X 175MM These venting systems in combination with the GF900 Direct Vent Gas Fireplace has been tested and listed as a direct vent heater system by Warnock Hersey Intertek The location of the termination cap must conform to the requirements in the Vent Terminal Locations diagram in Exterior Vent Termination Locations section Regency Direct Vent Flex System Termination Kits includ...

Page 20: ... using a Rigid Pipe Adaptor in conjunction withDuraventDirect Vent SelkirkDirect Temp Ameri Vent Direct Venting ICC Excel Direct and Security Secure Vent systems Use of these systems with the Rigid Pipe adaptor is deemed acceptable and does not affect the Intertek WHI listing of components WARNING Do not combine venting components from different venting systems However use of the the AstroCapTM an...

Page 21: ...ted 2 Minimum distance between elbows is 1 ft 305mm Maintain clearances to combustibles as listed in the Clearances section Horizontal vent must be supported every 3 feet Firestops are required at each floor level and whenever passing through a wall Must use optional rigid pipe adaptor Part 510 994 when using rigid pipe vent systems A vent guard should be used whenever the termination is lower tha...

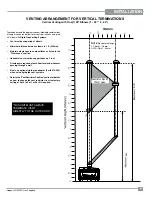
Page 22: ...ms as well as Simpson Dura Vent Direct Vent Ameri can Metal Products Ameri Vent Direct Vent Security Secure Vent ICC Excel Selkirk Direct Temp AstroCapTM is a proprietary trademark of FPI Fireplace Products International Ltd Dura Vent and Direct Vent are registered and or proprietary trademarks of Simpson Dura Vent Co Inc Roof Pitch Minimum Vent Height Feet Meters flat to 7 12 2 0 61 over 7 12 to ...

Page 23: ...Maintain clearances to combustibles as listed in the Clearances section Horizontal vent must be supported every 3 feet Firestops are required at each floor level and whenever passing through a wall Must use optional rigid pipe adaptor Part 510 994 when using rigid pipe vent systems Refertothe VentRestrictorPosition sectionfordetails on how to change the vent restrictor from the factory setting of ...

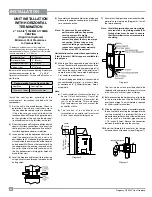
Page 24: ...over the existing inner and outer flue collar Fasten to the outer collar only with the 3 supplied screws drilling pilot holes will make this easier 4 Level the fireplace and fasten it to the framing using nails or screws through the top and side nailing strips Note For best results and optimum performance with each approved venting system it is highly recommended to apply Mill Pac sealant supplied...

Page 25: ...termination cap faces up there are markings on the cap indicating which way is up This will position the termination cap with proper down slope for draining water Fasten the cap to the outer wall with the 4 supplied screws 6 Pull the centre inner and outer flex liner out enough to slip over the flue collars of the fireplace You may wish to cut the liner shorter to make it more workable Do not bend...

Page 26: ...in the fully twist locked position and sealed 5 Cut a hole in the roof centered on the small drilled hole placed in the roof in Step 2 The hole shouldbeofsufficientsizetomeettheminimum requirements for clearance to combustibles of 1 1 2 Slip the flashing under the shingles shingles should overlap half the flashing as per Diagram 3 6 Continue to assemble pipe lengths Note If an offset is necessary ...

Page 27: ...urRegency dealerforfurther instructions Incorrectflamepatternwillhavesmall probably yellow flames not coming into proper contact with the rear burner or flame sensor Burner Flame Sensor Pilot Ignitor PILOT ADJUSTMENT Periodicallycheckthepilotflames Correctflame pattern has two strong blue flames 1 flowing around the flame sensor and 1 flowing across the burner it does not have to be touching the b...

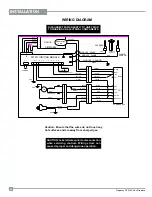
Page 28: ... 4 5 3 2 1 YELLOW 3 YELLOW BLUE GND BROWN LOW SPEED WHITE RED BLACK FAN 5 3 4 BROWN VIOLET BLUE RED 1 3 2 4 WHITE YELLOW VIOLET BLACK 5 6 1 2 BROWN BLUE VIOLET RED BLACK WHITE YELLOW VIOLET ORANGE ORANGE MODULATING 7 8 6 5 4 3 VALVE RESET SWITCH NC BLACK BLACK 2 1 COIL MODULE SPARK MODULE GROUND MODULE FLAME ORANGE ORANGE 5 4 ORANGE ORANGE GREEN SPARKER RED THERM COMMAND BOX FAN LOW ACTIVE NEUTRAL...

Page 29: ... Rear Log Tray Screw Locations Diagram 4 Burner Tray Screw Locations CONVERSION KIT 466 967 FROM NG TO ULPG FOR GF900 USING SIT 845 NOVA GAS VALVE THIS CONVERSION MUST BE DONE BY A QUALIFIED GAS FITTER IF IN DOUBT DO NOT DO THIS CONVERSION 5 Remove rear log tray by removing 3 screws as shown in Diagram 3 below FOLLOWING STEPS FOR GF900C 6 Remove glass crystals and stones if installed 7 Remove 3 sc...

Page 30: ...crews Manoeuvre through antenna 18 Reverse steps 17 16 15 9 for both units For GF900C reverse Steps 8 6 and Step 1 For GF900L reverse steps 5 1 19 Turn on gas supply and plug in power cord 20 Adjusting the Outlet Pressure All the adjustments must be carried out in the following order Control Box Cover Antenna Jumper Location 17 Remove the jumper using pliers Jumper Diagram 4 Remove Pilot Cap Pilot...

Page 31: ...s check electrical installation and gas leaks 23 Check operation of flame control 24 Check for proper flame appearance and glow on logs C B A Cable Electric Modulator Remove the modulator plastic cap A using needle nose pliers Maximum pressure Turn the unit ON to its highest input rating Screw in the nut B to increase the outlet pressure and screw it out to decrease it Use a 10 mm wrench NOTE The ...

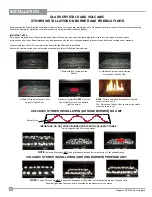
Page 32: ...ight that lead to pilot flame Ensure the crystals or stones do not overlap excessively as this will effect the flame pattern 1 Start installing Crystals on the Burner 2 Distribute Crystals evenly starting from back of Firebox Floor 3 Work Crystals from back to front edge of Firebox Floor 4 Ensure Crystals DO NOT block the front of the pilot hood and flame to light the burner VOLCANIC STONES INSTAL...

Page 33: ...ps and release back panel lift panel up and out to remove 4 Remove panels by sliding out 5 Reverse steps to reinstall Panel Clip and Burner Tray Screw Locations Panel Clip INNER PANEL REMOVAL INSTALLATION 3 Remove two 2 screws in locations shown below to release panel clips 4 Remove 3 screws in locations shown below to remove burner tray ...

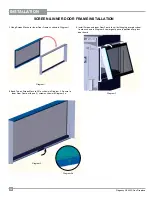
Page 34: ...n in Diagram 1 3 Install Screen and Inner Door Frame to unit but hanging over glass door frame as shown in Diagram 3 Lower gently once in position over glass door frame 2 Bend Tab on Screen Mesh to 90º as shown in Diagram 2 Secure to Inner Door Frame with one 1 screw as shown in Diagram 2a Diagram 1 Diagram 3 Diagram 2 Diagram 2a ...

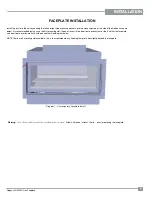
Page 35: ...ght side mounting brackets into the mounting slots at the side of the firebox as shown below It is recommended that you use the first mounting slot the one closest to the door frame overlay out of the 3 so that the faceplate and door frame overlay are flush with one another See diagram below NOTE There are 3 mounting slots available this is to accommodate any finishing that protrudes slightly beyo...

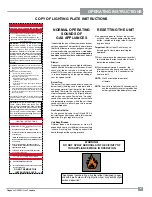
Page 36: ...el at the top rear of the unit to adjust to the desired speed Pressing and releasing the plus FAN button will change the fan speed as follows LOW MEDIUM HIGH Pressingandreleasingtheminus FANbutton will be the reverse of the above ADJUSTING FLAME HEIGHT Therearesixflamesettingsthatcanbeadjusted bypressingandreleasingtheplus and minus FLAME button SUMMARY OF CONTROLS On Off Button If the unit is swi...

Page 37: ...use some gas is heavier than air and will settle on the floor WHAT TO DO IF YOU SMELL GAS Do not try to light any appliance Do not touch any electric switch do not use any phone in your building Immediately call your gas supplier from a neighbors phone Follow the gas supplier s instructions If you cannot reach your gas supplier call the fire department B Do not use this appliance if any part has b...

Page 38: ...ns shown below 8 Loosen three 3 screws to remove heat deflector shown in Diagram 5 9 Remove two 2 screws to remove fan shown in Diagram 6 10 Reverse steps to reinstall fan 7 Remove valve tray by removing twelve 12 screws in locations shown in Diagram 4 Diagram 4 Valve Tray Screws Diagram 5 Heat Deflector Screws Diagram 6 Fan Screws Diagram 2 Burner Screw Locations Diagram 3 Air Deflector Screw Loc...

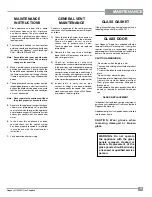
Page 39: ...Check the Venting System for corrosion in areas that are exposed to the elements These will appear as rust spots or streaks and in extreme cases holes These components should be replaced immediately 2 Remove the Cap and shine a flashlight down the Vent Remove any bird nests or other foreign material 3 Check for evidences of excessive condensation suchaswaterdropletsforming in the inner liner and s...

Page 40: ...ection fan operates but no Ignition module is in lockout reset module ignition after approx 1 minute Then turn on again NOTE On initial light up this may occur a number of times until any residual air is purged from the gas line through the burner system It is essential the required waiting time as stated in the manual is observed prior to attempting re ignition After resetting ignition module uni...

Page 41: ...repeat steps 1 5 on the other lower door latch 6 Pull the bottom of the door towards you until the door is angled away from the firebox by about 30 Lift the door up and over the upper door hooks 7 To install the glass door reverse steps 1 Insert the door tool into the lower door latch WARNING Do not operate the appliance with the glass panels removed cracked or broken Replacement of the glass pane...

Page 42: ...ROOM TEMPERATURE ALL POWER IS DISCONNECTED AND GAS SUPPLY IT TURNED OFF 1 Remove faceplate inner frame glass door and inner panels see instructions in this manual 2 Remove crystals and stones if installed 3 Remove burner side panels by lifting out as shown in Diagram 1 4 Remove burner by removing 2 screws in locations shown below Diagram 2 Burner Screw Locations Diagram 3 Air Deflector Screw Locat...

Page 43: ...y LP 466 574 P GF 900 Valve Assy NG 19 466 060 Left Panel 20 466 061 Right Panel 21 466 096 Rear Panel 22 466 071 Left Ceramic Filler 23 466 072 Right Ceramic Filler 24 904 966 0 250 20 x 7in Hex Bolt 25 296 122 Door Spring 1 2 x 7 Stainless Steel 26 904 143 HEX NUT 1 4 20 27 476 062 Panel Clip 28 466 083 Heat Exchanger Gasket 29 466 088 Panel Bracket LH 30 466 089 Panel Bracket RH 31 466 548 GF90...

Page 44: ...44 Regency GF900C Gas Fireplace PARTS LIST 5 5 9 32 33 29 19 21 27 31 35 16 13 30 20 34 MAIN ASSEMBLY ...

Page 45: ...32 467 922 Inner door frame Black w Screen 467 932 Inner door frame Stainless w Screen 33 466 543 Door Frame Overlay Black 34 467 938 Fascia and Door Frame Black w Screen 467 936 Fascia and Door Frame Stainless Steel w Screen 35 466 951 Fascia Black Glass not shown 32 33 34 ...

Page 46: ...46 Regency GF900C Gas Fireplace NOTES ...

Page 47: ...e closest approved service agent is situated more than thirty 30 kilometres from the installation Regency is not obliged to arrange warranty repairs and travel and or additional labour charges will apply Porcelain Enamel Absolute perfection is neither guaranteed nor commercially possible Any chips must be reported and inspected by an authorised dealer within three days of installation Reported dam...

Page 48: ...___________________________ Date Installed _______________________________________________________ Serial No ___________________________________________________________ Register your Regency warranty online www regency fire com au Reasons to register your product online today View and modify a list of all your registered products Request automatic email notification of new product updates Stay inf...

Reviews: