background image

19

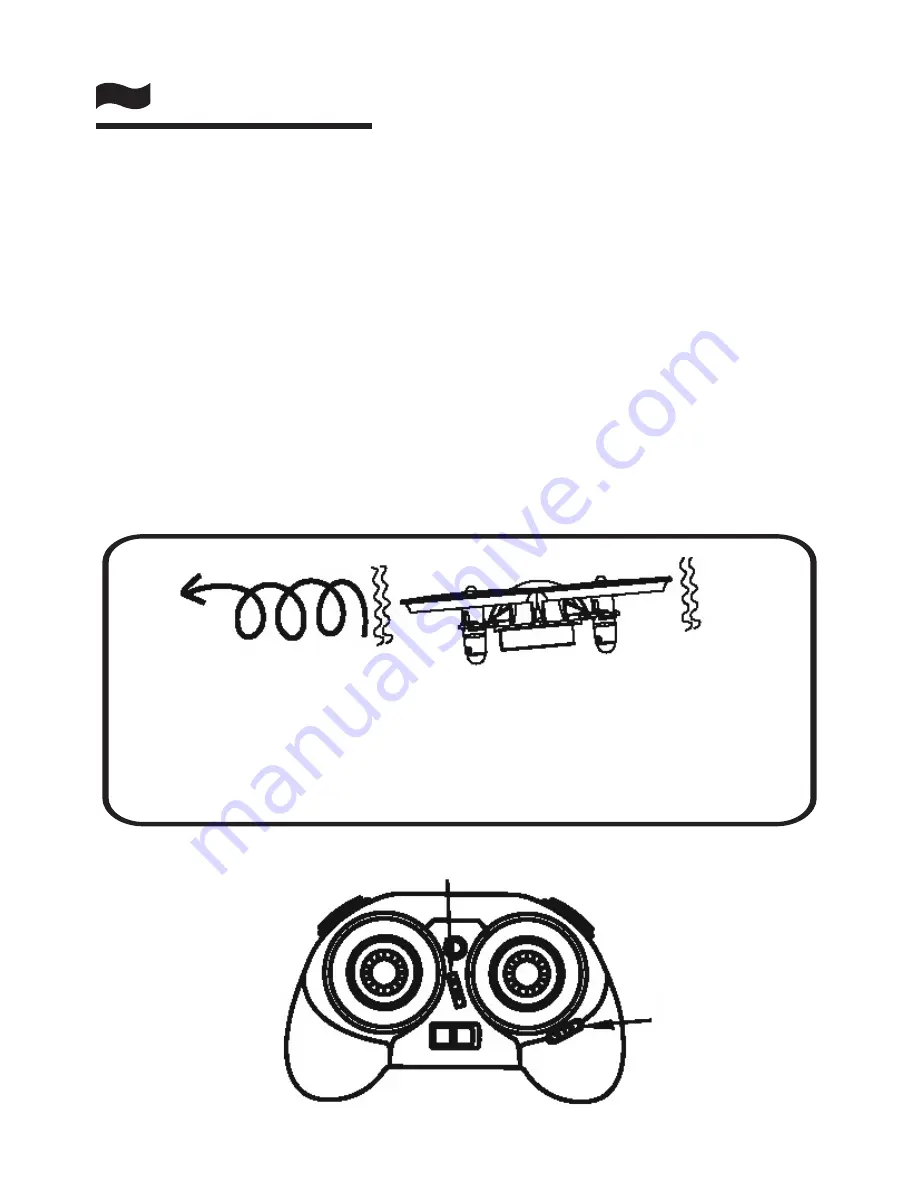
Sub Trim

The two buttons are elevator and aileron trimming. If there 
is any deviation of the direction, the pilot can do trimming 
by the two buttons.When hovering, there is deviaton in the 
front, we can press the “elevator trim” button to make the 
quadcopter fly stably; while if the deviation is in the opposite 
position,  press  the  trimming  in  the  opposite  position 
accordingly. If the deviation is in the left, press the “aileron 
trim” button to make the quadcopter fly stably; while if the 
deviation is in the right position, press the trimming in the 
left position accordingly.

for example

If the aircraft offsets to left when hovering, you can 

adjust the aileron trim on the transmitter to the right 

till the aircraft can hover in the air steadily.

Elevator Sub Trim

Aileron 

Sub Trim

Summary of Contents for 1385119

Page 1: ...Best Nr 1385119 k Elektro Quadrocopter Nano Sky RtF t Electric Quadrocopter Nano Sky RtF Version 10 15 ...

Page 2: ...Nano SKY Bedienungsanleitung Diese Bedienungsanleitung vor dem Gebrauch sorgfältig durchlesen ...

Page 3: ...n Länge Höhe Durchmesser Rotor Gewicht einschließlich Batterie Motoren Batterie Ladegerät Motor zu motor Flugdauer 98mm 27 5mm 40mm 21 2g Kernlos 68mm 150mAh 1S 3 7V LiPo USB LiPo Ladegerät 4 6 Minuten Inhaltverzeichnis ...

Page 4: ...ponenten von Wasser fern З З Nicht für den Gebrauch durch Kinder unter 14 Jahren З З Nicht fliegen wenn das Gerät beschädigt ist Ersetzen Sie alle beschädigten Teile vor dem Flug З З Reduzieren Sie zum Landen langsam das Gas Falls Sie den Nano SKY aus hoher Höhe fallenlassen kann der Quad beschädigt werden З З Laden Sie die Batterie für eine optimale Flugdauer und Reichweite immer vollständig auf ...

Page 5: ...tige Abdeckung und legen Sie 2 AA Batterien ein AA Batterien nicht enthalten Flugbatterie aufladen 1 Schließen Sie das Ladegerät an einen USB Ausgang 5V an 2 Während des Ladevorgangs erlischt die rote LED am Ladegerät nach dem Aufladen leuchtet die LED auf ...

Page 6: ... bis zu 30 Minuten dauern 5 Sobald die Anzeige wieder rot leuchtet ist der Ladevorgang abgeschlossen und vice versa Schalten Sie zunächst den Transmitter und erst dann den Quad ein Stellen Sie den Quad auf einen ebenen Untergrund und warten Sie bis die blinkenden LEDs stetig leuchten Nähere Informationen zum Transmitter Doppelfrequenz Kippschalter 1 Piepton Niedrige Frequenz 2 Pieptöne Mittlere Fr...

Page 7: ...st so auf die höchste Frequenz hin Drücken Sie die Taste ein weiteres Mal ertönt der Buzzer einmal und weist somit auf die niedrigste Frequenz Standardeinstellung hin Kippschalter Diese Taste befindet sich rechts am Transmitter Durch One Touch Bedienung kann der Quadrocopter nach vorn hinten links oder rechts gesteuert werden Doppelfrequenz Kippschalter Gebrauch Drücken Sie auf den Kippschalter un...

Page 8: ... an der gegenüber liegenden Position drücken Sie den Trimm Regler entsprechend in die entgegengesetzte Richtung Falls eine Abweichung links vorliegt drücken Sie die Taste Querruder Trimm damit der Quadrocopter stabiler fliegt Bei Abweichungen rechts drücken Sie den Trimm Regler entsprechend nach links Beispiel Falls am Flugzeug während des Schwebeflugs links Abweichungen auftreten können Sie die T...

Page 9: ...8 Knüppelmodell Betriebs LED Doppelfrequenz Kippschalter Modus 2 RUD THR Modus 2 AIL ELE Vorderseite Blaue Flügel Blaue Flügel Orangefarbene Flügel Orangefarbene Flügel Rückseite ...

Page 10: ...eitenruder Knüppel Nach vorn Nach hinten Linke Seitenansicht OBEN UNTEN Modus 2 Transmitter abgebildet Nach links Nach rechts Modus 2 Transmitter abgebildet Nach links gieren Nach rechts gieren Vorderseite Rückseite ...

Page 11: ...ppel Nach links Nach rechts Vorderseite Nach rechts Nach links Modus 2 Transmitter abgebildet Höhenruder Knüppel Modus 2 Transmitter abgebildet Nach vorn Nach hinten Linke Seitenansicht Rückwärtsneigung Vorwärtsneigung ...

Page 12: ...opellers Vorderseite Blaue Flügel Blaue Flügel Orangefarbene Flügel Orangefarbene Flügel Rückseite Ersatzteile Kabinenhaube Propeller 2 blaue 2 orangefarbene Rechtsdrehende Motoren Linksdrehende Motoren Motorlagerung Landeplatz Batteriefach Batterie 1 2 3 4 5 6 7 8 ...

Page 13: ...12 Einzelteildarstellung 1 2 3 5 4 6 7 8 5 ...

Page 14: ...Nano SKY Instruction Manual Read this manual carefully before use ...

Page 15: ...Specifications Length Height Rotor diameter Weight with battery Motors Battery Charger Motor to motor Flight time 98mm 27 5mm 40mm 21 2g Coreless 68mm 150mAh 1S 3 7V LiPo USB LiPo charger 4 6mins Contents ...

Page 16: ...o SKY off when not in use Ч Ч Keep all parts away from water Ч Ч Not intended for children under 14 years old Ч Ч Never fly xdamaged replace any damaged parts prior to flight Ч Ч Reduce throttle slowly to land Dropping the Nano SKY from altitude can result in damage to quad Ч Ч Always fully charge the battery for longest flight time and best range Ч Ч Always recharge with included USB charger plug...

Page 17: ...move rear cover and install 2 AA batteries AA batteries are not included Charging Flight Battery 1 Connect the charger to a USB outlet 5V 2 During charging the red LED of charger will go out and after charging the LED will light ...

Page 18: ...ating that the battery is charging It may take up to 30 minutes for the battery to properly charge 5 If the indicator light turns red again it signals that the battery has finished charging and vice versa Turn on transmitter first then quad Set quad on level surface and leave until blinking LED s become steady Transmitter Details Dual rate 1 Beep Low Rate 2 Beeps Mid Rate 3 Beeps High Rate Flip sw...

Page 19: ... buzz buzz sounds it means the rate is maximum Then press the button there is buzz sound it means the rate is minimum that is the default setting Flip Switch This button of flip switch is at the right side of the radio One touch flip can make the quadcopter move forward backward left and right Dual rate Flip switch Operation method press the Flip button and push the stick elevator or ai leron to t...

Page 20: ...ion is in the opposite position press the trimming in the opposite position accordingly If the deviation is in the left press the aileron trim button to make the quadcopter fly stably while if the deviation is in the right position press the trimming in the left position accordingly for example If the aircraft offsets to left when hovering you can adjust the aileron trim on the transmitter to the ...

Page 21: ...20 Stick Model Power LED Dual rate Flip switch Mode2 RUD THR Mode2 AIL ELE Front Blue blades Blue blades orange blades orange blades Rear ...

Page 22: ...21 Throttle Stick Rudder Stick Move forward Move backward Left side view UP DOWN Mode 2 transmitter shown Move left Move right Mode 2 transmitter shown Yaw Left Yaw Right Front Rear ...

Page 23: ...22 Aileron Stick Move Left Move Right Front Move right Move left Mode 2 transmitter shown Elecator Stick Mode 2 transmitter shown Move Forward Move backward Left side view Pitch backward Pitch forward ...

Page 24: ...on and Rotation Front Blue blades Blue blades orange blades orange blades Rear Replacement parts Canopy Propellers 2 blue 2 orange Clockwise motors Counter clockwise motors Motor mount Landing pad Battery compartment Battery 1 2 3 4 5 6 7 8 ...

Page 25: ...24 Exploded View 1 2 3 5 4 6 7 8 5 ...

Reviews: