Reebok i run se User Manual Download Page 5


Use-Environment: Please ensure that liquids or perspiration never enter the electronics. 


Use-Environment:  Keep  the  equipment  indoors,  away  from  moisture  and  dust.    Do  not  put  the 

equipment  in  a  garage,  covered  patio  or  near  water.  If  stored  in  this  location  you  warranty  will  be 

affected. 


Use-Environment: The product is made for home use only. Warranty and manufacturer's liability do 

not extend to any product or damage to the product caused by commercial use store display models, 

2nd hand machines or a machine purchased from an unauthorised retailer.     


User-Health: Consult your physician before starting with any exercise programs to receive advice on 

the optimal training technique. 


User-Health: Incorrect/excessive training can cause health injuries. 


User-Health: If you feel sickness, chest  pain, fits of dizziness or breathlessness during your  training, 

stop training immediately and consult your physician. 


Product-Preparation:  Ensure  that  training  only  starts  after  correct  assembly,  adjustment  and 

inspection of the home exerciser. 


Product-Preparation: Follow the steps of the assembly instruction carefully. 


Product-Preparation: Only use suitable tools for assembly and ask for assistance if necessary. 


Product-Preparation: Only use original Reebok parts as delivered (see checklist).   


Product-Preparation: Tighten all adjustable parts to prevent sudden movement while training. 


Product-Preparation: We suggest using an equipment mat to prevent damage on the ground. 


Use-Instruction:  Please  follow  the  advice  as  per  correct  training  technique  as  detailed  in  the 

instructions. 


Use-Instruction: Do not use the home exerciser without shoes or with loose fitting footwear. 

Use-instruction: Appropriate clothing must be worn at all times during use. 

Use-Safety:  Be  aware  of  the  position  and  proper  fixation  of  adjustable  or  moving  parts  while 

mounting or dismounting the home exerciser. 


Use-Safety: Allow the belt to fully stop before dismounting.   


Use-Safety: Pay attention: never insert any part of your body or clothes into the body of the treadmill 

while it is running or ready for use. 


Use-Safety:  Attach  the  emergency  stop  cord  to  your  clothing  before  starting  the  treadmill.  The 

Treadmill has an emergency stop mechanism for your safety.    Before starting your workout, fasten 

the cord of the safety key  to  your clothing.    If the  treadmill  has  been shut  down  by removing the 

safety  key,  restart  it  by  reinserting  the  key.    An  automatic  restart  of  the  treadmill  belt  does  not 

occur.  An  unmonitored  use  of  the  treadmill  by  other  people  can  be  prevented  by  removing  the 

safety key and keeping it safely hidden. In case of any emergency, hold on tightly to the handrail or 

handle  bar  with  both  hands  and  leave  the  treadmill  by  means  of  the  anti-slipping  surface  of  the 

lateral platform.    Activate the emergence stop mechanism (safety cut-out).   

Precautions 

Summary of Contents for i run se

Page 1: ...Reebok I Run SE Manual 20120418 I Run SE User Manual ...

Page 2: ...e made must be pre authorized by RFE This warranty does not extend to any product or damage to the product caused by or attributed to freight damage abuse misuse improper or abnormal usage or repairs not provided by a RFE authorized service centre products used for commercial or rental purposes or products used as store display models No other warranty beyond that specifically set forth above is a...

Page 3: ...Head office fax 0044 0 1908 793021 E mail info rfeinternational com Web www reebokfitness co uk Technical support Tel 0044 0 800 440 2459 E mail techsupport rfeinternational com The owner s manual is only for the customer reference Reebok can not be held responsible for mistakes Occurring due to translation or change in technical specification of the product Reebok products are recyclable At the e...

Page 4: ...the running surface Product Maintenance Search for noisy parts If you should notice unusual noises like grinding clacking etc try to locate it and have it repaired by a professional Make sure the treadmill is not used until after repairs have been made Product Feature The speed can be changed by the computer Use Safety The function of the immobilization method The purpose of immobilizing the tread...

Page 5: ...adjustable parts to prevent sudden movement while training Product Preparation We suggest using an equipment mat to prevent damage on the ground Use Instruction Please follow the advice as per correct training technique as detailed in the instructions Use Instruction Do not use the home exerciser without shoes or with loose fitting footwear Use instruction Appropriate clothing must be worn at all ...

Page 6: ...ntenance Incorrect repairs and structural modifications e g removal or replacement of original parts may endanger the safety of the user and will invalidate your warranty Product Maintenance Damaged components may endanger your safety or reduce the lifetime of the equipment For this reason worn or damaged parts should be replaced immediately and the user should refrain from using the equipment unt...

Page 7: ...Check list ...

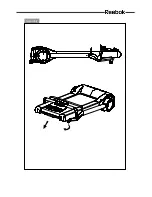
Page 8: ...Assembly ...

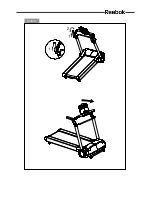
Page 9: ...Unfold ...

Page 10: ...Unfold ...

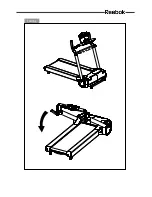
Page 11: ...Folding ...

Page 12: ...Folding ...

Page 13: ...Folding ...

Page 14: ...Transport ...

Page 15: ...the front hand bar Major exercise type This equipment focuses on your lower body and it can train your thigh and shank muscles Important Incorrect excessive training can cause health injuries The treadmill has two levels of inclination The level can be changed by adjusting the inclination leg Use the handle B to lift the treadmill with one hand and adjust the inclination leg with the other hand as...

Page 16: ...o the touch follow the instructions below Please use a non petroleum based silicone To apply lubricant to the walking belt 1 Position the walking belt so that the seam is located on top and in center of the walking board 2 Insert the spray nozzle into the spray head of the lubricant can if a nozzle is required 3 While lifting the side of the walking belt position the spray nozzle between the walki...

Page 17: ... cause the belt to shift off centre resulting in the belt rubbing with the plastic side rail or end caps and possibly causing damage To adjust the belt back to its proper position please follow the directions below If the belt has only moved by 1 2mm this will not affect the operation of your treadmill 1 If your belt tends to walk to the right simply adjust the left belt tension bolt by turning it...

Page 18: ...Parts diagram ...

Page 19: ...Parts diagram ...

Page 20: ...Parts diagram ...

Page 21: ...Parts diagram ...

Page 22: ...Parts diagram ...

Page 23: ...641 641 640 607 610 620 620 631 631 610 631 610 642 Wiring diagram ...

Page 24: ...od dock holder 2 115 I pod dock 1 201 Fold up grip 1 202 Upright left 1 203 Upright right 1 204 Console housing support tube 1 205 Hand pulse sensor 2 207 Handlebar cover right inner 1 208 Handlebar cover right outside 1 209 Handelbar cover left inner 1 210 Handlebar cover left outside 1 211 Side handlebar 2 213 Stationary pin OD12X32 2 214 ø2X3 ø15X16 Spring 2 215 Fold up grip connect rod 2 216 1...

Page 25: ...t 1 311 Front roller tube with shaft 1 313 Rubber Cushion 8 314 Side rail fix braket 2 315 Wire clip OD7X10X24 4 317 Transportation wheel side cover 2 401 Motor Cover upper 1 403 Motor hood decorate light strip 1 405 Motor Cover Bottom 1 406 Upright lower cover right 1 407 Upright lower cover left 1 410 Transport wheel bracket connecting bushing 2 411 Power switch board 1 412 Switch 1 413 Electric...

Page 26: ... Left 1 432 Fold up foot cover Right 1 501 Running belt 400X2540X1 6 1 502 Side rail L1024mm 2 506 Rear end cap rihgt 1 507 Rear end cap left 1 508 Running deck 1 509 Side rail guider 8 607 Grounding cable 1 610 2 pin Safety key cable 1 620 Hand Pulse Sensor wire 2 631 Six minus one pin cable 2100 1 640 White single wire 150 1 641 Red single wire 110 2 642 White single wire 450 2 801 M4X12 Screw 3...

Page 27: ...3 824 6 4X18X1 5 Washer 2 826 8X17X1 5 Washer 8 827 10 5X20X1 5 Washer 1 828 9X35X8 Curve Washer 2 829 M8 C clip 4 830 12X25X3 Washer 2 831 8X14X2 Washer 2 832 OD8XM8X78X25 Bolt 1 833 M5X24 Screw 2 834 M8 Thin Nut 2 835 M4X6 Screw 4 836 M4X15 Allen head 7 837 M3X14 Screw 4 839 washer 21X13X0 7 2 840 M6X10 screw 4 841 washer 4 2X8X1 5 1 842 Owner manual 1 847 C clip M15 2 848 Cup head hex screw M6X...

Page 28: ...Reebok ...

Reviews: