background image

24

The following guidelines will help you to plan your ex-
ercise program. RememberÑthese are general guide-
lines only. For more detailed exercise information, ob-
tain a reputable book or consult your physician. 

EXERCISE INTENSITY

Whether your goal is to burn fat or to strengthen your
cardiovascular system, the key to achieving the 
desired results is to exercise with the proper intensity.
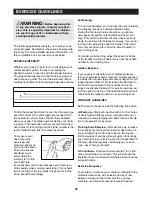
The proper intensity level can be found by using your
heart rate as a guide. The chart below shows recom-
mended heart rates for fat burning and aerobic exercise.

To find the proper heart rate for you, first find your age
near the bottom of the chart (ages are rounded off to
the nearest ten years). Next, find the three numbers
above your age. The three numbers define your Òtrain-
ing zone.Ó The lower two numbers are recommended
heart rates for fat burning and the higher number is the
recommended heart rate for aerobic exercise.

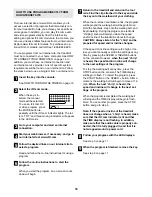
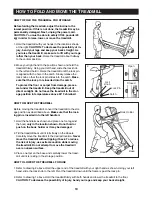
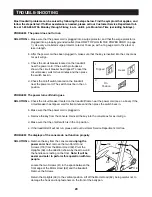
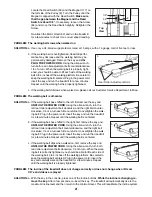
To measure your
heart rate, stop 
exercising and
place two fingers on
your wrist as shown.
Take a six-second
heartbeat count,
and multiply the 
result by ten to find
your heart rate. 
(A six-second count is used because your heart rate
drops quickly when you stop exercising.) If your heart
rate is too high or too low, adjust the speed or incline
of the treadmill accordingly.

Fat Burning

To burn fat effectively, you must exercise at a relatively
low intensity level for a sustained period of time.
During the first few minutes of exercise, your body
uses easily accessible 

carbohydrate calories

for en-

ergy. Only after the first few minutes does your body
begin to use stored 

fat calories

for energy. If your goal

is to burn fat, adjust the speed or incline of the tread-
mill until your heart rate is near the lowest number in
your training zone. 

For maximum fat burning, adjust the speed or incline
of the treadmill until your heart rate is near the middle
number in your training zone.

Aerobic Exercise

If your goal is to strengthen your cardiovascular sys-
tem, your exercise must be Òaerobic.Ó Aerobic exercise
is activity that requires large amounts of oxygen for pro-
longed periods of time. This increases the demand on
the heart to pump blood to the muscles and on the
lungs to oxygenate the blood. For aerobic exercise, ad-
just the speed or incline of the treadmill until your heart
rate is near the highest number in your training zone.

WORKOUT GUIDELINES

Each workout should include the following three parts:

A Warm-upÑ

Start each workout with 5 to 10 minutes

of stretching and light exercise. A proper warm-up in-
creases your body temperature, heart rate and circula-
tion in preparation for exercise. 

Training Zone ExerciseÑ

After warming up, increase

the intensity of your exercise until your heart rate is in
your training zone for 20 to 60 minutes. (During the
first few weeks of your exercise program, do not keep
your heart rate in your training zone for longer than 20
minutes.) Breathe regularly and deeply as you exer-
ciseÑnever hold your breath.

A Cool-downÑ

Finish each workout with 5 to 10 min-

utes of stretching to cool down. This will increase the
flexibility of your muscles and will help prevent post-ex-
ercise problems.

Exercise Frequency

To maintain or improve your condition, complete three
workouts each week, with at least one day of rest 
between workouts. After a few months, you may 
complete up to five workouts each week if desired. 

WARNING:

Before beginning this

or any exercise program, consult your physi-
cian. This is especially important for individu-
als over the age of 35 or individuals with pre-
existing health problems.

E

XERCISE

G

UIDELINES

Summary of Contents for C 1

Page 1: ...if there are missing parts we will guarantee complete satisfaction through di rect assistance from our factory PLEASE CALL DIRECT TO OUR TOLL FREE CUSTOMER HOT LINE The trained technicians on our customer hot line will provide immediate assistance free of charge to you CUSTOMER HOT LINE 1 800 999 3756 Mon ÐFri 6 a m Ð6 p m MST Model No RBTL11990 Serial No USER S MANUAL Visit our website at www wor...

Page 2: ... UNIVERSITY 22 EXERCISE GUIDELINES 24 PART LIST 26 HOW TO ORDER REPLACEMENT PARTS 27 LIMITED WARRANTY Back Cover Note An EXPLODED DRAWING is attached in the center of this manual TABLE OF CONTENTS REEBOK and the Vector Logo are registered trademarks and service marks of Reebok This product is manufactured and distributed under license from Reebok International ...

Page 3: ...not use an extension cord 13 Use only a UL listed surge protector rated at 15 amps with a 14 gauge cord of five feet or less in length Do not use an extension cord 14 Keep the power cord and the surge protector away from heated surfaces 15 Never move the walking belt while the power is turned off Do not operate the treadmill if the power cord or plug is damaged or if the treadmill is not working p...

Page 4: ... cleaning the treadmill and before performing the main tenance and adjustment procedures de scribed in this manual Never remove the motor hood unless instructed to do so by an authorized service representative Servicing other than the procedures in this manual should be performed by an authorized service representative only WARNING Before beginning this or any exercise program consult your physici...

Page 5: ...nt toll free at 1 800 999 3756 Monday through Friday 6 a m until 6 p m Mountain Time excluding holidays To help us assist you please mention the product model number and serial number when calling The model number is RBTL11990 The serial number can be found on a decal attached to the treadmill see the front cover of this manual for the location Before reading further please review the drawing belo...

Page 6: ...Pin 49 Insert the Lock Pin into the Lock Knob Sleeve 18 and the left Upright 39 Tighten the Lock Knob 17 onto the Lock Pin 3 Make sure that all parts are tightened before you use the treadmill Place a mat under the treadmill to protect the floor or carpet 39 1 2 Set the treadmill in a cleared area and remove all packing materials Do not dispose of the packing materials until set up is completed No...

Page 7: ...ly installed and grounded in accordance with all local codes and ordinances This product is for use on a nominal 120 volt circuit and has a grounding plug that looks like the plug illus trated in drawing 1 below A temporary adapter that looks like the adapter illustrated in drawing 2 may be used to connect the surge protector to a 2 pole recep tacle as shown in drawing 2 if a properly grounded out...

Page 8: ...utomatically control the speed and incline of the treadmill as a personal trainer guides you through every step of your workout High energy music provides added motivation Each CD features two programs designed by certified per sonal trainers In addition you can connect the treadmill to your VCR and TV and play iFit com video programs videocas settes are available separately Video programs offer t...

Page 9: ...ettings E SPEED ButtonsÑThese buttons control the speed of the walking belt Each time a button is pressed the speed will change by 0 1 mph if a button is held down the speed will change in increments of 0 5 mph The speed range is 0 5 mph to 10 mph F MODE ButtonÑThis button is used to select the manual mode preset workout programs and the iFit com mode G START ButtonÑThis button starts the walking ...

Page 10: ...As you exercise change the speed of the walking belt as desired by pressing the SPEED buttons or the QUICK SPEED buttons Note After the buttons are pressed it will take a moment for the walking belt to reach the selected speed setting Important Change the speed in small increments to avoid sudden jumps in speed To stop the walking belt press the STOP button The displays will pause and the TIME dis...

Page 11: ... key into the console The SPEED PACE display will show either an ÒEÓ for English miles or an ÒMÓ for metric kilometers Press the SPEED but ton to change the unit of measurement Then remove and reinsert the key DISTANCE LAPS displayÑThis display shows the distance that the walking belt has moved and the number of laps you have com pleted one lap equals 1 4 mile The display will alternate between on...

Page 12: ...tomatically adjust to the speed and incline settings for the second period The program will continue in this way until the speed setting for the last period is shown in the CURRENT PERIOD column and the TIME display counts down to zero The walking belt will then slow to a stop Note Each time a period ends and the speed set tings move to the left if all of the indicators in the CURRENT PERIOD colum...

Page 13: ...e This mode is intended to be used only when a treadmill is displayed in a store When the console is in the demo mode the power cord can be plugged in the key can be removed from the console and the displays and indicators on the console will auto matically light in a preset sequence although the but tons on the console will not operate If a ÒdÓ appears in the CALS FAT CALS display when the inform...

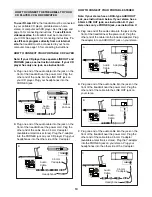
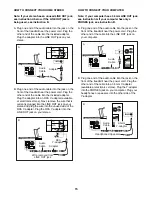
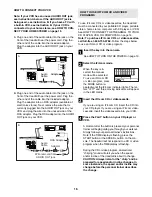
Page 14: ...lable at electronics stores Plug the Y adapter into the PHONES jack on your CD player Plug your headphones into the other side of the Y adapter HOW TO CONNECT YOUR PORTABLE STEREO Note If your stereo has an RCA type AUDIO OUT jack see instruction A below If your stereo has a 3 5mm LINE OUT jack see instruction B If your stereo has only a PHONES jack see instruction C A Plug one end of the audio ca...

Page 15: ...e RCA Y adapter Plug the RCA Y adapter into the LINE OUT jack on your stereo HOW TO CONNECT YOUR COMPUTER Note If your computer has a 3 5mm LINE OUT jack see instruction A If your computer has only a PHONES jack see instruction B A Plug one end of the audio cable into the jack on the front of the treadmill near the power cord Plug the other end of the cable into the LINE OUT jack on your computer ...

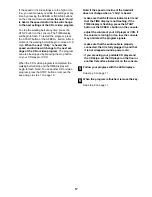
Page 16: ...teps below to use an iFit com CD or video program Insert the key into the console See HOW TO TURN ON THE POWER on page 10 Select the iFit com mode When the key is in serted the manual mode will be selected To use an iFit com CD or video program press the MODE button re peatedly until the iFit com indicator lights The let ters ÒI FITÓ and three moving indicators will appear in the LED matrix Insert...

Page 17: ...ed the walking belt will stop and the TIME display will begin to flash Note To use another CD or video program press the STOP button or remove the key and go to step 1 on page 16 Note If the speed or incline of the treadmill does not change when a ÒchirpÓ is heard make sure that the IFit com indicator is lit and that the TIME display is not flashing If the TIME display is flashing press the START ...

Page 18: ...en count down will begin Return to the treadmill and stand on the foot rails Find the clip attached to the key and slide the key onto the waistband of your clothing When the on screen countdown ends the program will begin and the walking belt will begin to move Hold the handrails step onto the walking belt and begin walking During the program an electronic ÒchirpingÓ sound will alert you when the ...

Page 19: ... in temperatures above 85 Fahrenheit HOW TO MOVE THE TREADMILL Before moving the treadmill convert the treadmill to the stor age position as described above Make sure that the lock ing pin is inserted into the left handrail 1 Hold the handrails as shown and place one foot against the hood only in the location shown Do not hold or push on the book holder or it may be damaged 2 Tilt the treadmill ba...

Page 20: ...emove the key from the console Reinsert the key into the console as far as it will go d Make sure that the on off switch is in the on position e If the treadmill still will not run please call our Customer Service Department toll free PROBLEM The displays of the console do not function properly SOLUTION a Remove the key from the console and unplug the power cord Next remove the two Short Hood Scre...

Page 21: ...ustment bolt clockwise and the right bolt counter clockwise 1 4 of a turn each Be careful not to overtighten the walk ing belt Plug in the power cord insert the key and run the treadmill for a few minutes Repeat until the walking belt is centered b If the walking belt has shifted to the right first remove the key and UNPLUG THE POWER CORD Using the allen wrench turn the left rear roller adjustment...

Page 22: ...s cholesterol from the body and can lower concentrations of blood triglyc erides a storage form of fat thus reducing the risk for cardiovascular disease Duncan and his colleagues3 concluded that exercise does not have to be vigorous to reduce cardiovascular risk factors In other words people who choose to stroll rather than walk briskly can reduce their risk for cardiovascular disease After studyi...

Page 23: ...ed a walking related injury that necessitated consulting with a physician Carroll and his colleagues10 reported that 14 of the elderly sub jects participating in a walking study suffered training related orthopedic injuries mostly to the lower leg and foot The majority of injuries occurred in the group as signed to fast walking It is important to note that all forms of exercise have some degree of...

Page 24: ...ntil your heart rate is near the lowest number in your training zone For maximum fat burning adjust the speed or incline of the treadmill until your heart rate is near the middle number in your training zone Aerobic Exercise If your goal is to strengthen your cardiovascular sys tem your exercise must be Òaerobic Ó Aerobic exercise is activity that requires large amounts of oxygen for pro longed pe...

Page 25: ...illes Stretch With one leg in front of the other reach forward and place your hands against a wall Keep your back leg straight and your back foot flat on the floor Bend your front leg lean forward and move your hips toward the wall Hold for 15 counts then relax Repeat 3 times for each leg To cause further stretching of the achilles tendons bend your back leg as well Stretches Calves achilles tendo...

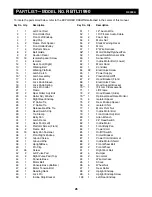
Page 26: ...1 10Õ IFit com Audio Cable 53 2 Foam Grip 54 4 Motor Nut 55 2 Static Warning Decal 56 1 Motor 57 1 8Ó Wire Harness 58 1 Motor Pulley Flywheel Fan 59 1 Reed Switch Sensor Wire 60 1 Sensor Wire 61 1 Incline Motor Bolt Lower 62 1 Motor Hood 63 1 Controller 64 22 Electronics Screw 65 1 Power Supply 66 4 Plastic Stand Off 67 2 Hood Bracket Front 68 1 Electronics Plate 69 1 Hood Support Bracket 70 1 IFi...

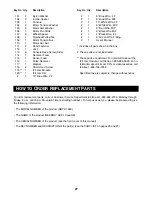
Page 27: ...own in the box These parts are not illustrated These parts are optional For information about the iFit com module call toll free 1 800 884 0620 For in formation about iFit com CDÕs or videocassettes call toll free 1 800 735 0768 Specifications are subject to change without notice Key No Qty Description Key No Qty Description To order replacement parts call our Customer Service Department toll free...

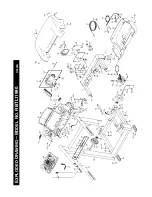
Page 28: ... f h f h f h f h f h f h f h f h f h f h f h f h f h f h f h f h e O 2 h f h O 2 0 M W 2 0 M e O M e W h f e O 2 0 Y e O 5 h f O 2 0 M e O 2 0 Y h f W 2 0 M e O 2 M h f O M e W 2 0 Y O h e O 2 H e O 0 M O 2 0 Y h O 2 0 Y O 2 0 M O 2 0 M g W 2 0 M e W 2 M W 2 0 M e f O M e J 0 Y O M e O 2 e O 2 0 Y e O M O 2 0 Y e W 2 O 2 0 M e O 2 Y O 2 0 M e O 0 M W 2 0 M e O 2 M 0 M e O 2 M e O e W 2 0 Y e e O 2...

Page 29: ... O 2 O Y O 2 0 M W W 2 0 Y U O 5 W M M S H W Y Y O W H 3 W 5 O V H W 2 Y N W 0 Y J W M C 5 7 Y W Y W 2 H 5 O Y 7 H W 2 Y e Y W Y f J W 0 Y g 7 Y 5 W M h H O Y h J 5 W 2 Y h e 7 H J W Y h e O 2 6 K 7 5 W 0 Y h f O 2 U V H W M O 2 U V U 5 O Y O 2 U V S 6 X J Y W 2 Y Y S X Y S K 7 H W Y J 5 Y V T R 6 X h e J 5 W Y 7 H I 4 S U K h W Y W 0 Y I 4 R T 6 K g 7 0 Y O M I S X 6 K e 0 M W 2 Y V 4 R 0 M W H W...

Page 30: ...member to do the periodic maintenance requirements specified in the Manual to assure proper operation and your continued satisfac tion HOW TO GET PARTS AND SERVICEÑSimply call our Customer Service Department at 1 800 999 3756 and tell them your name and address and the serial number of your Product They will tell you how to get a part replaced or if necessary arrange for service where your Product...

Reviews: