


2
A. For Shower Cabinets and
Recessed Installations
Shower tailpipes can be passed
through cabinet wall in order to
make plumbing connection using
standard tap connectors.
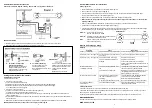
Powerstream
Shower Accessories
Schematic Installation Diagram showing
Powerstream
serving Shower and Basin
IMPORTANT NOTES
1. The HOT supply from the
Powerstream
MUST be connected to the red “turn on fully” control valve.
2. Please see the
Powerstream
handbook for full details of installation.
Setting the Outlet Water Temperature
Adjusting the service valve
Turn the service on, then-
•
If the unit is to supply a basin.
Ø
Turn on the hot water tap at the basin.
Ø
Adjust the service valve until the water comes out of the tap at the required temperature.
Ø
Check that the unit works correctly when the basin tap is closed and then opened again,
if not, adjust the service valve slightly
•
If the unit is to supply a shower.
Ø
Turn the service valve anti-clockwise until the neon light goes out,
and then turn it back until the neon light just comes on.
Ø
Check the water temperature of the handset and if necessary, turn the cold tap on and adjust to get the desired
shower temperature.
Ø
Explain to the user that when he unit is used, the hot water should be turned on fully so that the water temperature is
always the same.
•
Please refer to the
Powerstream
handbook for FULL details of operation and installation of the
Powerstream
.
IMPORTANT: Demonstrate the unit to the user and give th em this guide
B. For Surface Mounting
Position adaptor to suit or
discard if not required.
Bind tailpipes with P.T.F.E. tape
if necessary.
Screw on and orientate wall plate
elbows to suit incoming pipework.
Screw shower to surface of wall
using screw and wallplugs
provided.
Make plumbing connection.
3
Shower Mixer Valve User Instructions
Shower operation
•
Check that the power is switched on at the mains isolator switch.
•
Turn on the hot or “flow” tap fully (see diagram 1).
•
If the unit has been used recently, run the water through for a f ew seconds to let the temperature settle down.
You may get a short burst of very hot water front the unit.
•
Turn on the cold or “temperature” tap, if necessary, to adjust the temperature of the water.
•
Make sure that no other outle ts connected to the unit are used whilst you are in the shower, or the water flow
will drop suddenly.
•
When you have finished DO NOT switch off the power if you are going to use the unit again shortly.
•
It is important to clean the shower headset regularly (see page 4)
•
If the shower headset can reach the water in the shower tray, bath or basin, the shower hose should be fitted through
the hose-retaining loop on the soap tray. This will comply with the water by -laws.
Knob “A”
“Turn on fully” hot water on ly.
This tap must be FULLY OPEN.
Knob “B”
“Temperature control” tap used to bleed cold water
to give blended outlet temperature.
Note
Knob “A” and Knob “B” MUST be switched off/closed
when finished showering.
What to do if things go wrong
Self Help
Symptom
Cause
What to do
Little or no water flows
The main water supply is turned off
Turn on the main supply valve at the st op valve
Cold water only – neon light off The main water supply is not turned
on enough
Turn on main supply fully at the stop valve
Cold water only – neon light on The water flow rate is too high.
The inlet water temperature has
dropped
Adjust the service valve
Adjust the service valve
For a shower select inner or outer spray
pattern in the shower head to make best use of
the hot water
Water flow too low or
temperature too high
The mains supply water flow is too
low.
The hot tap is not fully open.
Increase the supply water flow. Make sure that
the service valve is correctly adjusted
Adjust the service valve so that the water is at
the right temperature with the tap fully open.
Always turn the hot tap fully on
Water goes from hot to cold
The water flow or pressure is too
low, and the thermal cut -out is
operating
A second outlet has been tuned on.
Increase the water flow. Make sure that the
service valve is correctly adjusted.
Refer to
Powerstream
Handbook
Do not use the basin whilst using the shower
Shower spray pattern
deteriorates
The showerhead is clogged
Clean the showerhead by simply regularly
rubbing the rubber nozzles
Professional Service
If the above checks fail to restore the performance, you should seek professi
onal help.
The person who installed the unit is probably the best one to repair it and is certainly the person to contact if you have
had a problem in the guarantee period.
In the first instance check that the unit has been correctly installed before con
tacting us at the number below.
After Sales Service
We offer a technical advisory service to contractors and customers needing advice or with a problem.
RING 0
344 879 3588


