background image

3.2 Operating different modes

The system has 4 operating modes (STANDBY, ARM, ALERT, and HOME) to suit individual requirements.
These modes can be set as follows:

3.2.1 STANDBY mode

If in STANDBY mode, the Smart Halo Panel is prepared for mode selection

A. Adjusting Exit Delay

The default setting of the Smart Halo Panel allows the user 20 seconds to exit the property before the alarm is ARMED. 
However, this Exit Delay can be adjusted to between 10 and 60 seconds as follows,make sure you are in standby mode 
before the setting.

• To make sure you are in STANDBY mode:

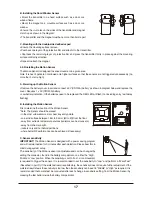
• Enter the default PIN                                                       OR your 

new 4-digit PIN

• Press              .
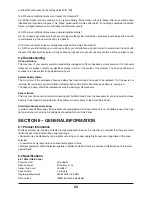
• The Smart Halo Panel will display the below image while you 
were in STANDBY mode:

(One beep indicates that you entered a valid PIN, three beeps 
indicate that an invalid operation was performed).

Keys

Description

Note

You must be in STANDBY
mode before turning to
ARM mode

B. Adjusting Entry Delay

The default setting of the Smart Halo Panel allows the user 30 seconds to enter the property and DISARM the alarm 
before it is triggered. However, this Entry Delay can be adjusted to between 10 and 60 seconds as follows, make sure 
you are in standby mode before the setting.

8

Confirm the setting and return the Smart Halo Panel to STANDBY 
by pressing

Press                to complete 
the setting

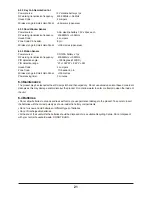
Press            then             (as 

many times as required)  to 
set the new Exit Delay

Keys

Description

Note

• When              is pressed the first time the Smart Halo Panel 

flashes with the number of seconds currently set for the Exit 
Delay(The factory default setting is 20 seconds)

• Each time             is pressed the Exit Delay is increased by a 

further 10 seconds between the adjustable range of 10 to 60 
seconds

• The Exit Delay time on the LCD display will flash until the setting 
is completed

Summary of Contents for SMART HALO

Page 1: ...hieldsecurity com Patent Pending 2014 Red Shield Security Limited All rights reserved Red Shield logo is the trademark owned by Red Shield Security Limited Apple and the Apple logo are trademarks of Apple Inc registered in the U S and other countries Android and Google Play are trademarks of Google Inc ...

Page 2: ...elay B Adjusting Entry Delay C Adjusting the Alarm Duration 3 2 2 ALERT mode A Entering the ALERT mode B Exiting the ALERT mode C Zone settings 3 2 3 HOME mode A Entering the HOME mode B Exiting the HOME mode C Zone settings 3 2 4 ARM mode A Arming the system B Disarming the system C Zone settings D Triggers in ARM mode 3 3 Introduction of Key Fob Remote Control A Introduction B Operation i Poweri...

Page 3: ...sor A Powering up the the Door Window Sensor B Installing the Door Window Sensor C Mounting with the double sided adhesive pad 4 2 2 Installing the Motion Sensor A Powering up the Motion Sensor B Installing the Motion Sensor C Sensor sensitivity D Walk test E Mounting using screws 4 3 House Security Code settings 4 4 Zone Code settings Section 5 Troubleshooting 5 1 FAQ 5 2 Troubleshooting Section ...

Page 4: ...all or part of the system The power to the sensors is inadequate or disconnected The sensors are not located in acceptable operating areas e g too close to a heat source Inadequate maintenance is the most common cause of alarm failure Therefore test your system at least once per week ensure the sensors and siren s are working properly Although having an alarm system may make you eligible for reduc...

Page 5: ...elay timer setting Remove additional keychain remote or keypad control Inquiry recipient number Entry delay timer setting Querying the ID number of a remote control or keypad control Record or playback Alarm duration setting Setting mode Enter 1 Stop panel flashes when the zone is triggered under ALERT status 2 Disable the beeping countdown under entry exit delay ARM mode HOME mode ALERT mode Chim...

Page 6: ...nel flashes press ALERT Zone triggered under ALERT status Smart Halo WHITE backlight remains ON for 10 seconds after entering into STANDBY mode STANDBY Silent 1 5 Introduction to the Smart Halo Panel sound alert and backlight Operating Mode ARM Situation Sound alert and backlight indication Alarm set under ARM status No siren Smart Halo flashes RED every 5 seconds providing an intruder deterrent d...

Page 7: ...ig 5 replace cover and screw firmly Your telephone will function normally until Auto Dialer is activated Upon activation the device will take control of the telephone line functions SECTION 2 INSTALLINGTHE SMART HALO HOME PROTECTION SYSTEM 2 1 Installing the Smart Halo Panel WARNING The Red Shield Smart Halo Panel has a built in tamper proof switch to prevent the system being disabled by an intrud...

Page 8: ... plugged in at all times with the 9V battery functioning as back up power supply only when the mains power supply is interrupted One beep will sound and the backlight will blink within 1 second White The Smart Halo Panel will display the below image The Smart Halo Panel will enter STANDBY mode after the automatic self checking is complete Then will appear on the LCD screen Enter the default 4 digi...

Page 9: ...ramming your new 4 digit PIN You must be in STANDBY mode before programming your new 4 digit PIN To make sure you are in STANDBY mode Enter the default PIN Press The Smart Halo Panel will display the image below when you are in STANDBY mode One beep indicates that you entered a valid PIN three beeps indicate that an invalid operation was performed The Smart Halo Panel will display the below image ...

Page 10: ...y with the panel keypad App is used for system setting only It is not a remote control for system operation System alerts will be communicated via PSTN network Turn audio volume to maximum Connect the cable and enter the default PIN 1234 press ENTER Launch Smart Halo App to start setting up The panel LED will turn Blue upon successful set up retry if no signal Volume A B Red Shield Smart Halo C SU...

Page 11: ... an invalid operation was performed Keys Description Note You must be in STANDBY mode before turning to ARM mode B Adjusting Entry Delay The default setting of the Smart Halo Panel allows the user 30 seconds to enter the property and DISARM the alarm before it is triggered However this Entry Delay can be adjusted to between 10 and 60 seconds as follows make sure you are in standby mode before the ...

Page 12: ...econds between the adjustable range of 10 to 60 seconds The Entry Delay time on the LCD display will flash until the setting is completed Press then as many times as required to set the new Entry Delay Confirm the setting and return the Smart Halo Panel to STANDBY by pressing Press to complete the setting A Entering ALERT mode On the Key Fob Remote Press to activate On the Smart Halo Panel First m...

Page 13: ... requirements The HOME mode allows the system operate in both the ARM and ALERT modes in different zones Keys Description Note Confirm the setting and return the Smart Halo Panel to STANDBY by pressing Press to complete the setting Toggle 1 2 3 4 5 6 7 8 to turn each zone ON or OFF If no number appears the zone is turned OFF If all zones are enabled the Smart Halo Panel will display the image as P...

Page 14: ... the beeping If the Zone is enabled a number will appear as displayed in the image below The system will then enter ARM mode after 20 seconds Enter the default PIN press and for ARM mode 3 2 4 ARM mode ARM mode default setting Sensor Zone Status mode Door Window Sensor 1 2 8 ARM ARM ARM Door Window Sensor Motion Sensor A Arming the system On the Key Fob Remote Control Press to ARM the system On th...

Page 15: ...te control The Smart Halo Panel will display the below image One beep indicates that the system is triggered Entry delay 30 seconds Description Note Under the ARM Mode System trigger After the initial triggering the alarm will immediately sound without delay if any other sensors are triggered Return to ARM mode after the initial triggering D Triggers in ARM mode Example Zone 1 trigger 3 3 Introduc...

Page 16: ...el has 3 remotes enrolled the LCD display will flash 03 Input the remote ID no e g 02 for the remote you wish to delete Inputting 00 will delete all remote controls LCD display will then flash the total number of remotes enrolled after deletion One beep indicates that the remote was successfully deleted from the Smart Halo Panel Press then to enter the Remote Control Deleting mode Then input the I...

Page 17: ...e all recipient number is done To change dialing cycle key in and press any numerical key 1 9 The default number is 3 but can be from 1 to 9 times press Press to exit in standby mode 3 4 3 Query Mode Query mode allows you to inspect which recipient lines correspond to which number A To inspect numbers in the memory enter Query mode and look Key in the PIN and press Press SETTINGS and Query mode Se...

Page 18: ...n 10 seconds of the end of the recorded message or This will last up to 60 seconds The recipient can also activate the speaker function by keying in 3 within 10 seconds of the end of the recorded message or This will last up to 60 seconds By alternating between 1 and 3 the recipient can interact with any individual near the Auto Dialler As long these keys are repeatedly keyed in within a 60 second...

Page 19: ...ransmitter will flash slowly 3 5Transmitting an emergency Panic alarm 3 5 1 Using the Panic alarm Pressing buttons together on the Keypad or Key Fob Remote Control will immediately transmit an alarm signal to the Smart Halo Panel activating the siren and transmitting an alarm signal to any optional response devices Auto Dialer Outdoor Bell Box to request emergency assistance To disarm the Panic al...

Page 20: ...g entry exit delay flashing B Installing the Motion Sensor First determine the location of the Motion Sensor Note The Sensor should be placed in the most vulnerable rooms or near key entry points on a solid surface between 1 8m to 2 4mm 6ft to 8ft from the floor away from extreme temperature sources radiators ovens stoves etc away from direct sunlight indoors only and not behind partitions where b...

Page 21: ... Drill the holes and insert wall plugs Attach the bracket to the mounting surface with the screws provided Attach the Motion Sensor to the mounting bracket Jumpers for House Security Cod Dip switches for House Security Code Smart Halo Panel Each sensor Default House Security Code 1 ON 2 ON 3 ON 4 ON Jumper ON Pushed in OFF Pulled out Key Fob Remote Control Default House Security 1 ON 2 ON 3 ON 4 O...

Page 22: ...ms Please refer to the user guide for more information about mounting the Smart Halo Panel and the wireless sensors Q 5 Do I have to programme the Smart Halo Panel A 5 The SMART HALO Home Protection System is designed for easy installation This means that the wireless sensors are in a default setting already registered to the Smart Halo Panel and will therefore function immediately after the senso...

Page 23: ...his may occur if the emergency back up battery has been drained and needs to be replaced If AC power is not restored the low battery symbol will flash indicating that the Smart Halo Panel back up battery is running low The back up battery should be replaced once the low battery symbol appears Sensor failure This may occur if a sensor is not communicating with the Smart Halo Panel It is necessary f...

Page 24: ...Zone Code Pin header 8 pin Wireless range to Smart Halo Panel 100 metres Power saving timer 3 minutes 6 3 Maintenance The product may be cleaned with a soft damp cloth and then wiped dry Do not use abrasive solvent based or aerosol cleaners as this may damage and or discolour the product Do not allow water to enter or attempt to clean the inside of the unit 6 4 Batteries Do not allow batteries to ...

Page 25: ...ART HAL Smart Halo Home Alarm System guarantees peace of mind Compatible with a wide range of sensors and accessories from Red Shield the system can work under various conditions protecting your home anytime More accessories available on www redshieldsecurity com ...

Reviews: