15
ENG
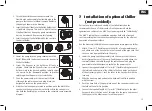
2. Thread the outlet bayonet connector onto the
flexible pipe and assemble the flexible pipe to the
pump so that the outlet elbow is perpendicular to
the pump as shown in the drawing.
3. Insert the Eyeball Seat into the Outlet Holder that
is fixed into the glass. This part is a tight fit so that
it will not float out during any pump maintenance
but can be removed if necessary for cleaning.
4. Insert the Eyeball outlet followed by the seal into
the Outlet Holder.
5. Lower the pump into the pump chamber until the
Outlet Elbow with the Bayonet connector is opposite
the Outlet Holder.
6. Screw the Bayonet to the Holder until firmly in
position. Check that the Eyeball is free to rotate but
held securely in the desired position. Initially adjust
the nozzle to the downward position to prevent
splashing when the pump is first switched on.
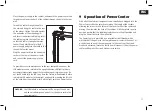
7. Feed the power cable over the rear wall, thread
it through the cable channel and plug it into the
designated socket on the power center.
8. With the circulation pump secured in position, push the black filter
sponge into the pump chamber so that the slit in the sponge is in
line with the flexible pipe, as shown in the complete sump assembly
diagram.
7 Installation of optional Chiller
(not provided):
For the long-term safety and vitality of reef inhabitants Red Sea
recommends the use of chillers with all reef aquariums. Both the
aquarium and cabinet of the MAX
®
E systems are provided “Chiller Ready”.
The MAX
®
E cabinet has air ventilation openings both at the front and
rear to providing the free convection cooling necessary for the efficient
operation of aquarium chillers.
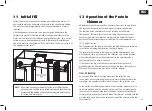
Use the Accessory/chiller kit to connect a pump and return pipes to a chiller.
1. Attach 17mm (¾”) flexible pipe to the outlet of a submersible pump
and attach one of the hose barbs to the free end of the pipe such that
the hose barb is perpendicular to the pump.
2. Lower the pump and tube assembly into the sump so that the hose
barb is facing the rear of the sump. Feed the power cable above the
rear wall, thread the cable through the cable channel and plug the
power cable into the designated socket on the power center.
3. Connect the required length of 17mm (¾”) flexible tubing to connect
the inlet and outlet ports of the chiller to the hose barbs on the back
of the accessory pipe unit. Lock the tubes to the hose barbs with the
lock nuts.
4. Slide the accessory pipe unit onto the back wall and fix in position
with the screw.
5. Push the hose barb of the pump into one of the connectors and screw
the lock nut to hold it in position.
6. Connect the required length of 17mm (¾”) flexible pipe to the other
hose barb. Insert the free end of this pipe into the sump and connect
the bayonet to the other connector on the pipe unit.
Summary of Contents for MAX E Series
Page 2: ......
Page 3: ...ENG DE FR JP CHN 2 24 28 51 54 77 80 102 106 126...
Page 4: ......
Page 29: ...25 ENG...
Page 30: ......
Page 56: ......
Page 82: ......
Page 83: ...79 ENG DE FR JP 79...
Page 85: ...81 ENG DE FR JP 81 3 ENG...
Page 86: ...Red Sea MAX E Series 82 82...
Page 87: ...83 ENG DE FR JP 83 5 ENG...
Page 88: ...Red Sea MAX E Series 84 84 Red Sea MAX E Series 6 E 170 25 55 E 260 40 90...
Page 89: ...85 ENG DE FR JP 85...
Page 90: ...Red Sea MAX E Series 86 86 Red Sea MAX E Series 8...
Page 91: ...87 ENG DE FR JP 87 9 ENG 1 2...
Page 93: ...89 ENG DE FR JP 89 11 ENG 10 11 1 9 9 6 6 8 2 3 4 4 7 7 5 5 12 13...
Page 94: ...Red Sea MAX E Series 90 90 Red Sea MAX E Series 12...
Page 95: ...91 ENG DE FR JP 91...
Page 96: ...Red Sea MAX E Series 92 92 Red Sea MAX E Series 14...
Page 97: ...93 ENG DE FR JP 93...
Page 98: ...Red Sea MAX E Series 94 94 Red Sea MAX E Series 16...
Page 99: ...95 ENG DE FR JP 95 17...
Page 100: ...Red Sea MAX E Series 96 96 Red Sea MAX E Series 18...
Page 101: ...97 ENG DE FR JP 97...
Page 102: ...Red Sea MAX E Series 98 98 Red Sea MAX E Series 20...
Page 103: ...99 ENG DE FR JP 99...
Page 104: ...Red Sea MAX E Series 100 100 Red Sea MAX E Series 22...
Page 105: ...101 ENG DE FR JP 101 23 ENG...
Page 106: ...Red Sea MAX E Series 102 102 Red Sea MAX E Series 24...
Page 107: ...103 ENG DE FR JP 103...
Page 108: ......
Page 109: ...105 ENG CHN MAX E...
Page 111: ...107 ENG CHN MAX E MAX MAX MAX E MAX MAX redseafish cn...
Page 112: ...Red Sea MAX E Series 108 1 1 1...
Page 114: ...Red Sea MAX E Series 110 3 MAX E 1 2 3 MAX E 2 5cm 1 15 kg lb E 170 25 55 E 260 40 90...
Page 117: ...113 ENG CHN 5 3 LED 5 4 LED LED LED 5 5 2 86cm 34 1 2...
Page 119: ...115 ENG CHN E 260 10 11 1 9 9 6 6 8 2 3 4 4 7 7 5 5 12 13...
Page 121: ...117 ENG CHN c d 1 2 3 4 12 122 5 6 6 2 6 3 6 4 24 72 6 5 6 6 MSK 900 c d...
Page 122: ...Red Sea MAX E Series 118 6 7 1 2 3 4 5 6 7 8...
Page 123: ...119 ENG CHN 7 MAX E MAX E 1 17mm 30cm 4 2 3 17mm 4 5 6 17mm 7 8 pH 8 LED M3 LED LED 5...
Page 124: ...Red Sea MAX E Series 120 LED LED LED LED DC 9 LED...
Page 125: ...121 ENG CHN 10 LED ReefLED 90 8 12 9 4 LED 8 20 4 5 11...
Page 126: ...Red Sea MAX E Series 122 12 MSK 30...
Page 127: ...123 ENG CHN 13 MAX pH...
Page 128: ...Red Sea MAX E Series 124 24 28 C 76 82 F 2 C 7 F 14 Q A Q A Q A MAX Q A 12 122...
Page 129: ...125 ENG CHN Q A Q A Q A MAX E 24...
Page 131: ......


