background image

REC

ORD

 SET

TINGS

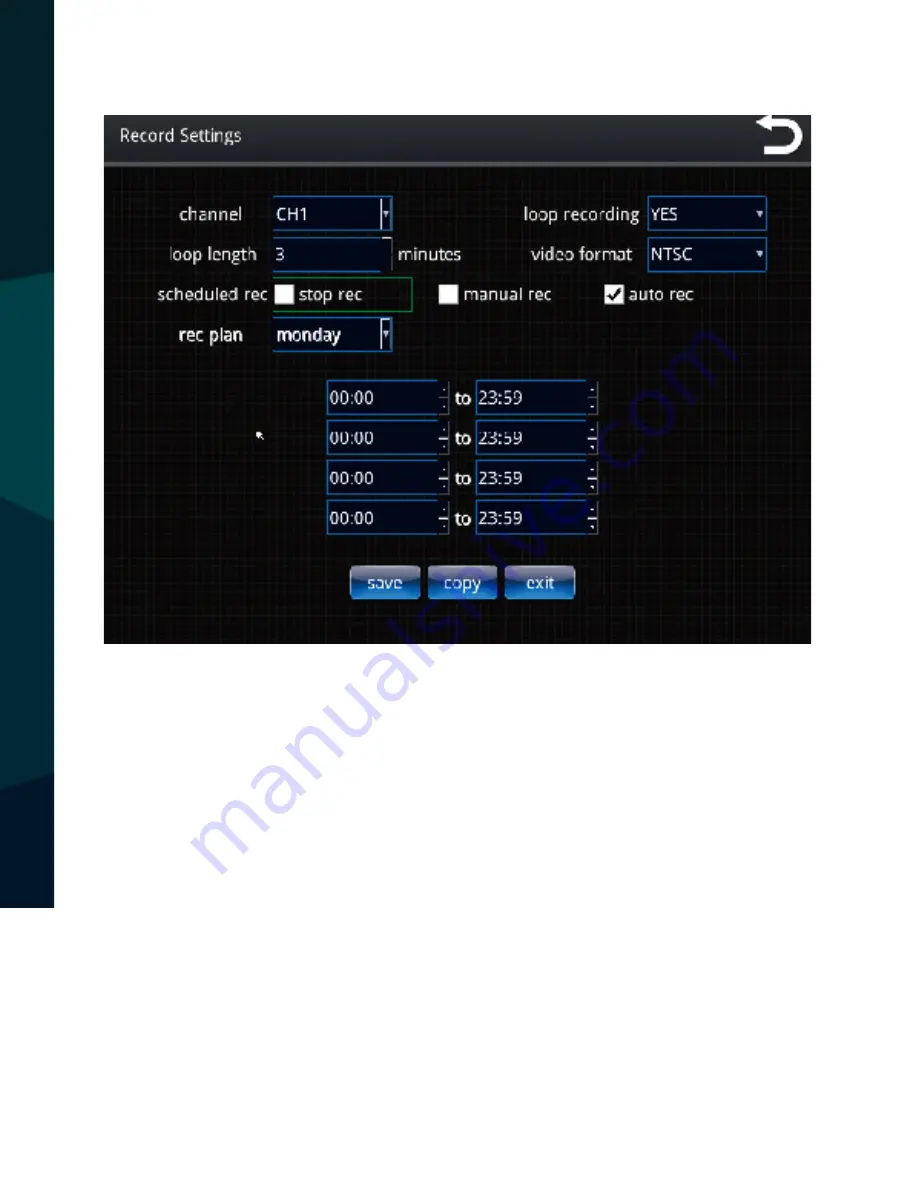
Record Settings

Channel: 

Select channel to adjust

Look Recording:

 Loop recording allows overwriting of SD card when 

full. Toggle ON/Off.

Loop Length:

 Change length of each video segment, toggle between 

1-60 minutes.

Video Format: 

Toggle PAL/NTSC

Schedule Rec:

 Choose between stop rec/manual rec/auto rec

Rear View Safety

16

Summary of Contents for RVS-3710-DVR

Page 1: ...7 Digital Quad View Color Monitor with Built in DVR Instruction Manual RVS 3710 DVR ...

Page 2: ...ntroduction 10 System Display 11 Login 12 MainMenu 13 General Settings 14 Video Settings 15 Record Settings 16 Alarm Control 17 Motion Detection 18 Monitor Display 19 Advanced Options 20 Display Settings 21 User Accounts 22 Modify Access 23 File Backup 24 25 Format 26 G Sensor 27 Video Playback 28 29 Warranty 30 Disclaimer 31 RearViewSafety 2 ...

Page 3: ...ed as a supplement aid to your standard rear view mirror that already exists in your vehicle The Backup Camera System should not be used as a substitute for the standard rear view mirror or for any other mirror that exists in your vehicle In some jurisdictions it is unlawful for a person to drive a motorvehicleequippedwithaTVviewerorscreenlocatedforwardof the back of the driver s seat or in any lo...

Page 4: ...erly Use of this system is not a substitute for safe proper or legal driving Neverbackupwhilelookingatthe monitor alone You should always check behind and around the vehi cle when backing up in the same way as you would if the vehicle did not have the RearView Camera System Ifyoubackupwhilelooking only at the monitor you may cause damage or injury Always back up slowly The Rear View Camera System ...

Page 5: ...wercablemaytouch a metal case cover the cable with friction tape A short circuit or disconnected wire may cause a fire While installing the Rear View System be careful with the wire positioning in order to avoid wire damage The RearView System should only be used when the vehicle is in reverse Do not watch movies or operate the monitor while driving as it may cause an accident Do not install the m...

Page 6: ... CONSEQUENTIAL DAMAGES OF ANY NATURE OR LOSSES OR EXPENSES RESULTING FROM ANY DEFECTIVE PRODUCT ORTHE USE OF ANY PRODUCT SAFETY INFORMATION Ifyouhavequestionsaboutthisproduct contact RearViewSafety 1797AtlanticAvenue Brooklyn NY11233 Tel 1 800 764 1028 RearViewSafety 6 ...

Page 7: ...ddoingabenchmarktestbeforeinstallation toinsurethatallcomponentsareworkingproperly Step 1 Choose the monitor and camera locations Step 2 Install all cables in vehicle when necessary a 0 8 20mm hole should be drilled for passing camera cable through vehicles walls Install split grommets where applicable Step3 Onceallcablesandwiringhavebeenproperlyrouted perform a system function test by temporarily...

Page 8: ...RODUCTION SystemIntroduction 1 USB Port Connect external mouse USB drive 2 Removable Sunshade 3 Location of power harness 4 GPS Antenna Port 5 SD Slot System records onto SD Card sold separately RearViewSafety 8 ...

Page 9: ...ngOptions 1 7 Digital QuadView Color Monitor with Built in DVR 2 Power Harness 3 GPS Module 4 U Bracket with installation screws 1 2 3 1 Butterfly mounting bracket sold separately 2 U bracket 3 Vertical monitor mount 9 ReverseWithConfidence ...

Page 10: ...INTRODUCITON Power CH1 CH2 CH3 CH4 Split Button HOME POWER Turn on monitor Ch1 2 3 4 Toggle between channels Split Button Toggle between multiple viewing options Home Return to main interface RearViewSafety 10 ...

Page 11: ...SystemDisplay TouchScreen Below is the default interface Touch the lower middle part of screen to bring up shortcut menu options The shortcut menu options are Playback Event Monitor and System 11 ReverseWithConfidence ...

Page 12: ...GIN As shown below you need to enter the user name and password Press OK without entering a password you can set a password from the menu Pressing password field will display a keyboard RearViewSafety 12 ...

Page 13: ...MAIN MENU SystemSettings Items shown below in system settings General Settings Video Settings Re cord Settings Alarm setting Monitor Display and Return MainMenu 13 ReverseWithConfidence ...

Page 14: ...ttings to change system time then press set time to con firm DateFormat Togglebetweenyear month day month day year day month year Time Format Toggle 24 12 hour GPSTime When enabled GPS will determine time Time Zone Change time zone RearViewSafety 14 ...

Page 15: ... Bit Stream Ctr Toggle Fixed Stream Dynamic Stream Encode Quality Toggle best very good good medium poor worst Frame Toggle frames per second Bitstream Toggle 303 455 607 911 1214 1518kbps Overlay Toggle time plate chan GPS overlay ON OFF Set desired posi tion then press home to return to video settings 15 ReverseWithConfidence ...

Page 16: ... Look Recording Loop recording allows overwriting of SD card when full Toggle ON Off Loop Length Change length of each video segment toggle between 1 60 minutes Video Format Toggle PAL NTSC Schedule Rec Choose between stop rec manual rec auto rec RearViewSafety 16 ...

Page 17: ...nel DevType Select high level low level Alarm Delay Toggle delay time RecChannel Willbeginrecordingonselectedchannel s whenalarm occurs Periods ofTime Manually set times for alarms Alarm Output Choose between Screen Display I O Output AlarmControl 17 ReverseWithConfidence ...

Page 18: ...lect Channel Alarm Delay Toggle delay secs after start of the alarm prompt and video Region Select area of display to be included in motion detection Sensitivity Toggle motion detection sensitivity Rec Channel What channels will be recorded with motion detection RearViewSafety 18 ...

Page 19: ...lay Channel Name Adjust channel names RollingDisplay DisplayTime Turnonautomaticdisplaychangesand determine display time Full Page Two Page Toggle what channels are included PreviewTime Toggle time ON OFF 19 ReverseWithConfidence ...

Page 20: ...ADVANCED OPTIONS System Upgrade System must be updated with a USB device The system can be automatically restarted after the upgrade From the main menu select advanced options RearViewSafety 20 ...

Page 21: ... Restore Default Use this setting to restore factory settings Display Settings Adjust display settings Brightness Range 0 100 Contrast Range 0 100 Saturation Range 0 100 OutputVolume Range 0 15 21 ReverseWithConfidence ...

Page 22: ...USER ACCOUNTS UserAccounts Use this setting to modify password access ModifyPassword Enterthecurrentpassword confirmidentity enter the new password and confirm the password RearViewSafety 22 ...

Page 23: ...MODIFY ACCESS ModifyAccess Use this setting to adjust user permissions From the main menu select System Information 23 ReverseWithConfidence ...

Page 24: ...FILE BACKUP Version info From main menu select File Backup RearViewSafety 24 ...

Page 25: ...Delete Deletes selected video Clear Clears all video in backup box Backup Backup up all video files to device selected in detection box Back up the video retrieve it by time type or channel then click the search in the lower left corner to get started The successfully found vid eo appears in the gray box in the photo Click Add to move video to file backup display 25 ReverseWithConfidence ...

Page 26: ...rom the main menu select format WithoutaharddiskorSDcard thereisnoharddiskcapacity information As shown above Press format to format hard disks and SD cards From the main menu choose Vehicle Settings RearViewSafety 26 ...

Page 27: ...G SENSOR Enter vehicle number company name license number driver s name and line number G Sensor 27 ReverseWithConfidence ...

Page 28: ...ra can detect an impact and will activate event mode The footage recorded during Event Mode will not be overwritten This ensures that you ll be able to pull up these recordings when you need them Toggle threshold and recording ON OFF From the main menu select Video Playback RearViewSafety 28 ...

Page 29: ...interface can be freely adjusted according to the progress bar The function keys from left to right are pause play stop rewind normal fast forward volume adjustment return to video playback menu channel display four channel display hide progress bar return to the main menu Video playback interface of a channel display shown above 29 ReverseWithConfidence ...

Page 30: ... INC SYSTEM AFTER PARTIAL FAILURE OR USEWITH IMPROPER ACCESSORIES WARRANTY PERFORMANCE DURINGTHE ABOVEWARRANTY PERIOD SHOULDYOUR REARVIEW SAFETY PRODUCT EXHIBIT A DEFECT IN MATERIAL ORWORKMANSHIP SUCH DEFECTWILL BE REPAIREDWHEN THE COMPLETE REAR VIEW SAFETY INC PRODUCT IS RETURNED POSTAGE PREPAID AND INSURED TO REARVIEW SAFETY INC OTHERTHANTHE POSTAGE AND INSURANCE REQUIREMENT NO CHARGEWILL BE MAD...

Page 31: ...AFETY AND OR ITS AFFILIATES SHALL HAVE NO RESPONSIBILITY OR LIABILITY FOR DAMAGE AND OR INJURY RESULTING FROM ACCIDENTS OCCURRING WITH VEHICLES HAVING SOME OF REARVIEW SAFETY PRODUCTS INSTALLED AND REARVIEW SAFETY AND OR ITS AFFILIATES THE MANUFACTURER DISTRIBUTOR AND SELLER SHALL NOT BE LIABLE FOR ANY INJURY LOSS OR DAMAGE INCIDENTAL OR CONSEQUENTIAL ARISING OUT OFTHE USE OR INTENDED USE OF THE P...

Page 32: ...If you have any questions about this product contact RearViewSafety Inc 1797AtlanticAvenue Brooklyn NY11233 800 764 1028 BetterCameras BetterService IT SOURGUARANTEE ...

Reviews: