background image

6

ENGLISH

RCF S.P.A. THANKS YOU FOR PURCHASING THIS PRODUCT, WHICH HAS BEEN 
DESIGNED TO GUARANTEE RELIABILITY AND HIGH PERFORMANCES.

This device can be either installed into a 19” rack cabinet (1 unit) thanks to its rack ears or 
put on a desk (after taking its rack ears off by removing the 4 screws on each side).


-

Use 2 new AAA (1.5 V) non-rechargeable batteries, better if alkaline.


-

Do NOT use old and new batteries at the same time.


-

Do NOT put together different models of batteries.


-

Do NOT attempt to charge non rechargeable batteries. 


-

Verify the polarity of batteries is correct (inserted properly, following the indication on 
the relevant compartment). 


-

Remove batteries when empty or in the case the device will not be used for a long time. 


-

Do NOT short-circuit batteries (i.e. connecting the 2 opposite poles together with 
metallic wires).


-

Throw empty batteries into dedicated garbage cans, according to your country laws 
about ecology and environment protection.

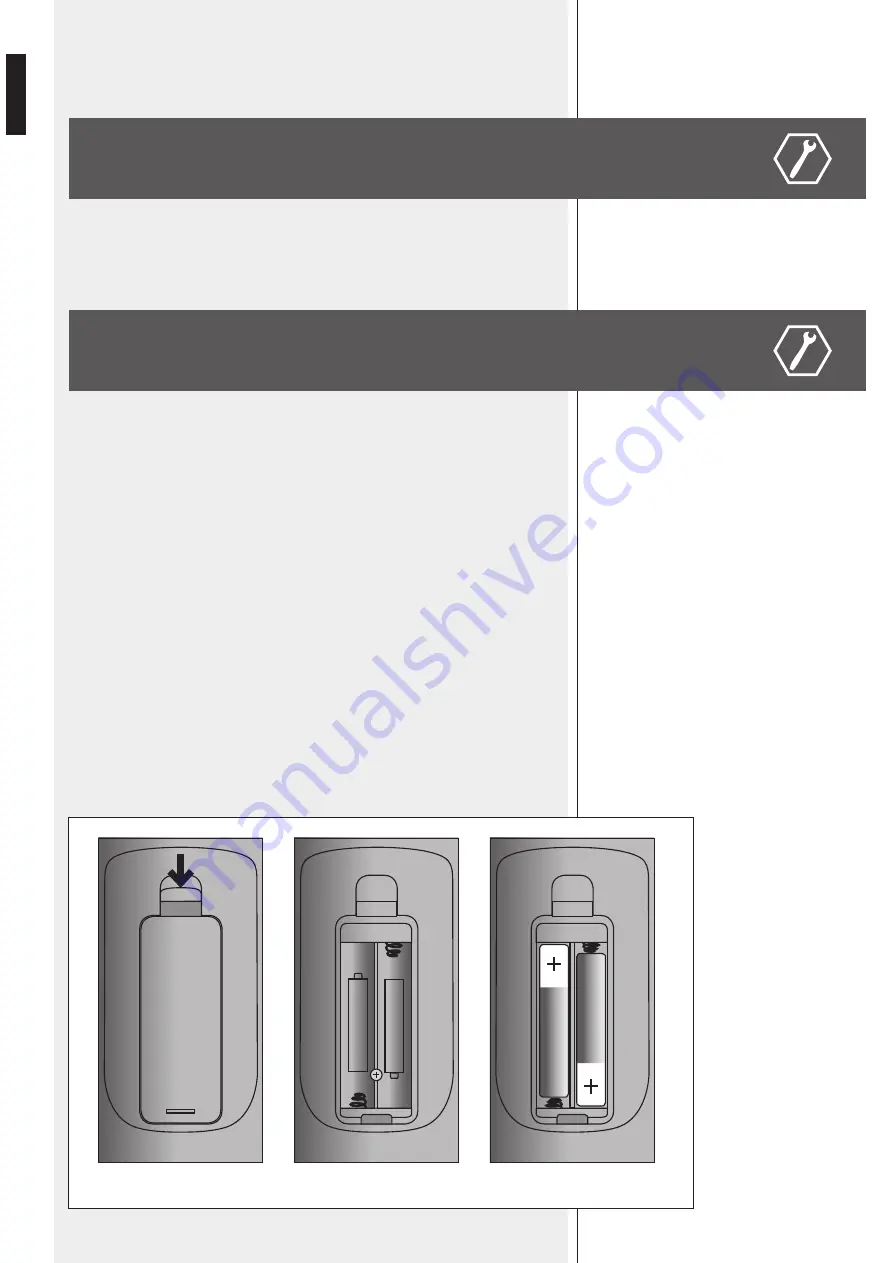
The battery compartment is on the bottom of the remote control rear side.
Push (slightly) the lever and pull the battery compartment cover to remove it (picture 1).
Remove old batteries (if present), by raising them from their positive pole. 
The right polarity is indicated in the battery compartment (picture 2).
Insert 2 new AAA type (1.5 V) non-rechargeable batteries, better if alkaline. Assure the 
polarity is correct when inserting. Battery insertion: first push its negative pole against the 
compartment spring, then push down its positive pole (to fix the battery; picture 3).

INSTALLATION

INSERT / REMOVE / CHANGE 

THE REMOTE CONTROL BATTERIES

PICTURE 1

AAA 1,5 -

- AAA 1,5 +

PICTURE 2

PICTURE 3

Summary of Contents for MS 1033

Page 1: ...OWNER MANUAL MANUALE D USO MS 1033 CD AUDIO MP3 PLAYER ON CD USB FLASH DRIVES SD CARDS TUNER LETTORE CD MP3 SU CD CHIAVI USB FLASH DRIVE MEMORIE SD SINTONIZZATORE RADIO...

Page 2: ...the user needs to access 3 Make sure that no objects or liquids can get into this product as this may cause a short circuit This apparatus shall not be exposed to dripping or splashing No objects fill...

Page 3: ...y and avoid putting them close to Equipment that produces high intensity electromagnetic fields for example high power transformers Mains cables Loudspeaker lines 13 Situate this product far from any...

Page 4: ...ed for a long time Do NOT short circuit batteries i e connecting the 2 opposite poles together with metallic wires Throw empty batteries into dedicated garbage cans according to your country laws abou...

Page 5: ...electronics It plays both audio tracks and MP3 files on compact discs CD CD R CD R W It plays MP3 files only on USB flash drives and Secure Digital SD cards this port is also compatible for MultiMedi...

Page 6: ...egins again press it twice quickly to select the previous track press more times to select other tracks press and hold for fast reversing 8 SKIP CUE In stop mode press to select the next track MP3 fil...

Page 7: ...play mode WHEN USING AN AUDIO CD PLAY ALL default mode it plays all track once respecting the original CD sequence REPEAT TRACK it continuously repeats the same track REPEAT ALL it continuously repea...

Page 8: ...s If pressed and held the frequency continuously increases when released the tuner will automatically tune itself to the first found station 23 MEMORY This key can be used to store the preferred stati...

Page 9: ...CD VOL CD OUT 34 volume control 32 TUNER OUT FM tuner stereo audio output 33 PRIORITY Stereo audio output common for both the FM tuner and the CD MP3 player The CD MP3 player signal has priority when...

Page 10: ...or the MP3 file PLAY PAUSE It switches play pause of the selected tracks files STOP It stops the track file play and completely clears the sequence when program ming PROG Programming mode a sequence...

Page 11: ...Compact disc ejection MUTE Press once to mute the CD player Press again to reset its normal volume level CD TUNER It toggles the control from the CD MP3 player to the tuner PLAY 1 After pressing this...

Page 12: ...station DOWN If pressed for a while the frequency decreases of 0 05 MHz manual search If pressed for more than a second and then released the previous station is automatically searched to lower freque...

Page 13: ...ssible to search a folder by using the FOLDER 14 FOLDER 13 keys or a file by using the SKIP CUE 8 and SKIP REV 7 Press the PLAY key 10 to start the play mode Information if available about the played...

Page 14: ...IO CD Press the PROG key 6 to enter the programming mode Choose the first track within 15 seconds by using the SKIP CUE 8 and SKIP REV 7 keys i e track no 4 Press the PROG key 6 to confirm and proceed...

Page 15: ...on is automatically searched If pressed and held the frequency continuously increases decreases After finding your favourite station this can be directly stored to 1 of the first 10 presets press MEMO...

Page 16: ...ION 1 KHZ 0 DB SIGNAL NOISE RATIO POWER SUPPLY AC DIMENSIONS W X H X D NET WEIGHT TUNING FREQUENCY RANGE SENSITIVITY IMAGE REJECTION RATIO AUDIO OUTPUT VOLTAGE AUDIO STEREO SEPARATION TOTAL HARMONIC D...

Page 17: ...many tel 49 2203 925370 e mail germany rcf it RCF Spain tel 34 91 817 42 66 e mail info rcfaudio es RCF Belgium tel 32 0 3 3268104 e mail belgium rcf it RCF USA Inc tel 1 603 926 4604 e mail info rcf...

Reviews: