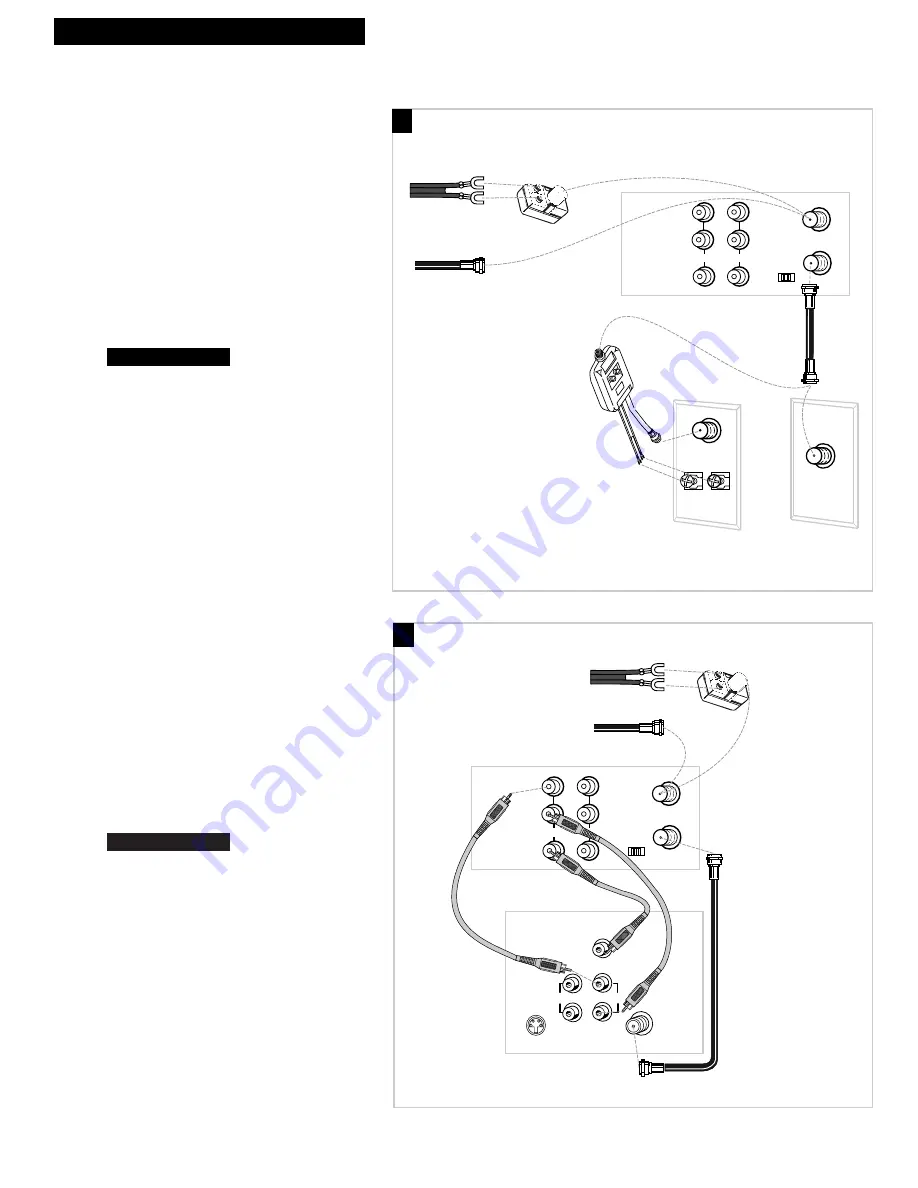
background image

A. Basic hookup.

Use this hookup for a simple connection
which requires fewer accessories.

1

. Set the 

3CH.4

switch on back of VCR to

either channel 3 or 4.

Tune the TV to this channel and use the

TV•VCR

button to watch the VCR.

2

.

Connect as shown.

This connection may require additional
accessories not provided.

3

. Plug in power cords of VCR and TV.

4.

B. Advanced hookup.

Use this hookup for slightly improved
picture quality, Hi-Fi, stereo playback and
more convenient operation Ñ use of the

TV•VCR

button is not required.

1.

Connect as shown.

This connection requires additional
accessories not provided. A Y-adapter may
be required to hear sound from both
channels if your TV is not stereo.

2

. Plug in power cords of VCR and TV.

3.

Tune the TV to its video input to watch the
VCR.
Set the 

AUTO TV/VCR

feature to 

OFF

See

page 10.

Continue to page 8.

Continue to page 8.

3

Hooking Up the VCR

OUT TO TV

IN FROM 
       ANT.

VHF/UHF

3 CH. 4

IN

AUDIO1

VIDEO1

R

L

OUT

Back of VCR

Back of TV

300/75 Ohm

 Adapter

OR 

From Antenna

 or Cable

Cable/

Antenna

OR 

VHF

UHF

RF Coaxial Cable

(supplied)

75 to 75/300 Ohm

Separator

Antenna or Cable System Without a Cable Box

OUT TO TV

IN FROM 
       ANT.

VHF/UHF

3 CH. 4

IN

AUDIO1

VIDEO1

Back of VCR

R

L

OUT

S-VIDEO

AUDIO

CABLE /
ANTENNA

L /

MONO

RIGHT

VIDEO

INPUT

IN

OUT

From Antenna

 or Cable

OR 

Back of TV

300/75 Ohm

 Adapter

RF Coaxial Cable

(supplied)

Audio/Video Cables

A

B

Summary of Contents for VR642HF

Page 1: ...USER S GUIDE VR642HF VIDEO CASSETTE RECORDER ...

Page 2: ...cal Please fill out the product registration card and return it immediately Returning this card allows us to contact you if needed Keep your sales receipt to obtain warranty parts and service and for proof of purchase Attach it here and record the serial and model numbers in case you need them The numbers are located on the back of the product Model No _____________________________________________...

Page 3: ...___________________ 17 Zero Search ______________________ 17 Blank Search _____________________ 18 Picture Search ____________________ 18 Slow Motion______________________ 18 Pause for Stop Action______________ 19 Frame Advance F ADV Button _____ 19 Automatic Tracking _______________ 19 Manual Tracking__________________ 19 TAPE PLAYBACK HI FI LINEAR M I X Feature________________________ 20 Recordi...

Page 4: ...A Outside antenna Ð Turn to page 3 B Rabbit ears set top and or bow tie antenna Ð Turn to page 3 C Cable System Ð Go to question 2 2 What type of Cable TV system do you have Choose one answer from below A Cable without a box Ð Turn to page 3 B Cable box to unscramble all the channels Ð Turn to page 4 C Cable box to unscramble only pay channels such as HBO Showtime Cinemax etc Ð Turn to page 5 You ...

Page 5: ...not provided A Y adapter may be required to hear sound from both channels if your TV is not stereo 2 Plug in power cords of VCR and TV 3 Tune the TV to its video input to watch the VCR Set the AUTO TV VCR feature to OFF See page 10 Continue to page 8 Continue to page 8 3 Hooking Up the VCR OUT TO TV IN FROM ANT VHF UHF 3 CH 4 IN AUDIO1 VIDEO1 R L OUT Back of VCR Back of TV 300 75 Ohm Adapter OR Fr...

Page 6: ... accessories 1 Set the 3CH 4 switch on back of VCR to either channel 3 or 4 Tune the TV to this channel and use the TV VCR button to watch the VCR 2 Connect as shown This connection may require additional accessories not provided 3 Plug in power cords of VCR TV and cable box 4 B Advanced hookup Use this hookup for slightly improved picture quality Hi Fi stereo playback and more convenient operatio...

Page 7: ...r may be required to hear sound from both channels if your TV is not stereo 2 Plug in power cords of VCR TV and cable box 3 Tune the TV to its video input to watch the VCR View all pay channels through the VCR Continue to page 8 Continue to page 8 5 Hooking Up the VCR Cable System With Cable Box to Unscramble Only Pay Channels such as HBO Showtime Pay Per View etc OUT TO TV IN FROM ANT VHF UHF 3 C...

Page 8: ...ugh 5 and then modify with this connection 2 Set the 3CH 4 switch on the playback VCR to either channel 3 or 4 Tune the recording VCR to this channel to receive the signal from the playback VCR 3 Connect as shown This connection may require additional accessories not provided 4 Plug in power cords of VCRs and TV 5 Option B hookup Use this hookup for slightly improved copy quality Hi Fi stereo play...

Page 9: ...h 5 and then modify with this connection 2 Connect as shown This connection requires additional accessories not provided 3 Plug in power cords of amplifier receiver VCR and TV 4 See ÒRecording Audio OnlyÓ on page 28 Select the line input on the VCR to receive the audio signal from the amplifier receiver Play back stereo tapes or receive a stereo broadcast through an amplifier receiver Connect your...

Page 10: ...d one of the advanced hookups tune the TV to the TVÕs video input See TV ownerÕs manual for details 4 Turn on the VCR Press POWER on the remote The POWER and VCR indicators light in the VCRÕs display panel appears in the clock area of the display panel Remote Stock No 221347 CLEAR MENU SPEED INPUT F ADV TRACKING STOP PLAY 1 2 3 5 4 6 7 9 8 0 PAUSE SLOW SEARCH REC FF REW CHAN POWER DISPLAY TV VCR P...

Page 11: ... the CHANNELS menu C Press 1 to begin AUTO CHANNEL SEARCH The VCR automatically selects the CABLE cable TV or ANTENNA signal To change the SIGNAL TYPE A Follow steps A B above B Press 3 to switch the SIGNAL TYPE between CABLE and ANTENNA 6 Add or remove channels from the VCR s memory You may want to add or remove channels if some of the channels are not active have weak signals or you do not want ...

Page 12: ...oes not light in the display panel Change channels using the TVÕs remote D Return the TV to the VCR viewing channel Ñ CH3 or CH4 E Press TV VCR to switch back to the picture from the VCR 9 Set the AUTO TV VCR feature Skip this step if you used one of the basic hookups If you connected your VCR using the TVÕs video input you can prevent the VCR indicator from turning on automatically and interrupti...

Page 13: ...ess 2 to display the TIME menu C Press 2 to select AUTO DST ON or OFF Select ON if you want the VCRÕs clock to automatically adjust for Daylight Saving Time Select OFF if you do not want the VCRÕs clock to automatically adjust for Daylight Saving Time In the Spring daylight saving time begins on the first Sunday in April Clocks are set forward one hour Because the clock automatically changes from ...

Page 14: ...u C Press 4 to select a FRONT PANEL mode Select AUTO to keep the display panel bright when VCR is on and dim when it is off Select BRIGHT to keep the display panel bright Select DIM to keep the display panel dim VCR MAIN MENU 1 TIMER RECORDINGS 2 TIME 3 CHANNELS 4 PREFERENCES PREFERENCES 1 REMOTE CONTROL VCR1 2 AUTO PLAY ON 3 AUTO TV VCR ON 4 FRONT PANEL AUTO 5 CA MARKING ON 6 CA PLAYBACK AUTO 7 C...

Page 15: ...s 0 through 9 Selects a channel up to 99Ñpress two numbers Selects a cable channel over 99Ñ press and hold 1 until 1 appears on the screen Then press the other two numbers PAUSE Pauses action for viewing during playback Pauses recording to prevent recording of unwanted scenes PLAY Plays a tape POWER Turns the VCR on and off PREV CH Previous Channel Switches between two channels Select one channel ...

Page 16: ...in the VCRÕs display panel 4 Press TRACKING up or down on the remote or the VCR to remove any streaks from the picture if necessary Details are on page 19 5 Press STOP EJECT on the VCR or STOP on the remote 6 Press REW on the VCR or the remote End of Tape The VCR automatically rewinds the tape if it reaches the end of the tape during playback Power Off If you press POWER while a tape is rewinding ...

Page 17: ...omatically rewind the tape and play the tape again 1 Press MENU on the remote to display the VCR MAIN MENU 2 Press 4 to display the PREFERENCES menu 3 Press 9 to display the SET AUTO REPEAT menu 4 Set the length of time you want the tape to play in a repeating loop Press CLEAR on the remote to correct the length Select a length of 0 00 with the CLEAR button if you do not want the tape to repeat Ej...

Page 18: ...it takes to record a program or play back a segment of a prerecorded tape It helps locate the beginning or end of programs you taped The time counter resets to 0 00 00 when the tape is ejected from the VCR For example if you record a 30 minute program at the beginning of the tape and you want to go to the end of that program to begin another recording you would 1 Insert the prerecorded tape 2 Pres...

Page 19: ...the index mark or marks is found the tape will begin playback 4 Follow the directions on the screen Zero Search The zero search feature allows the VCR to quickly return to a counter reading of 0 00 00 anywhere on the tape This is especially convenient when you want to watch a segment of the tape several times 1 Insert the prerecorded tape 2 Press DISPLAY twice to display only the time counter on t...

Page 20: ...Search 1 Press FF to search forward at a faster than normal speed 2 Press FF or PLAY to return to playback Rewind Search 1 Press REW to search backward at a faster than normal speed 2 Press REW or PLAY to return to playback Slow Motion You can view a tape in slow motion during play or play pause Sound is turned off during slow motion playback Slow motion works best in the SP or SLP speed 1 Press S...

Page 21: ...ch time you want to view a frame of the scene 3 Press PAUSE or PLAY on the remote or PLAY PAUSE on the VCR to resume normal playback Automatic Tracking The VCR has automatic tracking which adjusts the picture when you are playing back a tape recorded on another VCR Automatic tracking is turned on when a tape is inserted or the VCRÕs power is turned on Manual Tracking Occasionally you may need to m...

Page 22: ...u on the TV screen 3 Press 2 to switch between HI FI LINEAR or MIX sound Select HI FI to play back sound recorded on the Hi Fi track and for normal use The Hi Fi indicator lights in the VCRÕs display panel Select LINEAR to play back the sound recorded on the linear track such as a second audio program SAP The Hi Fi indicator turns off in the VCRÕs display panel Select MIX to play back the sound re...

Page 23: ... 3 Make sure CA MARKING is set to ON If not press 5 The VCR will mark most commercials for the following types of recording VCR Plus Timer or One Touch Recording The VCR will automatically mark the commercials after the power is turned off Manual Recording When you press STOP to stop recording the VCR will ask you if you want to mark the commercials Just follow the on screen display MARK and COMM ...

Page 24: ...others or a commercial is longer than one minute Press FF to scan through the commercial It is possible that part of a recorded program might be skipped if the program segment is between commercials and less than one minute or there are frequent dark and quiet scenes If part of the program is skipped rewind the tape to the beginning of the skipped program segment and press PLAY Select MANUAL and t...

Page 25: ...h its safety tab in place 2 If you are using one of the basic hookups make sure the VCR indicator lights in the VCRÕs display panel If not press TV VCR to turn it on 3 Use SPEED on the remote to select a recording speed The tape speed indicator appears on the TV screen 4 Select the channel to be recorded The channel number appears in the VCRÕs display panel and on the TV screen 5 Press RECORD on t...

Page 26: ...isplay panel During recording press RECORD on the VCR or REC on the remote to display the time remaining on the TV screen Press RECORD or REC again to increase the recording time Stopping an Express Recording in Progress You can stop a recording by Pressing and holding the STOP button on the remote or STOP EJECT on the VCR for approximately three seconds Pressing the RECORD button until 0 00 is di...

Page 27: ...el number or INPUT on the remote to select line input start time including AM or PM end time start date and recording speed of the recording Follow the on screen prompts Press CLEAR on the remote to correct an entry 6 Press MENU to enter your program If you have entered two programs whose times overlap PROGRAMS OVERLAP appears on the screen 7 Repeat steps 3 6 for additional programs and follow the...

Page 28: ...el number position Checking or Clearing Timer Recordings 1 Press MENU on the remote to display the VCR MAIN MENU 2 Press 1 to display the TIMER RECORDINGS menu 3 Press 2 to display the programÕs menu 4 Press MENU for next program or CLEAR to erase the program Recording While You re Away Timer Recording PROGRAM 1 ONE TIME CHANNEL VIDEO START TIME END TIME START DATE TAPE SPEED SLP PRESS CLEAR TO CO...

Page 29: ... the type of audio RECEPTION STEREO MONO or SAP Select STEREO for normal and stereo broadcast TV recording The STEREO indicator lights in the VCRÕs display panel when the station you are tuned to is broadcasting stereo Select MONO if the stereo signal is weak and the sound is too Ònoisy Ó Select SAP to record SAP second audio program on the linear track The SAP indicator lights in the VCRÕs displa...

Page 30: ...your amplifier or receiver userÕs guide for information Using the Recording Features Recording Pause To prevent recording short passages of unwanted material use PAUSE on the remote or PLAY PAUSE on the VCR during recording to stop and start recording D and Pappear in the VCRÕs display panel The VCR automatically switches from pause to stop after a few minutes Pro Tect Plus Child Lock Feature This...

Page 31: ...layback VCR by using FWD REW and PLAY Press PAUSE on the playback VCR Press PAUSE at the same time on both VCRs to resume copying 9 Press STOP EJECT on both VCRs when you are finished You may turn off the TV after the recording has started as it does not have to be on to copy a tape Copying and Editing Tapes Using Compatible Remote If you have a compatible RCA ProScan or GE remote with VCR1 and VC...

Page 32: ...g playback STOP EJECT Stops the normal functions such as record playback rewind fast forward or pause Press when the VCR is stopped to eject the cassette TV VCR Switches the picture signal so that it either comes from the VCR or the TV channel See page 10 Front Panel Tape Compartment Remote Sensor Back Panel 3CH 4 Switch Selects the channel to which you tune the TV to see the VCR picture if you co...

Page 33: ...P Auto repeat REW Rewind STOP Stop STEREO Indicator Lights when the station you are tuned to is broadcasting stereo Time Counter Time Status Channel Number Line Input L Shows the diplays for the time counter time status channel number line input L Press DISPLAY on remote to show these indicators Also press DISPLAY to switch between the current time and elapsed time counter DIndicator Lights when V...

Page 34: ...380 mm 11 2 inches deep 285 mm Weight 8 4 pounds 3 8 kg Storage Temperature Range 22ûF to 149ûF Operating Temperature Range 41ûF to 104ûF Check your cable companyÔs compatibility requirements Cleaning the VCR Use a soft cloth or dusting attachment of your vacuum cleaner to dust your VCR Remove dust from the ventilation holes on the top back sides and bottom of the cabinet Plastic surfaces are easi...

Page 35: ... 3 minute commercial break is scanned through in approximately 8 12 seconds In SP it takes about 25 35 seconds Yes The recorded program including commercials can be viewed by setting the CA Playback feature to MANUAL Simply rewind the tape to just before the skipped segment and press PLAY to view the program Yes If the CA Playback feature is set to AUTO the marked commercials should be skipped eac...

Page 36: ...tch on back of VCR Check TVÕs fine tuning Check video cable connections between VCR and TV monitor Set TV monitor to video input channel Try another tape Some snow streaks are normal during search stop action frame advance and slow motion playback Press the TRACKING button on the remote or the VCR to move streaks for the best picture Check tape Ñ it may be worn out or of poor quality The time coun...

Page 37: ...casting stereo or SAP Tape already rewound Cable box was not turned on at time recording was to begin Program entered incorrectly wrong channel or times Power interruption Reset clock See page 11 Check to see if time and date are correct Ñ including AM PM Program exceeded tapeÕs length or tape was not rewound beforehand VCR was not turned off at the time recording was to start No tape in VCR or ca...

Page 38: ...cover Customer instruction Your OwnerÕs Manual clearly describes how to install adjust and operate your VCR Any additional information should be obtained from your Dealer Installation and related adjustments Signal reception problems not caused by your VCR Damage from misuse or neglect Cleaning of video audio heads Remote control batteries A VCR that has been modified or incorporated into other pr...

Page 39: ... Recording 23 24 OUT TO TV Connector 3 6 31 PAUSE Button 13 19 26 27 Pause for Stop Action 19 Pause Recording 26 Picture Search 18 PLAY Button 13 14 17 19 27 PLAY PAUSE Button 14 18 19 26 31 Playing a Tape 14 20 POWER Button 8 13 14 26 31 Power Indicator 8 32 PREV CH Previous Channel Button 13 Problems Solving 34 35 Product Registration i Pro Tect Plusª Feature 26 Product Registration i REC Button...

Page 40: ...uct If you would like a copy of this manual in French please follow the instructions below Si un livret d instructions en français n est pas inclus avec votre appareil vous 30 en obtenir un indiquer le numéro de modèle votre nom et votre adresse en vous adressant à Thomson Consumer Electronics Attention Canadian Operations P O Box 0944 Indianapolis IN 46206 0944 10330 North Meridian Street Indiana...

Reviews: