background image

10330 N. Meridian St.
Indianapolis, IN 46290

©2001 Thomson multimedia Inc.
Trademark(s) ® Registered
Marca(s) Registrada(s)
Printed in USA

TOCOM 15739310

Please do not send any products to the address listed in this manual or on the carton. This will only add delays in service for your product.

Thomson


multimedia


Inc.

Summary of Contents for Scenium PHD50300

Page 1: ... PHD50300 ...

Page 2: ......

Page 3: ...delines for proper grounding and in particular specifies that the cable ground shall be connected to the gr ounding system of the building as close to the point of cable entry as practical FCC Information FCC Regulations state that unauthorized changes or modifications to this equipment may void the user s authority to operate it This equipment has been type tested and found to comply with the lim...

Page 4: ...sons attempt service or open the back cover Refer all service to authorized Service Centers To avoid damage and prolong operating life 1 Use only with 120V 50 60Hz AC power supply Continued operation at line voltages gr eater than 120 Volts AC will shorten the life of the unit and might cause a fire hazard 2 Handle the unit carefully when installing it 3 Locate set away from heat excessive dust an...

Page 5: ...Batteries 15 Programming the Remote 15 Find Out If You Need to Program the Remote 15 How to Program the Remote 16 Using Automatic Code Search 16 Using Direct Entry 17 How To Use the Remote Control After You ve Programmed It 17 Programmable Codes for the Remote Control 18 The Menu System 21 Basic Operations 22 Power 22 Volume 22 Mute 22 Navigating the Menus 22 The Multi Screen Feature 23 Selecting ...

Page 6: ...ng the Monitor to the correct HD Receiver Mode 40 Setting the Picture Size for RGB input signals 40 The SETUP Menu 41 Confirming the Frequencies Polarities mode and resolution of Input Signals 41 Selecting the Language for the Menus 42 Setting the Video Signal Format 42 The AUTOTUNING SETUP Menu 43 Autotuning the Component Buttons on he Remote Control 43 SLEEP TIMER 44 Setting the Sleep Timer 44 C...

Page 7: ...Connections and Setup Chapter Overview Contents of the Package Part Names and Functions Battery Installation Connections A Quick Tour of the Remote Control Chapter 1 ...

Page 8: ...tings attach to the back of the scr een and can then be used to secur e the monitor to the wall with str ong wire Contact your trained authorized dealer for pr ofessional installation In order to conform to mandatory FCC standar ds you must attach the supplied ferrite cor es to both ends of the power cable see below If you are connecting a computer to the monitor you must attach the ferrite cor es...

Page 9: ...p and down and 3 LEFT AND RIGHT When Zoom mode is on pr ess OK on the remote to turn ZOOM on and bring up the zoom icon press Right to enlarge the image or Left to reduce the image When a menu is being displayed used to navigate through menu and 1 2 3 4 5 4 INPUT GO BACK Switches the input in the following order Note You can set up CMPNT1 or RGB2 but not both When an on screen menu is being displa...

Page 10: ...N Connect the included power cor d here 3 VIDEO 1 2 3 Connect VCRs DVDs Laser discs etc here 4 AUDIO1 AUDIO2 AUDIO3 Connect audio her e 5 CMPNT1 Connect Laser discs etc her e 6 RGB1 Connect HD r eceiver here 7 BNC SELECT RGB2 Inputs the analog RGB signal CMPNT2 Connect DVDs Laserdiscs etc here 8 RGB3 DVI 29pin Inputs a digital RGB signal 9 CONTROL LOCK When CONTROL LOCK is in the ON position the b...

Page 11: ...he HD MONITOR OUT jack on the back of your HD r eceiver to the RGB1 HD MONITOR IN AUDIO1 IN jack on the back of the monitor If your HD receiver does not have the type of jack pictur ed on the right connect your HD receiver using the component video jacks and RCA cable For more information on HD receiver connections see your HD r eceiver user s manual The Back of the HD Receiver ANTENNA B IN ANTENN...

Page 12: ...el connections corr ect for stereo sound 4 Turn on the monitor and the VCR or laser disc player NOTE Refer to your VCR or laser disc player user s manual for more information about your equipment s video output requirements Connecting Your DVD Player RCA cables audio video cables are sold as a bundled set To connect your monitor to a DVD player 1 Turn off the power to the monitor and DVD player 2 ...

Page 13: ...VIDEO 2 VIDEO 3 VIDEO INPUTS CONTROL LOCK on off RGB 1 HD MONITOR IN REMOTE CONTROL EXTERNAL CONTROL L MONO R AUDIO 1 RGB 3 DIGITAL RGB R G B CR Y CB PR Y PB H SYNC V SYNC BNC SELECT RGB 2 CMPNT 2 L MONO R AUDIO 2 L MONO R AUDIO 3 CR Y CB Y PB PR CMPNT 1 VIDEO 1 VIDEO 2 VIDEO 3 VIDEO INPUTS CONTROL LOCK on off RGB 1 HD MONITOR IN REMOTE CONTROL EXTERNAL CONTROL L MONO R AUDIO 1 RGB 3 DIGITAL RGB R...

Page 14: ... To connect external speakers directly to the monitor 1 Strip the ends of the speaker wir es 2 Press down the tabs below the speaker ter minals and insert the speaker wir e and release the tab to secur e the speaker wire connection a Connect the right speaker located at right side of the monitor when viewed fr om the front positive wire to RIGHT b Connect the right speaker negative wir e to RIGHT ...

Page 15: ...wing CMPNT Toggles between CMPNT1 and CMPNT2 inputs GO BACK In HD r eceiver mode returns you to the pr evious channel When in the menu system r eturns you to the pr evious menu GUIDE In HD r eceiver mode brings up the on scr een program guide INFO Brings up channel infor mation INPUT Changes the video input MENU Brings up the on scr een menu MONITOR Turns the power to the monitor on and puts the r...

Page 16: ...or RGB or Autotuning must be set up VOL VOL Adjusts the volume VIDEO Selects whatever component is hooked up to the video sour ce inputs WHO MULTI When in Monitor mode activates the multi scr een feature The Multi screen feature allows you to select a scr een mode for viewing a single picture side by side pictures or picture in picture PIP Brings up personal viewer profiles for some components ZOO...

Page 17: ...amming the Remote The universal remote control that came with your monitor is alr eady programmed to operate most RCA GE and PROSCAN VCRs DVD players laserdisc players and satellite r eceivers This remote is also capable of operating many other brands of r emote controllable electronic components but you must pr ogram it to do so Find Out If You Need to Program the Remote To determine whether the ...

Page 18: ...the r emote turns on release both buttons Note Automatic Code Search can t be used with the AUX button 3 Press PLAY the red light on the r emote starts flashing The remote is searching the first set of component codes ther e are several sets of codes If the component you want to operate doesn t turn off automatically after 5 seconds pr ess PLAY again the red light starts flashing again as the r em...

Page 19: ...the remote commands If it doesn t try pressing the component button and then ON OFF again 6 If you get no r esponse repeat these steps using the next code listed for your brand until the component responds to the remote commands How To Use the Remote Control After You ve Programmed It Once the remote control has been programmed successfully you re ready to use it to operate other components 1 Pres...

Page 20: ...018 2058 2111 Zenith 2004 2098 2104 2119 2128 Cable Box AUX or HD RCVR button ABC 5002 5003 5004 5005 5006 5007 5053 Antronix 5008 5009 Archer 5008 5009 5010 5011 Cabletenna 5008 Cableview 5008 Century 5011 Citizen 5011 Colour Voice 5012 5013 Comtronics 5014 5015 Contec 5016 Eastern 5017 Garrard 5011 GC Electronics 5009 Gemini 5018 5019 5049 General Instrument 5003 Hamlin 5020 5021 5022 5035 5045 ...

Page 21: ...al 5008 5009 5010 5011 Videoway 5044 Viewstar 5015 5025 5027 5040 Zenith 5026 5050 5051 Satellite Receiver HD RCVR or AUX button Chapparal 5056 5057 Drake 5058 5059 GE 5000 5001 General Instuments 5060 5061 5062 Panasonic 5075 Primestar 5076 PROSCAN 5000 5001 RCA 5000 5001 Realistic 5063 Sony 5072 STS1 5064 STS2 5065 STS3 5066 STS4 5067 Toshiba 5068 Toshiba 5073 Uniden 5069 Audio AUX button only F...

Page 22: ...This page intentionally left blank ...

Page 23: ...The Menu System Chapter Overview Basic Operations The Picture Quality Menu The Audio Menu The Screen Menu The Function Menu The Options Menu The Setup Menu The Auto Tuning Menu The Sleep Timer Chapter 2 ...

Page 24: ...r emote control to reduce the sound to an inaudible level Pr ess MUTE again to restore the sound INFO MENU OK CLEAR GUIDE ZOOM These are the buttons on the remote you use to navigate through the monitor s on screen menu system Navigating the Menus You can adjust monitor options thr ough the monitor s menu system T o access the main menu pr ess the MENU button on the r emote control or MENU OK on t...

Page 25: ... selected use the left right arr ow buttons to position the subscr een as shown below VIDEO2 VIDEO1 VIDEO2 VIDEO1 subscreen VIDEO2 VIDEO1 subscreen main screen VIDEO2 VIDEO1 subscreen main screen Side by side 1 VIDEO1 is the active picture Side by side 2 VIDEO1 is the active picture Picture in picture window on the left VIDEO1 is the active picture Picture in picture window on the right VIDEO1 is ...

Page 26: ...EO2 as the active picture On Screen Menu Operation To access the main menu pr ess the MENU button on the r emote The MAIN MENU is displayed on the screen The main menu contains a list of all the menus that contr ol your monitor To select a menu use the up down arr ow buttons on the r emote to highlight the desir ed menu When the desired menu is highlighted pr ess the OK or MENU button to select No...

Page 27: ...ITY AUDIO SCREEN FUNCTION OPTIONS SETUP AUTOTUNING SETUP OK EXIT This is the main menu with the PICTURE QUALITY option highlighted Press OK to bring up the highlighted menu 1 From the main menu select PICTURE QUALITY The PICTURE QUALITY Menu will appear 2 Highlight the PRESETS option and pr ess the key on the r emote to select it The PRESETS window appears 3 Use the button on the r emote to select...

Page 28: ...Y NORMAL LOW PICTURE QUALITY SEL ADJ CONTRAST BLACK LEVEL SHARPNESS COLOR TINT PRESETS COLOR TEMP NOISE REDUCE R G RETURN 1 Use the or button to highlight the CONTRAST option Pr ess the button to select it The CONTRAST window appears Use and buttons to adjust the contrast NOTE If you don t push the or button within 5 seconds the current setting is accepted and the previous screen reappears 2 Once ...

Page 29: ...appears It allows individual setting of white and dark balance for each color r ed green and blue GAIN This adjusts the color balance for light bright colors BIAS This adjusts the color balance for dark colors To change the white balance GAIN setting 1 Highlight the RED GREEN or BLUE GAIN option and pr ess the button The GAIN scr een for that color appears 2 Adjust the balance using the and keys N...

Page 30: ...ct The settings switch as follows when the button is pressed This is the PICTURE QUALITY menu with the NOISE REDUCE noise reduction option highlighted This is the NOISE REDUCE noise reduction screen To change the noise r eduction setting 1 From the PICTURE QUALITY menu highlight the NOISE REDUCE option and select it by pr essing the button The NOISE REDUCE SCREEN is displayed 2 Use the and buttons...

Page 31: ...To access the AUDIO menu This is the AUDIO menu with the BASS option highlighted Press the right arrow button to select it AUDIO SEL ADJ BASS TREBLE BALANCE L R RETURN 1 From the main menu highlight and select the AUDIO option The AUDIO menu is displayed 2 Use the and arrow buttons on the r emote to highlight an option for example BASS 3 Use the and buttons to adjust to the desir ed setting 4 You ...

Page 32: ...ear on the right and left sides of the pictur e Note If viewing with a 4 3 aspect ratio for long periods of time set side gray level at 3 or 4 FULL expands the picture in the horizontal dir ection only This option corrects the aspect ratio of images that have been compr essed or horizontally squeezed STADIUM expands in both the horizontal and vertical dir ections but varies the amount of str etch ...

Page 33: ...s the GO BACK button on the remote to return to the SCREEN menu The V HEIGHT and H WIDTH options expand and contract the size of the picture to fill the scr een For example if the pictur e is slightly wider than the screen you can use the H WIDTH option to shrink the pictur e horizontally Note These options are not available in STADIUM mode To adjust the screen size 1 Select the desired option fro...

Page 34: ... the menu system Adjusting the Position of the Menu Display The on screen menus can de displayed in dif ferent positions on the screen There are a total of nine possible positions shown in the grid on the right To adjust the position of the on scr een menus 1 From the main menu highlight and select the FUNCTION option The FUNCTION menu is displayed 2 Highlight and select the MENU ADJUST option Use...

Page 35: ...WER SAVER GRAY LEVEL FILM MODE RGB3 ADJ SCREEN SAVER RESET RETURN Setting the POWER SAVER for Computer Images The POWER SA VER function can be used when the signal sour ce to the monitor comes from a computer conforming to the VESA DPMS for mat This function automatically reduces the monitor s power consumption if no operation is performed for a certain amount of time POWER SA VER can be turned on...

Page 36: ...e There is some amount of flickering that occurs in an image when it is transferred from film to video ON All images are displayed in film mode OFF Film mode is of f To turn FILM MODE ON 1 From the main menu highlight and select FUNCTION The FUNCTION menu is displayed 2 Highlight the FILM MODE option 3 Use the button to scroll through the three modes until ON is displayed 4 Press the button to ret...

Page 37: ... ar ound the screen intermittently to reduce the effects of phosphor aging The INVERSE function works in RGB mode only INVERSE inverts the video signal playing the image in a negative for mat Setting the PLE PLE has two options AUTO luminance level contrast is nor mal LOCK dims picture to reduce phosphor aging The factory setting is AUTO Setting the PLE option to LOCK dims the picture the contrast...

Page 38: ...NVERSE INVERSE has three options ON The picture is alternatively displayed as a positive and negative image OFF INVERSE is of f WHITE The screen turns white The factory setting is OFF To change the INVERSE mode 1 From the main menu highlight and select FUNCTION The FUNCTION menu is displayed 2 Highlight and select the SCREEN SA VER option 3 Highlight the INVERSE option 4 Use the button to select y...

Page 39: ...in all menus including autotuning configuration settings To reset to the factory default settings 1 From the main menu highlight and select FUNCTION The FUNCTION menu is displayed 2 Highlight the RESET function and pr ess OK 3 The RESET screen is displayed 4 Use the or button to highlight the RESET option and pr ess OK or MENU The RESET scr een will display the message NOW RESETTING When the setti...

Page 40: ...ions 3 Use the button to scroll through the available video sour ces The modes scroll as follows 4 When the desired mode is selected pr ess the button to return to the OPTIONS menu items Y ou can continue making adjustments within the OPTION menu pr ess GO BACK to r eturn to the previous menu or press MENU or CLEAR to exit the menu system The factory defaults are as follows AUDIO1 VIDEO1 AUDIO 2 C...

Page 41: ... line signal with a horizontal fr equency of 31 0kHz DTV This mode is primarily used to optimize pictur e quality if you ar e using a generic brand DTV r eceiver which outputs signal at 480P progressive scan lines VIDEO1 CMPNT1 RGB1 RGB2 AUTO 1080A ON OPTIONS SEL ADJ AUDIO INPUT AUDIO1 AUDIO2 AUDIO3 BNC SELECT RGB SELECT HD SELECT PICTURE SIZE RETURN This is the OPTIONS menu with the RGB SELECT op...

Page 42: ...TIONS menu items Y ou can continue making adjustments within the OPTIONS menu pr ess GO BACK to r eturn to the previous menu or press MENU or CLEAR to exit the menu system Setting the Picture Size for RGB Input The PICTURE SIZE option is used to adjust the pictur e size when the input signal is RGB Use this featur e for graphic arts and checking photos In TRUE mode ther e is no distortion of the p...

Page 43: ...e frequencies polarities mode and r esolution of the signals coming from a computer To confirm frequencies polarities mode and r esolution This is the SETUP menu with the FREQUENCY option highlighted This is the FREQUENCY screen SETUP SEL FREQUENCY MENU LANGUAGE COLOR SYSTEM OK RETURN 1 From the main menu highlight and select the SETUP option The SETUP menu is displayed 2 Highlight the FREQUENCY o...

Page 44: ...on The MENU LANGUAGE screen is displayed 3 Use the button to scroll through the language choices The settings switch as follows 4 When the desired language is highlighted pr ess GO BACK to r eturn to the SETUP menu Y ou can continue making adjustments within the SETUP menu press GO BACK to r eturn to the main menu or press CLEAR to exit the menu system Setting the Video Signal Format The COLOR SYS...

Page 45: ... highlight the DVD BUTTON option 3 Use the button to scroll through the output choices Select the choice which corresponds to the jacks you used to connect the DVD player In the example illustration on the right the DVD button on the remote will operate the component connected to the CMPNT1 jacks the DVD player 4 When the desired option is displayed pr ess the button to return to the AUTOTUNING me...

Page 46: ... 3 The timer starts when the Sleep display disappears fr om the screen To check the Remaining Time 1 Once the sleep timer has been set and the menu has tur ned off press the SLEEP button once 2 The remaining time is displayed then disappears after a few seconds 3 When five minutes remain the remaining time appears until it r eaches zero Cancelling the Sleep Timer 1 Press the SLEEP button twice in ...

Page 47: ...her Information Chapter 3 Chapter Overview Installation Connecting Your PC or Macintosh Computer Specifications Troubleshooting The Menu System Supported Resolution Limited Warranty Accessory Information ...

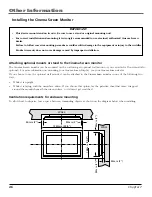
Page 48: ...unts or stand to the Cinema Screen monitor The Cinema Screen monitor can be mounted on the wall using an optional wall mount or you can attach a floor stand also optional For more information on mounting your Cinema Scr een Display see your Cinema Scr een dealer If you choose to use the optional wall mount it can be attached to the Cinema Scr een monitor in one of the following two ways While it i...

Page 49: ...GA VGA configuration If you need to install a new board see the manual that comes with your new graphics board for installation instructions 3 The Cinema Screen monitor provides signal compatibility with VESA 128021024 60MHz SXGA However we recommend not using this r esolution due to image readability on the monitor s 853 X 480 native pixel resolution panel 4 Use the signal cable that s supplied t...

Page 50: ...tand 0 C to 35 C 32 F to 95 F 20 to 80 0 to 1900m 0 to 6230 ft 10 C to 50 C 14 F to 122 F 10 to 90 Power on off Input source select Volume up down OSD control Power Management plug and play DDCI DDC2b RGB3 DDC2b only Remote control with two AA batteries RGB cable Mini D sub 15 pin to Mini D sub 15 pin connector power cord safety metal fitting screw for safety metal fitting User s Manual UL approve...

Page 51: ...t turn on when the remote control s power button is pressed Monitor does not operate when the remote control s buttons are pressed No sound or picture is produced Picture appears but no sound is produced Tint is poor or colors are weak Nothing appears on screen Part of picture is cut off or picture is not centered Image is too large or too small Picture is unstable Leave some space between the dis...

Page 52: ...E When turned on automatically adjusts for flickering and striped patterns FINE PICTURE Adjusts for flickering in the picture PICTURE ADJ Adjusts for striped patterns in the picture Main menu Sub menu Functions FUNCTION DISPLAY Turns the on screen display on and off MENU ADJUST Adjusts the vertical and horizontal position of the menu display POWER SAVER Sets the monitor for use as an energy saving...

Page 53: ...uency and synchronizing polarities of the signal currently being inputted MENU LANGUAGE Sets the language of the menus English French or Spanish COLOR SYSTEM Sets the VIDEO format Keep this set to AUTO Main menu Sub menu Functions AUTOTUNING SETUP HD RCVR BTN Autotunes the HD RCVR button on the remote control to the input that your HD receiver is hooked up to AUX BUTTON Autotunes the SAT2 button o...

Page 54: ...0 0 68 7 80 5 67 5 45 1 47 7 48 3 64 0 80 0 911 75 0 81 3 87 5 93 8 35 0 49 7 60 2 68 7 64 6 75 1 78 1 61 8 71 1 81 1 49 7 63 9 31 4 31 5 NEG NEG NEG NEG NEG NEG NEG POS NEG POS POS POS POS POS POS POS NEG NEG POS POS NEG POS POS POS NEG POS POS POS POS POS POS POS Sync on G Sync on G Sync on G Sync on G NEG NEG C Sync C Sync C Sync NEG NEG NEG NEG NEG NEG NEG NEG NEG POS NEG POS POS POS POS POS P...

Page 55: ...pin connector use an RGB cable 7 Other Screen modes are also available Notes When the input signals comply with the r esolution listed in the table above the position and size of the pictur emay need to be adjusted When a 1280 X 1024 line signal or a 1600 dot X 1200 line signal is input the pictur e will be compressed This monitor has a r esolution of 1365 dot X 768 line It is r ecommended that th...

Page 56: ...e geographic territory cover ed by an Authorized Service Center If not you must take your unit to the Service Center location at your own expense or pay for the cost the Service Center may char ge to transport your unit to and fr om your home Proof of purchase in the form of a bill of sale or r eceipted invoice which is evidence that the pr oduct is within the warranty period must be pr esented to...

Page 57: ...DISCLAIMER OF WARRANTIES AND LIMITED WARRANTY ARE GOVERNED BY THE LAWS OF THE STATE OF INDIANA EXCEPT TO THE EXTENT PROHIBITED BY APPLICABLE LAW ANY IMPLIED WARRANTY OF MERCHANTABILITY OR FITNESS FOR A PARTICULAR PURPOSE ON THIS PRODUCT IS LIMITED TO THE APPLICABLE WARRANTY PERIOD SET FORTH ABOVE How State Law relates to warranty Some states do not allow the exclusion nor limitation of incidental ...

Page 58: ...Attachable Speakers SPK50 Monitor Stand PLB50 The accessories listed below ar e available from your Cinema Screen Dealer See your dealer for prices 56 Accessories ...

Page 59: ... 8 11 AC IN 8 External Speakers 8 55 External Control 8 Video in Audio in 8 L Language for the Menus 42 Laser Disc Player 10 M Macintosh computer connecting 47 Memory Mode 25 Menu button 14 Menu OK 7 Menu display position 32 Menu System 23 50 Mini D sub 15 Pin VGA Signal Composition 47 Mode of Input Signals 41 Monitor button 14 Multi screen 23 Mute 22 N Navigating the menus 23 Noise Reduction 28 N...

Page 60: ...s 26 Sleep button 14 Sleep timer Cancelling 44 Checking 44 Setting 44 Speakers 12 55 Specifications 48 Stand using with Cinema Screen diaplay 55 T TREBLE 29 Troubleshooting 49 V VCR 10 VCR1 button 14 VCR2 button 14 Ventilation Requirements 46 Video button 14 Video 39 Viewing size selecting 30 Volume 14 22 Vol buttons 14 22 W Warranty 54 Wide 39 Z Zoom 7 14 Zoom in Zoom out buttons 14 Index 58 ...

Page 61: ......

Page 62: ...on multimedia Inc Trademark s Registered Marca s Registrada s Printed in USA TOCOM 15739310 Please do not send any products to the address listed in this manual or on the carton This will only add delays in service for your product Thomson multimedia Inc ...

Reviews: