background image

Display and Settings

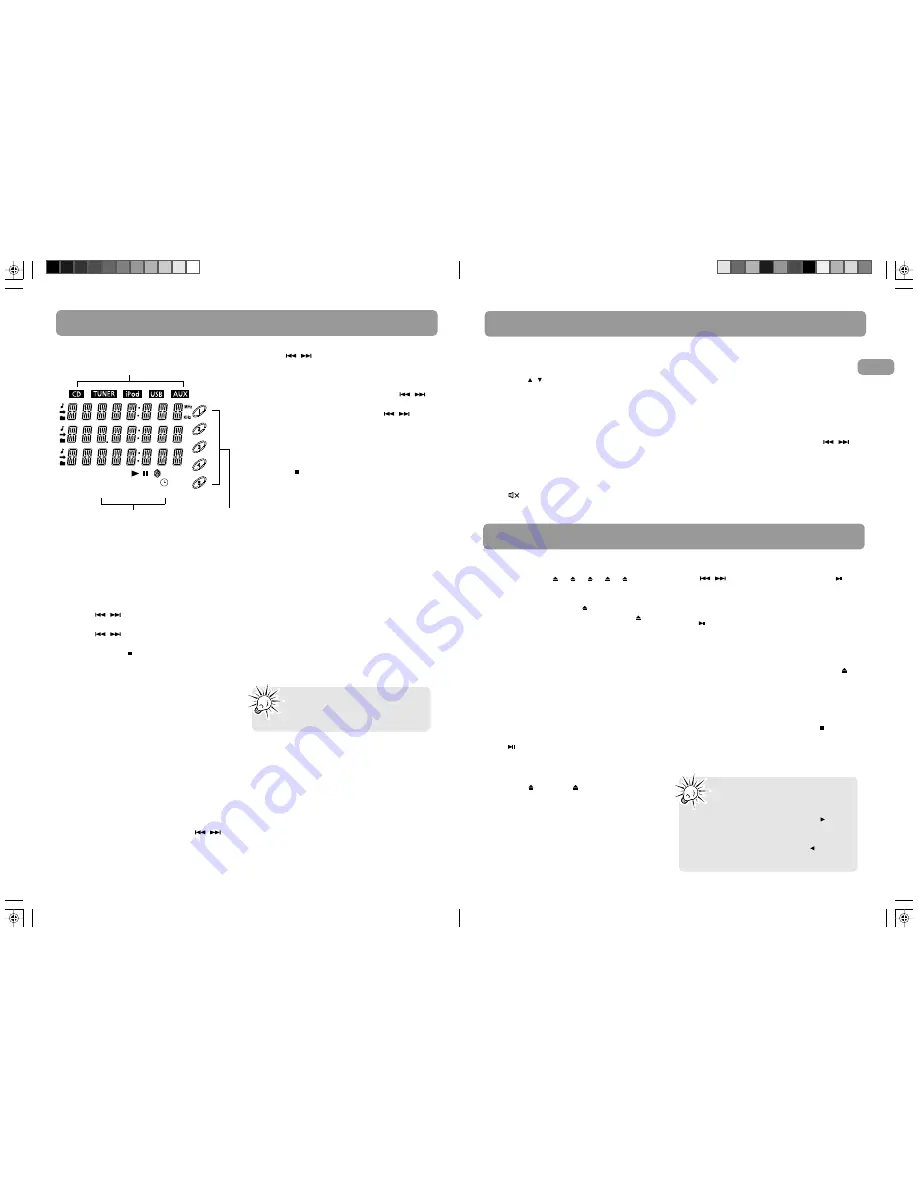
Display

Setting the Clock

1. Press and hold 

CLOCK

 on the remote

control until the hour flashes on the
display.

2. Press 

/

 to set the hour and then

press 

CLOCK

 to shift to minute digits.

3. Press 

/

 to set the minute.

4. Press 

CLOCK

  to save settings. Or press

TUNE/PRESET

to cancel the setting.

Timer and Program Recording

You can turn on/off the unit or record TUNER
at preset times by setting the timer.

You can use Program Recording to preset the
unit to record your favorite radio program.
When setting the timer, choose TUNER REC as
the source to record radio at the preset time.
Ensure there is adequate memory in the USB
device connected.

Setting the Timer

1. Press and hold 

TIMER

 on the remote

control until Timer On and the clock hour
flash on the display.

2. Set the Timer ON setting. Press 

/

 to

set the hour and then press 

TIMER

 to shift

to minute digits.

3. Press 

/

 to set the minute.

4. Press 

TIMER

 to change to Timer Off

setting with clock time flashing. Repeat
steps 2 & 3 for timer off time setting.

5. Press 

TIMER

 to select source. Press 

/

to select TUNER/TUNER REC/DISC/USB/iPod.
If TUNER REC is selected, press 

/

 to

select the preset station.

6. Press

 TIMER

 to set volume. Adjust

VOLUME CONTROL

 to select desired

volume level.

7. Press 

TIMER

 to save settings. Press 

TUNE/

PRESET

to cancel setting. The timer is

automatically activated once timer setting
is saved.

Activating the Timer

Press 

TIMER

 to turn on/off the alarm. The timer

icon is displayed when timer is activated.

Sleep Mode

You can select the time interval in minutes
before the unit turns off automatically.
Press 

SLEEP

 to select among OFF, 120, 90, 60,

45, 30, 15 and  5 minutes.
The SLEEP icon lights on the display when sleep
mode is activated.

View and Adjust Remaining Sleep Time

When sleep is activated, press 

SLEEP

 once to

view remaining sleep time. Press again to
change the time.

Showing Demonstration

Press

 DEMO

 to turn on/off demonstration

mode.

Source indication

Play Mode status

CD Tray Status:
Lights up when
loaded. Flashes
when playing.

Note: 

Sleep is automatically

de-activated when the unit is
turned off.

Sound Features

Volume Control

Turn the volume control on the main unit or
press 

VOL

  / on the remote control to adjust

volume level. The volume level shows briefly on
the display.

Bass Boost

Press 

B.BOOST

 to turn on/off boosting the bass

frequency. The BASS BOOST icon displays when
it is activated.

Muting Sound

Press        on the remote to mute the sound.
When MUTE is on, the symbol flashes.

Using Preset Equalizer Curves

Press 

EQ

 to toggle among FLAT, ROCK, POP,

JAZZ, CLASSIC and CUSTOM. The display shows
your selection briefly and the relative icon
lights on the display.

Creating a Custom Curve

1. Press 

EQ

 to select CUSTOM mode.

2. While CUSTOM is displayed, press 

/

to cycle among displayed bass and treble
range levels.

3. While BAS and TRE is displayed, adjust

volume control to set the associated gain
between -10 and +10.

4. Press 

EQ

 to save setting and exit.

CD and mp3 Disc Playback

Loading Discs

1. Press 

DISC 1  /2 

/3 

/4 

/5


 on the

main unit to open the desired disc tray.

2. Insert a disc with label facing up.
3. Press the same 

DISC 

 key to close the

disc tray, or press a different 

DISC 

 key

to open a different disc tray directly.

4. Repeat steps 2-4 to load discs in all the

disc trays.

The occupied disc tray icons displays and the
current disc icon flashes on the display.
If the disc is a mp3 / WMA CD, the respective
MP3 and WMA icon will be displayed.

Playing Discs

To play all discs in the disc tray

Press

in stop mode to begin playback.

To play a specific disc in the disc tray

From other modes (e.g. TUNER), press

DISC 1  

– 

DISC 5  

to play the

corresponding disc. If there is no disc in
the corresponding disc tray, the next
occupied tray will be played.

In CD mode, press 

SKIP DISC

 to play the

next available disc.

Pause Discs

Press

during playback to pause disc. Press

again to resume.

Play and load simultaneously

While playing one disc, you can press 

DISC 

to open or close other disc trays to load or
change disc without interrupting the playback.

Stop Playback

During playback, press

 TUNE/PRESET

to stop

playback. The unit returns to navigation mode
briefly (approximately 10 seconds) before
entering stop mode.

Tips:

• See pages 19 – 20 for details on

Navigation Mode.

In CD stop mode, press 

SELECT

/

to

enter navigation mode and show disc
menu.

In CD navigation mode, press

/

BACK

to return to stop mode.

EN

11

12

mp3 WMA  PROGRAM
STEREO  EQ  B.BOOST   SLEEP

RDS

INTRO  REPEAT  1ALL DISC S

To play a specific track in the disc

Press 

/

 to select the track and press

 to

start playback.

Summary of Contents for RS2135I - Compact Audio System

Page 1: ...R Comercializadora Thomson de México S A de C V Álvaro Obregón No 151 Piso 13 Col Roma Delegación Cuauhtémoc C P 06700 México D F Telefono 52 55 11 020360 RFC CTM 980723 KS5 RS2135i It is important to read this instruction book prior to using your new product for the first time Es importante leer este manual antes de usar por vez primera su euipo user manual manual de usuario iPod not included iPo...

Page 2: ...Do not install near any heat sources such as radiators heat registers stoves or other apparatus including amplifiers that produce heat 9 Do not defeat the safety purpose of the polarized or grounding type plug A polarized plug has two blades with one wider than the other A grounding type plug has two blades and a third grounding prong The wide blade or the third prong is provided for your safety I...

Page 3: ...stylus of a record player Although this product incorporates a laser pick up lens it is completely safe when operated according to directions Discs rotate at high speed inside the player Do not use damaged warped or cracked discs Do not touch the pick up lens which is located inside the disc tray To keep dust from collecting on the pick up lens do not leave the tray door open for an extended perio...

Page 4: ...er wires at all connection points Push Speaker terminal tab down to insert wire ends EN 5 6 ON VOL SOURCE STANDBY BAND MENU FM ST DEMO INFO RECORD PROG INTRO CLOCK DEL REPEAT R S 2 1 3 5 i SLEEP ADD TIMER DISC SKIP TUNE PRESET B BOOST EQ 1 2 3 4 FCC Information 1 Important Safety Instructions 2 Important Information 3 Getting Started 6 Content of box Connections of Antennas and Speakers Connecting...

Page 5: ...t starts and pauses playback TUNE PRESET In the CD or USB mode it stops playback In Recording mode it stops recording to USB drive In Tuner mode it selects tune or preset mode FAST REVERSE FORWARD In CD USB or iPod mode press to go to the previous next track hold to fast forward or reverse through track In Tuner mode it tunes the radio BAND INFO In CD or USB mode it displays various information e ...

Page 6: ...enter clock setting mode RANDOM In CD USB iPod or MP3 WMA mode it turns on off random playback TIMER Hold to enter timer setting mode Press to activate and deactivate timer REPEAT In the CD mode it repeats a track CD or all CDs In USB or iPod mode it selects repeat one file or repeat all files mode SLEEP Selects the time interval in minutes before the unit turns off ADD In the CD or USB mode it ad...

Page 7: ...VOL on the remote control to adjust volume level The volume level shows briefly on the display Bass Boost Press B BOOST to turn on off boosting the bass frequency The BASS BOOST icon displays when it is activated Muting Sound Press on the remote to mute the sound When MUTE is on the symbol flashes Using Preset Equalizer Curves Press EQ to toggle among FLAT ROCK POP JAZZ CLASSIC and CUSTOM The disp...

Page 8: ...disc before proceeding mp3 files in CD ROM EXTRA format disc are not recognized USB Playback Connecting USB drive to the Main Unit Insert the USB drive s connector into the main unit s USB Jack on the front panel To disconnect unplug the drive Selecting USB Mode Press SOURCE repeatedly to select USB mode USB Playback Features Start and Pause Playback Press to start and pause playback Stop Playback...

Page 9: ...ls on page 19 for details 2 Press DELETE on the main unit or DEL on the remote control 3 Turn the Volume button on the main unit or press or on the remote control to select Yes to delete or No to cancel 4 Press SELECT on the main unit or press on the remote control to confirm selection If Yes is selected the display shows memory usage information after deleting selected file For a few seconds the ...

Page 10: ...rename tracks Sampling Tracks Press INTRO on the remote control to play the first 10 seconds of each track on the current disc all discs in the tray or turn intro mode off INTRO is displayed when sampling is activated Repeat Press REPEAT on the remote control to select the repeat options Repeat the current track REPEAT 1 Repeat all tracks in USB mode REPEAT ALL Repeat current disc REPEAT 1 DISC Re...

Page 11: ... folder and returns to a higher level DELETE Deletes the selected item VOLUME CONTROL Adjusts volume In navigation mode it selects items on a list Navigation buttons In navigation mode it moves up down a list Remote Control MENU From stop mode it enters the navigation mode In navigation mode it plays selected track or enters selected folder MENU In navigation mode it exits current folder and retur...

Page 12: ...uum cleaner microwave and fluorescent lights CD does not play Check that the CD is in the tray Check that the CD label is facing up Check that PAUSE mode is not on Check that the CD function is selected Use the CD lens cleaner Clean the disc Try another CD CD sound skips Clean the disc Check the disc for warping scratches or other damage Check if something is causing the unit to vibrate If so move...

Page 13: ...of sale or receipted invoice which is evidence that the product is within the warranty period must be presented to obtain warranty service For rental firms proof of first rental is also required What your warranty does not cover Customer instruction Your Owner s Manual describes how to install adjust and operate your unit Any additional information should be obtained from your dealer Installation ...

Reviews: