background image

EN

Getting Started

2

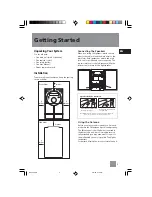
Unpacking Your System

You should have:

• One main unit (with 2 speakers);
• One remote control;
• One safety leaflet;
• One User Manual;
• Owner registration card.

Installation

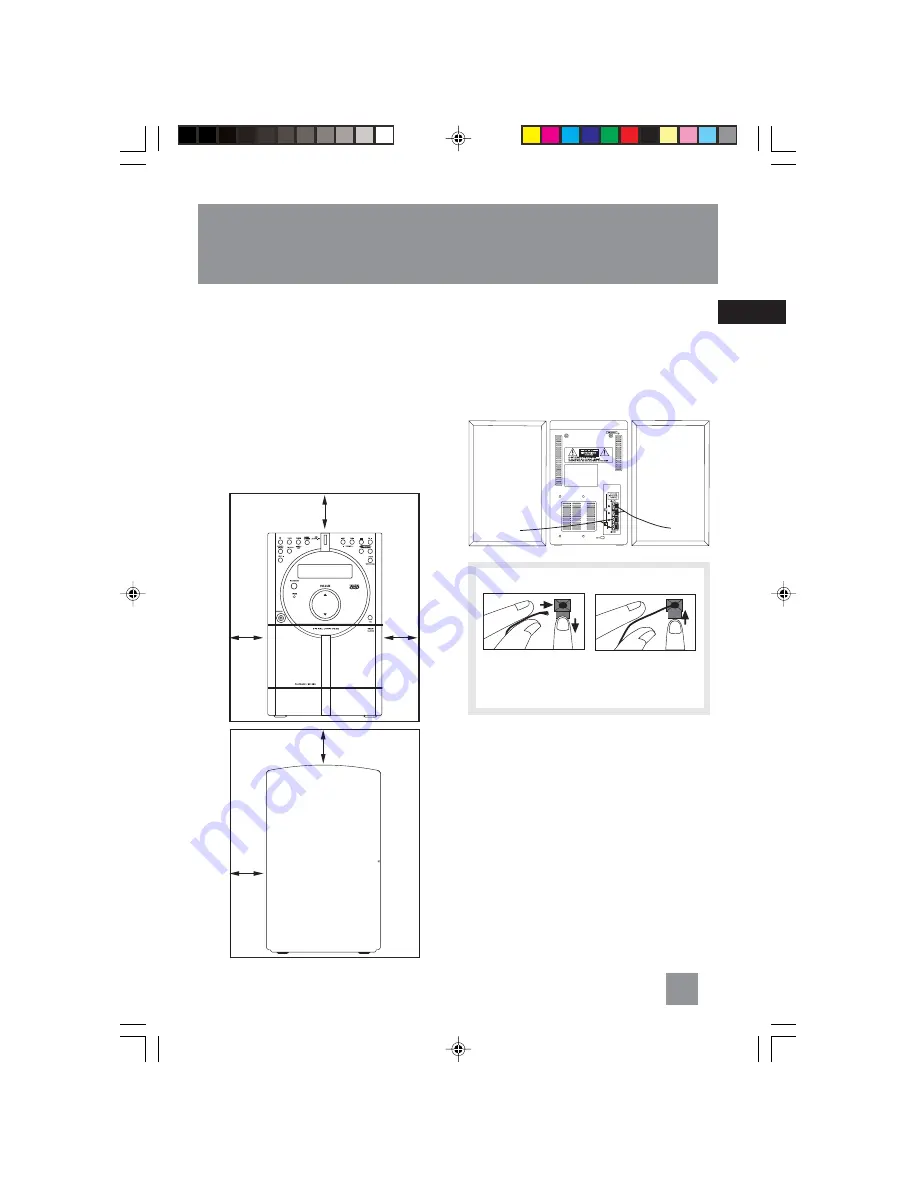
To ensure sufficient ventilation, keep the spacing
shown as below:

4 inches

4

inches

4

inches

4 inches

2

inches

Connecting the Speakers

When connecting the speakers, match the red
wires to the red jacks and the black wires to the
black jacks. Each speaker has a black and a red
jack, one for positive and one for negative. The
top two jacks are for the left speaker, while the
bottom two jacks are for the right speaker.

Release tab to lock wire in
the terminal.

NOTE: 

Make sure the insulation is completely removed from the

ends of the speaker wires at all connection points.

Speaker Wire Connection

Push Speaker terminal tab
down to insert wire.

Using the Antenna

Before you use your audio system, you’ll want to
make sure the FM antenna is positioned properly.
The FM antenna is the coiled wire connected to
the back of the unit. Uncoil it, making sure it is
fully extended (you may even want to tape it to
the wall behind the unit, if possible. The higher,
the better.)
For better AM reception, move or rotate the unit.

R

L

Front View

 Side View

RS2040 EN

2/2/04, 5:16 PM

5

Summary of Contents for RS2040

Page 1: ...equipment receiving interference are on different branch circuits If these measures do not eliminate the interference please consult your dealer or an experienced radio television technician for additional suggestions Also the Federal Communications Commission has prepared a helpful booklet How To Identify and Resolve Radio TV Interference Problems This booklet is available from the U S Government...

Page 2: ...U S VOLTAGE INSIDE THE PRODUCT CAUTION TO REDUCE THE RISK OF ELECTRIC SHOCK DO NOT REMOVE COVER O R B A C K N O U S E R SERVICEABLE PARTS IN SIDE REFER SERVICING TO QUALIFIED SERVICE PERSONNEL The descriptions and characteristics in this owner s manual are for the purpose of general reference only and not as a guarantee In order to provide you with the highest quality product we may make changes o...

Page 3: ...ayback 8 Sampling Tracks 8 Repeat 8 Setting Up a CD Program 8 Playing a Program List 8 View Program List 8 Deleting Program List 8 1 Radio 9 Selecting Tuner Band 9 Searching for a Station 9 Presetting a Station 9 Auto Preset Programming 9 Listening to the Preset Station 9 Suppressing Stereo Signal 9 Tape Player 10 Playing Cassette Tape 10 Recording a Radio Program 10 Recording a CD 10 Reset Tape C...

Page 4: ...are for the left speaker while the bottom two jacks are for the right speaker Release tab to lock wire in the terminal NOTE Make sure the insulation is completely removed from the ends of the speaker wires at all connection points Speaker Wire Connection Push Speaker terminal tab down to insert wire Using the Antenna Before you use your audio system you ll want to make sure the FM antenna is posit...

Page 5: ... TUNING SKIP BACKWARD SKIP FORWARD In CD mode skips backward or forward to the other tracks In Tape mode Rewinds or fast forwards tape In tuner mode searches down or up radio frequency STOP In CD mode Stops CD playback In Tape mode Stops tape playback PLAY PAUSE In CD mode Plays and pauses CD playback In Tape mode Plays and pauses tape playback PRESET In tuner mode selects preset station PROG SET ...

Page 6: ... In CD mode Plays disc and pauses CD playback In Tape mode Plays tape and pauses tape playback STOP Stops CD and tape playback MUTE Mutes Volume VOL Turns up or down volume level PROG SET CLEAR Enters program setting mode confirms your settings clears preset station in tuner programming mode clears CD program in CD programming mode and resets tape counter in tape mode Installing Batteries The remo...

Page 7: ...olume setting 8 Press TUNING or to select desired volume level 9 Press PROG SET CLEAR to move to timer off time setting The display toggles between OFF 00 and PM 00 10 Repeat steps 3 5 to set timer off hour and minute 11 Press PROG SET CLEAR to confirm settings Timer will be activated automatically after settings are finished Activating the Timer Press and hold CLOCK TIMER for 2 seconds on the mai...

Page 8: ...p is automatically de activated when the unit is turned off Setting Sleep Time You can select the time interval in minutes before the unit turns off automatically Press SLEEP on the remote control to toggle among OFF 90 80 70 60 50 40 30 20 and 10 minutes View Remaining Sleep Time When sleep is activated press SLEEP once to view remaining sleep time in minutes Adjust Sleep Time Press SLEEP again w...

Page 9: ...in the may vary due to variations in the may vary due to variations in the may vary due to variations in the quality of the CD RW disc and the quality of the CD RW disc and the quality of the CD RW disc and the quality of the CD RW disc and the quality of the CD RW disc and the recorder used to create the disc recorder used to create the disc recorder used to create the disc recorder used to creat...

Page 10: ...will be shown on the display and PROG flashes 3 Press SKIP BACKWARD or SKIP FORWARD to select a track to be stored into memory location 1 4 Press PROG SET CLEAR to confirm your selection and store that track into memory Repeat step 3 and this step to store additional tracks In CD program mode the PROG icon lights on the display Playing a Program List While in PROGRAM mode press PLAY PAUSE When the...

Page 11: ... enter program mode 4 Press PRESET or to select memory location up to 30 memory locations When you are selecting the preset location the preset station number is flashing 5 Press PROG SET CLEAR to confirm the setting Auto Preset Programming Press and hold TUNER BAND APP on the main unit or BAND APP on the remote control to scan stations in selected band A maximum of 30 stations can be stored Bewar...

Page 12: ... to record by pressing TUNING or on the main unit or SKIP BACKWARD or SKIP FORWARD on the remote control 3 Press REC II on the main unit The REC icon will flash on the display Press REC II again to start recording 4 Press STOP to stop recording Press REC II again to pause recording To resume recording press again Recording a CD 1 Press CD to select CD mode 2 Press SKIP BACKWARD or SKIP FORWARD to ...

Page 13: ...is not on Check that CD function is selected Use CD lens cleaner Clean the disc Try another disc Solution Clean the disc Check disc for warping scratches or other damage Check if something is causing the system to vibrate If so move the system Make sure the speakers are at least 3 feet away or on a different surface from the main unit Switch to another function TAPE Tuner and then back to CD Inspe...

Page 14: ...before you insert it Handling CDs Do not touch the signal surfaces Hold CDs by the edges or by one edge and the hole Do not affix labels or adhesive tapes to the label surfaces Do not scratch or damage the label CDs rotate at high speeds inside the player Do not use damaged cracked or warped CDs Cleaning CDs Dirty CDs can cause poor sound quality Always keep CDs clean by wiping them gently with a ...

Page 15: ...u do not use your remote control for more than one month Discard leaky batteries immediately as leaking batteries may cause skin burns or other personal injuries Dispose of batteries in the proper manner according to provincial and local regulations Any battery may leak electrolyte under the following circumstances if mixed with a different battery type if inserted incorrectly if all batteries are...

Page 16: ...mpleted Proof of purchase in the form of a bill of sale or receipted invoice which is evidence that the product is within the warranty period must be presented to obtain warranty service For rental firms proof of first rental is also required What your warranty does not cover Customer instruction Your Owner s Manual describes how to install adjust and operate your unit Any additional information s...

Page 17: ...NED BY THE LAWS OF THE STATE OF INDIANA EXCEPT TO THE EXTENT PROHIBITED BY APPLICABLE LAW ANY IMPLIED WARRANTY OF MERCHANTABILITY OR FITNESS FOR A PARTICULAR PURPOSE ON THIS PRODUCT IS LIMITED TO THE APPLICABLE WARRANTY PERIOD SET FORTH ABOVE How State Law relates to warranty Some states do not allow the exclusion nor limitation of incidental or consequential damages or limitations on how long an ...

Page 18: ...rchase in the form of a bill of sale or receipted invoice which is evidence that the product is within the warranty period must be presented to obtain warranty service For rental firms proof of first rental is also required What your warranty does not cover Customer instruction Your Owner s Manual describes how to install adjust and operate your unit Any additional information should be obtained f...

Page 19: ...IBITED BY APPLICABLE PROVINCIAL LAW ANY IMPLIED WARRANTY OF MERCHANTABILITY OR FITNESS FOR A PARTICULAR PURPOSE ON THIS PRODUCT IS LIMITED TO THE APPLICABLE WARRANTY PERIOD SET FORTH ABOVE How Provincial Laws relates to warranty This warranty gives you specific legal rights which are in addition to statutory warranties that may vary from Province to Province If you purchased your unit outside Cana...

Reviews: