background image

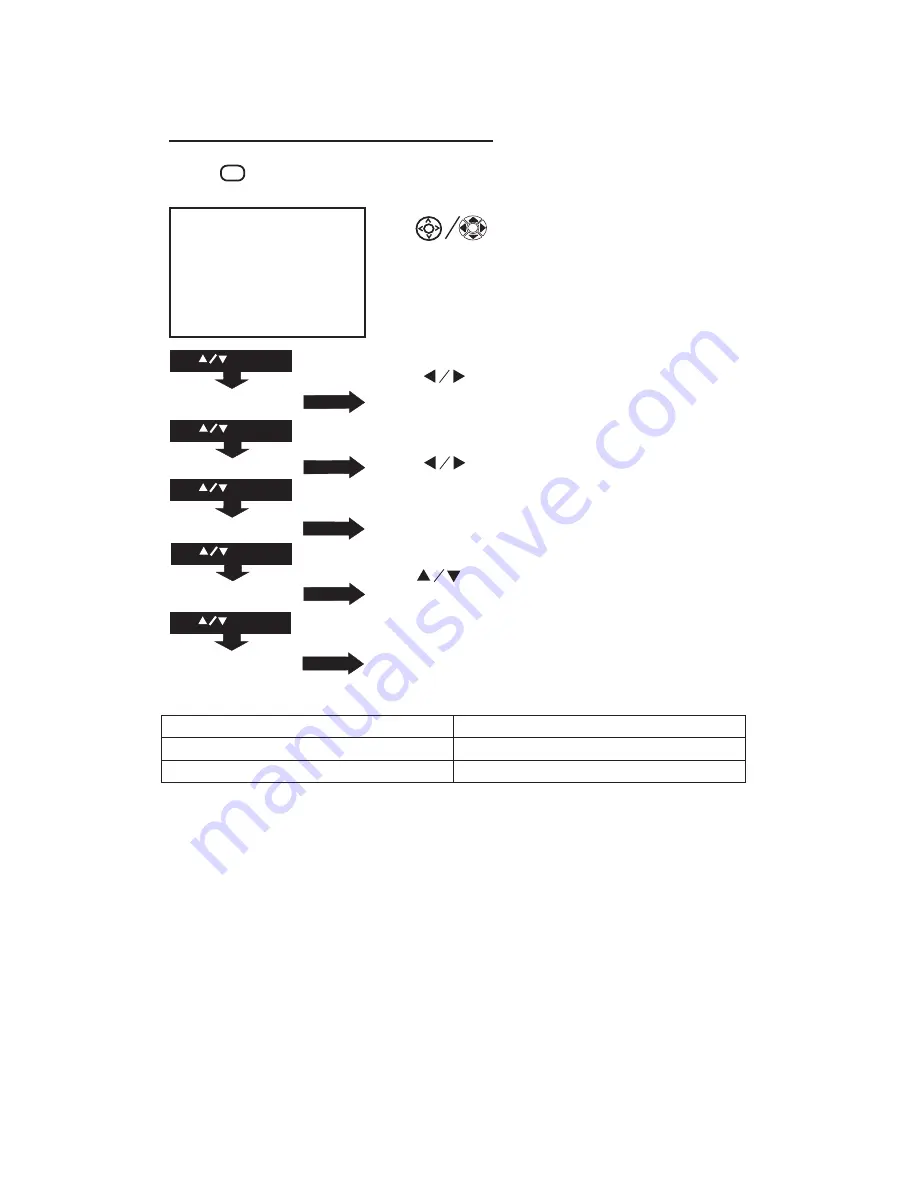
Using Projector Menu 3.0 

Press 

  button to enter projector menu. Press again to previous status. 

Use 

  buttons to select manual page.   

This manual showed on right upper of view 
screen.


Use 

 to select different sound effect 

Standard / Movie / Music / Sports / User. If select 
User, follow below figure to set digit. 

Use   

  to select Balance level to 0-50.


To select Off / On. 

Use 

 to select different sound effect to Off /               

Dolby Virtual / Surround.


To select Off / On for Bluetooth connect. 
Set to “ON” to turn on Bluetooth function. 


Sound Mode - User   

Parameter 

Treble 0-100 
Bass 0-100 

18

Sound Mode Standard

Balance 0

Auto Volume Off

Surround Sound Off

USE

TO SELECT

USE

TO SELECT

USE

TO SELECT

PRESS

G

OK

PRESS

G

OK

USE

TO SELECT

PRESS

G

OK

PRESS

G

OK

Balance 0

Auto Volume Off

Surround Sound Off

Bluetooth

Sound Mode Standard

USE

TO SELECT

PRESS

G

OK

Bluetooth

OK

OK

M

Summary of Contents for RPJ104

Page 1: ... Ltd RCA the RCA logo the two dogs Nipper and Chipper logo are registered trademarks or trademarks of RCA TrademarkManagement and are used under license by Curtis International Ltd Any other product service company trade or product name and logo referenced herein are neither endorsed nor sponsored by RCA Trademark Management or its affiliates ...

Page 2: ... point where they exit from the apparatus 10 Only use a achments accessories specified by the manufacturer 11 Unplug this apparatus during lightning storms or when unused for long periods of me 12 Refer all servicing to qualified service personnel Servicing is required when the apparatus has been damaged in any way such as power supply cord or plug is damaged liquid has been spilled or objects have ...

Page 3: ...5 WARNING Changes or modified to this unit not expressly approved by the party responsible for compliance could void the user s authority to operate the equipment 6 WARNING Use of this unit near fluorescent lighting may cause interference regarding use of the remote If the unit is displaying erratic behavior move away from any fluorescent lighting as it may be the cause 7 WARNING Shock hazard Do N...

Page 4: ...f not installed and used in accordance with the instructions may cause harmful interference to radio communications However there is no guarantee that interference will not occur in a particular installation If this equipment does cause harmful interference to radio or television reception which can be determined by turning the equipment off and on the user is encouraged to try to correct the inte...

Page 5: ...ote P8 Install Remove Battery Of Remote P8 Controls of Projector P9 Install Power Adapter P10 Main Operation P10 Connect HDMI show the Image On Projector Screen P11 Connect AV Show The Image On Projector Screen P11 Connect VGA Show The Image On Projector Screen P12 Connect Audio Output Aux Out Line Out Earphones P13 Install USB Device And Micro Sd Card TF P13 Using TF Card and USB Playback P14 Usi...

Page 6: ...reen NOTE A projector mount is required to install the projector in a ceiling Rear Table Select this location with the projector placed near the floor behind the screen NOTE That a special rear projection screen is required Rear Ceiling Select this location with the projector suspended upside down from the ceiling behind the screen NOTE A projector mount is required to install the projector in a c...

Page 7: ...purchase a projector mount recommended by an installation professional and follow the instructions that come with the mount Before installing the projector in the ceiling please check to make sure the ceiling structure can support the weight of the projector and the mount If in doubt please ask the advice from an installation professorial NOTE Projector mount and screw s not included 6 CEILING HAN...

Page 8: ...us near the screen edges may be less sharp than the screen center Keystone image is created when the projector beam is projected to the screen in an angle Keystone correction will restore the distorted image to a rectangular or square shape 7 SCREEN PROJECTOR VERTICAL DIMENSION VERTICAL DIMENSION SCREEN PROJECTOR VERTICAL DIMENSION SCREEN PROJECTOR AV HDMI USB VGA TF AV HDMI USB VGA TF Adjust this...

Page 9: ...y compartment cover on the back of your remote by carefully sliding to open The battery cover can then be lifted away Fit the correct batteries not included referring to the polarity markings Finally replace the cover Batteries shall not be exposed to excessive heat such as sunshine fire Be sure that the batteries are installed polarity correctly Do not mix old and new batteries Only same or equiv...

Page 10: ...WER Bu on 8 SOURCE Bu on 9 RETURN Bu on 10 MENU Bu on 11 STANDY indicator 12 IR Window Rear Side 13 IR Window Front Side 14 ANGEL ADJ Knob 15 EAR PHONE Jack 16 AV OUT Jack 17 TF Card Slot Micro SD Card 18 HDMI Port 19 USB Port 20 VGA Port 9 M S OK 18 19 13 14 15 16 17 20 HDMI VGA USB HDMI HDMI O K M S 1 2 3 4 5 6 7 8 9 10 11 12 ...

Page 11: ...the buttons to select screen item of projector menu EXIT Press the button to exit the projector menu Press the buttons to fast search forward and rewind on USB TF Press the buttons to search next or previous file on USB TF VOL VOL Press the buttons to select correct sound Press the button to play pause the connect USB TF card FLIP Press the button to rotate mirror projector screen ZOOM Press the b...

Page 12: ...e On Projector Screen Follow below picture to connect AV cable and device 1 Turn off the unit before connect AV cable 2 Use AV cable to connect follow below figure 3 After connect press the button to turn on unit and power indicator will light GREEN 4 Press the SOURCE button to AV mode and the video of AV device will show on projector screen 5 Press the button to turn off unit power 11 HDMI CABLE ...

Page 13: ... Press the SOURCE bu on to VGA mode and the video of VGA device will show on projector screen 5 Press the button to turn off unit power Please refer to the following table to adjust the output signal from computer Type Resolu on Frequency Field Frequency PC VGA 640x480 31 5 60 34 7 70 37 9 72 37 5 75 SVGA 800x600 31 4 50 35 1 56 37 9 60 46 6 70 48 1 72 46 9 75 XGA 1024x768 40 3 50 48 4 60 56 5 70 ...

Page 14: ... cable to connect follow below figure 3 After connect and turn on both units Your projector sound from external device now 4 After using turn off both unit Install USB Device And Micro Sd Card TF Follow below picture to install USB and TF card Turn off the unit before install USB TF card 13 AV HDMI USB VGA TF CABLE NOT INCLUDE Station Amplifier AV CABLE TF HDMI TF AV USB VGA HDMI TF USB ...

Page 15: ...e 9 During playback press the bu on to pause and press again to resume NOTE Remove USB TF device press the bu on to turn off power FIRST Sub Menu on Photo screen 1 When photo playback press the bu on and more func on screen show on lower figure 1 2 Use the button to select icon and press the bu on to play special func on Figure 1 Sub Menu on Music screen 1 When music playback press the bu on and mor...

Page 16: ... to enter Bluetooth menu 6 Use the button to select ON 7 Turn on your External Bluetooth Speaker and select to Bluetooth pairing mode 8 A few seconds you hearing do sound that your unit and external Bluetooth speaker connected 9 After connection completed the unit sound to External Bluetooth speaker Disconnect the Bluetooth 1 Press the button to enter the menu screen 2 Use the button to select abo...

Page 17: ...manual showed on right upper of view screen For service center use only Use the button to select press the button to enter and show below information Model RCA SN RPJ104 RCA SW Ver 3 0 LOGO RCA FL040CT_30 16 OK OK M Software Upgrade Software Upgrade USE TO SELECT PRESSGOK PRESSGOK USE TO SELECT Native information Native information ...

Page 18: ...ow figure Use buttons to select Off Low Middle High Default Use to select rotate 0 rotate 1 rotate 2 rotate 3 to set screen angle Color temper temperature Customer define Parameter red 0 100 blue 0 100 green 0 100 Aspect Ratio 4 3 The signal in a 4 3 aspect ratio projection image 16 9 The signal in a 16 9 aspect ratio projection image 17 OK OK M Use buttons to select Off Low Middle High Default US...

Page 19: ... Balance level to 0 50 To select Off On Use to select different sound effect to Off Dolby Virtual Surround To select Off On for Bluetooth connect Set to ON to turn on Bluetooth function Sound Mode User Parameter Treble 0 100 Bass 0 100 18 Sound Mode Standard Balance 0 Auto Volume Off Surround Sound Off USE TO SELECT USE TO SELECT USE TO SELECT PRESSGOK PRESSGOK USE TO SELECT PRESSGOK PRESSGOK Bala...

Page 20: ...manual showed on right upper of viewing screen Use button to select different language Follow below figure Use buttons to select Y or N If choose Y that your unit will go to factory default setting Optional English Hrvatski Nederlands Chinese Franais Deutech Slovenina Slovak Espanol Italiano Norsk Portugues Magyar Srpski Esky Polski Svenska Dansk Romnete Suomi 19 Clock Off Timer Off On Timer Off S...

Page 21: ...36W Standby 0 8W Power Input Connect Included Adapter DC 12V 2 5A Included Adapter Connect DC input of unit Input AC100 240V 50 60Hz Output DC12V 2 5A Display Color 16 7K Projection Size 30 100 inch Signal Port Video VGA HDMI USB Port Support USB device up to 32GB Support format mpeg1 Mpeg2 mpeg4 mp3 Jpeg SD Card Support SD card up to 32GB Support format mpeg1 Mpeg2 mpeg4 mp3 Jpeg Weight 0 9 KG Di...

Page 22: ......

Reviews: