background image

Important Information

WARNING

To reduce the risk of fire or
shock hazard, do not expose
this TV to rain or moisture.

To reduce the risk of electric shock, do not remove
cover (or back). No user serviceable parts inside.
Refer servicing to qualified service personnel.

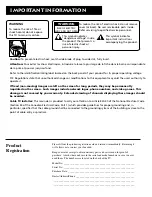
This symbol indicates
"dangerous voltage" inside
the product that presents a
risk of electric shock or
personal injury.

This symbol indicates
important instructions
accompanying the product.

WARNING

RISK OF ELECTRIC

SHOCK DO NOT OPEN

Caution: 

To prevent electric shock, match wide blade of plug to wide slot, fully insert.

Attention:

 Pour éviter les chocs électriques, introduire la lame la plus large de la fiche dans la borne correspondante

de la prise et pousser jusqú au fond.

Refer to the identification/rating label located on the back panel of your product for its proper operating voltage.

FCC Regulations state that unauthorized changes or modifications to this equipment may void the user’s authority to
operate it.

If fixed (non-moving) images are left on the screen for long periods, they may be permanently
imprinted on the screen.  Such images include network logos, phone numbers, and video games.  This
damage is not covered by your warranty.  Extended viewing of channels displaying these images should
be avoided.

Cable TV Installer:

 This reminder is provided to call your attention to Article 820-40 of the National Electrical Code

(Section 54 of the Canadian Electrical Code, Part 1) which provides guidelines for proper grounding and, in
particular, specifies that the cable ground shall be connected to the grounding system of the building as close to the
point of cable entry as practical.

Product
Registration

Please fill out the product registration card and return it immediately.  Returning it
will  allows us to contact you if needed.

Keep your sales receipt to obtain warranty parts and service and for proof of
purchase.  Attach it here and record the serial and model numbers in case you ever
need them.  The numbers are located on the back of the TV.

Model No: _________________________________________________________

Serial No: _________________________________________________________

Purchase Date: _____________________________________________________

Dealer/Address/Phone: _______________________________________________

_________________________________________________________________

_________________________________________________________________

Summary of Contents for E09344

Page 1: ...lortelevisioncolortelevision colortelevisioncolortelevisionco lortelevisioncolortelevisioncolo rtelevisioncolortelevisioncolort elevisioncolortelevisioncolortel evisioncolortelevisioncolortelev isioncolortelevisioncolortelevisi oncolortelevisioncolortelevision colortelevisioncolortelevisionco lortelevisioncolortelevisioncolo rtelevisioncolortelevisioncolort elevisioncolortelevisioncolortel evision...

Page 2: ...clude network logos phone numbers and video games This damage is not covered by your warranty Extended viewing of channels displaying these images should be avoided Cable TV Installer This reminder is provided to call your attention to Article 820 40 of the National Electrical Code Section 54 of the Canadian Electrical Code Part 1 which provides guidelines for proper grounding and in particular sp...

Page 3: ...M 9 TV Main Menu 9 The Picture Quality Menu 9 The Screen Menu 9 The Channel Menu 10 V Chip Parental Controls 10 V Chip Movie Rating Limit 11 Blocking Movie Ratings 11 Viewing Movie Ratings 11 V Chip TV Rating Limit 11 The TV Rating Limit Screen 12 Blocking Age Based Ratings and Content Themes 13 Viewing Age Based Ratings and Content Themes 13 V Chip Unrated Program Block 14 Lock Unlock Parental Co...

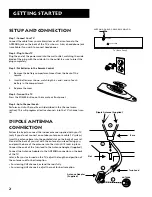
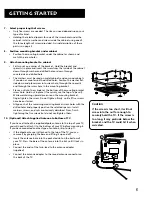
Page 4: ...nel menu section This will program all active channels into the TV s channel scan list Dipole Antenna Connection Follow the steps to connect the indoor antenna supplied with your TV only if you do not connect an outdoor antenna or a cable TV system Insert the antenna base into the pocketed slot on the back of your set Stand at the back of your set with the antenna twin lead facing you and press th...

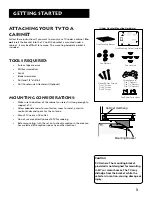
Page 5: ...ews Five 2 Screws Five 3 Screws Fifteen Spacers Five 1 Spacers Five 1 2 Spacers Five 1 4 Spacers Two Power Cord Hooks Five Hex Nuts Five Washers Drill 1 4 inch holes at the 5 locations marked FRONT 1 4 Percez trous de 1 4 pouce aux 5 endroits indiques Mounting Guide for mounting TV under a cabinet Guide de montage pour l installation de TV sous une armoire 3 4 Avant Also cut out screw guide along ...

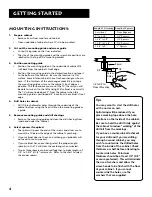
Page 6: ...gh the underside of the cabinet bottom using the five circles on the mounting guide as a guide 5 Remove mounting guide and drill shavings Remove the mounting guide and clean the drill shavings from inside and under the cabinet 6 Select spacers if required The spacers slip over the ends of the screws and allow you to mount the TV below the edge of the cabinet s overhang If your cabinet does not hav...

Page 7: ...use the top of a pencil While maintaining upward pressure on the mounting bracket finger tighten the screw Do not tighten firmly until all five screws have been started Allign each of the remaining mounting bracket screw holes with the drilled holes and properly position the selected spacers Install washers screws and nuts as previously described Now finish tightening the five screws but do not ov...

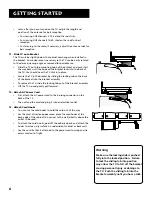
Page 8: ...e bracket assembly To remove the TV slide the locking tab out of the bracket assembly Lift the TV up and gently pull forward 12 Attach AC Power Cord First attach the AC power cord to the 4 prong connector on the back of the TV Then extend the cord and plug it into an electrical outlet 13 Attach Cord Hooks You can use the cord hooks to hold the cord out of the way For the most attractive appearance...

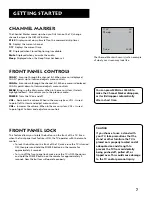
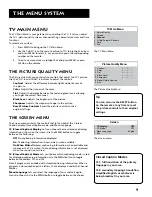
Page 9: ... up to items and adjusts menu controls CHAN v Scans down through the channel list When a menu is displayed CHAN v points down to items and adjusts menu controls MENU Brings up the Main menu When in the menu system it selects highlighted items Also returns you to the previous menu POWER Turns the TV on and off VOL Decreases the volume When in the menu system VOL is used to point left to items and a...

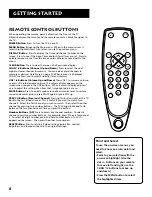
Page 10: ...pears on the screen when you press the VOL buttons When a menu is displayed press or v to adjust the setting of an item that is highlighted in a menu MUTE Button Press to quickly reduce sound to minimum level To restore sound and normal picture press MUTE again or press VOL up PREV CH Button Previous Channel Pressing this button switches the TV back to the last tuned channel This is useful if you ...

Page 11: ...way closed captioning information is shown on the screen Use the MENU button to toggle between the following Off No captioning information displayed On Captioning information shown always when available On When Muted Displays captioning information when available and whenever the TV is muted The captioning information is not displayed when the sound is not muted CC Closed Caption Mode Lets you cho...

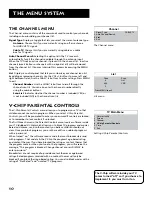
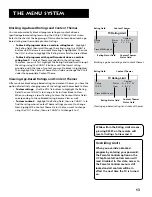
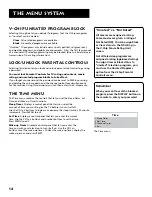
Page 12: ...you to program your TV so that children cannot see certain programs When you select V Chip Parental Controls you will be prompted to enter your password if controls are locked or to remember to lock controls if unlocked The first three choices in the Parental Controls menu involve software inside your TV dubbed V Chip which allows you to block TV programs and movies based on violence sex or other ...

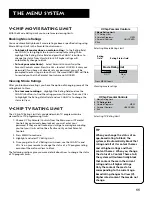
Page 13: ...hip Parental Controls from the Main menu If Parental Controls have previously been locked you must enter your password If they are not locked you will get a message reminding you that your limits will not be effective until you lock Parental Controls 2 Press MENU to continue 3 Highlight and select TV Rating Limit 4 Once you get to the TV Rating Limit screen use the CHAN v and VOL v on your remote ...

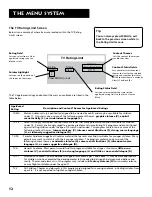
Page 14: ...e material that many parents would find unsuitable for children under 14 Parents are strongly urged to exercise greater care in monitoring this program and are cautioned against letting children under the age of 14 watch unattended This program contains one or more of the following content themes intense violence V intense sexual situations S strong coarse language L or intensely suggestive dialog...

Page 15: ...k is highlighted Then highlight the Content Theme Status field and change the V to B under the appropriate Content Theme Viewing Age Based Ratings and Content Themes After you have blocked age based ratings and content themes you have the option of selectively changing some of the ratings and themes back to View To view ratings Use the VOL v buttons to highlight the Rating Field then use CHAN v to...

Page 16: ...r Set Time and Wake up Timer functions Sleep Timer Displays a control panel that lets you select the amount of time you want to give the TV before it shuts itself off Use the VOL buttons to increase or decrease the sleep timer by 30 minute increments Press MENU to exit Set Time Displays a control panel that lets you enter the current time Use the VOL buttons and number buttons to set the time Pres...

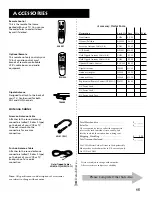
Page 17: ... 2 CABLE REW FF STOP PLAY REC TV VCR PROG PAUSE SETUP DISPLAY CLEAR ID 1 2 3 4 5 6 7 8 9 0 CHAN VOL MENU AUDIO VIDEO PC MUTE PIP SWAP FRZ MOVE Remote Control This is the remote that came packed with your TV You can use the order form to order it direct by mail if desired Optional Remote This remote not only controls your TV but can also control most brands of remote controllable VCR s cable boxes ...

Page 18: ... 4 weeks for delivery All accessories are subject to availability Prices are subject to change A complete and correct order will save you days of waiting IMPORTANT Copy complete account number from your Discover Card My card expires Daytime Phone Number Placing An Order To place your order by phone have your Visa MasterCard or Discover Card ready and call the toll free number listed below Use this...

Page 19: ...ing Electronic protection circuit may have been activated because of a power surge Wait 30 seconds and then turn on again If this happens frequently the voltage in your house may be abnormally high Maybe the Sleep Timer or Alarm Timer is activated Blank screen or black box appears on the screen Try another channel Press RESET in case the picture controls are set too low Captioning may be turned on...

Page 20: ...levision to the Service Center location at your own expense or pay for the cost the Service Center may charge to transport your television to and from your home To identify your nearest Authorized RCA Television Service Center ask your dealer look in the Yellow Pages or call 1 800 336 1900 Show the Authorized Service Center Representative your sales receipt or other evidence of purchase date or fi...

Reviews: