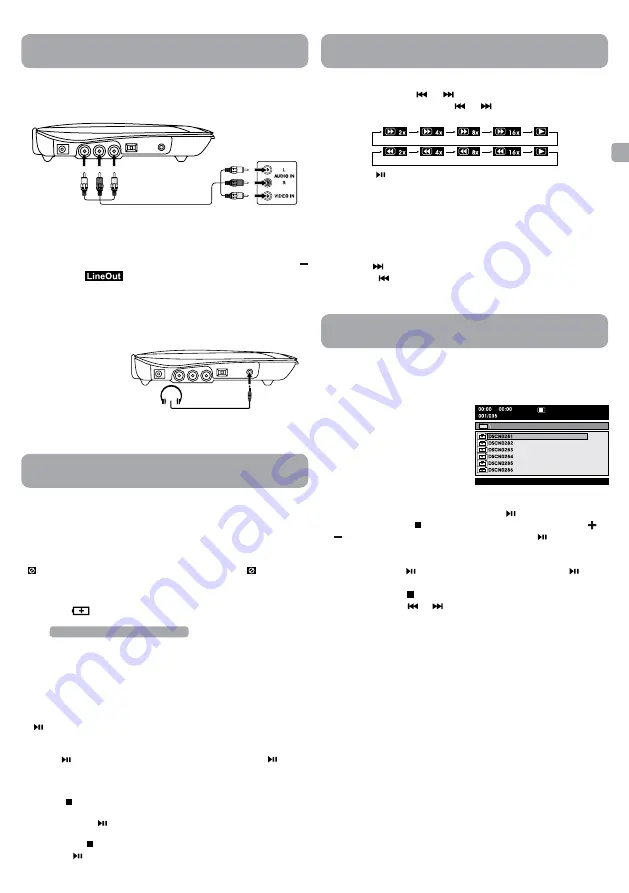
background image

5

EN

Connections

A. Connecting a TV

If your TV has audio/video inputs, you can connect the unit to your TV 
using standard Audio/Video cables.

To AUDIO / 

VIDEO OUT 

jacks

Audio / Video cable

(not included) 

TV

  White  Red  Yellow 

 W

hit

Red Y

ello

This owner’s manual explains the basic instructions for operating 

this unit. Some DVDs are produced in a manner that allows specific 

or limited operation during playback. Therefore, this unit may not 

respond to all operating commands. THIS IS NOT A DEFECT. Please 

refer to the instructions accompanying the specific DVD in question 

for more information about the options available on that DVD. 

“   ” may appear on the screen during operation. A “   ” means the 

desired operation is not permitted by the unit or disc. 

Playing a Disc

1.  Slide the 

 / STANDBY / ON

 switch on the left side of the unit to 

the ON position.

  See Customizing the function settings before proceeding to step 2.

2.  use your fingers to hold the disc door on the front of the unit and 

lift it up to open.

3.  Hold the disc by its sides and carefully place it onto the spindle with 

the label side facing up, pushing gently until you hear a “click”.

4.  Close the disc door. It takes a short while for your unit to load the 

disc. After loading, the unit will automatically bring you to the main 

menu of the DVD or start playing the DVD.

5.  If the unit does not automatically start playing the DVD, press the  

 button on the unit.

Pausing Playback (Still Mode)

Press the   button. To resume normal playback, press the   button 
again.

Stopping Playback

Press the   button at the location where you want to interrupt 

playback. To resume playback at the position where the disc was 

stopped, press the   button.

If you press the   button twice, the unit’s memory will be cleared and 
pressing the   button will reset the DVD to the beginning.

Playing a Disc (Basic Playback)

Playing a Disc (Basic Playback)

Caution: 

Avoid listening to sound 

at levels which may be 

harmful to your ears.

Headphones/Earphones 

(3.5mm diameter plug)

(not included)

Watching a DVD on your TV

1.  Turn on the unit.

2.  Turn on the TV and follow the instructions included with it to watch 

video from external sources.

3.  To mute the unit and listen the sound from TV only, please press   

button until 

 appear on the screen.

B. using Headphones/Earphones

• 

Turn down the volume before connecting, and then adjust the level.

• 

When headphones/earphones are connected, no sound will be 

emitted from the unit’s speaker.

Fast Forward / Fast Reverse 

1.  Press and hold the 


or 


button when a disc is playing. Each 

time you press and hold the 


or 


button, the playback speed 

changes in the following sequence:

2.  Press the   button twice when you reach the desired point to 

resume normal playback.

Notes:

•  The DVD player mutes sound and subtitles during reverse and 

forward scan of DVDs.

•  The fast playback speed may differ depending on the disc.

Skip (Forward / Reverse)

•  Press the 


button to advance titles, chapters/tracks.

•   Press  the 


button to go back to current or previous titles, 

chapters/tracks.

This unit can play JPEG files recorded on a CD-R or CD-ROM disc (CD-RW 
is not recommended).

Viewing JPEG Files 

1.  use your fingers to hold the disc 

door on the front of the unit and 
lift it up to open.

2.   Hold a JPEG file disc by its edges 

and gently push it onto the 
spindle with the label side facing 
up until you hear a “click”.

3.  Close the disc door. The JPEG 

files on the disc will be displayed one by one automatically. If the 
disc does not play automatically, press the   button.

4.  Press the 

MENU

 or   button to display a folder list. Press the   or 

 button to highlight a JPEG file to play. Press the   button to start 

playback.

Notes:

•  You can press the 

 button to freeze the picture. Press the   button 

again to resume picture slide show.

•  You can press the 

 button to quit playback.

•  You can press the 

 or 

 button to change the picture.

•  Some discs may not permit this operation.

Viewing JPEG Files

Summary of Contents for DRC96100

Page 1: ...he first time Es importante leer este manual antes de usar por vez primera su equipo DRC96100 user manual manual de usuario EN ES Scan for more user manual details or visit www RCAav com Escanear para más detalles del manual de usuarios o vistita www RCAav com ...

Page 2: ... is warm and damp water droplets or condensation may form inside the unit When there is condensation inside the unit the unit may not function normally Let the unit stand for 1 to 2 hours before turning the power on or gradually heat the room and allow the unit to dry before use Ventilation Warning Do not block the ventilation openings or holes If the ventilation openings or holes are blocked by a...

Page 3: ...safety If the provided plug does not fit into your outlet consult an electrician for replacement of the obsolete outlet 10 Protect the power cord from being walked on or pinched particularly at plugs convenience receptacles and the point where they exit from the apparatus 11 Only use attachments accessories specified by the manufacturer 12 Use only with a cart stand tripod bracket or table specifi...

Page 4: ...ly be recharged when the unit is in CHARGE mode while using the AC power adapter The built in battery cannot be recharged when the unit is in ON mode Do NOT recharge the built in battery in a vehicle using the car power adapter Batteries should not be exposed to excessive heat such as sunshine fire or the like Note When the built in battery power is low Battery Low will display on the screen and t...

Page 5: ...ying a Disc Basic Playback Caution Avoid listening to sound at levels which may be harmful to your ears Headphones Earphones 3 5mm diameter plug not included Watching a DVD on your TV 1 Turn on the unit 2 Turn on the TV and follow the instructions included with it to watch video from external sources 3 To mute the unit and listen the sound from TV only please press button until appear on the scree...

Page 6: ...ton to return to the previous menu 6 Press the MENU button to exit the menu Go To Language Menu Language Menu System Language Video Player Menu Audio Subtitle Disc Menu Eng Eng Off Eng TV Display Pan Scan When wide screen video is played this mode clips the right and left sides of the image so that it can be viewed on a conventional screen Some wide screen DVDs that do not permit Pan Scan mode pla...

Page 7: ...sc from the disc compartment Maintenance Troubleshooting Guide No power Ensure the AC power adapter is connected The unit is not turned on No sound or only a very low level sound is heard The volume control is located on the side of the unit please try adjusting this The system is in pause mode Press the button to return to normal play mode The unit is in fast forward or fast reverse mode Press th...

Page 8: ...intenance or use in violation of instructions provided with the product or to product which has been altered or modified without authorization of AVC or to products or parts thereof which have had the serial number removed or changed Out of Warranty In the event your product requires repair after the limited warranty period has expired please contact our Customer Support Center at 1 800 506 5746 1...

Page 9: ...dor de CA de la toma de CA En cuanto a la condensación Si deja la unidad en un lugar caluroso y húmedo es posible que en el interior del reproductor la unidad se formen pequeñas gotas o que se forme condensación Si existe condensación Si existe condensación en el interior del aparato es posible que la unidad no funcione de manera normal Deje que la unidad esté en reposo por 1 ó 2 horas antes de en...

Page 10: ...o o perforado específicamente en el área del enchufe la toma de corriente y el punto en donde salen del aparato 11 Sólo use los anexos accesorios especificados por el fabricante 12 Use sólo con el carro soporte trípode o mesa especificados por el fabricante o vendidos con el aparato Cuando use el carro mueva la combinación de carro aparato de manera cautelosa para evitar daños a causa de que se vu...

Page 11: ... CA del enchufe de CA de la pared Al estar enchufado el adaptador de CA el aparato no está completamente desconectado de la red eléctrica aun cuando el equipo esté apagado Advertencia El adaptador de CA se usa como dispositivo de desconexión y se debe poder acceder a él fácilmente al usarlo Para desconectar completamente el aparato de la red eléctrica el adaptador de CA debe desconectarse completa...

Page 12: ...el botón Para reanudar la reproducción normal oprima de nuevo el botón Para detener la reproducción Presione el botón a la altura del disco donde usted desee interrumpir la reproducción Para reanudar la reproducción en el mismo punto donde haya detenido el disco oprima el botón Si oprime dos veces el botón la memoria de la unidad se borrará y al apretar el botón el DVD se reiniciará desde el comie...

Page 13: ... 2 Oprima el botón para seleccionar la Menú de Video Video Menu 3 Oprima el botón para seleccionar la opción Brightness Brillo o Contrast Contraste y luego oprima el botón 4 Oprima el botón para modificar la configuración oprima el botón para confirmar 5 Repita los pasos 3 y 4 para modificar otras opciones Oprima el botón para regresar a la menú anterior 6 Oprima el botón MENU para salir del menú ...

Page 14: ...iente de bits de Dolby Digital y brinda una mezcla apropiada para escuchar en dos canales Se requiere un decodificador adicional de Dolby Digital para reproducir temas disponibles en varios DVD en canales múltiples Fabricado bajo la licencia de Dolby Laboratories Dolby y el símbolo de la doble D son marcas registradas de Dolby Laboratories Limpieza del disco Si pone en el equipo un disco defectuos...

Page 15: ...rucciones que acompañan este producto o de haber modificado o alterado el producto sin la autorización de AVC o de haber quitado o cambiado el número de serie de las piezas o del producto Fuera de la Garantía En caso que su producto necesite ser reparado y que el período de garantía ya haya expirado sírvase contactarse con el Centro de Ayuda al Cliente en el fono 1 800 506 5746 1 877 252 6873 o ww...

Page 16: ...dia Markham Ontario L3R 1E3 Printed in China Impreso en China 811 261091W040 Need More Help Please visit online help at Necesita más ayuda Por favor o visite nuestra página de ayuda en internet http www RCAav com ...

Reviews: