background image

Graphics contained within this publication are for representation only.

11

Chapter 1: Connections and Setup

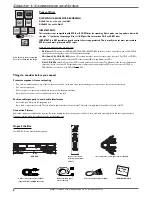
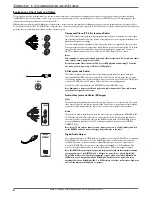
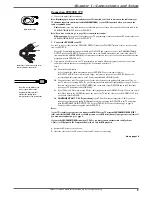
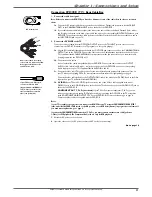
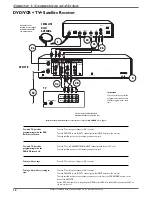
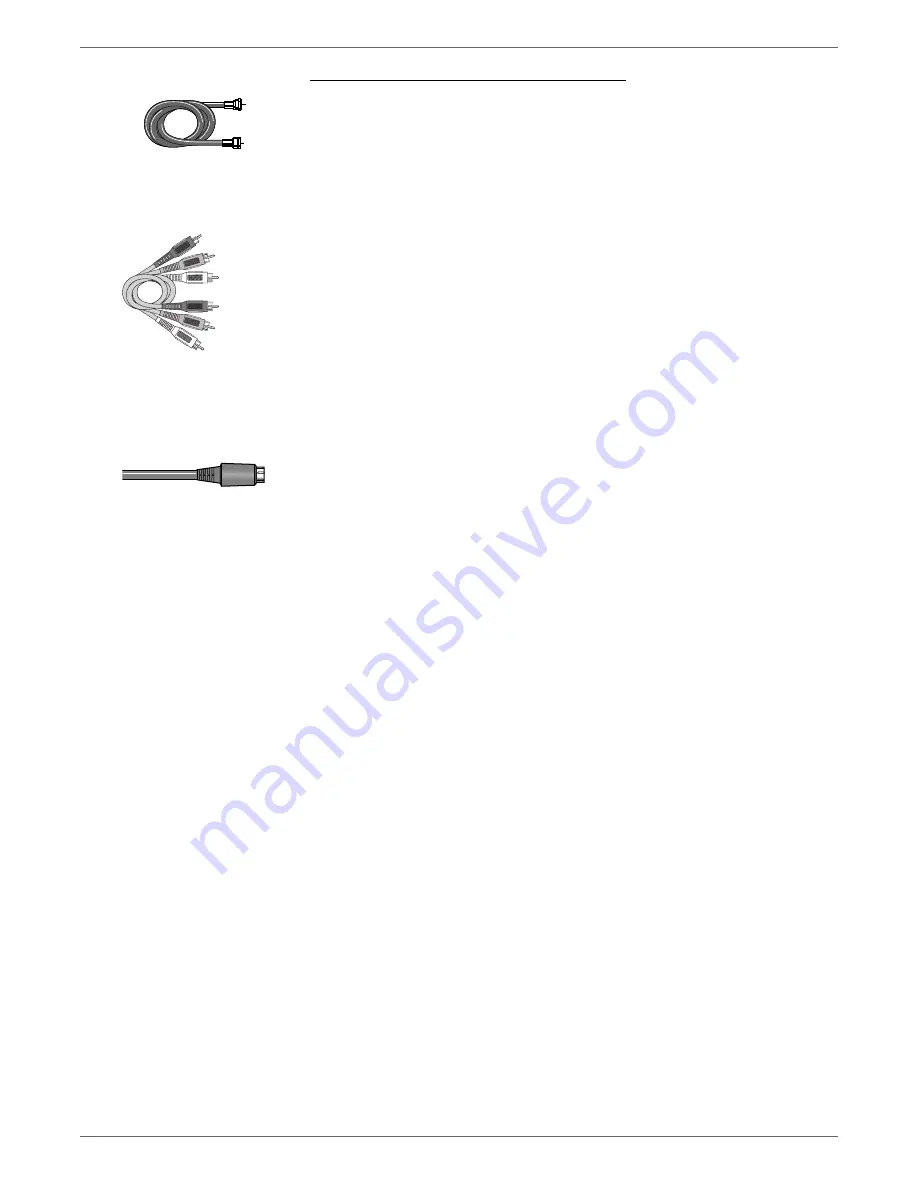
RF Coaxial cable

If your TV has an S-Video jack, 
connect the S-Video cable 
(supplied with model DRC8312 
only). S-Video provides better 
video quality than composite 
video (the yellow jack).

Audio video cables are usually 
color-coded red, white, and yellow. 
Red= right audio; White = left 
audio; Yellow = video.

Red

Yello

w

White

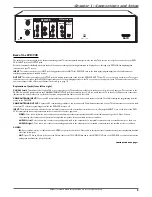
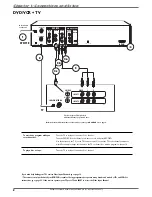
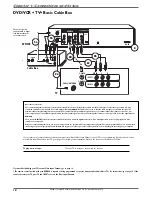
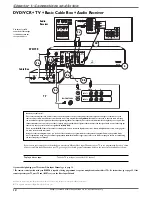
Connection: DVD/VCR + TV + Basic Cable Box

1.  Connect the cable box signal.

Note: Before you connect the DVD/VCR, you’ll need to disconnect some of the cables fi rst in order to reconnect 
them.

1a. 

  Connect the RF coaxial cable that is connected to the cable box’s Output jack (sometimes labeled CABLE 

OUT) to the CABLE/ANTENNA INPUT jack on the back of the DVD/VCR.

1b.

  If your cable box has audio/video output jacks, connect the audio cables to the Audio Output L (left – white) 

and R (right – red) jacks on the back of your cable box, and to the corresponding INPUT AUDIO jacks on your 
DVD/VCR. Then connect the video cable (yellow) to the Video Out jack on the back of your cable box, and to 
the INPUT VIDEO jack on your TV.

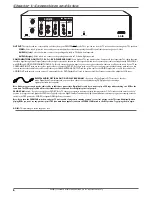
2.  Connect the DVD/VCR to the TV


You need to connect cables from the DVD/VCR’s OUTPUT jacks to the TV’s INPUT jacks in order to see the 
content from the DVD/VCR (whether it’s a TV program or a disc you’re playing).

2a.

  Use the RF coaxial cable that was packed with your DVD/VCR, and connect one end to the CABLE/ANTENNA 

OUTPUT jack on the DVD/VCR. Connect the other end to the Cable/Antenna Input jack on the back of your 
TV (sometimes labeled CABLE/ANTENNA). It is important to make this connection so you can watch cable 
box programs when the DVD/VCR is off.

2b. 

  Connect the audio cables.


A set of audio/video cables was packed with your DVD/VCR. Connect the audio cables to the OUTPUT 
AUDIO L (left – white) and R (right – red) jacks on the back of your DVD/VCR, and to the corresponding 
Audio Input jacks on your TV (sometimes labeled AUDIO IN L and R).

2c.

  Connect the video cable. The cables you use for the video determine the quality of the picture you’ll see on 

your TV when you’re playing DVDs. For more information about cables and signal quality, go to page 4.


Connect the video cable (yellow) to the OUTPUT VIDEO jack on the back of your DVD/VCR, and to the Video 
Input jack on your TV (sometimes labeled VIDEO IN).

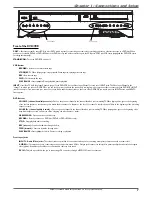
2d.


S-VIDEO

 If your TV has an S-VIDEO jack, connect one end of the S-Video cable (supplied with model 

DRC8312 only) to the S-VIDEO IN jack on the back of the TV and the other end to the S-VIDEO OUT jack on 
the back of the DVD/VCR.


COMPONENT OUT Y, Pb, Pr (not shown)

 If your TV has Component Input Jacks (Y, Pb, Pr), you can 

achieve even greater picture quality (DVD playback only) by connecting the DVD/VCR to the TV using these 
jacks (COMPONENT VIDEO OUTPUT, Y, Pb, Pr on the DVD/VCR). For more explanation, go to page 4. 
Component Video cables not supplied with the DVD/VCR.

Notes:

If your TV is capable of progressive scan, connect the DVD/VCR to the TV using the COMPONENT VIDEO OUTPUT 
jacks, and slide the PROG SCAN switch to the ON position to see DVD titles (movies) in progressive scan format. If 
you need more explanation, go to page 6.

If you use the COMPONENT VIDEO connection (Y, Pb, Pr), you must connect another video cable (yellow or 
S-Video) for VCR playback. The Component Out jacks are only for DVD playback.

3.

  Attach the AC power cord to the unit.

4.

  Insert the other end of the AC power cord into an AC outlet (or power strip).

Go to page 16

Summary of Contents for DRC8310N

Page 1: ...er s Guide Important Disc Information This Product Can Record on the Following DiscTypes DVD R 2 4x 4x 8x and 16x DVD RW 2 4x and 4x This recorder cannot record on DVD R or DVD RW discs Please make sure to purchase discs with the plus symbol on the package ...

Page 2: ...to contact you if needed Keep your sales receipt to obtain warranty parts and service and for proof of purchase Attach it here and record the serial and model numbers in case you need them The numbers are located on the back of the DVD Recorder Model No __________________________ Serial No __________________________ Purchase Date ___________________________________________________________ Dealer A...

Page 3: ...nel 39 Recording to tape while you watch a DVD disc 39 Timer recordings 39 Copying a videocassette tape to a DVD disc DVD R or DVD RW 40 Copying a DVD disc DVD R or DVD RW to tape 40 Copying a digital video camcorder tape to a DVD disc 41 Chapter 4 Playing Discs Regional Coding 43 Types of discs you can play 43 How to Load and Play Discs 43 Using Different Menus 44 Search Options 44 Playback Optio...

Page 4: ...the back of this product Arrange the components so that air can circulate freely Don t stack components When you place components in a stand make sure you allow adequate ventilation If you connect an audio receiver or amplifier place it on the top shelf Position cables properly to avoid audio interference Insert each cable firmly into the designated jack If you place components above theTV route a...

Page 5: ...N CLO SE RECORD INPUT Cable Box TV DVD VCR STOP CH SKIP CH SKIP FWD REV PLAY PAU SE OPEN CLO SE RECORD INPUT DVD VCR STOP CH SKIP CH SKIP FWD REV PLAY PAU SE OPEN CLO SE RECORD INPUT TV TV page 8 Coaxial Audio video S Video TV cable box page 10 Coaxial Audio video S Video TV satellite receiver page 12 To achieve enhanced picture quality use an S Video cable to connect your DVD VCR to yourTV if you...

Page 6: ... and white part of the picture If yourTV has an S VIDEO jack connect the DVD VCR to theTV with an S Video cable for a better quality picture One S Video cable is supplied with your DVD VCR for model DRC8312 only Note Remember to connect the left and right audio cables because the S Video cable carries only the picture signal not the sound Audio Video Jacks and Cables RCA type Video The basicVideo ...

Page 7: ...cable from an off air antenna cable box or cable outlet to this jack The cable is sending the programming from the source to the DVD VCR CABLE ANTENNA OUTPUT Connect an RF coaxial cable provided to this jack and to the Cable Antenna Input jack on yourTV It is important to connect this cable so that yourTV receives programming even when the DVD VCR is turned off INPUT These jacks receive audio and ...

Page 8: ...nly use ComponentVideo for DVD Playback You ll need to have anotherVideo Output connected for playback ofVCR tapes OPTICAL Y Pb ON OFF VIDEO INPUT OUTPUT L R PROG SCAN AUDIO VIDEO OUTPUT L R AUDIO OUT IN Pr COMPONENT VIDEO OUTPUT DIGITAL AUDIO OUT S VIDEO CABLE ANTENNA INPUT CABLE ANTENNA CH4 CH3 DVD VCR DVD Playback Only AC IN DIGITAL AUDIO OPTICAL OUT DVD PLAYBACK ONLY If you have a Dolby Digita...

Page 9: ...hen you re watchingTV When playing a disc goes to the beginning of the current chapter or track unless you re within the first minute of a chapter or the first 15 seconds of a track then you ll skip to the beginning of the preceding chapter or track CH SKIP channel up skip forward Goes to the next channel in the channel list when you re watchingTV When playing a disc goes to the beginning of the n...

Page 10: ...ts Input 1 channel orVid 1 channel Tune the DVD VCR to the channel you want to record and press RECORD Use the buttons on theTV or theTV s remote control to tune theTV to the channel you want to watch For example change the channel on theTV to channel 8 to watch a program on channel 8 To play a disc or tape Tune theTV to its Input 1 channel orVid 1 channel If you need help finding your TV s variou...

Page 11: ...cks on the back of your DVD VCR and to the corresponding Audio Input jacks on yourTV sometimes labeled AUDIO IN L and R 3b Connect the video cable The cables you use for the video determine the quality of the picture you ll see on yourTV when you re playing DVDs For more information about cables and signal quality go to page 4 Connect the video cable yellow to the OUTPUTVIDEO jack on the back of y...

Page 12: ...TV press TV and INPUT to access the Video Input Channel DVD VCR TV Basic Cable Box To play a disc or tape Tune theTV to its Input 1 channel orVid 1 channel Notes about cable boxes The connection diagram shown above reflects a basic setup Since there are many different cable companies and types of cables boxes your cable box may come with a different recommended connection diagram Normally ANALOG c...

Page 13: ...ou can watch cable box programs when the DVD VCR is off 2b Connect the audio cables A set of audio video cables was packed with your DVD VCR Connect the audio cables to the OUTPUT AUDIO L left white and R right red jacks on the back of your DVD VCR and to the corresponding Audio Input jacks on yourTV sometimes labeled AUDIO IN L and R 2c Connect the video cable The cables you use for the video det...

Page 14: ... watchTV satellite programming with the DVD Recorder turned on Tune theTV to its Input 1 channel orVid 1 channel Tune the DVD VCR to the INPUT 1 channel press the INPUT button on the remote Tune the satellite receiver to the channel you want to watch Tune theTV to its Input 1 channel orVid 1 channel To watchTV satellite programming with the DVD VCR turned off Tune theTV to its CABLE ANTENNA INPUT ...

Page 15: ...n yourTV sometimes labeled AUDIO IN L and R 3c Connect the video cable The cables you use for the video determine the quality of the picture you ll see on yourTV when you re playing DVDs For more information about cables and signal quality go to page 4 Connect the video cable yellow to the OUTPUTVIDEO jack on the back of your DVD VCR and to theVideo Input jack on yourTV sometimes labeledVIDEO IN S...

Page 16: ... Receiver Audio Receiver To play a disc or tape Tune theTV to its Input 1 channel orVid 1 channel Notes about cable boxes The connection diagram shown above reflects a basic setup Since there are many different cable companies and types of cables boxes your cable box may come with a different recommended connection diagram Normally ANALOG cable boxes are used so that the cable company can scramble...

Page 17: ...ntenna Input jack on the back of your TV sometimes labeled CABLE ANTENNA 2b Connect the video cable The cables you use for the video determine the quality of the picture you ll see on yourTV when you re playing DVDs For more information about cables and signal quality go to page 4 Connect the video cable yellow to the OUTPUTVIDEO jack on the back of your DVD VCR and to theVideo Input jack on yourT...

Page 18: ...he rightVideo Input Channel when you see the DVD VCR menu for the language selection see below If you have another brand ofTV turn on theTV and tune theTV to the correctVideo Input Channel if you don t know how to access theVideo Input Channel on your TV go to page 19 for help Note You can program your remote to operate most brands of remote controllable TVs Instructions are on page 22 Complete th...

Page 19: ...o make sure the cable is connected properly Note If you are using only a cable box or satellite receiver there will be few if any channels in the channel list Antenna Cable Antenna Cable Done Searching channels 35 complete 2 channels found Select your local time zone Eastern Central Mountain Should the clock be automatically adjusted for daylight savings time Yes No 4 Channel List The Channel List...

Page 20: ...y when you re changing channels because the signal goes to the DVD VCR and is then sent out to theTV Discs for Recording Recording to DVD discs is new to many people There are several different formats of DVD discs For your DVD VCR only DVD R 2 4x 4x 8x or 16x and DVD RW 2 4x and 4x type discs can be used for recording A DVD RW disc is rewritable which means you can use the disc over and over agai...

Page 21: ...nnel up and or down buttons on theTV s remote control sometimes theVideo Input Channel is stored in yourTV s channel list Next Steps This chapter is dedicated to connecting your DVD VCR Choose what you want to do next and go to the appropriate chapter for instructions Chapter 2 The Remote Control page 20 A description of each button is in Chapter 2 Additionally the universal remote control can be ...

Page 22: ...our product than they appear in this book The on screen help text provides the most current operational information page 20 Chapter 2 The Remote Control Explanation of the Buttons Find Out if the Remote Can OperateYourTV Programming the Remote to OperateYourTV Programming the Remote to Operate Other Components Using the Remote s Features Code Lists ...

Page 23: ...splays DVD VCR Turns on the DVD VCR and puts the remote in DVD mode so it operates the DVD VCR EDIT When playing a disc displays the Info Display and Edit menu see page 36 for details FORWARD Searches forward through the disc or tape GO BACK Returns you to the previous menu When watchingTV goes back to the previous channel INFO Displays the on screen Info Display for details about the Info Display...

Page 24: ...code search without programming theTV button to operate yourTV press CLEAR until the indicator on the remote turns off 1 Turn on theTV 2 Press and hold theTV button While you continue pressing theTV button press and hold the ON OFF button until theTV button turns on then release both buttons 3 Point the remote at theTV Press and release PLAY then wait 5 seconds or until theTV button stops flashing...

Page 25: ...lease both buttons 3 Point the remote at the component 4 Press and release PLAY then wait 5 seconds or until the component button stops flashing At this point the remote is searching for the correct code you ll know it s found the correct code when the component turns off go to step 5 If after 5 seconds the component doesn t turn off press PLAY again to tell the remote to search the next set of co...

Page 26: ... s remote control to operate your audio receiver or amplifier Go to page 23 for instructions If you can t program this remote to operate your audio receiver Volume Punchthrough won t work 2 While setting upVolume Punchthrough it s best to point the remote away from components 3 Decide which mode the remote will be in when the volume from the audio receiver punches through The mode will be one of t...

Page 27: ...G 1006 Loewe 1038 Logik 1002 Luxman 1005 1007 LXI 1001 1007 1029 1038 1043 1044 1045 1104 1116 1130 1132 1147 1157 Magnavox 1005 1007 1008 1018 1038 1040 1041 1046 1047 1048 1055 1082 1083 1124 1125 1129 1139 Majestic 1002 Marantz 1005 1007 1036 1038 1049 Megatron 1007 1036 Memorex 1002 1006 1007 1029 1045 MGA 1005 1006 1007 1018 1020 1030 1050 1051 Mitsubishi 1005 1006 1007 1018 1020 1030 1050 10...

Page 28: ... 2064 2074 2087 2088 Go Video 2073 2076 Goldstar 2006 2011 2015 2033 2036 Gradiente 2023 Harman Kardon 2006 Harwood 2037 Hitachi 2034 2035 2036 2054 2058 2064 JC Penney 2006 2007 2008 2009 2010 2011 2018 2019 2031 2034 2035 2037 2038 2054 Jensen 2034 2035 2058 JVC 2006 2007 2008 2015 2058 2065 2077 Kenwood 2006 2007 2008 2013 2015 2058 2065 KLH 2037 Kodak 2011 2018 LG 2011 Logik 2037 LXI 2011 Magn...

Page 29: ...utton Aiwa 3004 Apex 3007 3008 3048 3049 Broksonic 3009 3050 Daewoo 3010 Emerson 3011 3012 3052 Funai 3012 GE 3000 3001 3013 3062 Go Video 3040 Hitachi 3014 JVC 3041 Kenwood 3015 Konka 3005 Koss 3051 Lasonic 3038 Magnavox 3002 3016 Memorex 3017 Mintek 3018 Mitsubishi 3003 NAD 3011 Norcent 3019 Onkyo 3020 Oritron 3024 Panasonic 3006 3021 3056 3057 Philips 3002 3044 3046 Pioneer 3022 3023 Proscan 30...

Page 30: ...Receiver Tuner AUDIO button AUX button Aiwa 4008 4009 4010 4019 Denon 4023 Harman Kardon 4018 JBL 4018 JVC 011 Kenwood 012 Onkyo 4020 Optimus 4024 Panasonic 4021 RCA 4003 4013 4027 4028 4031 4034 4044 Sherwood 4022 Sony 4014 4015 Technics 4021 Yamaha 4016 4017 Home Theatre In A Box AUDIO button AUX button JBL Audio 4037 DVD 3053 JVC Audio 4038 DVD 3054 Koss Audio 4035 4036 DVD 3055 Audio AUDIO but...

Page 31: ...ns buttons and display messages might be different in your product than they appear in this book The on screen help text provides the most current operational information Chapter 3 Recording Playback Features WatchingTV DVD Recording DVD R and DVD RW Disc Library DVD Playback VCR Recording VCR Playback ...

Page 32: ...are rewritable discs which can be erased and reused for recording Notes This recorder is not compatible with DVD R or DVD RW discs for recording Please make sure to purchase discs with the plus symbol on the package Also it is NOT possible to record on CD R or CD RW discs IMPORTANT It is NOT possible to record content that is copy protected This is usually true for most pre recorded DVD discs and ...

Page 33: ...lp go to page 19 2 Using the DVD VCR s channel buttons tune to the program you want to record Press the RECORD button 3 If the remote that came with your DVD VCR operates yourTV just press theTV button and use the channel up and down buttons to change the channel on theTV If the remote doesn t operate yourTV use theTV s remote control to change channels 4 When you re finished recording remember to...

Page 34: ...ording takes up on the disc or tape go to page 57 for more information Press OK to confirm the quality recording setting 10 When you re finished make sure KeepTimer is highlighted and press OK Notes The DVD VCR s clock must be set in order for Timer Recordings to work properly Setting up timer recordings to transfer a disc to tape or tape to disc 1 From the DVD VCR s main menu use the remote s arr...

Page 35: ... choose Show All Discs additional sorting options appear Sort by Space Lists the discs by the amount of recording space left Sort by Disc No Lists the discs numerically Sort by DiscTitle Lists discs alphabetically by disc title Show AllTitles Lists all the titles recorded Delete Disc Deletes the disc that is highlighted and the its contents from the Disc Library but doesn t delete the contents fro...

Page 36: ...ically when you insert the disc If the screen is blank you might not have your TV tuned to the correct Video Input Channel For more information about Video Input Channels go to page 19 5 Use the up and down arrow buttons on the remote to highlight the DiscTitle Menu and press OK the options appear 6 There are two ways to access your recordings within these menu options Play Disc If you want to pla...

Page 37: ...sc has already been finalized After a disc is finalized you can t record more programs to the disc Make Compatible DVD RW discs only If you have made edits to the disc described in the next section such as adding or deleting chapter markers or hiding chapters this option enables the edited version of the disc to be compatible with other DVD players If you press OK when a title is highlighted the f...

Page 38: ...is video will appear The Edit icon Insert Chapter Marker Delete Chapter Marker Hide Chapter New Title Frame Rename Title Play Title Play All Chapters Delete Title Clear Chapters Insert Chapter Marker Delete Chapter Marker Hide Chapter New Title Frame Simon s 4th Birthday Fri 6 20 2003 03 00 pm 04 00 pm 1 Best EditingTitles with the Hide Chapter Feature As with most editing features on recorded dis...

Page 39: ...used each time you press PAUSE the video moves forward one frame Press the CH CH buttons to remove any streaks from the picture if necessary Press STOP to stop playback Tape Eject Press the STOP EJECT button on the DVD VCR when stopped to eject the tape You can also press the OPEN CLOSE button on the remote control to eject the tape Basic Recording 1 If necessary change the tape speed SP or SLP in...

Page 40: ...r go forward to the next index point Press FORWARD to go to the next Index Mark press REVERSE to go to the previous Index mark TheTape menu will be displayed while the DVD VCR searches for the next Index Mark A B Edit This feature was designed so that you can copy your videotape collection of home movies to DVD discs in separate segments so the events appear as separate titles on the DVD disc For ...

Page 41: ... to be connected 1 Make sure the DVD VCR and theTV are on Tune theTV to the appropriateVideo Input Channel if you need help go to page 19 2 Put a tape with its safety tab intact into theVCR deck 3 Using the DVD VCR s channel buttons tune to the program you want to record Press the RECORD button 4 If the remote that came with your DVD VCR operates yourTV just press theTV button and use the channel ...

Page 42: ...tents between a tape and a disc confirm the settings below and select Start Copy A B Edits Only Tape to disc 1 oh 47 min Copying a DVD disc DVD R or DVD RW to a videocassette tape When you access Copy Disc through the Disc menu the Copy screen appears Here you can choose the destination Disc toTape the tape speed and the copy mode The DVD recorder will record for the amount of time you specified f...

Page 43: ... make sure it s cued up or rewound to the beginning 3 Connect the camcorder to the DV IN jack on the front of the unit and turn it on Then press PLAY on the camcorder 4 From the DVD VCR s main menu select DV CAM and press OK the pictures and sound from the camcorder are displayed on theTV 5 Press RECORD on the remote control or on the front of the unit to begin recording To pause recording press P...

Page 44: ...ght be different in your product than they appear in this book The on screen help text provides the most current operational information page 42 Chapter 4 Playing Discs Regional Coding Types of DiscsYou Can Play How to Load and Play Discs Using the Different Menus Search Options Playback Options Using the On screen Info Display ...

Page 45: ...FF on the remote or press the STANDBY ON button on the DVD VCR 1 Make sure theTV is tuned to itsVideo Input channel if you need more information go to page 19 2 Press the OPEN CLOSE button the disc tray opens 3 Place a disc gently into the tray with the disc s label facing up double sided discs have content on both sides so you can place either side up 4 Press the OPEN CLOSE or PLAY button The dis...

Page 46: ...t a time press PAUSE again the on screen icon changes from PAUSE to FRAME Each time you press the FORWARD button the picture goes to the next frame To resume normal playback press PLAY Slow Motion in Freeze Frame Mode DVD discs only While a disc is playing press PAUSE Press REVERSE or FORWARD each time you press REVERSE or FORWARD the slow motion will get a little faster until you reach the fastes...

Page 47: ...e Info Display feature isn t available for the disc you re playing The invalid symbol appears on the screen when you press a button that doesn t have any function To make the Info Display disappear from the screen press INFO on the remote control Text will appear here as you highlight different icons to help you use the Info Display This is the Info Display you ll see when you re playing a pre rec...

Page 48: ...can skip to a specific chapter by using the Chapter feature in the Info Display 1 While a disc is playing press INFO on the remote the Info Display appears 2 Press the right arrow button until the chapter icon is highlighted 3 Press the up and or down arrow buttons to go to different chapters Notes You can also use the number button s on the remote to enter the chapter you want to play you may nee...

Page 49: ...s OK to set A point appears at the bottom of the Info Display Press OK when the disc gets to the beginning point of the segment the A point that you want to repeat 3 Go to the end of the segment you want to repeat Press OK to set the B point the segment you marked will play repeatedly until you turn off the Repeat feature 4 To turn off the Repeat feature highlight the Repeat icon and press the up ...

Page 50: ...y Mode feature lets you set up the order in which you want the tracks on the CD to play There are three Play Modes Standard the tracks play in the same order as listed on the CD starting with track 1 This is the default play mode Random the tracks on the CD play in a random order Program the tracks play in the order you designate To use the Program play mode you must set up the order in which you ...

Page 51: ...s mp3 files and convert them to other formats such as MPX Your DVD VCR won t recognize or play MPX files or other types of converted mp3 files WMA Windows Media Audio is another audio file format developed by Microsoft JPEG files are image files Make sure that they have a resolution of less than 5 megapixels approximately 2MB Note The time taken for the contents of the disc to be displayed varies ...

Page 52: ...ture the or buttons to go back to the previous picture or go on to the next one the FORWARD and REVERSE buttons to change the speed of the slide show the speed selection varies depending upon the size of the JPEG files and the MENU button to interrupt the slide show and display the disc s contents You can also press the INFO button to bring up the JPEG Info Display see below 5 When the player has ...

Page 53: ... every folder repeat play Repeat Off repeat is set to off Rotate Rotates the picture clockwise 90º 180º and 270º respectively Press OK to rotate Zoom Zooms in on the picture up to 4x Press OK to zoom or you can also zoom in by pressing ZOOM on the remote control Slideshow Speed This feature allows you to change the speed of a JPEG slideshow You can choose from Slow Normal and Fast ...

Page 54: ...ns and display messages might be different in your product than they appear in this book The on screen help text provides the most current operational information page 52 Chapter 5 Menu System Overview of the DVD VCR s Menu System WatchTV Menu Disc Menu Tape Menu Disc Library Menu Timer Menu Setup Menu ...

Page 55: ... all programs you ve recorded using this DVD VCR You can use the Disc Library as a search tool by sorting recorded programs As much information as possible is stored automatically The information is stored in the DVD VCR s memory and has storage limits You may need to delete some library contents in the future to make room for new recordings For detailed information about the Disc Library go to pa...

Page 56: ...isc a different name Highlight Done when you re finished and press OK You cannot select the disc name for a finalized DVD R disc Erase Disc erases a DVD RW disc so you can record new programming onto it Not available for DVD R disc Lock Disc protects contents of the DVD so nobody can record new programming onto it If the disc is locked this option changes to unlock This option isn t available for ...

Page 57: ... unlocked without any rating limits set If you want to use the Parental Control feature set Ratings Limits and then lock the player Lock and Unlock 1 From the DVD VCR s main menu select Setup and press OK the Setup menu items appear 2 Since Parental Control is highlighted just press the OK button the Parental Control menu items appear 3 Since Lock is highlighted just press the OK button on the rem...

Page 58: ...titles from being played you need to choose Password Required from the UnratedTitles menu and lock the player If you want this setting to apply to discs you recorded DVD R and DVD RW discs simply highlight Password required and press OK System Options This menu contains settings and menus for advanced audio features such as the digital audio out settings and surround sound settings Digital Audio O...

Page 59: ...creen vertically The movie might appear with black bars at the top and bottom of the screen 4 x 3 Standard choose this setting if you want the movie to fill the entire screen of yourTV This might mean that parts of the picture the left and right edges won t be seen Most discs that are produced in a widescreen only format can t be cropped in this fashion 16 x 9 choose this setting if your DVD VCR i...

Page 60: ...l Search will automatically search the signal and put the latest channels in the DVD VCR s channel list Use the arrow buttons to highlight Channel Search and press OK to begin a progress indicator appears to let you know how quickly the search is being completed Clock Setup if the clock is incorrectly set or you skipped this step during the interactive setup you can set the DVD VCR s clock using t...

Page 61: ...reens buttons and display messages might be different in your product than they appear in this book The on screen help text provides the most current operational information Chapter 6 Additional Information Troubleshooting Handling Cautions Maintenance of Cabinet LimitedWarranty Accessory Information ...

Page 62: ...disc and determine the disc type You won t be able to eject the disc during this time Wait 15 seconds and try again Maybe theTray Lock feature has been activated If locked the padlock icon shows in the display on the front of the unit To unlock the disc tray press and hold the STOP button on the front of the unit and then press and hold the OPEN CLOSE button on the front of the unit at the same ti...

Page 63: ...dvance etc If you connected an audio receiver to your DVD VCR make sure you chose the correct input setting on the receiver Can t advance through a movie You can t advance through the opening credits and warning information that appear at the beginning of DVD movies because the disc is programmed to prohibit that action Subtitle and or audio language is not the one selected from the initial settin...

Page 64: ...to the DVD VCR go to page 19 for more help If you connected a satellite receiver or a cable box make sure it is turned on Some snow or streaks are normal during search stop action frame advance and slow motion playback Adjust the tracking by pressing the CH and or CH buttons during tape playback The tape may be worn out or poor quality Press the ANTENNA button Tape won t play Make sure your DVD VC...

Page 65: ...other RCA GE or Proscan brand product with a remote control that has a DVD button some of the buttons will probably operate this product if you press the DVD button first Handling Cautions Before connecting other components to this DVD VCR be sure to turn all components off Don t move the player while a disc is being played The disc may get scratched or broken and the player s internal parts may b...

Page 66: ...ete the online Product Registration on RCA com or complete and mail the Product Registration Card packed with your unit It will make it easier to contact you should it ever be necessary The return of the card is not required for warranty coverage Limitation ofWarranty THEWARRANTY STATED ABOVE ISTHE ONLYWARRANTY APPLICABLETOTHIS PRODUCT ALL OTHERWARRANTIES EXPRESS OR IMPLIED INCLUDING ALL IMPLIEDWA...

Page 67: ...ical Plug to Optical Plug for Optical Audio connection to a compatible receiver 3 feet part number DV3 price 15 95 6 feet part number DV6 price 19 95 Optical Plug to Mini Plug 3 feet part number DV3M price 15 95 6 feet part number DV6M price 19 95 Surge Protector part number PS83202C2 price 34 95 GO BACK VOL CH MUTE TV ON OFF DVD VCR CABLE AUX AUDIO CLEAR MENU OK LIVE RECORD STOP PLAY INPUT ANTENN...

Page 68: ... or on the carton This will only add delays in service for your product Thomson Inc Thomson Inc 10330 North Meridian Street Indianapolis IN 46290 2005 Thomson Inc Trademark s Registered Marca s Registrada s Printed in Thailand TOCOM 1644356A Visit our website at www rca com THOMSON ...

Reviews: