background image

Connections & Setup

Chapter 1

11

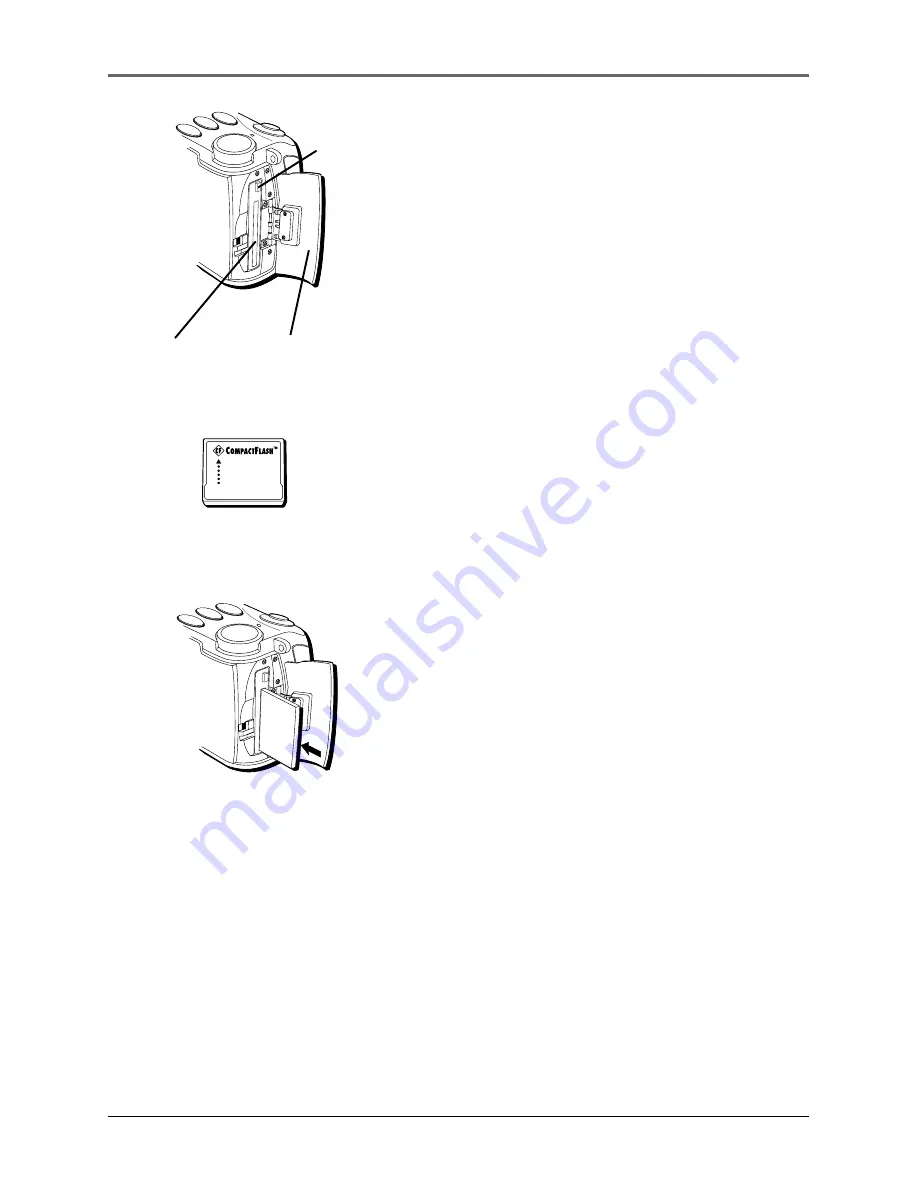
Insert the CompactFlash™ card

1.

Make sure the Power dial is set to OFF.

2.

Slide the CompactFlash card compartment door
to the rear of the camera. (The doors springs
open.)

3.

Before inserting the card, make sure the Eject
button is pushed in so that the door can close.

With the label of the card facing the front of
the camera

, fully insert the card into the slot in

the camera.

4.

Close the card compartment door until it snaps
back into place.

Important: 

Never remove or insert the

CompactFlash card while the camera power is
on. You could corrupt the information stored
on the card.

Notes:


If you try to turn on the camera without

the CompactFlash card installed, the
camera beeps and will not turn on.

This camera accepts both Type 1 and
Type 2 CompactFlash cards. Type 2 cards
are thicker than Type 1 cards.

CompactFlash™ card

CompactFlash card
compartment door

Card slot

Inserting the
CompactFlash card

Eject
button

Summary of Contents for CDS6300

Page 1: ...Digital Still Camera User s Guide Changing Entertainment Again CDS6300 ...

Page 2: ...ck No user serviceable parts inside Refer servicing to qualified service personnel This symbol indicates important instructions accompanying the product WARNING RISK OF ELECTRIC SHOCK DO NOT OPEN Product Registration Please fill out the product registration card and return it immediately Returning this card allows us to contact you if needed Keep your sales receipt for proof of purchase to obtain ...

Page 3: ...evel icon 10 Insert the CompactFlash card 11 Take a picture 12 View your picture 12 Turn off the camera 12 Powering the Camera 13 Using the Power Supply 13 Using the Neck Strap and Lens Cover Holder 15 Setting the Date and Time 16 Chapter 2 Using the Camera s Features Digital and Optical Zooming 18 Using the Zoom Lever W and T 18 Quick Review 19 Using the Navigation Button 19 Using the Status Scre...

Page 4: ...System Requirements for PhotoStudio 2000 37 Connecting to a Computer 38 Chapter 4 Other Information Troubleshooting 40 Care and Cleaning 42 Cleaning the Camera 42 Proper Care and Storage 42 CD ROM Care 43 Things to Avoid 43 Traveling Tips 44 Specifications 45 Limited Warranty 46 FCC Declaration of Conformity and Industry Canada Information 50 Optional Accessories 51 Accessories Order Form 53 Index...

Page 5: ...ctions Setup Chapter Overview Parts Checklist System Requirements for PhotoStudio 2000 Buttons and Controls Getting Started Powering the Camera Using the Neck Strap and Lens Cover Holder 3 Changing Entertainment Again ...

Page 6: ...e the power supply for any purpose other than powering the camera AC power supply Part 252110 A F Z o om 5 4 16 2mm 1 2 8 4 4 Imaging and driver software CD ROM Video output cable Part 252113 8MB CompactFlash card Lens cap Part 252325 Serial cable Part 252111 USB cable Part 252112 4 AA batteries Lens cap holder Part 252326 Soft camera case ...

Page 7: ... port recommended Pentium based or faster microprocessor 32 MB RAM 50 MB available hard disk space CD ROM drive Color VGA display Macintosh Requirements Mac OS 8 5 or later Power Mac or iMac USB compatible 32 MB RAM 50 MB available hard disk space Available USB port CD ROM drive Color VGA display PhotoStudio2000 is a registered trademark of ArcSoft Inc Windows is a trademark of Microsoft Corporati...

Page 8: ... 16 2mm 1 2 8 4 4 MENU QUICK REVIEW DISPLAY Lens Flash bulb Optical viewfinder front Self timer indicator Navigation button LCD monitor CompactFlash card compartment door Speaker Neck strap eyelet Optical viewfinder back DISPLAY button QUICK REVIEW button MENU button ...

Page 9: ...S E T U P V I E W OFF Battery compartment door lock Battery compartment door Status screen Shutter button Power Zoom dial Power dial MODE button TIMER button FLASH button Tripod mounting socket TV DIGITAL POWER TV jack DIGITAL jack POWER jack Camera bottom view ...

Page 10: ...s Unpack the camera and accessories The items shown in the parts checklist are packed with the camera If any pieces are missing or appear damaged contact your dealer immediately Remove the plastic film that covers the front LCD monitor and viewfinder and any logos on the camera Use your fingernail not anything sharp to remove Save all packing materials and box in case the camera ever needs to be s...

Page 11: ... by pushing down the door and pressing it toward the back of the camera Then slide the LOCK switch to secure it Note You must also insert the CompactFlash card before you can turn the camera power on see page 11 Important Never use manganese batteries Your camera will not work if the batteries are not inserted properly If the camera will not be used for an extended period of time remove the batter...

Page 12: ... some battery power As you use more battery power the icon changes again This icon flashes in the viewfinder when the battery power is almost gone The camera turns off automatically after a few seconds Battery Level Icon The battery level icon appears in the Status screen and reveals how much battery power is left ...

Page 13: ...e card into the slot in the camera 4 Close the card compartment door until it snaps back into place Important Never remove or insert the CompactFlash card while the camera power is on You could corrupt the information stored on the card Notes If you try to turn on the camera without the CompactFlash card installed the camera beeps and will not turn on This camera accepts both Type 1 and Type 2 Com...

Page 14: ...the camera flash to indicate information is being stored on the card Do not remove the batteries remove power from the camera or turn the camera off while they are on This may corrupt information on the card Note The camera automatically turns off to save power if you don t use the features for more than a few minutes To turn it back on set the Power dial to OFF then back to VIEW REC or SETUP View...

Page 15: ...the camera and lets you power it directly from standard household power 110 240 volts 50 60 Hz 1 Plug the small end of the power supply into the POWER jack on the camera 2 Plug the other end of the power supply into a working AC outlet 110 240V 50 60Hz Caution Never use this power supply for any purpose other than supplying power to the camera TV DIGITAL POWER POWER 1 2 POWER jack AC power supply ...

Page 16: ...to do so can result in a malfunction Note Removing the power supply and batteries from the camera returns all settings to the factory defaults but does not erase any information on the CompactFlash card Using an Optional Plug Adapter in Foreign Countries Even though the power supply is 110 240 volts an optional plug adapter might be required in some countries 1 Plug the power supply s plug into th...

Page 17: ...from moving Once the lens cover holder is in place you can snap the lens cover on it to avoid losing it 2 While holding one end of the neck strap by the metal clasp pry open the clasp and rotate it around the strap eyelet on the camera much like you would a key chain When finished the clasp should be completely secure and moveable inside the eyelet 3 Repeat the procedure to attach the other end of...

Page 18: ...ars 2 Use the Navigation button to scroll to DATE TIME Press the right arrow on the Navigation button to select it The Date Time menu appears 3 Use the Navigation button arrows to change the items month day year hour minute The on screen arrows indicate which arrows you can use on the Navigation button 4 When finished highlight ACCEPT Press the middle of the Navigation button to select it FLASH TI...

Page 19: ...Chapter 2 Using the Camera s Features Chapter Overview Digital and Optical Zooming Quick Review Using the Navigation Button Using the Status Screen Using the Menus 17 Changing Entertainment Again ...

Page 20: ...ere are two settings when using digital zoom 2X and 4X When zooming past the 3X optical zoom and into digital you must view the image using the LCD monitor on the back of the camera not the optical viewfinder Keep in mind that the optical viewfinder only shows images within the 3X zoom range Once the limits of the 3X optical viewfinder are reached the camera beeps once If you continue to zoom the ...

Page 21: ...en NO PICTURES TO REVIEW appears Using the Navigation Button You can use the Navigation button to adjust the camera s various on screen menus The LCD monitor usually shows you which direction you can scroll to with the Navigation button Use the arrow buttons to navigate the menus or adjust the settings and then press the middle of the Navigation button to confirm your selection FLASH TIMER MODE ON...

Page 22: ... To change this setting see page 26 Capture Modes You can choose from 4 types of modes for picture taking normal macro burst and multi Normal no icon This mode allows you to take a standard picture with all flash modes available To set the picture mode to normal press and release the MODE button until you don t see any of the capture mode icons Macro This mode allows you to take a close up picture...

Page 23: ... mode allows you to take 8 quick pictures for a slideshow effect or for action shots The images are stored as 8 separate files No flash modes are available with this setting To conserve file size the picture resolution quality is automatically adjusted to a lower setting When you return to normal picture taking mode all quality and flash settings you previously selected will return To set the pict...

Page 24: ... take a standard picture without using a flash To set the flash mode to normal press and release the FLASH button until you don t see any of the flash mode icons Auto Flash This mode automatically senses when a flash is needed To set the flash mode to Auto Flash press and release the FLASH button until you see the Auto icons Forced Flash This mode uses a forced flash with every picture you take To...

Page 25: ...SH button until you see the red eye icon Self Timer Status Once you set the self timer to your desired setting you can view it in the Status screen The available settings are 3 seconds and 10 seconds For details on the self timer see page 32 To turn on the self timer press the TIMER button The timer icon appears Camera Busy When the camera is processing information such as deleting several picture...

Page 26: ...the correctness of color reproduction under various lighting If the white balance is correct all other colors will be accurately reproduced The white balance is usually adjusted automatically however you may want to control this function manually to achieve a more professional color tint reproduction 1 Set the Power dial to REC The image in front of the camera appears 2 Press the MENU button The R...

Page 27: ...llowing situations When taking pictures in reverse lighting or when the background is too bright When taking pictures on a reflective background such as at the beach or when skiing 1 Set the Power dial to REC The image in front of the camera appears 2 Press the MENU button The Record menu appears and WHITE BAL is highlighted 3 Use the Navigation button to scroll to EXPOSURE and adjust the setting ...

Page 28: ... depending on what kind of picture you want Because economy quality pictures take up less memory the camera can store more of them than in fine mode 1 Set the Power dial to REC The image in front of the camera appears 2 Press the MENU button The Record menu appears and WHITE BAL is highlighted 3 Use the Navigation button to scroll to QUALITY and adjust the setting ECONOMY NORMAL FINE 4 When finish...

Page 29: ...icture you took appears 2 Press and release the DISPLAY button to toggle what information is displayed date time picture number no information or index Index Review You can view all the pictures you have taken in a thumbnail format smaller pictures 1 Set the Power dial to VIEW The last picture you took appears 2 Press and release the DISPLAY button until you see smaller images of the pictures you ...

Page 30: ...dle of the Navigation button to select it The picture is deleted 5 When finished you can delete another picture or use the Navigation button to return to the previous menu Lock Unlock a Picture You can lock special pictures so that you don t delete them inadvertently Any locked pictures must first be unlocked before you can delete them unless you format the CompactFlash card completely see page 34...

Page 31: ... UNLOCK and select it with the Navigation button Delete All Pictures This feature lets you delete all the pictures on the CompactFlash card except for those that are locked 1 Set the Power dial to VIEW The last picture you took appears 2 Press the MENU button The View menu appears and DELETE PICTURE is highlighted 3 Use the Navigation button to scroll to DELETE ALL 4 Press the middle of the Naviga...

Page 32: ...gation button to scroll to SLIDESHOW 4 Press the middle of the Navigation button to select it The Slideshow menu appears 5 Use the left and right arrows on the Navigation button to select the slide speed 6 Use the Navigation button to highlight START Press the middle of the Navigation button to select it The slideshow of your pictures starts 7 To end the slideshow press the middle of the Navigatio...

Page 33: ...GHT is highlighted 2 Use the Navigation button arrows to change the brightness The on screen arrows indicate which arrows you can use on the Navigation button 3 When finished use the Navigation button to scroll to the next setting or set the Power dial to the desired mode Sound You can adjust the beep and shutter sounds to be on or off 1 Set the Power dial to SETUP The Setup menu appears and LCD B...

Page 34: ...e is left before the picture is taken For the 3 second mode it flashes once every half second For th 10 second mode it flashes once a second for 7 seconds and then once every half second for the remaining three seconds 1 Set the Power dial to SETUP The Setup menu appears and LCD BRIGHT is highlighted 2 Use the Navigation button to scroll to SELF TIMER 3 Use the Navigation button arrows to adjust t...

Page 35: ...type of signal The on screen arrows indicate which arrows you can use on the Navigation button 4 When finished use the Navigation button to scroll to the next setting or set the Power dial to the desired mode Language The menu languages can be displayed in English French German Spanish and Portuguese 1 Set the Power dial to SETUP The Setup menu appears and LCD BRIGHT is highlighted 2 Use the Navig...

Page 36: ...n the Navigation button to select it The Format menu appears 3 Use the Navigation button arrows to highlight FORMAT CARD Press the middle of the Navigation button to select it NOW FORMATTING appears If you want to reset the picture numbers so that they start at 0001 again use the Navigation button to highlight RESET PICTURE NUMBERS Then press the middle of the Navigation button to select it If you...

Page 37: ...Chapter 3 Viewing and Downloading Chapter Overview Using Your Camera with a TV or PC System Requirements for PhotoStudio 2000 Connecting to a Computer 35 Changing Entertainment Again ...

Page 38: ...IDEO IN jack on the TV or VCR 4 Turn on the TV and tune it to the video input channel or turn on the VCR and place it in the line or camera mode If you need further instructions for viewing pictures on your TV or VCR consult the owner s manual for that product 5 Set the Power dial on the camera to VIEW The last picture you took appears on the TV and the LCD monitor on the camera turns off Notes Al...

Page 39: ...USB port recommended Pentium based or faster microprocessor 32 MB RAM 50 MB available hard disk space CD ROM drive Color VGA display Macintosh Requirements Mac OS 8 5 or later Power Mac or iMac USB compatible 32 MB RAM 50 MB available hard disk space Available USB port CD ROM drive Color VGA display PhotoStudio2000 is a registered trademark of ArcSoft Inc Windows is a trademark of Microsoft Corpor...

Page 40: ... small end of the USB cable into the DIGITAL jack on the camera Then plug the other end of the cable into the USB jack on your computer TV DIGITAL POWER DIGITAL 4 Set the Power dial to VIEW on the camera The last picture you took appears 5 Launch the software on your computer 6 In PhotoStudio2000 click File on the Main Menu then click Select Source 7 In the Select Source dialog box highlight the d...

Page 41: ...ation Chapter Overview Troubleshooting Care and Cleaning Traveling Tips Specifications Limited Warranty FCC Declaration of Conformity and Industry Canada Information Optional Accessories Index 39 Changing Entertainment Again ...

Page 42: ...es not come back on by itself The camera automatically turns off to save power if you don t use the features for more than a few minutes Turn the Power dial off and then on again The batteries are completely discharged Feature and Function Problems Vertical white lines appear when shooting a very bright object This sometimes occurs when there is a lot of contrast between the background and the obj...

Page 43: ...ome pictures before you can store new ones see page 28 It isn t possible to shoot in succession It takes approximately 2 seconds to store a picture in memory You ll have to wait until it is stored before taking another picture If you want to take more pictures in a short amount of time use Burst mode see page 21 All pictures can t be deleted even if Delete All is selected Some pictures may be lock...

Page 44: ...ply has been disconnected Mold may form if the lens is left dirty When using a cleaner or chemically treated cloth refer to the cautions of each product Proper Care and Storage Always cap the lens when the camera is not in use Before handling the camera make sure your hands and face are free from any chemical products such as suntan lotion as it might damage the finish The camera might be damaged ...

Page 45: ...ter moving it from a cold location to a warm location Give the camera 1 1 2 to 2 hours to reach a stable temperature before using Never aim the camera at the sun or other bright objects Do not leave the camera in direct sunlight for extended periods of time The resulting heat buildup might permanently damage the camera s internal parts Do not operate the camera in extremely humid environments Do n...

Page 46: ... a beach or pool Spray sand and dust should be avoided If your lens has been exposed to the elements clean it only with proper lens cleaning supplies Make sure you have any plug adapters that you might need before taking your camera to other countries Consult your dealer for advice Carry your camera in a carrying case when traveling An ordinary suitcase or carry bag does not offer the protection y...

Page 47: ...polated Lens 5 4 16 2mm 3x optical zoom Normal Range 50cm infinity Macro range 5 50cm Digital zoom 2x 4x Recording medium CompactFlash type 1 or type 2 Erase Single or all Video system NTSC or PAL Power source 4 AA alkaline or NiCd or NiMH rechargeable batteries AC Power Supply 110 240V 60Hz AC input 6V DC 800mA output ...

Page 48: ... be provided with a Service Request SR number and the location of a nearby exchange point if one exists No returns will be accepted without the SR number Proof of purchase in the form of a bill of sale or receipted invoice which is evidence that the product is within the warranty period must be presented to obtain warranty service For rental firms proof of first rental is also required Option I 1 ...

Page 49: ...the repairs are covered by your warranty you will not be billed Thomson assumes no responsibility for warranty shipments from the customer to the factory if not shipped in the manner prescribed by Thomson To receive a replacement camera after we have received your unit Write the SR number on the outside of the carton used to return the unit Make sure you insure your shipment in case of damage or l...

Page 50: ...d it ever be necessary The return of the card is not required for warranty coverage Limitation of Warranty THE WARRANTY STATED ABOVE IS THE ONLY WARRANTY APPLICABLE TO THIS PRODUCT ALL OTHER WARRANTIES EXPRESS OR IMPLED INCLUDING ALL IMPLIED WARRANTIES OF MERCHANTABILITY OR FITNESS FOR A PARTICULAR PURPOSE ARE HEREBY DISCLAIMED NO VERBAL OR WRITTEN INFORMATION GIVEN BY THOMSON MULTIMEDIA INC ITS A...

Page 51: ... do not allow the exclusion nor limitation of incidental or consequential damages or limitations on how long an implied warranty lasts so the above limitations or exclusions may not apply to you This warranty gives you specific legal rights and you also may have other rights that vary from state to state If you purchased your camera outside the United States This warranty does not apply See your d...

Page 52: ...ations However there is no guarantee that interference will not occur in a particular installation If this equipment does cause interference to radio or television reception which you can determine by turning the equipment off and on try to correct the interference by one or more of the following measures Reorient or relocate the receiving antenna that is the antenna for the radio or television th...

Page 53: ... a selection of accessories to help make your memorable moments look and sound even better These accessories are designed to make the process of taking pictures more enjoyable To order accessories contact your local Dealer If a dealer is not nearby all accessories are available through toll free ordering or by using the order form found on page 53 Using the Optional AC088 Tripod Mounting the camer...

Page 54: ...phone have your Visa MasterCard or Discover card ready and call the toll free number listed below Use this number only to place an order for accessory items listed on this order form 1 800 338 0376 To place your order by mail detach and mail the completed order form with credit card information money order or check in U S currency made payable to Thomson multimedia Inc to the following address Vid...

Page 55: ...15 35 USB cable 252112 14 10 16MB CompactFlash card PC16CF 99 95 All prices subject to change without notice Total Merchandise _________ Sales Tax _________ We are required by law to collect the appropriate sales tax for each individual state county and locality to which the merchandise is being sent Shipping and Handling _________ Total Amount Enclosed _________ Use VISA MasterCard or Discover Mo...

Page 56: ... date Copy Number above your name on MasterCard AUTHORIZED SIGNATURE Prices are subject to change without notice Please make sure that both sides of this form have been filled out completely Allow 4 weeks for delivery All accessories are subject to availability IMPORTANT Copy complete account number from your Discover Card Expiration date Print or type your name and address clearly A complete and ...

Page 57: ...This Page Left Blank Intentionally ...

Page 58: ...ng to a TV 36 D Date and time setting 16 Delete a picture 28 Delete all pictures 29 E Exposure 25 F FCC declaration of conformity 50 Flash modes 22 Auto flash 22 Forced flash 22 No flash 22 Red eye reduction flash 23 G Getting started 8 I Important information i Index review 27 Industry Canada information 50 Insert the batteries 9 Insert the CompactFlash card 11 L Language 33 LCD monitor brightnes...

Page 59: ...ick review 19 R Record menu 24 S Self timer 32 Self timer status 23 Setup menu 31 Slideshow 30 Sound 31 Specifications 45 Status screen 20 System requirements for PhotoStudio 2000 5 37 T Taking a picture 12 Things to avoid 43 Traveling tips 44 Troubleshooting 40 Turning off the camera 12 TV or PC connecting 36 TV signal 33 V View menu 27 Viewing your picture 12 W W and T zoom lever 18 Warranty 46 ...

Page 60: ...N 46290 Please do not send any products to the Indianapolis address listed in this manual or on the carton This will only add delays in service for your product 2001 Thomson multimedia Inc Trademark s Registered Marca s Registrada s Printed in Malaysia TOCOM 15747670 ...

Reviews: