


13
Copyright © 2020 RCA Communications Systems
www.RCACommunicationsSystems.com
Communications Systems
BRM350D Digital Mobile
Two-Way Radio
INSTRUCTION MANUAL
Security
The Security Feature allows you to enable or disable any radio within
your system. For example, you might want to disable a stolen radio, to
preventing a thief from using it, then enable that radio once recovered.
NOTE:
The Disable/Enable feature requires your radio to have this function
enabled. Check with your RCA dealer or system administrator for more
information.
Radio Security enables you to perform the following functions:
Radio Disable:
Radio’s receive / transmit functions become
disabled after the radio receives the Disable code set by your RCA
Communications Systems dealer.
1. Press [
VK
] to access the main menu.
2. Press [▲] or [▼] to navigate to Contacts and press [
VK
] to select.
3. Press [▲] or [▼] to navigate to the desired subscriber alias or ID and
press [
VK
] to select. OR - Press [▲] or [▼] to navigate to Manual Dial and
press [
VK
], input subscriber ID and press [
VK
] to select.
4. Press [▲] or [▼] to navigate to Radio Disable and press [
VK
] to select.
5. The display shows Radio Disable: <Subscriber alias or ID> and LED
indicator lights red.
6. Wait for acknowledgment.
7. If successful, a tone sounds and the display shows Radio Disable
successful. If failed, a tone sounds and the display shows Radio
Disable failed.
Radio Enable:
Radio’s receive / transmit functions become enabled,
when the radio is in Disable status, after the radio receives the Active
code set by your RCA Communications Systems dealer. OR - Radio
Enable can be initiated through the Menu of your radio.
1. Press [
VK
] to access the main menu.
2. Press [▲] or [▼] to navigate to Contacts and press [
VK
] to select. The
entries are alphabetically sorted.
3. Press [▲] or [▼] to navigate to the desired subscriber alias or ID and
press [
VK
] to select. OR - You can press [▲] or [▼] to navigate to Manual
Dial and press [
VK
], input subscriber ID and press [
VK
] to select.
4. Press [▲] or [▼] to navigate to Radio Enable and press [
VK
] to select.
5. The display shows Radio Active: <Subscriber alias or ID> and LED
indicator lights red.
6. Wait for acknowledgment.
7. If successful, a tone sounds and the display shows Radio Enable
successfully. If failed, a tone sounds and the display shows Radio
Enable failed.
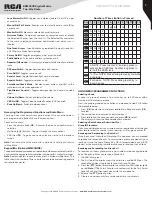
Scan Lists
Scan lists are created and assigned to individual channels / groups.
The radio scans for voice activity by cycling through the channel/group
sequence specified in the scan list for the current channel / group. Your
radio has 250 scan lists with 16 members each. Each scan list supports a
mixture of both analog and digital entries. You can add, delete, or prioritize
channels by editing the scan lists.
Viewing an Entry in the Scan List
1. Use the Channel Selector Knob to select a channel programmed
with a scan list.
2. Press [
VK
] to access the menu.
3. Press [▲] or [▼] to navigate to Scan and press [
VK
] to select.
4. Press [▲] or [▼] to navigate to View List and press [
VK
] to select.
5. Use [▲] or [▼] to view the members on the scan list.
Note:
If set as priority, the Priority icon appears left of the member’s alias,
indicate whether the member is on a Priority 1 or Priority 2 channel list.
You cannot have multiple Priority 1 or Priority 2 channels in a scan list.
There is no priority icon if priority is set to None.
Scan Instructions and Methods
When a scan is initiated, your radio cycles through the programmed
scan list for the current channel looking for voice activity. The LED
blinks red and you see the Scan icon on the display.
There are two ways of initiating scan:
• Manual Scan:
Initiate scan manually using the programmed Scan ON/
OFF side button by your RCA Communications Systems dealer. OR - By
menu function
.
• In Manual Scan, radio will detect all channel / groups on the
programmed scan list.
• Auto Scan:
Your radio automatically starts scanning when you select a
channel / group that has Auto Scan enabled.
Starting and Stopping Scan
Press the programmed Scan ON/OFF button to start or stop the Scan. OR -
Follow the procedure below:
1. Use the Channel Selector Knob to select a channel programmed with a
scan list.
2. Press [
VK
] to access the menu.
3. Press [▲] or [▼] to navigate to Scan and press [
VK
] to select.
4. The display shows Turn Off if scan is disabled or the display shows Turn
on if scan is enabled.
5. Press [
VK
] to select.
6. The LED blinks red and the Scan icon is displayed when Scan is enabled.
The LED turns off and the Scan icon disappears when Scan is disabled.
Responding to a Scan
During scanning, your radio stops on any channel / group where activity
is detected. After the transmission is over the radio remains on the active
channel for a programmed time period known as “hang time”.
1. Press the PTT button during “hang time” to respond to the call. The LED
lights up red.
2. Release PTT button to listen.
Note:
If you do not respond within the “hang time” period, the radio
continues scanning other channels / groups.
Deleting a Nuisance Channel
If a channel continually generates unwanted calls or noise (termed
a “nuisance” channel), you can temporarily remove the unwanted
channel from the scan list.
Note:
This capability does not apply to the channel designated as the
Selected Channel. This feature is not accessible through the menu.
1. When your radio stops on an unwanted or nuisance channel, press
the programmed Nuisance Channel Delete button until you hear a
tone.
2. Release the Nuisance Channel Delete button. The nuisance channel
is deleted.
Restoring a Nuisance Channel
To restore the deleted nuisance channel, power the radio off and back
on again. OR - Press Stop and Start to restart a scan via the programmed
Scan button.
Utilities
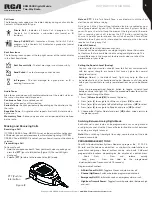
Keypad Locked or Unlocked (For use with optional MM301HD
Keypad/Mic.)
You can lock your radio’s keypad to avoid an inadvertent key entry.
1. Press [
VK
] to access the main menu.
2. Press [▲] or [▼] to navigate to Utilities and press [
VK
] to select.
3. Press [▲] or [▼] to navigate to Radio Settings and press [
VK
] to select.
4. Press [▲] or [▼] to navigate to Keypad Lock and press [
VK
] to select.
5. The display shows Keypad Locked and returns to the home screen.
To unlock the keypad, press [
VK
] button then press [
*
] button. The
display shows Keypad Unlocked and returns to the home screen.