background image

Using the Menu System

58

Chapter 5

MENU

 TIME
 VIDEO ADJUST
 AUDIO ADJUST
 CLOSED CAPTION
 TIMER RECORDINGS
 LANGUAGE
 SETTING
 V-CHIP BLOCK

SELECT       /   : SET    OK 
PREVIOUS         : QUIT   MENU

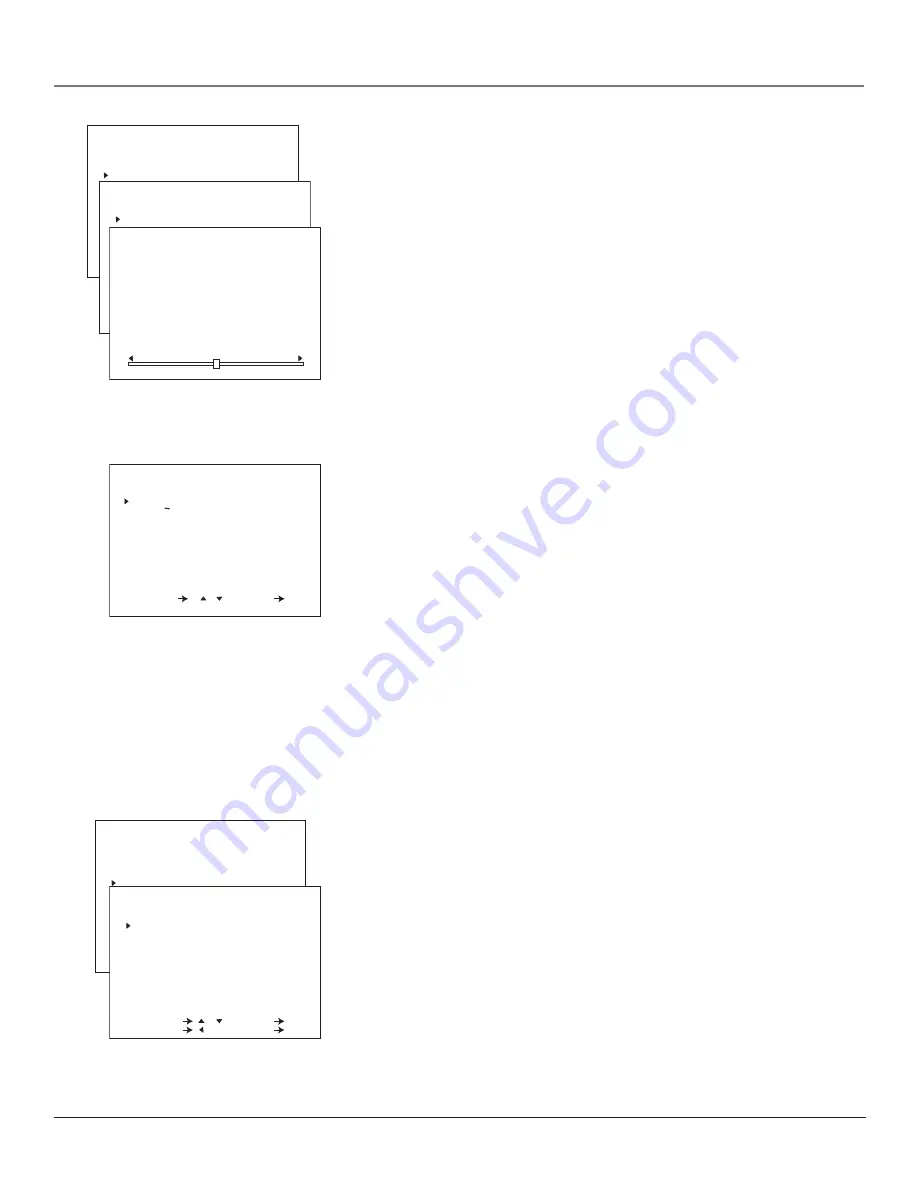
AUDIO ADJUST

 EQUISOUND OFF
 BASS
 TREBLE
 BALANCE
 RESET

SELECT       /   : SET    OK 
PREVIOUS         : QUIT   MENU


BASS


 ENGLISH
 ESPANOL
 FRANCAIS

SELECT       /   : SET    OK 

LANGUAGE

MENU

 TIME
 VIDEO ADJUST
 AUDIO ADJUST
 CLOSED CAPTION
 TIMER RECORDINGS
 LANGUAGE
 SETTING
 V-CHIP BLOCK

SELECT       /   : SET    OK 
PREVIOUS         : QUIT   MENU

CLOSED CAPTION

 MODE         CAPTION

 DATA

SELECT       /   : SET    OK 
PREVIOUS         : QUIT   MENU

         CH1

Audio Adjust


Menu

EQUISOUND


     Displays a choice list that allows you to turn on or off the

change of sound during a commercial break.

ON


allows you to have the volume of the audio remain constant

during program changes and commercial breaks.

OFF

allows you to have the volume of the audio change during

program changes and commercial breaks.

BASS


     Increases or decreases the bass.

TREBLE

Increases or decreases the treble.

BALANCE


   Press the right arrow to increase the right volume and the left

arrow to increase the left volume.

RESET

All audio adjustments are changed to the presets used at the

factory.

Language Menu

The language of the on-screen menus is set to English. If you want your TV/
VCR’s menus to appear in Spanish or French, follow these steps:

1.

Press the down arrow button on the remote to select 

ESPAÑOL

 (Spanish) or

FRANCAIS

 (French).

2.

Press OK (the on-screen menus appear in the language you selected).

Setting Closed-Caption Modes

Closed captioning is not available on all channels at all times. Only specific
programs encoded with closed-captioning information are applicable. Check
your TV/VCR program listings for CC (closed caption) broadcasts.

The TV/VCR automatically enters the closed caption mode when you press

MUTE 

on the remote (or turn the volume all of the way down). Press MUTE

again to remove the captions.

To Set the


Closed-Caption Mode:

1.

From the main 

MENU

, select 

CLOSED CAPTION

. Press the up or down

arrow buttons to select 

MODE 

or 

DATA

, and press OK.

2.

If you select 

MODE

, press the up or down arrow to select 

CAPTION

TEXT

,

or 

OFF

.

CAPTION

   Subscripts, dialogues, and commentaries appear while allowing

a clear view of the screen.

TEXT 

Display on-screen boxes containing the text of general information

not necessarily related to the program being watched.

Note: 

The 

Text

 modes cover nearly half of the picture on-screen to display the

closed-captioned text. If no text is being broadcast, the screen may become dark
and blank.

Summary of Contents for B27TF680

Page 1: ...TV VCR DVD User s Guide Changing Entertainment Again ...

Page 2: ...vice and for proof of purchase Attach it here and record the serial and model numbers in case you need them These numbers are located on the product Model No _____________________________________ Serial No _________________________________________ Purchase Date ______________________________________________________________________________________ Dealer Address Phone ______________________________...

Page 3: ...tings and or movie ratings that can be watched on your TV Requirements For TV Parental Controls set up the TV GUIDELINES and MPAA menus in the TV s main menu Chapter 3 has details The broadcasters must use the rating system when they send the program to your TV in order for your TV to block the program For DVD Parental Controls set up the PARENTAL CONTROL menu in the DVD s setup menu instructions ...

Page 4: ...sc Playback Description Your DVD player can play back compatible MP3 audio files recorded on CD R or CD RW discs Requirements The discs must be recorded on compatible equipment Chapter 4 has details The DVD player must be on Digital Output Jacks DVD Playback Only Description The jacks on the back of your TV VCR DVD labeled OPTICAL and COAXIAL DIGITAL OUT can be used to connect a component with dig...

Page 5: ...hoose Your Connection 9 TV VCR DVD Only 10 TV VCR DVD Satellite Receiver 11 Dolby Digital and DTS 12 TV VCR DVD Receiver 13 Plug in the TV VCR DVD 14 Put Batteries in the Remote 14 How to Use the Remote Control to Complete the Initial Setup 14 Turn on the TV VCR DVD 14 Initial Setup 15 Select a Language 15 Automatically Searching for Channels 15 Add or Erase Channels 16 Turn the Energy Save Featur...

Page 6: ...it 35 Download New Rating System 36 Turning V Chip Block On and Off 36 Recording Features 37 Recording Speeds 37 Recording Pause 37 Types of Recording 37 One Touch Recording 38 Timer Recording 38 Check Change or Delete Timer Recordings 39 Copying and Editing Tapes 40 Recording from the DVD Player 40 Picture Search Options 41 Frame Advance 41 Slow Motion 41 Index Search 41 Tracking 42 Time Counter ...

Page 7: ...use 52 Track Advance 52 Using the Repeat Feature 52 Playing MP3 Discs 53 To Play an MP3 Disc 53 Playback Features Using the Remote 54 Pause 54 Track File Advance 54 Using the Repeat Feature 54 Chapter 5 Using the Menu System How to Use Y our Menu System 56 Time Menu 56 Video Adjust Menu 57 Audio Adjust Menu 58 Language Menu 58 Setting Closed Caption Modes 58 Additional Setup Features 59 The DVD Me...

Page 8: ...ts 6 Chapter 6 Other Information Troubleshooting 66 The Front of Your TV VCR DVD 70 Back Panel Jacks 71 Care and Cleaning 72 Limited Warranty 74 Finding the TV VCR s Video Line Input Channel 76 Accessories 77 Index 79 ...

Page 9: ...tion Connections Plug in the TV VCR DVD Put Batteries in the Remote How to Use the Remote Control to Complete the Initial Setup Turn on the TV VCR DVD Initial Setup VCR Basics DVD Basics 7 Chapter 1 Changing Entertainment Again Graphics used within this publication are for representation only ...

Page 10: ...n t flow around other components Position Cables Properly to Avoid Audio Interference Insert each cable firmly into the designated jack If you place components above the TV VCR DVD route all cables down the side of the back of the TV VCR DVD instead of straight down the middle If your antenna uses 300 ohm twin lead cables do not coil the cables Also keep the twin lead cables away from audio video ...

Page 11: ...hows each cable separately for better visibility This TV VCR DVD s OPTICAL DIGITAL OUT jack fully complies with the international standard governing this type of jack IEC958 and is designed for connection to a Dolby Digital AC 3 or PCM receiver or Dolby Digital AC 3 or PCM decoder Older equipment some of which is not fully compliant with IEC958 may not be compatible with the Dolby Digital bitstrea...

Page 12: ... 75 LINE IN 1 OUT AUDIO TV VCR DVD Back Panel From Antenna Cable Feed TV VCR DVD TV VCR DVD Only 1 Connect the antenna cable feed to the TV VCR DVD Connect the coaxial cable from your cable or antenna to the ANT CABLE jack on the TV VCR DVD Go to page 14 1 ...

Page 13: ...ed OUT TO TV B Connect the audio video cables Connect audio cables white and red to the TV VCR DVD s LINE IN IN 1 AUDIO L and R jacks and the other ends to the satellite receiver s corresponding Audio Output jacks Connect one end of the video cable to the TV VCR DVD s LINE IN IN 1 VIDEO jack and the other end to the satellite receiver s Video Output jack 2 Connect antenna or cable to your satellit...

Page 14: ...common subwoofer The disc will play 5 1 channel sound only if you ve connected a DTS or Dolby Digital receiver or decoder and if the original movie the disc was recorded from was encoded in the Dolby Digital or DTS format Please Read this Before Using the OPTICAL DIGITAL OUT Jack This TV VCR DVD s digital output jack is designed for a connection to a Dolby Digital or DTS receiver or decoder There ...

Page 15: ...ils Also check the audio within the DVD Options menu to make sure it is set up correctly Chapter 4 has details Note The illustration on the left shows a digital optical cable connection If your receiver has a coaxial Audio In jack use a shielded coaxial video or audio cable with RCA plugs at both ends to connect the coaxial digital jacks on the TV VCR DVD and the A V receiver or 1B Connect the A V...

Page 16: ...3 Put the battery compartment cover back on the remote How to Use the Remote Control to Complete the Initial Setup The technical term is called navigation how you move through the on screen menus The theory is the same throughout the menu screens highlight your choice and select it To highlight or point to an item on the screen press the arrow buttons on the remote you ll notice the highlight move...

Page 17: ...llow these steps 1 Press the down arrow on the remote to highlight ESPANOL Spanish or FRANCAIS French 2 Press OK to select the language Note If you need to change the language later you can access this menu from the main MENU Chapter 5 has details Automatically Searching for Channels The next part of the initial setup asks you if you want to start AUTO CH PRESET also called auto programming or aut...

Page 18: ...NU appears 2 Press the down arrow button to highlight SETTING 3 Press OK the SETTING menu appears 4 Press the down arrow button to highlight CH MEMORY 5 Press OK the CH MEMORY menu appears Follow the on screen directions to ADD or ERASE a channel 6 You can add or erase more channels by entering the channel number or pressing CH or CH Turn the Energy Save Feature Off This feature reduces the bright...

Page 19: ...ess STOP to stop playing the tape Press STOP EJECT on the TV VCR DVD when the tape is stopped to eject the tape Automatic Rewind The VCR automatically rewinds the tape when it reaches the end of the tape during playback While rewinding you can press the ON OFF button on the remote and the VCR ejects the tape and turns off after rewinding Basic Recording 1 Insert a videotape with its safety tab in ...

Page 20: ... want to record on the tape simply cover the hole with adhesive tape 2 Make sure the remote is in VCR mode by pressing the VCR button 3 Use the CH buttons to select the channel you want to record and press the RECORD button to begin recording The RECORD indicator on the front panel lights 4 Press TV the VCR indicator turns off and then press VIEW to switch to the TV Use the CH buttons to tune to t...

Page 21: ...play This player s code is Region 1 Using Different Menus Each disc is programmed with different features There are three separate menu paths that you can use to access features Remember that a feature will only work if the disc was programmed with that feature The Disc menu The disc menu is part of each disc and is separate from the DVD player s menus The contents of each disc menu varies accordi...

Page 22: ...eart or hexagonal To Load and Play a Disc 1 Press the OPEN CLOSE button on the front of the DVD player The disc tray opens 2 Place a disc gently into the tray with the disc s label facing up double sided discs have content on both sides so you can place either side up 3 Press the OPEN CLOSE button The disc tray closes 4 Press the DVD button on the remote control Then press PLAY on the front of the...

Page 23: ...tles and chapters or it may allow you to change features such as language and playback settings Although the content and operation of disc menus vary from disc to disc the following example gives you an idea of what to expect 1 While the disc is playing press DISC MENU on the remote The disc menu appears 2 Press the up and down arrow buttons to highlight the section of the disc menu you want to ch...

Page 24: ...ere the icon is located on screen one button might be quicker to access the icon than the other When an icon is highlighted press OK on the remote Use the up or down arrow button to display other options if they are available and press the OK button to select the highlighted option To return to a previous screen press the RETURN button on the remote Remember you can only access the options menu wh...

Page 25: ...mote Control Programming the Remote to Operate Other Components How to Use the Remote After You ve Programmed It How to Order a New Remote Control Code List 23 Chapter 2 Changing Entertainment Again Graphics used within this publication are for representation only ...

Page 26: ...s Press TV to put the remote in the TV mode Press VCR to put the remote in VCR mode 0 9 Number buttons Enter channel numbers directly through the remote To enter a 2 digit channel press the two digits To enter a 3 digit channel press and hold the first digit until two dashes appear on the screen to the right of the first number then add the next two digits Example to tune to channel 123 press and ...

Page 27: ...Starts VCR recording The remote must be in VCR mode RETURN Returns you to the previous channel Removes on screen menus REVERSE Rewinds when the tape is stopped Also searches the picture in reverse during playback The remote must be in VCR mode SKIP TITLE Press once before changing channels and the TV will wait 30 seconds before returning you to the original channel Press repeatedly to add more tim...

Page 28: ...S Press this button to display the DVD s Option menu when you re playing a disc DVD SETUP Press this button while playback is stopped to display the DVD Setup menu FORWARD Allows you to search forward through a disc while it is in play mode Repeatedly press to increase speed INFO Press this button while you re playing a disc to see the title chapter and time information The info display contains v...

Page 29: ...l can be programmed to operate most brands of remote controllable VCRs satellite receivers and cable boxes The remote is already programmed to operate most RCA GE and Proscan VCRs and satellite receivers Note The TV VCR and DVD buttons cannot be programmed Find Out If You Need to Program the Remote To determine whether the universal remote needs to be programmed turn a component ON such as a VCR p...

Page 30: ...nent button and then ON OFF again If you get no response repeat these steps using the next code listed for your brand until the component responds to the remote commands If you try all the codes for your component brand and none work try the automatic code search method If automatic code search doesn t find the code the remote is not compatible with your component How to Use the Remote After You v...

Page 31: ...003 2013 2021 2055 2056 2082 2083 2084 2085 2086 2087 2088 2089 2090 2091 2107 2115 2120 2125 Radioshack Realistic 2002 2011 2013 2014 2021 2022 2023 2026 2029 2049 2050 2096 2131 Radix 2014 Randex 2014 Ricoh 2128 Runco 2104 Samsung 2005 2013 2015 2033 2053 2112 Sanky 2131 2104 Sansui 2010 2092 2111 2123 Sanyo 2011 2013 2023 Scott 2012 2015 2025 2032 2035 2038 2065 2093 2116 Sears 2011 2014 2021 2...

Page 32: ... This page intentionally left blank ...

Page 33: ...Overview Parental Controls and V Chip Recording Features Picture Search Options Audio Features Disc Playback Features Using the Remote Chapter 3 Changing Entertainment Again 31 Graphics used within this publication are for representation only ...

Page 34: ...V 14 etc and content themes Violence V Adult Language L etc If you have blocked the rating and or content themes that the program contains a message appears and the channel won t be available for viewing Broadcasters aren t required to provide content themes so programs that aren t tagged with a content theme can only be blocked if you block their age based rating The TV age based ratings and cont...

Page 35: ... the developmental skills needed to distinguish between make believe and reality Themes and elements in this program may include mild fantasy violence FV or comedic violence or may frighten children under the age of 7 All Children Themes and elements in this program are designed for a young audience including children from ages 2 6 It is not expected to frighten younger children Age Based Rating D...

Page 36: ...iew Shows distinction between content ratings that can be set square and content ratings that cannot be set because they are not broadcast Lets you view whether the status of the content theme is currently VIEW no check or BLOCK checked TV Y7 AGE BLOCK D L S V FV BLOCK SELECT SET OK PREVIOUS QUIT MENU 5 Press the up or down arrow buttons to select the age based rating or its contents that you want...

Page 37: ...ou select If you only want your child to watch movies that have a PG rating and lower in other words movies rated PG and G then you could automatically block out all other movies with higher ratings 1 Press TV MENU on the remote to display the main MENU 2 Use the up or down arrow to select V CHIP BLOCK and press OK on the remote 3 The INPUT SECRET NO menu appears Use number buttons 0 9 to enter a ...

Page 38: ...t your password unplug the TV VCR DVD Press and hold both the VOL up and STOP EJECT buttons on the front panel while you plug in the TV VCR DVD Release the buttons after approximately two seconds This resets the password 4 The V CHIP BLOCK menu appears Use the down arrow to select DOWNLOAD and press OK 5 Press the down arrow to select ON and press OK The new V Chip Data will not be downloaded unle...

Page 39: ...rded in SP Recording Pause This feature allows you to prevent recording short passages of unwanted material Press PAUSE during recording to temporarily stop and start recording STILL appears on the screen while the tape is paused The TV VCR automatically switches from pause to stop after a few minutes to prevent tape wear Types of Recording Your TV VCR DVD provides five ways to capture programming...

Page 40: ...ly at that time 5 Press the STOP button to stop OTR Timer Recording Timer recording allows you to program the TV VCR to record up to five different programs This is useful if you plan on being away from home for a long period of time Before setting the timer make sure that the clock is set correctly To set a timer recording 1 Press TV MENU to display the main MENU 2 Press the up or down arrow to s...

Page 41: ... the first program will have priority over the start of the second program Watching TV While Timer Recording 1 Perform the steps to set a Timer Recording 2 Press the TV button on the remote to place the TV VCR DVD in the TV mode 3 Select the channel you want to watch on the TV Play a DVD or CD While Timer Recording 1 Perform the steps to set a Timer Recording 2 Press the DVD button on the remote t...

Page 42: ... DVD s remote to pause the tape Then locate the next segment you want to copy on the playback VCR or camcorder by using FORWARD REVERSE or PLAY Press PAUSE on the playback VCR or camcorder Press PAUSE at the same time on both the VCR or camcorder and the TV VCR DVD s remote to resume copying 8 Press STOP on both the VCR or camcorder and the TV VCR DVD s remote when you are finished Recording from ...

Page 43: ...ndex Search The VCR automatically records index marks on the tape each time you begin recording During playback you can locate the program you want to play by the number of index marks To Select a Specific Index Number for Index Playback 1 Insert the pre recorded tape containing index marks and press STOP 2 Press INDEX once on the remote for each index number up to 19 you want to locate forward on...

Page 44: ...tracking press the CH and CH buttons on the front of the TV VCR at the same time Time Counter The time counter shows the actual time used in recording or playing back a tape The time counter helps locate the beginning or end of recorded events For example if you record a 30 minute program at the beginning of a tape rewind it and then want to go to the end of the first program to start another reco...

Page 45: ... appears on the screen Tape Playback The VCR records audio on both the Hi Fi stereo and linear tracks on the tape Hi Fi sound is recorded on separate left and right stereo channels Monaural sound is recorded on the linear track SAP is recorded on the linear track and the main audio is recorded on the Hi Fi track To enjoy Hi Fi sound connect your TV VCR DVD to a stereo system using the audio jacks ...

Page 46: ...ress the button again to scan at a faster speed Each time you press the button the scanning speed increases 3 Press the PLAY button at any time to resume normal playback Note You won t hear the sound audio on DVDs when you re using the picture scan feature Freeze Frame 1 Press PAUSE when a disc is playing to freeze the picture 2 Press PLAY to resume normal playback Slow Motion Playback While the d...

Page 47: ...ter that is playing Title repeats the title that is playing A B Set the beginning point A and the end point B to make this part of the disc play repeatedly To Use Repeat 1 While a disc is playing press REPEAT on the remote The repeat icon appears on screen Press the REPEAT button once and press the PLAY button to repeat the chapter that is playing Press the REPEAT button twice and press the PLAY b...

Page 48: ... This page intentionally left blank ...

Page 49: ...Playing Discs 47 Chapter 4 Changing Entertainment Again Chapter Overview Playing DVDs Playing Audio CDs Playing MP3 CDs Graphics used within this publication are for representation only ...

Page 50: ... have one title You can also select a title number by pressing SKIP TITLE on the remote and using the arrow or number buttons 0 9 to select the title you want Press OK to start playing that title Selecting a Chapter Because DVD discs use digital technology a title can be divided into individual chapters similar to tracks on a CD You can skip to a specific chapter by using the Chapter feature 1 Whi...

Page 51: ...scroll through the subtitle languages that are available on the disc Press OK when the language you want is highlighted Notes Changing the subtitle language with the options menu only affects the disc currently being played When the disc is removed or the player is turned off the subtitle language reverts to the language setting specified through the DVD player menu The subtitle language can also ...

Page 52: ...iscs allow you to change the audio format from the disc menu Changing the Virtual Dolby QSURROUND Setting You can use this feature to add a surround sound effect to the audio This feature only works if you are using the analog LINE OUT AUDIO L and R outputs You must turn COMPRESSION to OFF in the AUDIO SETUP menu to use this feature instructions on page 62 1 While the disc is playing press the DVD...

Page 53: ...he left or right arrow button to select the Gamma level you want and press OK Changing the Digital Super Picture Setting You can use this feature to enhance viewing by sharpening the picture 1 While the disc is playing press the DVD OPTIONS button on the remote 2 Press the up or down arrow button to highlight and press OK If digital super picture is not available XX is displayed Press the up or do...

Page 54: ...tton on the remote when you re playing a disc 2 Press the button again to scan at a faster speed 3 Press the PLAY button at any time to resume normal playback Note You won t hear the sound audio on CDs when you re using the scan feature Pause 1 Press the PAUSE button when a disc is playing to pause the disc 2 Press the PLAY button to resume normal playback Track Advance 1 While a disc is playing y...

Page 55: ...atures during playback Chapter 1 has details on loading and playing discs To Play an MP3 Disc 1 Press the DVD button on the remote to put the remote in DVD mode 2 Insert the MP3 disc The folder selection screen appears 3 Use the arrow buttons on the remote to select the folder you want to play and press the OK button You can also use the number buttons 1 9 to select the folder 4 Use the arrow butt...

Page 56: ...button to resume normal playback Using the Repeat Feature Press the REPEAT button to use the repeat feature There are two types of repeat available on MP3 CDs Track repeats the track file that is playing Disc repeats the disc that is playing To Use Repeat 1 While a disc is playing press REPEAT on the remote The repeat icon appears on the TV screen Press the REPEAT button once and press the PLAY bu...

Page 57: ...nu System Time Menu Video Adjust Menu Audio Adjust Menu Language Menu Setting Closed Caption Modes Additional Setup Features DVD Menu System Graphics contained within this publication are for representational purposes 55 Chapter 5 Changing Entertainment Again ...

Page 58: ...CHIP BLOCK SELECT SET OK PREVIOUS QUIT MENU Accessing Menus The first menu is called the main MENU Press TV MENU on the remote to bring up the main MENU Press TV MENU again to exit a menu The choices in the main MENU take you to a sub menu or screen that enables you to change a setting Time Menu You must set the clock before you can use the On Timer or Sleep Timer TIMER Displays a choice list that...

Page 59: ...gnal It may take a few hours to set the clock Manual Clock Set Press the up or down arrow to select AUTO CLOCK OFF and press OK The triangular icon moves to MONTH Press the up or down arrow to select the MONTH and press OK Continue using the up and down arrows and OK button to enter the DAY YEAR TIME hour minutes and AM or PM Note To correct an entry press the left arrow to return to the entry you...

Page 60: ...nu The language of the on screen menus is set to English If you want your TV VCR s menus to appear in Spanish or French follow these steps 1 Press the down arrow button on the remote to select ESPAÑOL Spanish or FRANCAIS French 2 Press OK the on screen menus appear in the language you selected Setting Closed Caption Modes Closed captioning is not available on all channels at all times Only specifi...

Page 61: ...et to ON at the factory BLUE SCREEN This feature reduces the noise and mutes sound from channels with no signal and during playback of unrecorded portions of tape The BLUE SCREEN feature is set to ON at the factory REPEAT PLAY This feature tells the VCR to repeatedly play a tape from the beginning to a blank portion on the tape TAPE BLANK or the end of the tape TAPE END The VCR automatically rewin...

Page 62: ... format can t be cropped in this fashion This means the black bars appear at the top and the bottom of the screen 4 3 LB Letterbox Choose this setting if you want to see movies in their original aspect ratio height to width ratio You ll see the entire frame of the movie but it will take up a smaller portion of the screen vertically The movie appears with black bars at the top and bottom of the scr...

Page 63: ...umber buttons 0 9 to enter a 4 digit password and press OK The password verification screen appears Enter your password again and press OK Important Note Be sure to remember your password The next time you try to access this menu you will have to enter the same password If you forget your password you can erase the current one by pressing the STOP button on the remote four times 4 The ratings for ...

Page 64: ... DVD normalized and raised This makes the very soft sounds louder and the loud sounds softer Select OFF to turn compression off Turn compression OFF when connected to audio equipment 5 Press RETURN to exit and remove the AUDIO SETUP menu Note Turning COMPRESSION ON automatically sets the Virtual Dolby setting to OFF Select Dolby Digital Setting 1 Press the DVD SETUP button to display the setup men...

Page 65: ...4 Press the up or down arrow button and left or right arrow button to highlight the desired language and then press OK To select a language that is not listed highlight OTHER and then press OK Press the up or down arrow button to select the first letter of the language code Press the left or right arrow button to move to the second letter Press the up or down arrow button to select the second lett...

Page 66: ...dic KM Cambodian KN Kannada KO Korean KS Kashmiri KU Kurdish KY Kirghiz LA Latin LN Lingala LO Laothian LT Lithuanian LV Latvian Lettish Code Language Name MG Malagasy MI Maori MK Macedonian ML Malayalam MN Mongolian MO Moldavian MR Marathi MS Malay MT Maltese MY Burmese NA Nauru NE Nepali NL Dutch NO Norwegian OC Occitan OM Afan Oromo OR Oriya PA Panjabi PL Polish PS Pashto Pushto PT Portuguese Q...

Page 67: ...e Front of Your TV VCR DVD Back Panel Jacks Care and Cleaning Limited Warranty Finding the TV VCR DVD s Video Line Input Channel Accessories Index 65 Chapter 6 Changing Entertainment Again Graphics used within this publication are for representation only ...

Page 68: ...ou are finished TV VCR DVD turns off unexpectedly Sleep timer may have been activated Go to page 56 for instructions TV VCR DVD turned on with On Timer Automatically turns off after two hours if no other control is used Electronic protection circuit may have been activated because of a power surge Wait 30 seconds and then turn the TV VCR DVD on again If this happens frequently the voltage in your ...

Page 69: ... the TV VCR DVD is in TV mode Press INFO again to clear the information Then press DVD to put the remote control in DVD mode The Remote Control Doesn t Work You have to make sure the remote control is in the right mode if you re using VCR features you need to press the VCR button on the remote to put it in VCR mode If you re using TV functions you need to press the TV button to put the remote in T...

Page 70: ...ality Might need to adjust the tracking Go to page 42 for instructions TV VCR DVD makes noise when VCR stopped VCR is removing tape from heads which is normal The head cylinder inside the VCR continues to rotate for a few minutes after you put the VCR in stop mode DVD Playback Problems DVD won t play Make sure disc is for Region 1 for this player Make sure the correct type of disc is inserted Go t...

Page 71: ...ly Go to 57 for more information Program exceeded tape s length or tape was not rewound beforehand No tape in TV VCR DVD or tape inserted without a safety tab OTR recording takes precedence over timer recording Go to page 38 for details Image distorted during DVD recording Some DVD s are copyright protected and cannot be recorded Problems with V Chip Parental Controls for TV VCR The rating limits ...

Page 72: ...To select these front panel jacks press INPUT on the remote until LINE 2 appears VOL or Decreases and increases the volume DVD Controls DVD Indicator Lights when the TV VCR DVD is in the DVD mode OPEN CLOSE Press to open and close the DVD tray PLAY Press once to begin playback of disc Press to resume playback when disc is paused or in slow motion SKIP REV and SKIP FWD Press SKIP REV to search the ...

Page 73: ...OUT AUDIO Back Panel Jacks ANT CABLE Jack Receives a signal from an antenna or cable system when the TV VCR DVD is attached with an RF cable LINE IN IN 1 AUDIO L and R and VIDEO Jacks Receives signals from another component such as another VCR or camcorder when the component is connected to these jacks To see the content coming from the component connected to these jacks press the INPUT button on ...

Page 74: ...xed images for extended periods of time can cause them to be permanently imprinted on the picture tube or projection TV picture tubes ALSO some network program logos phone numbers etc may cause similar damage This damage is not covered by your warranty Formation of Condensation Due to sharp changes in temperature and humidity condensation may form if warm air comes in contact with any cold parts i...

Page 75: ...irty discs can cause reduced video and audio performance Always keep discs clean by wiping them gently with a soft cloth from the inner edge toward the outer perimeter If a disc becomes very dirty wet a soft cloth in water wring it out well Wipe the dirt away gently and remove any water drops with a dry cloth Do not use record cleaning sprays or anti static agents on discs Also never clean the dis...

Page 76: ...d by an Authorized RCA Television Service Center If not you must take your TV VCR DVD to the Service Center location at your own expense or pay for the cost the Service Center may charge to transport your unit to and from your home To identify your nearest Authorized RCA Service Center ask your dealer look in the Yellow Pages or call 1 800 336 1900 Proof of purchase in the form of a bill of sale o...

Page 77: ...HE USE OF THIS PRODUCT OR ARISING OUT OF ANY BREACH OF ANY EXPRESS OR IMPLIED WARRANTY ON THIS PRODUCT THIS DISCLAIMER OF WARRANTIES AND LIMITED WARRANTY ARE GOVERNED BY THE LAWS OF THE STATE OF INDIANA EXCEPT TO THE EXTENT PROHIBITED BY APPLICABLE LAW ANY IMPLIED WARRANTY OF MERCHANTABILITY OR FITNESS FOR A PARTICULAR PURPOSE ON THIS PRODUCT IS LIMITED TO THE APPLICABLE WARRANTY PERIOD SET FORTH ...

Page 78: ...your TV VCR DVD to the video line input channel if you re using the AUDIO VIDEO A V IN jacks to connect other components such as a cable box another VCR or satellite receiver You must select the TV VCR DVD s video line input channel before you can see the video and hear the audio from another component you have connected to these jacks To access the video line input Press INPUT to select LINE 1 to...

Page 79: ...ype on the back of your TV VCR DVD Ends push on for a quick connection Monaural VCR Dubbing Cable Double cable that lets you connect the video and audio jacks of two VHS VCRs to duplicate tapes Can also be used to connect a VCR to your TV VCR DVD Cable is color coded and shielded Has RCA type phono plugs on each end Stereo VCR Dubbing Cable Triple cable that lets you connect the video and left and...

Page 80: ...3 4 5 6 7 8 9 0 ON OFF TV VCR INFO CLEAR INPUT REVERSE PLAY FORWARD RECORD STOP PAUSE OK CH CH VOL VOL D V D OPTIO N S TIMER S P EED ZO O M VCR2 DVD SAT CABLE RETURN SOUND MUTE TV MENU VIEW REPEAT DVD SETUP SKIP TITLE SLOW INDEX INDEX DISC MENU TRACK TRACK Surge Protector SCTV160 r r s TM Charge your order on your VISA MasterCard or Discover Card by filling in below USE YOUR CREDIT CARD IMPORTANT ...

Page 81: ...r 29 VCR 29 Color adjust 57 Color Temp adjust 57 Compression 62 Connection 8 Connections choosing 9 TV VCR DVD A V receiver 13 TV VCR DVD Dolby Digital receiver 13 TV VCR DVD DTS receiver 13 TV VCR DVD Satellite receiver 11 TV VCR DVD only 10 Content Themes 33 Copying tapes 40 D D PCM 62 Digital Gamma 51 Digital Super Picture 51 Disc cleaning 73 handling 73 loading and playing 20 DISC MENU button ...

Page 82: ...chapter 45 title 45 REPEAT button 26 Repeat Play feature 59 Reset audio 58 video 57 RETURN button 25 26 REVERSE button 25 26 REW button 71 Rewind automatic 17 S SAP Second Audio Program 43 SAT CABLE button 24 Satellite Receiver code list 29 Satellite receiver 11 Search Index 41 options 41 Searching for channels 15 Setup initial 15 Sharpness adjust 57 SKIP TITLE button 25 27 SKIP FWD button 70 SKIP...

Page 83: ...Chapter 6 81 Index Video Adjust menu 57 Video input channel 76 VIEW button 27 Virtual Dolby 50 VOL buttons 70 VOL button 25 VOL button 25 W Warranty 74 Widescreen 60 Z Zoom 45 ...

Page 84: ...end any products to the Indianapolis address listed in this manual or on the carton This will only add delays in service for your product 2002 Thomson multimedia Inc Trademark s Registered Marca s Registrada s Printed in Malaysia TOCOM 1577596A Visit the RCA web site at www rca com THOMSON ...

Reviews: