background image

1

NOTA: si usted selecciona la opción AUTOMATICO, el LCD se activará durante la llamada entrante ó 

cuando se presione un botón. Si usted selecciona una opción SIEMPRE ENCNDIDO, la luz de fondo del 

LCD se activará siempre..

7.  Presione el botón 

Sel/Save

 para salvar. Para volver a empezar, Presione el botón 

Exit

 para volver 

al menú de 

CONFIG PANTALLA

.

Tono de Timbre

Los timbres para todas las líneas pueden ser ajustados de forma independiente uno de otro.
1.   Presione el botón 

Menu

.

2.   Utilice los botones 

5

 ó 

6

 para ir a la indicación 

CONFIG SONIDO

.

3.   Presione el botón 

Sel/Save

.

4.   Utilice los botones 

5

 ó 

6

 para ir a la indicación 

TONO TMBR

.

5.   Presione el botón 

Sel/Save

.

6.   Utilice los botones 

3

 ó 

4

 para seleccionar L1 ó L2 para cambio del tono de timbre.

7.   Luego, utilice los botones 

5

 ó 

6

 para desplazarse a la selección del ton. Hay 7 tonos de timbre, 

entre los que usted puede seleccionar.

8.   Presione el botón 

Sel/Save

 para salvar. Para volver a empezar, Presione 

Exit

 para regresar al 

submenú 

CONFIG SONIDO

 y repita el paso 5.

Volumen del Tono de Tecla

1.   Presione el botón 

Menu

2.   Utilice los botones 

5

 ó 

6

 para ir a la indicación 

CONFIG SONIDO

.

3.   Presione el botón 

Sel/Save

.

4.   Utilice los botones 

5

 ó 

6

 para llegar a la indicación 

VOL TONO TECLA

.

5.   Presione el botón 

Sel/Save

.

6.   Utilice los botones 

5

 ó 

6

 para activar 

OFF

BAJO

 ó 

ALTO

.

7.   Presione el botón 

Sel/Save

 para salvar. Para volver a empezar, Presione el botón 

Exit

 para volver 

al menú de 

CONFIG SONIDO

.

Conexión y Programación

Summary of Contents for 25205

Page 1: ...Two Line Speakerphone Answering System with Call Waiting Caller ID User s Guide Please read this manual before operating this product for the first time Model 25205 ...

Page 2: ...ation instructions for details Notes This equipment may not be used on coin service provided by the telephone company Party lines are subject to state tariffs and therefore you may not be able to use your own telephone equipment if you are on a party line Check with your local telephone company Notice must be given to the telephone company upon permanent disconnection of your telephone from your l...

Page 3: ...llation Privacy of Communications may not be ensured when using this product If this equipment does cause harmful interference to radio or television reception which can be determined by turning the equipment off and on the user is encouraged to try to correct the interference by one or more of the following measures Reorient or relocate the receiving antenna that is the antenna for radio or telev...

Page 4: ...Going Announcement RECORD 19 Ring Delay 20 Message Length 20 Call Screening 21 Remote Password 21 Work Hours 22 After Hours 22 Configure Out Going Announcement 23 Restoring the Defaults 23 Telephone Operation 24 Telephone Operation 24 Making Calls with the Handset 24 Making Calls with the Speakerphone 24 Making Calls with the Optional Headset 24 Making a Call on a Line while Receiving a Call on An...

Page 5: ...ds to Memory Phone Directory Memory 30 Deleting a CID Record 30 Deleting All CID Records 30 Dialing Back 30 Call Waiting Caller ID 31 Digital Answering System 31 Digital Answering System 31 Answering System Indicator 31 Answering System On Off Status Check 32 Playback Messages 32 Memo Recording 32 2 Way Recording 33 Remote Access 33 Table of Contents Memory 34 Direct Access Memory Directory Memory...

Page 6: ...Caller ID phone enables you to Identify callers before you answer the phone View the time and date of each incoming call Record up to 100 Caller ID messages sequentially Know who called while you were away To get the most from your new phone we suggest that you take a few minutes right now to read through this user s guide IMPORTANT In order to use this unit you must subscribe to either the standa...

Page 7: ... 3 DIR directory button 5 6 volume buttons DND Do Not Disturb button Auto Redial button Flash button Store button Confer conference button Hold button Line 1 2 buttons Headset button Preset EQ button Mute button Dial button Speaker button Microphone Pause button Answer L1 L2 buttons Memo Record button Play Stop button 16 One Touch Dial buttons ...

Page 8: ...ook like the one pictured here installed in your home office Installation Important Installation Information Never install telephone wiring during a lightning storm Never touch uninsulated telephone wires or terminals unless the telephone line has been disconnected at the network interface Use caution when installing or modifying telephone lines Never install telephone jacks in wet locations unles...

Page 9: ...rtment door located on the bottom of the phone by inserting a flathead screw driver into the battery door latch area and gently tilting the screw driver away from the battery door to release the latch Insert the batteries as shown on the diagram inside the battery compartment Snap the battery compartment door back into place IMPORTANT If you are not going to use the telephone for more than 30 days...

Page 10: ...e is facing up and the end with data port and line jacks is pointing away from you B Turn the desktop pedestal so that the side with four rectangle rubber feet is facing you C Insert the tabs on the pedestal into the two lower slots on the bottom of the base then push the pedestal downward until the tabs on the top of the pedestal snap lock into place ...

Page 11: ...the other end of each line cord into separate wall jacks Connections and Setup NOTE To use two lines you must have two telephone lines with unique telephone numbers If you only have one telephone line this phone will still operate but only as a single line telephone 6 Connect the handset cord Plug one end of the coiled handset cord into the side of the base and the other end into the jack on the h...

Page 12: ...h to 1 and give him the phone number for line 1 Your fax machine can now receive calls on line 1 IMPORTANT Be sure to switch the fax machine back to the normal line when you are done because outside callers who may not know that you have multiple lines will not be able to reach your fax machine if they dial the normal fax line Wall Mounting the Phone 1 Remove the desktop stand from the base of the...

Page 13: ...all is received 1 Press the Menu button 2 Use the 5 or 6 button to scroll to DISPLAY SETTING 3 Press the Sel Save button 4 Use the 5 or 6 button to scroll to TIME DATE 5 Press the Sel Save button 6 Use the 5 or 6 button to scroll to the desired Month 7 Press the Sel Save button to save The cursor moves to the Date field 8 Use the 5 or 6 button to select the Date 9 Press the Sel Save button to save...

Page 14: ...G menu LCD Contrast 1 Press the Menu button 2 Use the 5 or 6 button to scroll to DISPLAY SETTING 3 Press the Sel Save button 4 Use the 5 or 6 button to scroll to LCD CONTRAST 5 Press the Sel Save button 6 Use the 5 or 6 button to adjust the LCD contrast 7 Press the Sel Save button to save To start over press the Exit button to return to the DISPLAY SETTING menu LCD Backlight 1 Press the Menu butto...

Page 15: ...l to RING TONE 5 Press the Sel Save button 6 Press 3 or 4 to select L1 or L2 for ring tone change 7 Then use the 5 or 6 button to scroll to the tone selection There are 7 ring tones from which you can select from 8 Press the Sel Save button to save To start over press the Exit button to return to the SOUND SETTING submenu and repeat step 5 Key Tone Volume 1 Press the Menu button 2 Use the 5 or 6 b...

Page 16: ...ss the Sel Save button to save To start over press the Exit button to return to the SOUND SETTING menu Local Area Code 1 Press the Menu button 2 Use the 5 or 6 button to scroll to PHONE SETTING 3 Press the Sel Save button 4 Use the 5 or 6 button to scroll to AREA CODE 5 Press the Sel Save button ENTER DIGITS is displayed 6 Use the touch tone pad to enter your area code NOTE If you make a mistake p...

Page 17: ... scroll to REGIONAL CODE 5 Press the Sel Save button 6 Use the 5 or 6 to scroll to desired code 7 Use the touch tone pad to enter the code Press Delete to clear and re enter all three digits Or use the 3 or 4 navigation button to go to the incorrect digit and retype in the correct one 8 When finished press the Sel Save button to save and return to REGIONAL CODE Flash Time Depending on the services...

Page 18: ...er to leave message PERSONAL It is empty when powered up for the first time You have to record it if you don t want to use the DEFAULT OGA ANNOUNCE It is empty when powered up for the first time You have to record it ONLY before using it for answering When ANNOUNCE ONLY is selected under CONFIG OGA the unit will use this OGA as an answering announcement and will not record incoming message WORK HO...

Page 19: ...RS 8 Press the Sel Save button to start playback 9 When playback finishes it will stop automatically Or press the Exit button to stop playback When playback stops it returns to OGA PLAY menu Out Going Announcement RECORD 1 Press the Menu button 2 Use the 5 or 6 to scroll to ANSWERING SYS 3 Press the Sel Save button 4 Use the 5 or 6 to scroll to OGA RECORD 5 Press the Sel Save button 6 Use the or t...

Page 20: ...6 to scroll to the desired ring delay 2 3 4 5 6 rings TOLL SAVER For TOLL SAVER selection the unit will answer on the 3rd ring if new voice messages have been recorded or on the 5th ring if there are no new voice messages 8 Press the Sel Save button to save To start over press the Exit button to return to the ANSWERING SYS menu Message Length This is to limit the length of the incoming caller s me...

Page 21: ... the Exit button to return to the ANSWERING SYS menu Remote Password The 3 digit remote password is required for remote access functions and it prevents unauthorized access to your answering system 1 Press the Menu button 2 Use the 5 or 6 to scroll to ANSWERING SYS 3 Press the Sel Save button 4 Use the 5 or 6 to scroll to REMOTE PASSWD 5 Press the Sel Save button 6 Enter the 3 digits code Press De...

Page 22: ...utton to save To start over press the Exit button to return to the ANSWERING SYSmenu After Hours This will allow you to program the start time for After Hours 1 Press the Menu button 2 Use the 5 or 6 to scroll to ANSWERING SYS 3 Press the Sel Save button 4 Use the 5 or 6 to scroll to AFTER HOURS 5 Press the Sel Save button 6 Use the 5 or 6to scroll to desired after work start Hour 7 Press the Sel ...

Page 23: ...Exit button to return to the ANSWERING SYS menu NOTE After the call is answered if the TIMED option is selected the unit announces the WORK HOURS OGA and AFTER HOURS OGA according to the time set in the weekday time On Saturdays and Sundays the unit announces AFTER HOURS OGA Restoring the Defaults This feature allows you to reset all the menu settings to the original default settings 1 Press the M...

Page 24: ...ove the microphone to approximately 2 to 3 inches from your mouth 4 Press the Headset button and the phone automatically selects an open line 5 Wait for a dial tone 6 Dial a phone number 7 When you are finished press the Speaker button again NOTE To converse while using the headset the handset must be placed in the cradle Making a Call on a Line while Receiving a Call on Another Line If Line 1 is ...

Page 25: ...re making or receiving a call the caller is disconnected if you press another line without putting the call on hold first NOTE To converse while using the headset the handset must be placed in the cradle Receiving Calls Simultaneously When the phone rings on both lines simultaneously the line indicators flash rapidly 1 Press the corresponding line button This will automatically enable the speakerp...

Page 26: ...isplay NOTE To enter a pause when pre dialing press the PAUSE button twice displays as P for example 9P555 1234 Call Timer During a phone conversation a built in call timer displays the length of the call in minutes and seconds When the call is finished total time shows in the display for about 10 seconds A call is timed even while it is on hold Mute To have a private off line conversation use the...

Page 27: ...ress the Speaker or Headset button 2 The line is selected automatically 3 Wait for a dial tone 4 Press the Auto Redial button Volume The ringer speaker and handset headset volumes can be set independently Your telephone is preset but may be set to individual taste Ringer Volume While the phone is in idle mode press the Vol or Vol button to enter the ringer volume menu You may choose from Level 1 t...

Page 28: ...old 2 To talk with one caller press the corresponding line button The other line remains on hold 3 To resume the conference call with both lines press the Confer button Do Not Disturb This feature disables an incoming call ring within the time duration you selected You can program the Do Not Disturb duration 1 While the handset is on the cradle press the DND button The DND indicator flashes 2 Use ...

Page 29: ...ecords This unit receives and displays information transmitted by your local phone company This information can include the phone number date and time or the name phone number date and time The unit stores up to 100 call records for later review When the call log is full a new call automatically replaces the oldest call NEW appears in the display for calls received that have not been reviewed Revi...

Page 30: ...D records you can dial back the numbers showing on the display If You Programmed Your Local Area Code in the Setup Menu 1 Press the CID button to enter the CID review menu then use 5 or 6 button to scroll to the desired number 2 Press the Dial button If you see a number with 7 digits i e 555 1234 then the call was received from within your area code However this does not guarantee the call is a lo...

Page 31: ...all Waiting Service To know who is calling while you are on the phone you must subscribe to Caller ID with Call Waiting Service Digital Answering System This unit incorporates a digital answering system with a total voice recording capacity of approximately 40 minutes The messages are saved in non volatile memory and will not be lost even in the event of total power outage Once the recording capac...

Page 32: ...ge 6 During playback press Delete to delete to the current message Press Sel Save or Delete to confirm message delete 7 During playback press and hold Delete for 2 seconds to delete to the all messages Press the Sel Save or Delete button to confirm all message delete 8 Press Play Stop or Exit to stop and exit playback NOTE After playing a message the unit will prompt you to keep or delete the mess...

Page 33: ...OTE Unit will not answer until after 10 ring if answering system is not activated 2 After unit answers enter your 3 digit remote password 3 Follow the voice menu to use the answering system s remote functions Press 1 to review Press 2 to play message press 2 again to stop Press 3 to skip Press 4 to turn on and off the answering system Press 7 to review menu again Press 0 while playing a message to...

Page 34: ...the letter L Press the 5 key 3 times for the second letter L and press the 1 key to insert a space between the first and last name Press the 7 key 4 times for the letter S press the 6 key once for the letter M press the 4 key 3 times for the letter I press the 8 key for the letter T press the 4 key twice for the letter H NOTE If you make a mistake press the Delete button to delete the last letter ...

Page 35: ...r in Memory section OR 1 Press a One Touch dial button 2 Press the Sel Save button and edit the content according to the steps in the Storing a Name and Number in Memory section Storing the Last Number Dialed 1 Press the Store button 2 Press the Auto Redial button to view the last number dialed 3 Press the Sel Save button to save the number 4 Follow the steps in the Storing a Name and Number in Me...

Page 36: ...2 Wait for the dial tone 3 Press the One Touch dial button and the number automatically dials Chain Dialing This process allows you to dial a succession of stored numbers from separate memory locations This is useful when you must dial several sequences of numbers such as with frequent calls via a telephone company long distance provider For example Memory location Local access number of long dist...

Page 37: ...fter a busy tone is received 1 After getting the busy tone place the handset back on the cradle or press Speaker to hang up the call 2 Press the Auto Redial button 3 The phone will automatically redial the last dialed number 4 The speaker LED blinks and the speaker is on which allows you to listen for the call to connect However the microphone is muted at this point 5 If the caller answers you can...

Page 38: ... This calibration samples the sound from both sides of the conversation Depending upon the surroundings and the conversation this calibration may take up to 30 seconds to complete Typically the calibration will complete in less than 10 seconds 2 During this calibration both parties in the conversation may hear a faint echo which will fade off as your speakerphone adapts itself to its surroundings ...

Page 39: ...s only activated when speakerphone mode is activated If you press the Preset EQ button while using the handset or a headset you will hear an error beep but there will be no difference in the tone of the conversation Display Messages The following special messages indicate the status of a message or the unit NO CALLS The CID memory log is empty UNKNOWN CALLER The incoming call does not have CID ser...

Page 40: ...l service You cannot be heard by the other party Make sure the handset or headset cord is connected properly and securely If using the Headset ensure that the headset plug is fully inserted into the jack Make sure MUTE is not turned on Phone does not ring Make sure the ringer is turned on You may have too many extension phones on your line Try unplugging some phones See solutions for No dial tone ...

Page 41: ...loth Never use a strong cleaning agent or abrasive powder because this will damage the finish Retain the original packaging in case you need to ship the phone at a later date Other Information AC power adaptor Headset 5 2719 5 2425 To place order have your Visa MasterCard or Discover Card ready and call toll free 1 800 338 0376 A shipping and handling fee will be charged upon ordering We are requi...

Page 42: ...hority to operate this product For instructions on how to obtain a replacement unit refer to the warranty included in this guide or call customer service at 1 800 511 3180 Or refer inquiries to Thomson Inc Manager Consumer Relations P O Box 1976 Indianapolis IN 46206 Attach your sales receipt to this booklet for future reference or jot down the date this product was purchased or received as a gift...

Page 43: ...e presented to obtain warranty service For rental firms proof of first rental is also required Also print your name and address and a description of the defect Send via standard UPS or its equivalent to Thomson Inc 11721 B Alameda Ave Socorro Texas 79927 Pay any charges billed to you by the Exchange Center for service not covered by the warranty Insure your shipment for loss or damage Thomson Inc ...

Page 44: ...all not be liable for incidental or consequential damages resulting from the use of this product or arising out of any breach of any express or implied warranty on this product This disclaimer of warranties and limited warranty are governed by the laws of the state of Indiana Except to the extent prohibited by applicable law any implied warranty of merchantability or fitness for a particular purpo...

Page 45: ...ata Port 12 Deleting a CID Record 30 Deleting All CID Records 30 Deleting All Directory Memory 37 Dialing a Stored Number 36 Dialing Back 30 Digital Answering System 31 Direct Access Memory Directory Memory 34 Display Language 13 Display Messages 39 Do Not Disturb 28 E Enhanced Full Duplex Speakerphone 38 Equipment Approval Information 2 F Flash 27 Flash Time 17 G General Product Care 41 H Hearing...

Page 46: ...tion 18 Out Going Announcement Playback 19 Out Going Announcement RECORD 19 P Parts Checklist 8 Placing a Call on Hold 27 Playback Messages 32 Pre Dialing Telephone Numbers 26 Preset Equalizer 39 Programming the Telephone 13 R Receiving and Storing CID Records 29 Receiving Calls Simultaneously 25 Receiving Calls with the Handset 25 Receiving Calls with the Optional Headset 25 Receiving Calls with ...

Page 47: ... a Name and Number in Memory 34 Storing a Pause 35 Storing the Last Number Dialed 35 Summary Screen 29 Switching Between the Speakerphone Handset and Headset 25 T Telephone Jack Requirements 8 Telephone Operation 24 Troubleshooting Guide 40 V Volume 27 W Wall Mounting the Phone 12 Warranty Assistance 42 Work Hours 22 ...

Page 48: ...apolis address listed in this manual or on the carton This will only add delays in service for your product Thomson Inc 101 W 103rd Street Indianapolis IN 46290 1102 2008 Thomson Inc Trademark s Registered Marca s Registrada s Model 25205 00019577 Rev 3 DOM E S 08 23 Printed in China ...

Page 49: ...Teléfono con Altavoz de Dos Líneas Sistema de Contestadora con Identificador de Llamada en Espera Guía del Usuario Por favor lea este manual antes de operar este producto por primera vez Modelo 25205 ...

Page 50: ...o Están diseñados para ser conectados a un enchufe modular compatible que también esté en conformidad Para más detalles vea las instrucciones para la instalación NOTAS No se puede usar este equipo con un teléfono de previo pago proveído por la compañía telefónica Las líneas compartidas son sujetas a las tarifas del estado y por eso es posible que Ud no pueda usar su propio equipo telefónico si Ud ...

Page 51: ...gurada al usar este producto Si este equipo causa en efecto una interferencia dañosa a la recepción de la radio ó de la televisión lo cual puede ser determinado apagando y prendiendo el equipo le animamos a Ud de tratar de corregir la interferencia por medio de una ó más de las sugerencias siguientes Cambie la posición ó la ubicación de la antena quiere decir la antena de la radio ó de la televisi...

Page 52: ...nsaje de Salida 18 Reproducción del Mensaje de Salida 19 Grabacion del Mensaje de Salida 19 Para Restablecer las Programaciones de Fábrica 23 Operación del Teléfono 24 Operación del Teléfono 24 Para Hacer Llamadas con el Auricular 24 Para Hacer Llamadas con el Altavoz 24 Para Hacer Llamadas con los Audífonos Opcionales 24 Para Hacer una Llamada en una Línea Mientras Recibe una Llamada en otra Líne...

Page 53: ...ra Cambiar un Nombre ó Número Almacenado 35 Para Almacenar una Pausa 35 Para Marcar un Número Almacenado 36 Marcado en Cadena 36 Para Borrar Todas las Memorias del Directorio 37 Función de Remarcado Automático 37 Otra Información 38 Teléfono con Altavoz Full Duplex Ampliado 38 Preselección de Ecualizador 39 Mensajes de la Pantalla 39 Guía para Solución de Problemas 40 Cuidado General del Producto ...

Page 54: ...le permite Identificar a la persona que llama antes de que usted conteste el teléfono Ver la hora y fecha de cada llamada entrante Grabar hasta 100 mensajes del Identificador de Llamadas en secuencia Saber quién llamó mientras usted estaba fuera Para aprovechar al máximo su nuevo teléfono le sugerimos que se tome unos minutos ahora mismo para leer esta guía del usuario IMPORTANTE Para poder utiliz...

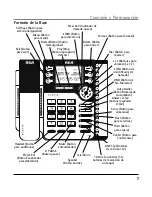
Page 55: ...D Botón de No Molestar Answer L1 L2 botóns responder L1 L2 Delete Botón para borrar Exit Botón para salir New Call Indicador de llamada nueva Sel Save Botón para seleccionar guardar Conexión y Programación Formato de la Base Auto Redial Botón Remarcado Automático 4 CID Botón de identificador de llamada Format Botón para formato Preset EQ Botón Ecualizador preestablecido micrófono PAUSE Botón pausa...

Page 56: ...gatos que pueden ser como el que está ilustrado aquí en su casa oficina Instalación Información Importante para la Instalación Nunca instale cableado telefónico durante una tormenta de relámpagos Nunca toque cables ó terminales no aislados a menos que la línea telefónica haya sido desconectada en la interfaz de la red Utilice precaución cuando instale ó modifique líneas telefónicas Nunca instale e...

Page 57: ... la parte inferior del teléfono insertando un desarmador de cabeza plana en el área del seguro de la puerta de la batería e inclinando suavemente el desarmador hacia afuera de la puerta de la batería para liberar el seguro Introduzca las baterías como se muestra en el diagrama dentro del compartimiento de las baterías Coloque la puerta del compartimiento de las baterías en su sitio IMPORTANTE Si u...

Page 58: ...on el puerto de datos y receptáculos de línea esté apuntando lejos de usted B Voltee el pedestal de escritorio de forma que el lado con cuatro patas de hule rectangulares esté frente a usted C Inserte las lengüetas en el pedestal dentro de las dos ranuras inferiores en la parte inferior de la base luego empuje el pedestal hacia abajo hasta que la lengüeta en la parte superior del pedestal quede co...

Page 59: ...o de marcar Levante el auricular y espere a escuchar el tono de marcar Si escucha un tono de marcar quiere decir que el teléfono está instalado adecuadamente Si usted tiene dos líneas telefónicas instaladas en un solo enchufe conecte un extremo del cable de línea liso dentro del enchufe marcado LINE 1 2 en la parte trasera de la base Conecte el otro extremo en el enchufe de pared de 2 líneas Si us...

Page 60: ...al de datos DATA PORT a la línea 1 y dé a esa persona el número telefónico de la línea 1 Ahora su máquina de fax puede recibir llamadas por la línea 1 IMPORTANTE Asegúrese de volver a cambiar su máquina de fax a la línea normal cuando usted termine con esa llamada porque si no las personas que no saben que usted ha cambiado de línea su máquina de fax no podrán enviarle faxes si marcan la línea don...

Page 61: ...y los minutos cada vez que se recibe una llamada 1 Presione el botón Menu 2 Utilice los botones 5 ó 6 para ir a la indicación CONFIG PANTALLA 3 Presione el botón Sel Save 4 Utilice los botones 5 ó 6 para ir a la indicación FECH Y HORA 5 Presione el botón Sel Save 6 Utilice los botones botón 5 ó 6 para desplazarse al Mes deseado 7 Presione el botón Sel Save El cursor se mueve al campo de Fecha 8 Ut...

Page 62: ...NTALLA Contraste del LCD 1 Presione el botón Menu 2 Utilice los botones 5 ó 6 para ir a la indicación CONFIG PANTALLA 3 Presione el botón Sel Save 4 Utilice los botones 5 ó 6 para ir a la indicación CONTRASTE LCD 5 Presione el botón Sel Save 6 Utilice los botones 5 ó 6 para ajustar el contraste del LCD 7 Presione el botón Sel Save para salvar Para volver a empezar Presione el botón Exit para volve...

Page 63: ...5 Presione el botón Sel Save 6 Utilice los botones 3 ó 4 para seleccionar L1 ó L2 para cambio del tono de timbre 7 Luego utilice los botones 5 ó 6 para desplazarse a la selección del ton Hay 7 tonos de timbre entre los que usted puede seleccionar 8 Presione el botón Sel Save para salvar Para volver a empezar Presione Exit para regresar al submenú CONFIG SONIDO y repita el paso 5 Volumen del Tono d...

Page 64: ...a volver a empezar Presione el botón Exit para volver al menú de CONFIG SONIDO Clave de Área Local 1 Presione el botón Menu 2 Utilice los botones 5 ó 6 para ir a la indicación CONFIG TELFONO 3 Presione el botón Sel Save 4 Utilice los botones 5 ó 6 para ir a la indicación CLAVE DE AREA 5 Presione el botón Sel Save La indicación INGRESE DIGITOS aparece en la pantalla 6 Utilice el teclado numérico pa...

Page 65: ...n Sel Save 6 Utilice los botones 5 ó 6 para ir al de la clave de área deseada 7 Utilice el teclado numérico para inscribir su clave de área Presione el botón Delete para eliminar y volver a inscribir elimine los tres dígitos Ó use el botón de navegación 3 ó 4 para ir al digito incorrecto y vuelva a escribir el que sea correcto 8 Cuando haya terminado Presione el botón Sel Save y vuelva al menú de ...

Page 66: ...a invitar a la persona que llama a dejar mensaje PERSONAL Está vacío al momento de activar por primera vez Usted tiene que grabarlo si no prefiere usar el MENSAJE DE SALIDA PREDETERMINADO SOLO MENSAJE Está vacío al momento de encender por primera vez Usted tiene que grabarlo antes de usar para responder Cuando SOLO MENSAJE está seleccionado bajo CONFIG OGA la unidad usa este OGA como mensaje de co...

Page 67: ...Sel Save para iniciar la reproducción 9 Al terminar la reproducción se detendrá automáticamente O presione Exit para detener la reproducción Cuando la reproducción se detiene regresa al menú de REPRODUCCIÓN OGA Grabacion del Mensaje de Salida 1 Presione el botón Menu 2 Utilice los botones 5 ó 6para desplazarse a SIST DE CONTESTADORA ANSWERING SYS 3 Presione el botón Sel Save 4 Utilice los botones ...

Page 68: ...plazarse a la demora de timbre deseada 2 3 4 5 6 timbres TARIFA REDUCIDA TOLL SAVER Para selección de TARIFA REDUCIDA la unidad responderá al 3er timbrado si nuevos mensajes de voz han sido grabados ó al 5º timbrado si no hay nuevos mensajes de voz 8 Presione el botón Sel Save para guardar Para volver a comenzar presione Exit para regresar al menú SIST DE CONTESTADORA Longitud del Mensaje Esto es ...

Page 69: ... Exit para regresar al menú SIST DE CONTESTADORA Clave de Acceso Remoto Requiere la clave de acceso de 3 dígitos para funciones de acceso remoto y evita el acceso no autorizado a su sistema de contestadora 1 Presione el botón Menu 2 Utilice los botones 5 ó 6para desplazarse a SIST DE CONTESTADORA ANSWERING SYS 3 Presione el botón Sel Save 4 Utilice los botones 5 ó 6para desplazarse a CLAVE DE ACCE...

Page 70: ...ardar Para comenzar nuevamente presione Exit para regresar al menú SIST DE CONTESTADORA Horas Inhábiles Esto es para programar el tiempo de inicio de las horas inhábiles 1 Presione el botón Menu 2 Utilice los botones 5 ó 6 para desplazarse a SIST DE CONTESTADORA ANSWERING SYS 3 Presione el botón Sel Save 4 Utilice los botones 5 ó 6 para desplazarse a HORAS INHABILES AFTER HOURS 5 Presione el botón...

Page 71: ...ONTESTADORA NOTA Después de que la llamada sea contestada si la opción POR TIEMPO TIMED es seleccionada la unidad anuncia el MENSAJE DE SALIDA HORAS HABILES y el MENSAJE DE SALIDA HORAS INHABILES de acuerdo con la hora establecida en el tiempo de los días de la semana En sábados y domingos la unidad anuncia el MENSAJE DE SALIDA HORAS INHABILES Para Restablecer las Programaciones de Fábrica Esta fu...

Page 72: ...ófono a aproximadamente 2 ó 3 pulgadas de su boca 4 Presione el botón Headset y el teléfono selecciona automáticamente una línea abierta 5 Espere al tono de marcar 6 Marque el número telefónico 7 Presione el botón Headset cuando usted haya terminado NOTA Para conversar utilizando los audífonos el auricular debe estar sobre la base Para Hacer una Llamada en una Línea Mientras Recibe una Llamada en ...

Page 73: ...ed hace una llamada como si la recibe la persona que llama se desconecta si usted oprime el botón de otra línea sin antes poner en espera a la línea original NOTA Para conversar utilizando los audífonos el auricular debe estar sobre la base Para Recibir Llamadas Simultáneamente Cuando el teléfono timbra en ambas líneas simultáneamente los indicadores de línea parpadean rápidamente 1 Presione el bo...

Page 74: ... pre marcar presione el botón de PAUSE dos veces Las exhibiciones de pantalla una pausa como P por ejemplo 9P555 1234 Temporizador de Llamadas Durante una conversación telefónica un temporizador integrado muestra la duración de la llamada en minutos y segundos Cuando la llamada termina el tiempo total permanece en la pantalla durante aproximadamente 10 segundos Se marca la duración de una llamada ...

Page 75: ...y presione el botón Speaker ó Headset 2 La línea es seleccionada automáticamente 3 Espere al tono de marcar 4 Presione el botón Auto Redial Volumen El volumen del timbre del altavoz y del auricular audífonos pueden ser programados independientemente Su teléfono ha sido pre programado pero puede ser cambiado a su gusto Volumen del Timbre Mientras el teléfono esté en modo inactivo presione el botón ...

Page 76: ...ersona presione el botón de la línea correspondiente La otra línea permanece en espera 3 Para volver a la llamada en conferencia con ambas líneas Presione el botón Confer Función de No Molestar Esta función deshabilita el timbre de una llamada entrante durante el tiempo que usted ha seleccionado Usted puede programar la duración de la función de No Molestar 1 Mientras que el auricular está en la b...

Page 77: ... se muestra hasta que todas las llamadas nuevas hayan sido recibidas Para Recibir y Almacenar Archivos del Identificador de Llamadas Este aparato recibe y muestra información transmitida por su compañía telefónica local Esta información puede incluir el número telefónico fecha y hora ó el nombre número telefónico fecha y hora El aparato puede almacenar hasta 100 llamadas para ser revisadas después...

Page 78: ...icación BORRAR TODOS LOS REGISTROS CID aparece en la pantalla 2 Presione nuevamente el botón Sel Save para confirmar Para Volver a Marcar Cuando usted revisa los archivos del Identificador usted puede marcar los número que aparecen en la pantalla Si usted programó su Clave de Área en el Menú de Programación 1 Presione primero el botón CID para ir al modo de revisión CID y luego use el botón 5 y 6 ...

Page 79: ...nciones del Identificador de Llamadas con este aparato usted debe suscribirse ya sea al Servicio Estándar de Identificador de Llamadas de Nombre Número ó al Servicio de Identificador de Llamada en Espera Caller ID with Call Waiting Sistema de Contestadora Digital Esta unidad incorpora un sistema de contestadora digital con una capacidad de grabación de voz total de aproximadamente 40 minutos Los m...

Page 80: ...ar el mensaje actual Presione Sel Save ó Delete para confirmar la eliminación del mensaje 7 Durante la reproducción presione y sostenga Delete por 2 segundos para eliminar todos los mensajes Presione Sel Save ó Delete para confirmar la eliminación de todos los mensajes 8 Presione Play Stop ó Exit para detener y salir de la reproducción NOTA Después de terminar la reproducción de un mensaje la unid...

Page 81: ...tivado 2 Después de que la unidad responda ingrese su clave de acceso remota de 3 dígitos 3 Siga las indicaciones del menú de voz para usar las funciones de control remoto del sistema contestador Presione 1 para revisar Presione 2 para reproducir mensaje presione 2 otra vez para detener Presione 3 para saltar Presione 4 para encender y apagar el sistema de contestadora Presione 7 para revisar el m...

Page 82: ...e la tecla del 5 nuevamente tres veces para la segunda letra L Presione la tecla del 1 para introducir un espacio entre la letra L y S Presione la tecla del 7 cuatro veces para la letra S Presione la tecla del 6 una vez para la letra M Presione el 4 tres veces para la letra I Presione el 8 para la letra T y el 4 dos veces para la letra H NOTA Si usted comete un error presione al botón Delete para ...

Page 83: ...o la Sección de Memoria O 1 Presione uno de los botones de marcación de un toque One Touch dial 2 Presione el botón Sel Save y corrija el contenido de acuerdo a los pasos en la sección Para Almacenar un Nombre y Número la Sección de Memoria Para Almacenar el Último Número Marcado 1 Presione el botón Store 2 Presione el botón Auto Redial para ver el último número marcado 3 Presione el botón Sel Sav...

Page 84: ...ón de la marcación de un toque One Touch dial y el número se marca automáticamente Marcado en Cadena Este proceso le permite marcar una sucesión de números almacenados en diferentes localizaciones de memoria Esto es muy útil cuando usted debe marcar diferentes secuencias de números como llamadas frecuentes de larga distancia Por ejemplo Localización de Memoria Número local de acceso de su compañía...

Page 85: ...rcar después de que se recibe un tono de ocupado 1 Después de obtener el tono de ocupado vuelva a colocar el auricular en la base ó presione Speaker para colgar la llamada 2 Presione el botón Auto Redial 3 El teléfono remarcará automáticamente el último número marcado 4 El LED Speaker parpadea y el altavoz se activa lo cual le permite escuchar mientras se establece la llamada Sin embargo el micróf...

Page 86: ... teléfono con altavoz 1 Esta calibración muestrea el sonido de ambos lados de la conversación Dependiendo de los entornos y de la conversación esta calibración puede tomar hasta 30 segundos para completarse Típicamente la calibración se terminará en menos de 10 segundos 2 Durante esta calibración ambas partes en la conversación pueden escuchar un eco débil el cual desaparecerá conforme su teléfono...

Page 87: ... cuando el modo teléfono con altavoz está habilitado Si usted presiona el botón Preset EQ mientras usa el auricular ó un audífono usted escuchará un bip de error pero no habrá diferencia en el tono de la conversación Mensajes de la Pantalla Los siguientes mensajes especiales indican el estado actual de un mensaje ó del aparato NO HAY LLAMADAS El registro de memoria está vacío PERSONA DESCONOCIDA L...

Page 88: ...ente Si esta usando el audífono asegúrese de que el conector del audífono esté completamente insertado en el receptáculo Asegúrese que la función del enmudecedor Mute no haya sido activada El teléfono no timbra Asegúrese que el selector del timbre RINGER esté en la posición de activado ON Usted puede tener demasiadas extensiones de teléfono en su línea Intente desconectar algunos teléfonos Vea las...

Page 89: ...no con un trapo suave Nunca use un agente de limpieza fuerte ni un polvo abrasivo ya que esto dañará el acabado Retenga el empaque original en caso de que necesite embarcar el auricular en el futuro Información de Accesorios Otra Información 5 2719 5 2425 Convertidor de corriente AC Audífonos Para ordenar tenga lista su tarjeta Visa Mastercard ó Discover y llame al 1 800 338 0376 Se aplicará un ca...

Page 90: ...perar este producto Para las instrucciones en cómo obtener una unidad del reemplazo refiera a la garantía incluida en este servicio de cliente de la guía ó de la llamada en 1 800 511 3180 O envíe sus preguntas a Thomson Inc Gerente Servicio al Consumidor P O Box 1976 Indianápolis IN 46206 Adjunte su recibo al folleto para futura referencia ó anote la fecha en la que se compró ó recibió este produc...

Page 91: ...omo evidencia el primer contrato de renta También escriba claramente su nombre dirección y la descripción del defecto Mande vía UPS ó un servicio de paquetería equivalente a Thomson Inc 11721 B Alameda Ave Socorro Texas 79927 Pague cualquier cargo que le facture el Centro de Intercambio por servicio que no esté cubierto por garantía Asegure su empaque para prevenir pérdida ó daño Thomson Inc no ac...

Page 92: ...ible por daños incidentales daños derivados como consecuencia del uso este producto ó como resultado del incumplimeinto de cualquier garantía implícita ó expresa de este producto La invalidez de las garantías ó las garantías limitadas están reglamentadas por las leyes del estado de Indiana Excepto por el alcance establecido por las leyes aplicables cualquier garnatía implícita de mercado ó de salu...

Page 93: ...ción de Remarcado Automático 37 Funciones del Identificador de Llamadas Caller ID 29 G Garantía Limitada 43 Grabación de 2 Vias 33 Grabación de Memo 32 Grabacion del Mensaje de Salida 19 Guía para Solución de Problemas 40 I Idioma de la Pantalla 13 Indicación de Respuesta 31 Indicador de Llamada Nueva 18 Información de Accesorios 41 Información de Interferencias 3 Información Importante para la In...

Page 94: ...27 Para Programar el Teléfono 13 Para Programar la Fecha y Hora Manualmente 13 Para Recibir Llamadas con el Altavoz 25 Para Recibir Llamadas con el Auricular 25 Para Recibir Llamadas con los Audífonos Opcionales 25 Para Recibir Llamadas Simultáneamente 25 Para Recibir y Almacenar Archivos del Identificador de Llamadas 29 Para Restablecer las Programaciones de Fábrica 23 Para Revisar Archivos del I...

Page 95: ...mporizador de Llamadas 26 Terminal de Datos 12 Tiempo para Servicios Especiales Flash 17 Tono de Timbre 15 Tono para Alerta de Llamada 16 V Volumen 27 Volumen del Altavoz Auricular ó Audífonos 27 Volumen del Timbre 27 Volumen del Tono de Tecla 15 Índice ...

Page 96: ...anápolis enlistada en este manual ó en la caja Esto únicamente resultará en un retraso para dar servicio a su producto Thomson Inc 101 W 103rd Street Indianapolis IN 46290 1102 2008 Thomson Inc Trademark s Registered Marca s Registrada s Modelo 25205 00019577 Rev 3 DOM E S 08 23 Impreso en China ...

Reviews: