background image

1

Operación del Audífono y Broche del Cinturón

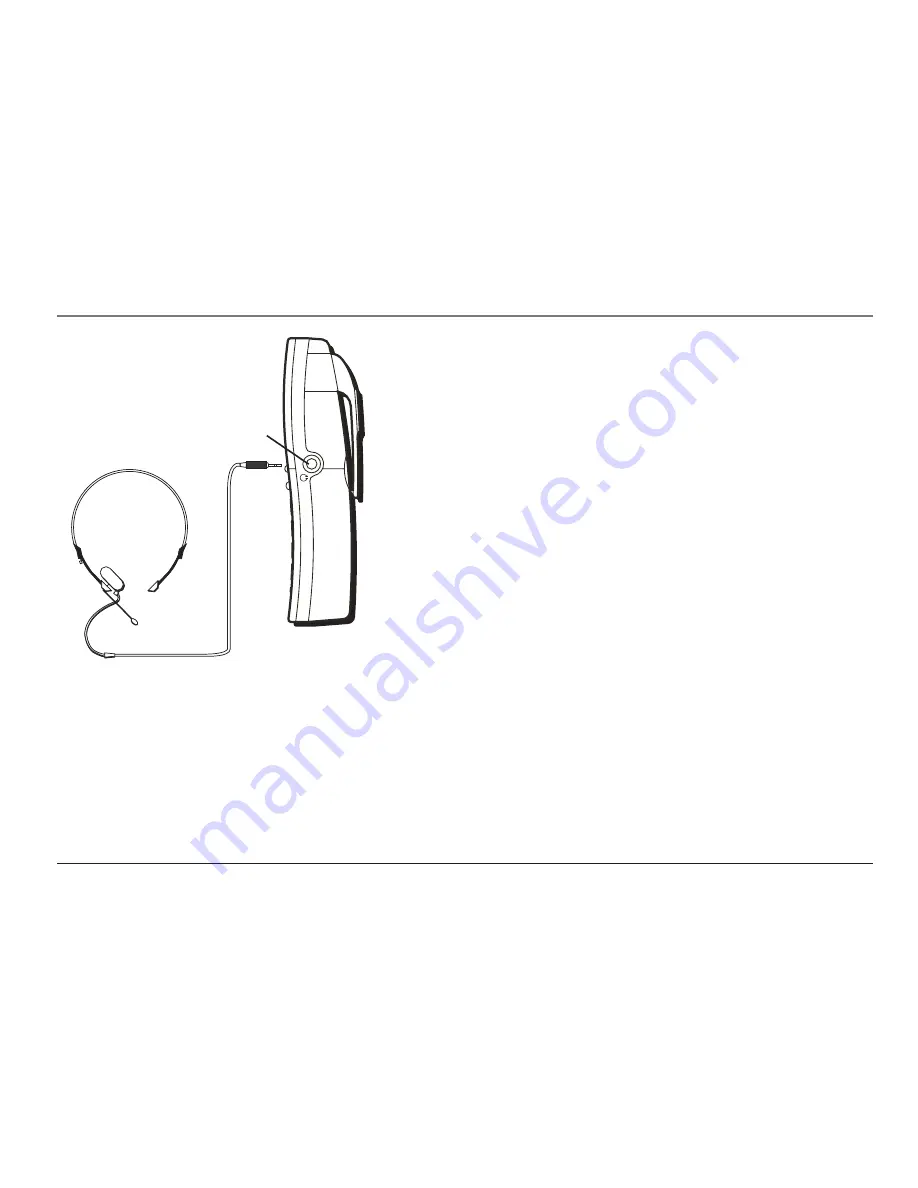
Para Conectar Unos Audífonos Opcionales al Auricular

1.  Conecte los audífonos (opcionales) al Clavija del Audífono como se muestra en la 

ilustración. La bocina del auricular y el micrófono se desactivan automáticamente cuando 

se conectan los audífonos.

SUGERENCIA: Para ordenar unos audífonos, por favor refiérase al formulario para ordenar 

accesorios, localizado al final de esta guía del usuario.

2.  Ajuste los audífonos a que descansen cómodamente sobre su cabeza y alrededor de su 

oreja. Mueva el micrófono a aproximadamente 2 a 3 pulgadas de su boca.

3.  Oprima el botón Talk para contestar o hacer una llamada. 
4.   Para volver a la operación normal, desconecte los audífonos del enchufe.

Para Conectar el Gancho del Cinturón

1.  Introduzca los lados del gancho del cinturón en las ranuras localizadas a cada lado del 

auricular.

2.   Empuje los extremos del gancho del cinturón a que entren en su sitio.

Otra Información

Clavija del Audífono

Summary of Contents for 25110RE3

Page 1: ...2 4 Ghz Cordless Telephone and Wireless Headset with Call Waiting Caller ID User s Guide Please read this manual before operating this product for the first time Model 25110 ...

Page 2: ...lephone equipment if you are on a party line Check with your local telephone company Notice must be given to the telephone company upon permanent disconnection of your telephone from your line If your home has specially wired alarm equipment connected to the telephone line ensure the installation of this product does not disable your alarm equipment If you have questions about what will disable al...

Page 3: ...ications equipment and receiving antenna Connect the telecommunications equipment into an outlet on a circuit different from that to which the receiving antenna is connected If these measures do not eliminate the interference please consult your dealer or an experienced radio television technician for additional suggestions Also the Federal Communications Commission has prepared a helpful booklet ...

Page 4: ...ries 11 Installing the Handset Battery 11 Installing the Headset Battery 12 Headset Set Up 13 Headband Attachment 13 To switch from ear to ear 14 Ear Clip Attachment 15 To switch from ear to ear 15 Handset Layout 16 Headset Layout 17 Handset Set Up 18 Display Language 18 Tone Pulse Dialing 18 Area Code 18 Ringer Tone 19 Ringer Volume 19 Default Setting Selection 19 Telephone Operation 20 Making a ...

Page 5: ...iewing a Stored Number 29 Changing a Stored Number 29 Storing a Redial Number 29 Dialing a Stored Number 30 Inserting a Pause in the Dialing Sequence of a Stored Number 30 Reviewing and Deleting Stored Numbers 30 Headset and Belt Clip Operation 31 Connecting an Optional Headset to the Handset 31 Attaching the Belt Clip 31 Replacing the Batteries 32 Handset Battery 32 Handset Memory Retention 32 He...

Page 6: ...e them for future reference Your Caller ID phone stores and displays information provided by your local telephone company to subscribers of Caller ID or similar caller identification services Your Caller ID phone enables you to Identify callers before you answer the phone View the time and date of each incoming call Record up to 99 Caller ID messages sequentially Know who called while you were awa...

Page 7: ...e includes the following items Wall base Handset Battery compartment cover Telephone line cord AC power adaptor Connections Setup Charger Handset battery Belt clip Headband Headset battery Ear clip ring Ear clip Headset Headset sponge cover ...

Page 8: ...porarily disconnect any equipment connected to the phone such as faxes other phones or modems Installation Guidelines Install the wall base unit into an electrical outlet that is near a telephone modular jack Avoid sources of noise such as a window by a busy street and electrical noise such as motors microwave ovens and fluorescent lighting Avoid heat sources such as heating air ducts heating appl...

Page 9: ... may also use the 2 4GHz frequency for communication and if not properly set these devices may interfere with each other and or your new telephone If you are concerned with interference please refer to the owner s manual for these devices on how to properly set channels to avoid interference Typical devices that may use the 2 4GHz frequency for communication include wireless audio video senders wi...

Page 10: ...ck nearby 1 Plug the wall base unit into an electrical outlet 2 Make sure that the pins are inserted fully and firmly into the outlet If not choose another electrical outlet Connecting the Telephone Line There are two jacks on the bottom of the wall base unit Plug one end of the telephone line cord into the LINE jack on the bottom of the wall base unit and the other end into a modular jack The PHO...

Page 11: ...set 3 Plug the battery pack cord into the jack inside the compartment NOTE It is important to maintain the polarity black and red wires to the jack inside the compartment To ensure proper battery installation the connector is keyed and can be inserted only one way 4 Insert the battery pack 5 Close the battery compartment by pushing the door up until it snaps into place 6 Place the handset in the c...

Page 12: ...t 4 Insert the battery pack 5 Plug the battery pack cord into the jack inside the compartment NOTE It is important to maintain the polarity black and red wires to the jack inside the compartment To ensure proper battery installation the connector is keyed and can be inserted only one way 6 Close the battery compartment by pushing the door up until it snaps into place 7 Replace the foam cover 8 Pla...

Page 13: ...t it into keyed slot marked with an arrow on the headset NOTE To ensure proper installation the connector is keyed and can only be inserted one way 2 Rotate the L shaped band 90 degrees clockwise 3 Align the L shaped band into the hole on the headset Connections Setup ...

Page 14: ...14 To switch from ear to ear Rotate microphone boom to reposition nearer to mouth Connections Setup ...

Page 15: ...ear clip into either side of ear clip ring matching with the L or R marked on ear clip ring to fit either your left or right ear To switch from ear to ear Unplug the ear clip from ear clip ring Insert the ear clip to ear clip ring with L mark for Left ear Insert the ear clip to R mark for Right ear Rotate microphone boom to reposition nearer to mouth ...

Page 16: ...ton Talk button Prog Flash program flash button Exit button Mem memory button Pause button display Off button Handset Layout Mute Del mute delete button CID Vol 5 Caller ID Volume button Headset button VM visual message waiting indicator Connections Setup ...

Page 17: ...17 Vol 3 or 4 Volume button Charge indicator Talk Off button Headset Layout Connections Setup Charge contact ...

Page 18: ...ad to select 1 ENGLISH 2 FRANCAIS or 3 ESPANOL The default setting is 1ENG 3 Press the Prog Flash button to confirm You will hear a confirmation tone Tone Pulse Dialing 1 Press the Prog Flash button until 1TONE 2PULSE shows in the display 2 Use the CID Vol 5 or 6 buttons or the handset number pad to select 1 TONE or 2 PULSE The default setting is TONE 3 Press the Prog Flash button to confirm You w...

Page 19: ...OL 1HI shows in the display 2 Use the CID Vol 5 or 6 buttons or the handset number pad to select 1 HI 2 LOW or 3 OFF The default setting is 1HI 3 Press the Prog Flash button to confirm You will hear a confirmation tone Default Setting Selection 1 Press the Prog Flash button until DEFAULT 1NO shows in the display 2 Use the CID Vol 5 or 6 buttons or the handset number pad to select 1 NO or 2 YES The...

Page 20: ...Off button on the handset OR the Talk Off button on the headset to hang up Answering A Call On the Handset 1 When the phone rings pick up the handset and press the Talk button to answer the call 2 When finished press Off button on the handset to hang up On the Headset 1 When the phone rings pick up the headset and press the Talk Off button OR press the Headset button on the handset to answer the c...

Page 21: ...te feature The party on the telephone line will not hear you but you can still hear them On the Handset or Headset 1 Press the Mute Del button on the handset MUTE ON will blink intermittently along with the call status in the display on the handset 2 Press the Mute Del button again to cancel mute and return to your phone conversation Redial When the phone is on in TALK mode press the Redial Format...

Page 22: ...vel and press the 6 button to decrease VOL 1 is the lowest level and VOL 4 is the loudest Headset Volume To Adjust Volume from Headset While talking the headset receiver volume can be adjusted by pressing the Vol 3 or 4 buttons The volume can be increased or decreased step by step up to 4 levels When maximum level or minimum level is reached an error tone is emitted The last setting is kept when r...

Page 23: ...nal and play ring tone In Use Indicator Light On the Handset The handset in use indicator light is lit when the handset is on It flashes when a call is received if there is a Voice Mail VM or if the Page button on wall base is pressed On the Headset The headset in use indicator light is lit when the headset is on It flashes when a call is received if the Page button on the wall base is pressed if ...

Page 24: ...nk you may need to enter your account number Using the temporary tone feature allows you to temporarily switch to touch tone mode so you can enter and send your number 1 Press the Talk button dial the telephone number i e bank or credit card company and wait for the line to connect 2 When your call is answered press the Exit button on your handset number pad to temporarily change from pulse dialin...

Page 25: ... Number Caller ID Service or Call Waiting Caller ID Service To know who is calling while you are on the phone you must subscribe to Call Waiting Caller ID Service Receiving and Storing Calls When you receive a call the information is transmitted by the phone company to your Caller ID telephone between the first and second ring When the memory is full a new call automatically replaces the oldest ca...

Page 26: ...ry location with a new CID record 1 Repeat steps 1 through 3 2 REPLACE MEMO shows in the display 3 Press the Exit button to exit or press Mem again and the new CID record replaces the old CID record in that memory location You will hear a confirmation tone Deleting Records Use the Mute Del button to erase the record currently shown in the display or all records Deleting the Current Record 1 Make s...

Page 27: ... want to dial 3 Press the Talk or Headset button on the handset The number dials automatically Changing the CID Number Format The format button lets you change the format of the displayed CID number The available formats are as follows 7 digit 7 digit telephone number 10 digit 3 digit area code 7 digit telephone number 11 digit long distance code 1 3 digit area code 7 digit telephone number 1 Use ...

Page 28: ...for the letter I and press the five key three times for the letter L After one second press the five key three times again for the second letter L and press the one key to insert a space between the letter L and S Press the seven key four times for the letter S press the six key once for the letter M press the four key three times for the letter I press the eight key once for the letter T and pres...

Page 29: ...tone Storing a Redial Number 1 Repeat steps 1 through 5 in Storing a Name and Number in Memory 2 Press the Redial Format button 3 Press the Mem button to store the number You will hear a confirmation tone To replace an old redial number stored in a memory locations with a new redial number 1 Repeat steps 1 through 5 in Storing a Name and Number in Memory 2 Press the Redial Format button 3 Press th...

Page 30: ...e Talk or Headset button on the handset The number dials automatically Inserting a Pause in the Dialing Sequence of a Stored Number When a pause is needed to wait for a dial tone press the Pause button twice within one second for example when you must dial 9 for an outside line or to wait for a computer access tone A pause in the dialing sequence shows in the display as a P Each pause counts as 1 ...

Page 31: ...er form at the end of this user s guide 2 Adjust the headset to rest comfortably on top of your head and over your ear Move the microphone to approximately 2 to 3 inches from your mouth 3 Press the Talk button to answer or place a call 4 To return to normal operation unplug the headset from the jack Attaching the Belt Clip 1 Insert the sides of the belt clip into the slots on each side of the hand...

Page 32: ...ortant to maintain the polarity black and red wires to the jack inside the compartment To ensure proper battery installation the connector is keyed and can be inserted only one way 5 Close the battery compartment by pushing the door up until it snaps into place 6 Place the handset in the charging cradle Allow the handset battery to properly charge for 16 hours prior to first use or when you instal...

Page 33: ...ide the compartment To ensure proper battery installation the connector is keyed and can be inserted only one way 5 Close the battery compartment by snapping the cover into place 6 Replace the foam cover 7 Place the headset in the charging cradle Allow the headset battery to properly charge for 16 hours prior to first use or when you install a new battery pack If you do not properly charge the pho...

Page 34: ...TY Indicates a memory location is vacant END OF LIST Indicates there is no additional information in Caller ID memory ENTER NAME Prompt telling you to enter the name for one of the 50 memory locations ENTER TEL NUMBR Prompt telling you to enter the telephone number for one of the 50 memory locations HDST Headset unit HDST 00 00 VOL1 Indicates the headset speakerphone is turned on Other Information...

Page 35: ... have been stored NO DATA No Caller ID information was received PAGING Someone has pressed the page button on the base TALK 00 00 VOL1 Indicates the handset earpiece is active UNKNOWN NAME The incoming call is from an area not serviced by Caller ID or CALLER NUMBER the information was not sent Handset Sound Signals Signal Meaning A long warbling tone with ringer on Signals an incoming call Two lon...

Page 36: ...e indicates the presence of noise on the line Telephone No dial tone Check or repeat installation steps Make sure the base power converter is connected to a working electrical outlet Make sure the telephone line cord is connected to the base and the wall jack Disconnect the base from the wall jack and connect another phone to the same jack If there is no dial tone in the second phone the problem m...

Page 37: ... use to indicate there is a message waiting It stops flashing after the message has been reviewed You experience static noise or fading in and out Handset or headset may be out of range Move closer to the base Relocate the base Charge the battery Make sure the base is not plugged into an outlet with another household appliance Unit beeps See solutions for No dial tone Replace the battery Memory di...

Page 38: ...sive powder because this will damage the finish Retain the original packaging in case you need to ship the phone at a later date Causes of Poor Reception Aluminum siding Foil backing on insulation Heating ducts and other metal construction can shield radio signals You re too close to appliances such as microwaves stoves computers etc Atmospheric conditions such as strong storms Base is installed i...

Page 39: ...ly approved by Thomson Inc could void the user s authority to operate this product For instructions on how to obtain service refer to the warranty included in this guide or call customer service at 1 800 511 3180 Or refer inquiries to Thomson Inc Manager Consumer Relations P O Box 1976 Indianapolis IN 46206 Attach your sales receipt to the booklet for future reference or jot down the date this pro...

Page 40: ...vidence that the product is within the warranty period must be presented to obtain warranty service For rental firms proof of first rental is also required Also print your name and address and a description of the defect Send via standard UPS or its equivalent to Thomson Inc 11721 B Alameda Ave Socorro Texas 79927 Pay any charges billed to you by the Exchange Center for service not covered by the ...

Page 41: ...is the exclusive remedy of the consumer THOMSON Inc shall not be liable for incidental or consequential damages resulting from the use of this product or arising out of any breach of any express or implied warranty on this product This disclaimer of warranties and limited warranty are governed by the laws of the state of Indiana Except to the extent prohibited by applicable law any implied warrant...

Page 42: ...der have your Visa MasterCard or Discover Card ready and call toll free 1 800 338 0376 A shipping and handling fee will be charged upon ordering It is required by law to collect appropriate sales tax for each individual state country and locality to which the merchandise is being sent Items are subject to availability Belt clip 5 2679 Ear clip pack 5 2680 Headband pack 5 2681 Optional wired headse...

Page 43: ...e AC Electrical Power 10 Connecting the Telephone Line 10 D Default Setting Selection 19 Deleting All Records 27 Deleting Records 26 Deleting the Current Record 26 Dialing a Caller ID Number 27 Dialing a Stored Number 30 Display Language 18 Display Messages 34 E Ear Clip Attachment 15 Equipment Approval Information 2 Exit 22 F FCC RF Radiation Exposure Statement 3 Flash 22 G General Product Care 3...

Page 44: ... Memory 28 Mute 21 P Paging the Handset and Headset 23 Parts Checklist 7 Phone Installation 10 R Receiving and Storing Calls 25 Redial 21 Replacing the Batteries 32 Reviewing and Deleting Stored Numbers 30 Reviewing Records 25 Ringer Tone 19 Ringer Volume 19 S Safety Precautions 8 Service 39 Storing a Name and Number in Memory 28 Storing a Redial Number 29 T Telephone Jack Requirements 9 Telephone...

Page 45: ...45 ...

Page 46: ...olis address listed in this manual or on the carton This will only add delays in service for your product Thomson Inc 10330 North Meridian Street Indianapolis IN 46290 2006 Thomson Inc Trademark s Registered Marca s Registrada s Model 25110 00005708 Rev 4 DOM E S 06 23 Printed in China ...

Page 47: ...eléfono Inalámbrico de 2 4 GHz y Audífono Inalámbrico con Llamada en Espera Identificador de Llamada Guía del Usuario Por favor lea este manual antes de operar este producto por primera vez Modelo 25110 ...

Page 48: ...go proveído por la compañía telefónica Las líneas compartidas son sujetas a las tarifas del estado y por eso es posible que Ud no pueda usar su propio equipo telefónico si Ud estuviera compartiendo la misma línea telefónica con otros abonados Se debe notificar la compañía telefónica cuando se desconecte permanentemente su teléfono de la línea Si su casa tiene algún equipo de alarma especial conect...

Page 49: ...l equipo de telecomunicaciones y la antena receptora de la radio o de la televisión que está recibiendo la interferencia Conecte el equipo de telecomunicaciones a una toma en un circuito diferente del circuito al cual la antena receptora esté conectada Si estas medidas no eliminan la interferencia favor de consultar a su distribuidor o a un técnico de radio televisión experto por otras sugerencias...

Page 50: ...ería del Auricular 11 Instalación de la Batería del Audífono 12 Ajuste del Audífono 13 Banda para la cabeza accesorio 13 Para cambiar de un oído al otro 14 Clip para Oído Accesorio 15 Para cambiar de un oído al otro 15 Diagrama del Auricular 16 Diagrama del Audífono 17 Montaje del Auricular 18 Idioma en Pantalla 18 Marcado por Tono Pulso 18 Código de Area Local 18 Tono de Timbre 19 Volumen del Tim...
Page 51: ...iar un Número Almacenado 29 Para Almacenar un Número para Volver a Marcar 29 Para marcar un Número Guardado 30 Para Introducir una Pausa en la Secuencia de Marcado de un Número Almacenado 30 Para Revisar y Borrar Números Almacenados 30 Operación del Audífono y Broche del Cinturón 31 Para Conectar Unos Audífonos Opcionales al Auricular 31 Para Conectar el Gancho del Cinturón 31 Reemplazo de Batería...

Page 52: ...a información específica que proviene de su compañía telefónica local para suscriptores del Identificador de Llamadas o servicios similares para la identificación de la persona que llama Su teléfono Identificador de Llamadas le permite Identificar quién es la persona que llama antes de que usted conteste el teléfono Ver la hora y la fecha de cada llamada entrante Grabar hasta 99 mensajes del Ident...

Page 53: ...ular Puerta del compartimento de batería Cable de línea telefónica Adaptador de corriente CA Conexión y Programación Cargador Batería del auricular Broche de cinturón Banda para la cabeza Batería para audífonos Anillo del clip para el oído Clip para el oído Audífonos Cubierta de la esponja para audífonos ...

Page 54: ... Pautas para la Instalación Instale el Base para la pared junto a un enchufe modular telefónico y un enchufe para corriente eléctrica Nunca instale enchufes telefónicos en localizaciones mojadas a menos que el enchufe haya sido diseñado específicamente para localizaciones mojadas Nunca toque cables o terminales no aislados a menos que la línea telefónica haya sido desconectada en la interfaz de la...

Page 55: ...te instalados estos dispositivos pueden interferir uno con otro y o con su nuevo teléfono Si usted tiene problemas con interferencia por favor consulte el manual del propietario para estos aparatos sobre cómo instalar apropiadamente los canales para evitar interferencia Los dispositivos típicos que pueden usar la frecuencia 2 4 GHz para comunicación incluyen emisores de audio video inalámbricos re...

Page 56: ...necte la unidad de base de pared a una toma eléctrica 2 Asegúrese de que las cuchillas estén insertadas completa y firmemente dentro de la toma Si no seleccione otra toma eléctrica Conexión de la Línea Telefónica Hay dos receptáculos en la parte inferior de la unidad de base de pared Conecte un extremo del cable de la línea telefónica en el receptáculo LINE en la parte inferior de la unidad de bas...

Page 57: ...del auricular 3 Conecte el cable de la batería en el conector dentro del compartimento NOTA Es importante mantener la polaridad cables negro y rojo en el conector dentro del compartimento Para asegurar la instalación apropiada de la batería el conector está diseñado de forma que puede ser insertado solamente de una manera 4 Inserte la batería 5 Cierre el compartimento de la batería empujando la pu...

Page 58: ...ería 5 Conecte el cable de la batería en el conector dentro del compartimento NOTA Es importante mantener la polaridad cables negro y rojo en el conector dentro del compartimento Para asegurar la instalación apropiada de la batería el conector está diseñado de forma que puede ser insertado solamente de una manera 6 Cierre el compartimento de la batería empujando la puerta hacia arriba hasta que em...

Page 59: ...on una flecha en el audífono NOTA Para asegurar la instalación apropiada de la batería el conector está diseñado de forma que puede ser insertado solamente de una manera 2 Gire la banda en forma de L 90 grados en el sentido de las manecillas del reloj 3 Alinee la banda en forma de L dentro del orificio del audífono Conexión y Programación ...

Page 60: ...14 Conexión y Programación Para cambiar de un oído al otro Gire la pluma del micrófono para reposicionarlo más cerca de la boca ...

Page 61: ...cidiendo con la L o R marcados en el anillo del clip del oído para que se adapten ya sea a su oído izquierdo o derecho Para cambiar de un oído al otro Desconecte el clip del oído del anillo del clip del oído Inserte el clip del oído en el anillo del clip del oído con la marca L para el oído izquierdo Inserte el clip del oído en la marca R para el oído derecho Gire la pluma del micrófono para repos...

Page 62: ...Prog Flash botón colgar y servicios especiales programa Exit botón borrar Mem botón memoria Pause botón pausa pantalla Off botón terminar Diagrama del Auricular Mute Del botón silencio borrar CID Vol 5 botón identificador de llamada volumen Headset botón audífono VM indicador maiil de la voz Conexión y Programación ...

Page 63: ...17 Vol 3 4 botón volumen Charge indicador de carga Talk Off botón llamar terminar Diagrama del Audífono Conexión y Programación Carga contacto ...

Page 64: ...3 ESPANOL La selección de fábrica es 1ENG 3 Presione el botón Prog Flash para confirmar y avanzar a la siguiente opción de menú Marcado por Tono Pulso 1 Presione el botón Prog Flash hasta que 1TONO 2PULSO se muestre en la pantalla 2 Use el botón CID Vol 5 o 6 o el teclado numérico del auricular para seleccionar 1 TONO o 2 PULSO La selección de fabricar es 1TONO 3 Presione el botón Prog Flash para ...

Page 65: ...D Vol 5 o 6 o el teclado numérico del auricular para seleccionar 1 ALT 2 BAJ o 3 APG La selección de fabricar es 1ALT 3 PressPresione el botón Prog Flash para confirmar Usted escuchará un tono de confirmación Programaciones de Fábrica 1 Oprima el botón Prog Flash hasta que DE FABRICA 1NO se muestre en la pantalla 2 Use el botón CID Vol 5 o 6 o el teclado numérico del auricular para recorrer las op...

Page 66: ...e el botón Off en el auricular O el botón Talk Off en el audífono para colgar Para Responder una Llamada En el Auricular 1 Cuando el teléfono timbre levante el auricular y presione el botón Talk para responder la llamada 2 Al terminar presione el botón Off en el auricular para colgar En el Audífono 1 Cuando el teléfono timbre levante el audífono y presione el botón Talk Off O presione el botón Hea...

Page 67: ...o lado de la línea no puede escucharle pero usted puede aún escuchar a esa persona En el Auricular o el Audífono 1 Oprima el botón Mute Del en el auriuclar ENMU ON parpadeará intermitentemente junto con el status de llamada en la pantalla del auricular 2 Oprima el botón Mute Del nuevamente para cancelar la función del enmudecedor y volver a su conversación telefónica Volver a Marcar Mientras el te...

Page 68: ...más bajo es VOL 1 y el volumen más alto es VOL 4 Volumen del Audífono Para Ajustar el Volumen desde el Audífono Mientras habla el volumen del receptor del audífono puede ser ajustado presionando el botón Vol 3 o 4 El volumen puede ser aumentado disminuido paso a paso hasta cuatro niveles Cuando el nivel máximo o nivel mínimo son alcanzados un tono de error es emitido La última selección es manteni...

Page 69: ...ono de timbre Indicador de Uso Luminoso En el Auricular La luz del indicador en uso del auricular se ilumina cuando el auricular está encendido Parpadea cuando una llamada es recibida si hay un correo de voz VM o si el botón Page en la base de pared es presionado En el Audífono La luz del indicador en uso del audífono se ilumina cuando el audífono está encendido Parpadea cuando una llamada es reci...

Page 70: ...o usted puede necesitar inscribir su número de cuenta El hacer uso de esta función le permite cambiar temporalmente su servicio para marcar en la modalidad de tono para que usted pueda inscribir su número 1 Oprima el botón Talk marque el número telefónico por ejemplo del banco o de la compañía de su tarjeta de crédito y espere a que la línea conecte 2 Cuando su llamada es contestada oprima el botó...

Page 71: ...compañía telefónica local el servicio estándar de Identificador de Nombre Número para poder saber quién llama cuando suena el teléfono o el servicio de Identificador de Llamada en Espera para saber quién llama mientras usted está en otra llamada en el teléfono Para Recibir y Almacenar Llamadas Cuando usted recibe una llamada la información es transmitida por la compañía telefónica a su Teléfono co...

Page 72: ...amadas almacenado en una localización de memoria por otro archivo de Identificador de Llamadas 1 Repita los pasos 1 al 3 2 La pantalla muestra EMPLAZAR MEMO 3 Oprima el botón Exit para salir u oprima nuevamente el botón Mem y el nuevo archivo del Identificador de Llamadas reemplaza al viejo en esa localización de memoria Usted escuchará un tono de confirmación Para Borrar Datos Utilice el botón Mu...

Page 73: ...que usted quiera marcar 3 Oprima el botón Talk o Headset en el auriuclar El número se marca automáticamente Para Cambiar el Formato del Numero de Identificador de Llamadas El botón de formato le permite cambiar el formato del número de Identificador de Llamadas mostrado Los formatos disponibles son los siguientes 7 dígitos número telefónico de 7 dígitos 10 dígitos código de área de 3 dígitos númer...

Page 74: ... la tecla del 4 tres veces para la letra I y oprima la tecla del 5 tres veces para la L Después de un segundo oprima la tecla del 5 nuevamente tres veces para la segunda L y oprima la tecla del 1 para inscribir un espacio entre las letras L y S Oprima la tecla del 7 cuatro veces para la letra S oprima la tecla del 6 una vez para la M oprima el 4 tres veces para la I oprima el 8 una vez para la T y...

Page 75: ...ción Para Almacenar un Número para Volver a Marcar 1 Repita los pasos del 1 al 5 en la sección Para Almacenar un Nombre y Número en la Memoria 2 Oprima el botón Redial Format 3 Oprima el botón Mem para almacenar el número Usted escuchará un tono de confirmación Para remplazar un número para volver a marcar que se encuentre en una localización de memoria 1 Repita los pasos del 1 al 5 en la sección ...

Page 76: ...et en el auriuclar El número se marca automáticamente Para Introducir una Pausa en la Secuencia de Marcado de un Número Almacenado Cuando una pausa es necesaria para esperar al tono de marcar oprima el botón Pause dos veces en un segundo por ejemplo después de que usted marca 9 para obtener línea externa o para esperar e tono de acceso en una computadora La pausa se representa en la pantalla con u...

Page 77: ...ccesorios localizado al final de esta guía del usuario 2 Ajuste los audífonos a que descansen cómodamente sobre su cabeza y alrededor de su oreja Mueva el micrófono a aproximadamente 2 a 3 pulgadas de su boca 3 Oprima el botón Talk para contestar o hacer una llamada 4 Para volver a la operación normal desconecte los audífonos del enchufe Para Conectar el Gancho del Cinturón 1 Introduzca los lados ...

Page 78: ...ías y conecte el cable en el enchufe dentro del compartimiento de las baterías NOTA Es importante mantener la polaridad cables negro y rojo en el conector dentro del compartimento Para asegurar la instalación apropiada de la batería el conector está diseñado de forma que puede ser insertado solamente de una manera 5 Cierre el compartimento de la batería empujando la puerta hacia arriba hasta que e...

Page 79: ...r dentro del compartimento Para asegurar la instalación apropiada de la batería el conector está diseñado de forma que puede ser insertado solamente de una manera 5 Cierre el compartimiento de batería colocando la cubierta en su lugar 6 Una la cubierta de la esponja de la espuma 7 Coloque el audífono en la base de carga Deje que el batería del audífono se cargue durante 16 horas antes de utilizarl...

Page 80: ...irmando que el archivo del Identificador de Llamadas Memoria ha sido borrado VACIO Indica que una localización de memoria está disponible FIN DE LISTA Indicación de que no hay información adicional en la memoria del Identificador de Llamadas INSCRIBA NOMBRE Indicación pidiéndole que inscriba el nombre para una de las 50 localizaciones de memoria INSCRIBA NUMERO Indicación pidiéndole que inscriba e...

Page 81: ...ibido llamadas nuevas NO ENVIADO Ninguna información del Identificador Caller ID fué recibida LOCALIZANDO Alguien ha oprimido el botón page en la base HABLAR 00 00 VOL1 Indica que la bocina del auricular está activada DESCONOCIDO NOM La llamada entrante es de un códigode área no incluído en el DESCONOCIDO NUM serviciodel Identificador de Llamadas o la información no fué DESCONOCIDO enviada Señales...

Page 82: ...a de ruidos en la línea o que un mensaje inválido ha sido enviado desde la compañía telefónica Teléfono No hay tono de marcar Verifique o repita los pasos para la instalación Asegúrese que el adaptador de corriente CA de la base esté conectado a un contacto que sirve Asegúrese que el cable telefónico esté conectado a la base del aparato y a un enchufe de pared Desconecte la base del contacto de pa...

Page 83: ...ay un mensaje esperando Deja de parpadear después de que el mensaje ha sido revisado Usted experimenta estática ruido o debilitamiento del sonido entrante o saliente El auricular o audífono puede estar fuera de rango Acérquelo a la base Coloque la base en otra localización Cargue la batería Asegúrese de que la base no esté conectada en un enchufe con otro aparato eléctrico El aparato emite tonos V...

Page 84: ...sto dañará el acabado Retenga el empaque original en caso de que necesite embarcar el auricular en el futuro Causas de una Mala Recepción Recubrimiento externo de la casa con aluminio Aislación con revestimiento de papel de aluminio Conductos de calefacción y otras construcciones de metal que paran las señales de radio Está demasiado cerca de los aparatos eléctricos como microondas cocina computad...

Page 85: ...omson Inc podría ser motivo de anulación de la autoridad del usuario para operar este producto Para recibir instrucciones sobre cómo obtener servicios de mantenimiento por favor consulte la garantía incluida en esta Guía o llame a Información para el Usuario 1 800 511 3180 O envíe sus preguntas a Thomson Inc Gerente Servicio al Consumidor P O Box 1976 Indianápolis IN 46206 Adjunte su recibo al fol...

Page 86: ...e garantía debe ser presentado para obtener servicio bajo garantía Para compañías de arrendamiento se requiere como evidencia el primer contrato de renta También escriba claramente su nombre dirección y la descripción del defecto Mande vía UPS o un servicio de paquetería equivalente a Thomson Inc 11721 B Alameda Ave Socorro Texas 79927 Pague cualquier cargo que le facture el Centro de Intercambio ...

Page 87: ...USIVO DEL CONSUMIDOR THOMSON INC NO SE HACE RESPONSIBLE POR DAÑOS INCIDENTALES DAÑOS DERIVADOS COMO CONSECUENCIA DEL USO DE ESTE PRODUCTO O COMO RESULTADO DEL INCUMPLIMIENTO DE CUALQUIER GARANTÍA IMPLÍCITA O EXPRESA DE ESTE PRODUCTO LA INVALIDEZ DE LAS GARANTÍAS O LAS GARANTÍAS LIMITADAS ESTÁN REGLAMENTADAS POR LAS LEYES DEL ESTADO DE INDIANA EXCEPTO POR EL ALCANCE ESTABLECIDO POR LAS LEYES APLICA...

Page 88: ...ios Para ordenar tenga lista su tarjeta Visa Mastercard o Discover y llame al 1 800 338 0376 Se aplicará un cargo por envío al ordenar La ley nos requiere que cobremos el impuesto sobre la venta apropiado para cada estado condado y área individuales a las cuales se envíe la mercancía Los artículos están sujetos a disponibilidad Clip para cinturón 5 2679 Paquete de clip para el oído 5 2680 Paquete ...

Page 89: ...Exposure Statement 3 Flash 22 G Garantía Limitada 40 Guía de Solución de Problemas 36 I Identificador de Llamadas 25 Identificador de Llamadas con Llamada en Espera 25 Idioma en Pantalla 18 Indicador de Uso Luminoso 23 Información de Accesorios 42 Información de Interferencias 3 Informacion Importante para la Instalacion 8 Información sobre la Aprobación de Equipo 2 Instalación del Teléfono 10 Ins...

Page 90: ...Para Instalar la Baterías 11 Para Introducir una Pausa en la Secuencia de Marcado de un Número Almacenado 30 Para marcar un Número Guardado 30 Para Recibir y Almacenar Llamadas 25 Para Responder una Llamada 20 Para Revisar Archivos 25 Para Revisar y Borrar Números Almacenados 30 Para Salir 22 Para Transferir Archivos del Identificador de Llamadas CID a la Memoria 26 Para Ver un Número Almacenado 2...

Page 91: ...45 ...

Page 92: ...nápolis enlistada en este manual o en la caja Esto únicamente resultará en un retraso para dar servicio a su producto Thomson Inc 10330 North Meridian Street Indianapolis IN 46290 2006 Thomson Inc Trademark s Registered Marca s Registrada s Model 25110 00005708 Rev 4 DOM E S 06 23 Impreso en China ...

Reviews: