12
WWW.ROLLINGBIGPOWER.COM
INSTALLATION INSTRUCTIONS
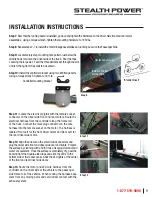
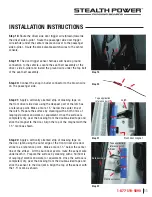
Step 23
Step 24
Step 25
Flush with tape
Flush with bulb seal
Step 23:
Apply a horizontally oriented strip of masking tape on the
rear driver side door jamb using the door detent as a reference
point. Make a mark 0.5” from the edge marked as 0”. Prepare
the surface by cleaning with a 50/50 mix of isopropyl alcohol and
water or equivalent. Lift the bulb door seal to route the sensor wire
underneath it. Once the surface is completely dry, peel the backing
from the double-sided tape and stick the rear door sensor to the
door jamb. Align the top left corner of the sensor with the 0.5”
mark as shown.
Step 24:
Extend the masking tape used for the sensor over to the
inside door trim panel as shown. Prepare the surface by cleaning
with a 50/50 mix of isopropyl alcohol and water or equivalent.
Once the surface is completely dry, peel the backing from the
double-sided tape and stick the magnet to the door. Align the top
edge of the magnet with the tape and the right side of the magnet
with bulb seal as shown.
Step 25:
Repeat steps 19-24 to install the passenger side door
trigger sensors and magnets. The passenger side door trigger
harness is connected to the white wire that was routed under the
carpet to the driver side b-pillar in step 18.
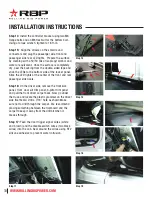
Step 26:
Remove the left center console trim panel. Prepare the
surface by cleaning with a 50/50 mix of isopropyl alcohol and
water or equivalent. Once the surface is completely dry, peel the
backing from the double-sided tape and stick the disable switch on
the lower dash panel. Plug the disable switch connector into the
black wire harness that was routed under the carpet to the center
console in step 18.
From the controller
Disable switch
Rear door
sensor
Rear door
magnet
Door detent
0”
1.5”
Horizontal strip of tape
Disable switch
Left center
console trim
panel


