


3
Note:
The joint lever is spring-
loaded and will automatically lock
in the upright position when fully
upright.
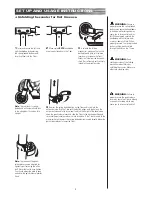
4
Depress the spring loaded button on the T-bar and insert into the
extension tube. Turn the T-bar until the button aligns with the hole on the
extension tube and locks into place. To adjust the height of the handlebars,
open the quick-release lever and slide the T-bar to the desired position and
resecure the quick release lever to lock into place. If the T-bar is raised to the
maximum height, depress the spring loaded button located directly below the
quick release lever to lower the T-bar.
Note:
The tension of the quick-
release lever can be adjusted by
tightening or loosening the allen
bolt. Be careful not to over-tighten.
You should always be able to open
and close the quick-release lever by
hand.
WaRNINg:
Failure to
properly secure the quick-release
lever may cause the T-bar to slideup
or down while riding which may
cause you to lose control and fall.
SET UP aND USagE INSTRUCTIONS
WaRNINg:
Failure to
properly secure the spring-loaded
buttons may cause the handlebars
to dislodge while riding and may
cause you to lose control and/or
fall. When properly secured, the
handlebars will not rotate and/
or move sideways. Note: When
properly secured, the spring-loaded
buttons will be clearly visible
through the holes on the T-tube.
2
Make certain
BOTH
handlebars
are properly locked onto the T-bar.
1
Insert and secure the left and
right handlebars by depressing
the spring-loaded buttons and
inserting them into the T-bar.
3
To release the folding
mechanism, place one foot on the
deck plate and push joint release
lever down to release the T-bar/
Extension Tube from the locked po-
sition. Raise T-bar up until securely
locked in the upright position.
WaRNINg:
Keep
your fingers clear of the folding
mechanism when folding or
unfolding the scooter. Make sure
others are standing clear.
q
Unfolding the scooter for first time use.


