Raytrix R29 Manual Download Page 5


5/

5


raytrix


GmbH

 · We sharpen your image! 

                                  Schauenburgerstraße 116 

· 

D-24118 Kiel  · Germany 


www.raytrix.de


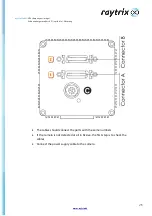
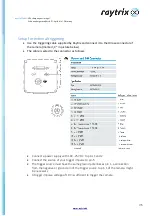
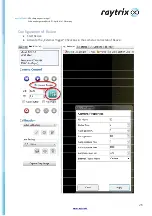
Click on the teal slider icon to open the additional camera property window


Set the external trigger mode to „Camera“


If you wish to use the PIV mode, activate the checkbox for PIV mode


The R29 can be triggered in external trigger mode at up to 5.9 frames per second


Using a faster trigger impulse frequency will result in lost frames


PIV mode


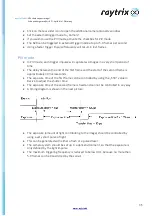
In PIV mode, each trigger impulse will capture two images in a very short period of 
time


The delay between the end of the first frame and the start of the second frame is 
approximately 30 microseconds


The exposure time of the first frame can be controlled by using the „Shtr.“ value in 
RxLive to adjust the shutter time


The exposure time of the second frame is fixed and can not be controlled in any way


A timing diagram is shown in the next picture:


The exposure (amount of light contributing to the image) should be controlled by 
using a very short pulse of light


This can be generated with either a flash or a pulsed laser


The camera system should be set up in a dark environment, so that the exposure is 
only defined by the light impulse


The maximum triggering frequency is reduced to below 3 Hz, because no more than 
5.9 frames can be transmitted by the sensor


Summary of Contents for R29

Page 1: ...p Make sure any old software for interfacing with the Camera is uninstalled RxLive 2 8 TypeD 2 8 camera drivers TypeCL 2 8 FrameGrabber drives ConvCam 3 ConvCam 4 Make sure that the newest version of the Euresys MultiCam software for your Euresys Grablink Full FrameGrabber is installed Install the newest version of RxLive CL Euresys FrameGrabber drivers and TypeD camera drivers Install the RxCalib...

Page 2: ...auenburgerstraße 116 D 24118 Kiel Germany www raytrix de The cables should connect the ports with the same numbers If the camera is not detected at all in RxLive the first step is to check the cables Connect the power supply cable to the camera ...

Page 3: ...era marked C in picture below The cable is wired to the connector as follows Connect a power supply with 10V 25V DC to pins 1 and 2 Connect the source of your trigger impulse to pin 5 The trigger source must have the same ground potential as pin 1 a connection from the negative or ground pin of the trigger source to pin 1 of the camera might be necessary A trigger impulse voltage of 10V is suffici...

Page 4: ...raytrix GmbH We sharpen your image Schauenburgerstraße 116 D 24118 Kiel Germany www raytrix de Configuration of RxLive Start RxLive Activate the External Trigger Checkbox in the camera control tab of RxLive ...

Page 5: ...he end of the first frame and the start of the second frame is approximately 30 microseconds The exposure time of the first frame can be controlled by using the Shtr value in RxLive to adjust the shutter time The exposure time of the second frame is fixed and can not be controlled in any way A timing diagram is shown in the next picture The exposure amount of light contributing to the image should...

Reviews: