


Installation Steps
1. Feed cable through bracket solution
2. Mount Illuminator
3. Mount PSU
4. Connect Illuminator to PSU
5. Connect Photocell to PSU
Set Up Steps
1. Locate unit(s) as advised in
lighting design
2. Position unit to provide illumination
down onto a scene
3. If using UBA48 or UBA32 model,
adjust the horizontal angle via
Adaptive illumination™
4. Tighten all fixings
Package Contents
1. Illuminator
2. Power Supply (PSU)
3. Illuminator cable (5m)
4. Photocell cable (5m)
illuminators installation guide
LUX URBAN
1
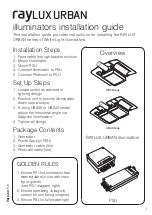
RAYLUX URBAN illuminators
PSU
Overview
This installation guide provides instructions for installing the RAYLUX
URBAN series of White-Light illuminators.
!
warning
!
warning
Version 1.1
GOLdeN RULeS:
1. ensure PSU lid orientation has
warning label in line with main
input glands
(see PSU diagram, right)
2. ensure operating voltage is
correct for unit being installed
3. ensure PSU is fully water tight
UBF range
UBa range