background image

160_3tem.p65

01/05/01, 16:16

34

Summary of Contents for ST40 Wind

Page 1: ...ST40 Wind Instrument Owner s Handbook Document number 81160 4 Date March 2006...

Page 2: ...Raymarine ST40 and SeaTalk are trademarks of Raymarine UK Ltd Handbook contents copyright Raymarine UK Ltd...

Page 3: ...Raymarine equipment and accessories are designed to the best industry standards for use in the recreational marine environment ThedesignandmanufactureofRaymarineequipmentandaccessoriesconformto the a...

Page 4: ...wascorrectwhen it went to press However Raymarine cannot accept liability for any inaccuracies or omissions it may contain In addition our policy of continuous product improvement may change specifica...

Page 5: ...lighting and contrast adjustment 3 1 3 Screen descriptions 4 Apparent and true wind screens 4 Locked apparent wind screen 4 1 4 High wind speed alarm 4 Indications 5 True wind 5 Apparent wind 5 Enabli...

Page 6: ...d transducer 13 Instrument 13 3 2 Procedures 14 Fitting Rotavecta transducer 14 Running transducer cable 15 Connections to the instrument 16 Stand alone connections 17 SeaTalk connections 18 Fitting t...

Page 7: ...face ThankyouforpurchasingaRaymarineproduct Wearesureyour ST40instrumentwillgiveyoumanyyearsoftrouble freeoperation Thisinstrumentisdesignedtoprovidereliableperformance even underthemostdemandingcondi...

Page 8: ...display backlighting contrast Normal operation ST40 Wind Instrument quick reference guide or To exit adjust mode press or wait for 5 second timeout LEVEL 1 LEVEL 1 OFF LEVEL 2 LEVEL 3 LEVEL 2 To enter...

Page 9: ...Yourinstrumentiscalibratedtofactory default settingswhen firstsuppliedandmustthereforebecalibratedbeforeuse to ensureoptimumperformanceonyourvessel DoNOTusethe instrumentuntilthecalibrationprocedures...

Page 10: ...o locked apparent wind Increase locked wind angle Decrease locked wind angle Course computer enters vane lock WIND ST40 Increase Decrease 3 seconds Alarm on off Set high wind speed alarm threshold ST4...

Page 11: ...IGHTING or wait for 5 second timeout or press D4856 1 The current contrast level is displayed Select the required contrast level then or press Normal operation ADJUST CONTRAST or wait for 5 second tim...

Page 12: ...ed with an A LOCK annunciator to indicate that the locked wind angle is controlled by the course computer and cannot be changed manually STEER Relative direction of the locked wind angle Flashing segm...

Page 13: ...RUEwindspeed exceedsthethreshold Apparent wind Ifboatspeedinformationisnotpresent thealarmistriggeredifthe APPARENTwindspeedexceedsthethreshold Enabling disabling alarm Youcanenableordisablethehighwin...

Page 14: ...6 ST40WindInstrumentOwner sHandbook...

Page 15: ...tioninstructions to enableyoutoensureminimuminteractionbetweendifferentitems ofequipment i e ensureoptimumElectromagneticCompatibility EMC AlwaysreportanyEMC relatedproblemtoyournearestRaymarine deale...

Page 16: ...nstrumentandreconnectanythatare loose Changesintheelectronicenvironmentmayadverselyaffectthe operationofyourST40equipment Typicalexamplesofsuchchanges are Electricalequipmenthasrecentlybeeninstalledor...

Page 17: ...g No wind information Display blank D4757 2 OR WIND ST40 WIND ST40 AgroupofSeaTalk instruments not working Action CheckthesecurityofSeaTalk connectorsbetweenfunctioningand non functioninginstruments D...

Page 18: ...10 ST40WindInstrumentOwner sHandbook Assistance Ifyouareunabletorectifyanyproblem pleasecontactyourlocal RaymarineDealerforassistance...

Page 19: ...underallconditions itisimportanttounderstandwhatfactorscould affecttheoperationoftheproduct TheguidelinesgivenheredescribetheconditionsforoptimumEMC performance butitisrecognisedthatitmaynotbepossibl...

Page 20: ...iledintheinstallation manual Ifasuppressionferriteisattachedtoacable thisferriteshouldnot beremoved Iftheferriteneedstoberemovedduringinstallationit mustbereassembledinthesameposition Suppression Ferr...

Page 21: ...face or clamped to a horizontal rail Suitable rail diameters are from 23 mm 29 32 inch to 25 mm 1 inch TheRotavectamustbefitted As high as possible and away from any equipment which may shield the tra...

Page 22: ...fromacompass Itisatleast500 mm 20 in fromradioreceivingequipment Thereisreasonablerearaccessforinstallationandservicing Therearoftheinstrumentisprotectedfromwater 3 2 Procedures Adapttheseproceduresa...

Page 23: ...clamp Running transducer cable TheRotavectatransducerhasa20 m 65 ft cable fittedwithspade terminalsatthefreeend forconnectiontotheST40Windinstrument Observingthefollowingguidelines runthecabletotheins...

Page 24: ...tionalSeaTalkInterconnectionKit PartNo E25028 Whenconnectedinthismanner powercanbe providedfromtheSeaTalkbus e g fromtheautopilot YoucanalsoconnecttheinstrumenttoboththeRotavectatransducer andSeaTalk...

Page 25: ...0 instrumentisprotectedbya3Afuseorcircuitbreaker 3 A circuit breaker Red ve Uninsulated wire screen ve _ D4794 2 Connections to a stand alone instrument Cable from wind transducer Power cable Blue Red...

Page 26: ...screen ve D4826 2 Typical SeaTalk connections SeaTalk bus SeaTalk bus SeaTalk interface kit Power cable Note A 5 A fuse can be used in place of the circuit breaker if preferred Fitting the instrument...

Page 27: ...Chapter3 Installation 19 2 Cut hole 57 mm 2 25 in cutter D4760 1 Peel protective sheets from gasket 3 D4770 1 4 Stick gasket to rear of instrument D4761 1...

Page 28: ...D4818 1 6 Feed cables through clamping bracket connect cables then secure instrument with bracket and thumb nut Desktop Mounting Bracket AnoptionalDesktopMountingBracket PartNo E25024 enablesyou tomo...

Page 29: ...rST40instrument dosoinaccordancewiththe InstructionSheet whichisincludedwiththeDesktopMounting Bracket 3 3 Calibration requirement Onceinstallationiscompleteandbeforeyouuseyourinstrument carry outthec...

Page 30: ...22 ST40WindInstrumentOwner sHandbook...

Page 31: ...d EMC conformance Alwayschecktheinstallationbeforegoingtoseatomakesurethatit isnotaffectedbyradiotransmissions enginestartingetc 4 2 User calibration Usercalibrationenablesyouto Setthewindangleandspee...

Page 32: ...operation for approximately 2 seconds hold down and To save your settings and return to normal operation from any screen Master Repeater Set wind speed units CAL WIND ST40 M S When linearisation succ...

Page 33: ...ration from either screen WIND CAL During normal operation ST40 WIND ST40 for approximately 2 seconds and hold down INTERMEDIATE CALIBRATION Note If there is no key activity when the Software version...

Page 34: ...CALIBRATION Entry screen D4766 2 for approximately 12 seconds Hold down and Calibration access Boat show mode Factory defaults for approximately 2 seconds hold down and WIND ST40 CAL Return to normal...

Page 35: ...mAwithmaximumbacklighting Operating temperature 0 Cto 70 C Interfaces SeaTalk Overall dimensions 126mmx70mm x38mm 5 00inchesx 2 80inchesx1 55inches Boss diameter 55mm 2 20inches Wind speed range 0to60...

Page 36: ...28 ST40WindInstrumentOwner sHandbook...

Page 37: ...nd direction Valuesarefrom1 slowresponse to15 fastresponse SeaTalk SeaTalkisaproprietaryRaymarinesystemwhichlinksdifferent compatibleproducts toprovideasingle integratednavigationalsystem SeaTalkcanal...

Page 38: ...30 ST40WindInstrumentOwner sHandbook...

Page 39: ...g Bracket 20 21 Dimensions 27 E EMC conformance i 23 installation guidelines 11 12 F Factory defaults 25 Fault finding 8 assistance 10 blank display 9 low battery 8 no wind information 9 SeaTalk probl...

Page 40: ...and safety 7 Setting backlighting 3 contrast 3 high wind alarm level 2 wind angle response 24 wind speed response 24 wind speed units 24 Silencing alarm 1 Site requirements 13 14 instrument 13 14 tran...

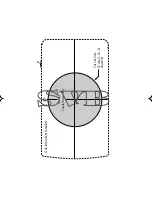
Page 41: ...D4800 1 TOP Cut out shaded area only Cut out hole 57 mm 2 25 in diameter ST40 Instrument Template...

Page 42: ......

Reviews: