8.1 Tools required
1.
Power drill.
2. Pozidrive screwdriver.
3.
Drill bit.
4.
Hex wrench (Allen key) — supplied.
5. 24 mm (
15
/
16
in) Hole saw (only required if you are routing the camera
ethernet and power fitted cable through the mounting surface).
Note:
The appropriate drill bit size is dependent on the thickness and material of
the mounting surface.
8.2 Camera orientation
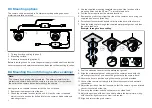
The camera can be mounted in 2 different orientations, referred to as
“ball-up” (upright) and “ball-down” (upside down).
When mounting your camera, ensure that the green infrared sensor is
centered at the top (as illustrated below).
Example: camera mounting orientations
1.
Ball-up: the camera is mounted on top of the mounting surface, and the
green infrared sensor is centered
away
from the attached metallic collar.
2. Ball-down: the camera is suspended upside down below the mounting
surface, and the green infrared sensor is centered
toward
the attached
metallic collar.
29


