background image

P/N 016-0171-675 Rev. A

51

SYSTEM DIAGRAMS

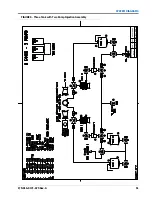
FIGURE 6. Three Tank with Two Pump Injection Assembly

ECO #

RELEASED

DATE

REV.

DRAWING NO.

31457

A

054-7120-007

Summary of Contents for ICD Sidekick Pro

Page 1: ...ICD Sidekick Pro Injection for Case Trident Installation Manual P N 016 0171 675 Rev A 06 18 E31337 Copyright 2018 ...

Page 2: ...nsible for any modifications or repairs made outside our facilities nor damages resulting from inadequate maintenance of this system As with all wireless and satellite signals several factors may affect the availability and accuracy of wireless and satellite navigation and correction services e g GPS GNSS SBAS etc Therefore Raven Industries cannot guarantee the accuracy integrity continuity or ava...

Page 3: ...ank Optional Installation 11 Pump Mounting 12 Fill Plumbing Assembly and Installation 14 Plumbing Installation 16 Tank Plumbing Assembly Options 16 Tank Plumbing Assembly and Installation 17 Calibrator Mounting 19 Tee Plumbing Assembly 20 Pump Plumbing Assembly and Installation 21 Rinse Plumbing Assembly and Installation 22 Mixer Installation 24 Plumbing Mixer Assembly 24 Two Tanks with One Pump P...

Page 4: ...onnect overflow 32 Four Tanks with Two Pumps Plumbing Installation 32 Connect tank to Fill station 34 Connect Fill Station Pump 34 Connect Rinse 34 Connect Pump Recirculation Outlet to Tank 34 Connect Pump to Injection Point 34 Connect overflow 34 Electrical Installation 34 Chassis Harness Installation 35 Pump Cable Installation 36 Chapter 4 Troubleshooting 37 Motor Control Node LED Status Indicat...

Page 5: ...rive the machine with equipment enabled on any public road Determine and remain a safe working distance from other individuals The operator is responsible for disabling the system when the safe working distance has been diminished Ensure the system is disabled prior to starting any maintenance work on the system or the implement AGRICULTURAL CHEMICAL SAFETY Thoroughly bleed pressure from chemical ...

Page 6: ... word harness is used to mean all electrical leads and cables bundled and unbundled When installing harness secure it at least every 30 cm 12in to the frame Follow existing harness as much as possible and use these guidelines Harness should not contact or be attached to Lines and hoses with high vibration forces or pressure spikes Lines and hoses carrying hot fluids beyond harness component specif...

Page 7: ...objects such as rocks that may fall or be thrown by the unit Buildup of dirt mud snow ice submersion in water and oil Tree limbs brush and debris Damage where service personnel or operators might step or use as a grab bar Damage when passing through metal structures High pressure wash INSTRUCTIONS FOR HOSE ROUTING The word hoses is used to mean all flexible fluid carrying components Follow existin...

Page 8: ...ges cylinders articulation joints attachments Ground engaging components For hose sections that move during machine operation Allow sufficient length for free movement without interference to prevent pulling pinching catching or rubbing especially in articulation and pivot points Clamp hoses securely to force controlled movement to occur in the desired hose section Avoid sharp twisting or flexing ...

Page 9: ...ions Performance of the Raven injection system relies on proper installation of the complete sprayer system Please review and follow the instructions in this manual before installing and operating the system to ensure proper setup INJECTION SYSTEM COMPONENTS The Raven injection system consists of Raven control console or Case Pro 700 controller Sidekick Pro ICD injection pump s In line mixer Chemi...

Page 10: ...nce is to provide us with feedback on this manual Your feedback will help shape the future of our product documentation and the overall service we provide We appreciate the opportunity to see ourselves as our customers see us and are eager to gather ideas on how we have been helping or how we can do better To serve you best please send an email with the following information to techwriting ravenin...

Page 11: ...ressure from plumbing components 3 Drain out the main carrier tank rinse tank and boom plumbing BRACKET PREPARATION 1 Remove the wires from three studs on the lower cross tube FIGURE 1 Stud Locations on Lower Cross Tube 2 Using an angle grinder with a cutoff disc remove the three studs HYDRAULIC HOSE REPLACEMENT IMPORTANT Follow equipment safety precautions for removing hydraulic lines Ensure the ...

Page 12: ...boom center raise lower circuit FIGURE 2 Hydraulic Hose Locations 2 Install one of the supplied 8 90 flat face fittings on the tee fitting along the right side of the sprayer frame 3 Connect one of the supplied hoses to the previously installed 8 90 flat face fittings and the open port of the main boom raise lower hydraulic manifold 4 Repeat step 1 through step 3 for the second hose HARDWARE INSTA...

Page 13: ... until the end SUPPORT TUBE INSTALLATION 1 Mount the support tubes P N 116 0159 823 to the installed mounting bases FIGURE 4 Support Tubes 2 Secure with a 1 2 bolt two washers and a lock nut Do not tighten at this time NOTE All bolt assemblies used for this installation that are not U bolts will be installed using a bolt two washers and a lock nut as shown below Bases U Bolt x4 Lower Cross Tube Ba...

Page 14: ... Secure the upper base frame to the sprayer skid with the 7 16 hardware There will be two slots on each side of the base that will align with the slots in the skid 3 Secure the upper base frame to the support tubes using 1 2 hardware Do not tighten the hardware at this time LOWER FRAME SUPPORT INSTALLATION 1 Position the lower tank straps P N 107 0172 588 under the upper cross tube and secure to t...

Page 15: ...ails 1 Using the provided 1 2 hardware in the four hardware locations install the tank frames P N 116 0159 759 for all available tanks for up to three tanks FIGURE 8 Tank Frame Installation FOURTH TANK OPTIONAL INSTALLATION 1 Mount the fourth tank frame P N 116 0159 825 to the upper tank base frame using the supplied 1 2 hardware Lower Tank Support Straps Tank Support Strap Hardware Tank Frame Har...

Page 16: ...entral tank cage FIGURE 10 Fourth Tank Frame Brackets Installed 4 Ensure that one hardware assembly will be above the tank cage cross brace 5 Install the 1 4 bolt nut and washer to secure with 1 4 hardware 6 Verify the proper alignment of the installed frame components to ensure there is no interference with the machine 7 Tighten all the hardware installed to this point PUMP MOUNTING 1 Place the p...

Page 17: ...ont feet of the pump s with the rear edge of the pump bracket s FIGURE 12 Pump Mounted to Pump Bracket 4 Secure the pump s to the pump bracket s with the provided 5 16 hardware NOTE The pump foot straps may need to be loosened for adjustment to align pump feet to the pump mount holes and avoid interference with the calibrator and frame Base Bracket Pump Bracket Hardware Locations Pump Mounting Har...

Page 18: ...ual tank configuration loosely mount the mounting bracket and jam nuts to the dry disconnect fittings prior to installed the dry disconnect fittings to the plumbing assembly FIGURE 14 Trident Fill Assembly for Two Pumps and Two Tanks 1 Banjo Dry Disconnect 1 to 3 4 Reducing Nipple 3 4 3 Way Ball Valve 3 4 Street Elbow 3 4 Nipple 3 4 Nipple 3 4 MNPT to 1 Hose Barb Jam Nut 3 4 MNPT to 1 Hose Barb El...

Page 19: ...ng bracket P N 107 0172 589 slots Secure the plumbing to the bracket with jam nuts 1 Banjo Dry Disconnect 1 to 3 4 Reducing Nipple 3 4 3 Way Valve 3 4 MNPT to 1 Hose Barb Elbow Jam Nut From Tank 1 and 2 Tee From Tank 3 and 4 Tee To Pump 1 To Pump 2 3 4 MNPT to 1 Hose Barb Jam Nut 1 Banjo Dry Disconnect 1 to 3 4 Reducing Nipple 3 4 3 Way Valve 3 4 MNPT to 1 Hose Barb Elbow To Tanks 1 and 2 Tee To T...

Page 20: ...nd appropriate assembly to the center of the lower cross tube PLUMBING INSTALLATION NOTE It may be necessary to lubricate the hose barb fitting to install the hose TANK PLUMBING ASSEMBLY OPTIONS The table below shows tank mounting and plumbing configurations for various configurations While reading this manual refer to the configuration specific assembly options listed in each section Fill Assembl...

Page 21: ...bing Assembly and Installation section on page 17 for tank plumbing assembly details 2 2 One left L One right R Refer to Tank Plumbing Assembly and Installation section on page 17 for tank plumbing assembly details 3 2 One left L Two right R Refer to Tank Plumbing Assembly and Installation section on page 17 for tank plumbing assembly details 4 2 Two left L Two right R Refer to Tank Plumbing Assem...

Page 22: ...nk Top Plumbing with Recirculation Port M100 to 1 MNPT M100 Street Elbow 3 4 3 Way Valve 3 4 Cap 3 4 NPT to 1 Hose Barb M100 to 3 4 MNPT Front of Machine Front of Machine Left Configuration Right Configuration Elbow M100 x 1 HB 1 2 Hose Barb Elbow M100 to 1 2 FNPT M100 Gasket and Clamp M100 to 3 4 MNPT Recirculation Port 1 MNPT to M100 Overflow Port ...

Page 23: ...IBRATOR MOUNTING FIGURE 21 Calibrator Assembly NOTE For single pump systems this valve assembly replaces the existing outlet fitting on the calibrator Attach the valve and fitting assembly directly to the check valve for the single pump system Elbow M100 x 1 HB M100 to 1 MNPT M100 Gasket and Clamp Cap 1 MNPT to M100 Overflow Port Pump Calibrator and Plumbing Assembly Attach Calibration Assembly to...

Page 24: ...urations 2 Use the provided 1 4 U bolts and hardware to secure the tee assembly to the lower tank support strap near the appropriate tanks Calibration and Recirculation Valve Assembly Install Valve Assembly Remove 1 2 Hose Barb to 1 2 FNPT Fitting and Replace with 1 2 Valve Assembly 1 2 NPT to Hose Barb Elbow Thread Check Valve Into Here 3 4 MNPT to 1 Hose Barb Elbow M100 to 1 Hose Barb 45 M100 to...

Page 25: ...UMBING ASSEMBLY AND INSTALLATION 1 Build the pump plumbing assembly according the pictures below Tee Assembly 1 4 U Bolts and Hardware Left Side Lower Tank Support Straps M100 to 1 Hose Elbow 3 4 MNPT to 1 Hose Barb Elbow M100 to 3 4 FNPT M100 Tee M100 to 1 Hose Barb 45 M100 Elbow To Pump 2 Fill Assembly M100 Clamps and Gasket To Tank 4 To Tank 3 Tee Assembly 1 4 U Bolts and Hardware Right Side Lo...

Page 26: ...ng Flanged M100 to 3 4 MNPT Check Valve To Fill Station 1 2 NPT Street Elbow 3 Way 1 2 NPT Valve 1 2 MNPT Strainer 3 x 1 2 Nipple M100 x 1 2 FNPT Secure to Pump with M100 Clamp and Gasket 3 4 NPT to 1 2 NPT Flow Direction M100 to 1 Hose Barb 45 Fitting Flanged M100 to 3 4 MNPT Check Valve 3 4 NPT to 1 2 NPT 1 2 NPT Street Elbow 3 Way 1 2 NPT Valve 1 2 MNPT Strainer 1 2 NPT Street Elbow M100 x 1 2 ...

Page 27: ...inse Plumbing Assembly FIGURE 30 Rinse Plumbing Assembly 3 4 3 Way Ball Valve 3 4 MNPT to 3 4 Hose Barb Elbow 3 4 Nipple 3 4 Cap M220 to 3 4 FNPT To M220 Rinse Tee Fitting To Pump or Dual Pump Rinse Tee Rinse Plumbing is Mounted Behind Foamer Tank If Equipped ...

Page 28: ...tations as shown below Use pipe thread sealant on the threaded joints FIGURE 32 Assembling Dual Pump Station Rinse Tee Fittings Dual Pump Station System Only MIXER INSTALLATION PLUMBING MIXER ASSEMBLY 1 Assemble the mixer inlet and outlet plumbing as shown below using the fittings clamps and gaskets provided 3 4 3 Way Ball Valve 3 4 MNPT to 3 4 Hose Barb Elbow 3 4 Cap Existing Rinse Tee on Machine...

Page 29: ...Valve M300 Sweep Elbow with Gauge Port M300 Clamps and Gaskets M220 Clamp and Gasket M300 Sweep Elbow M220 to 2 Hose Barb M220 to 2 Hose Barb Injection Point with Plumbing Installed To Hose From Machine M300 Clamps and Gaskets M300 Sweep Elbow 4 Mixer with Check Valve M300 Sweep Elbow with Gauge Port M300 Clamps and Gaskets M300 Sweep Elbow Injection Point with Plumbing Installed M300 to 3 Hose Ba...

Page 30: ...bing Assembly Installed Dual Pump Injection Point Shown 5 Thread the injection point plumbing into the mixer 6 Install the mixer to the upper center boom section of the machine with the supplied 3 8 16 x 2 1 2 for 120 or 1 5 16 U bolts for 90 100 3 8 washers 3 8 spacers for 120 and 3 8 nyloc nuts Place the mixer so that the inlet check valve is on the right side of the machine 1 2 NPT Street Elbow...

Page 31: ...llow enough length for boom movement and to connect to the boom outlet 8 For high flow machines connect a short piece of hose to connect the mixer inlet to the sweep elbow shown in Figure 38 on page 27 M300 to 3 Hose Barb M300 Sweep Elbow Existing M300 Sweep Elbow Fitting on High Flow Plumbing M300 Clamp and Gaskets Short Piece of Hose ...

Page 32: ...TWO TANKS WITH ONE PUMP PLUMBING INSTALLATION NOTE Refer to Figure 4 on page 49 for a plumbing schematic for two tanks with one pump FIGURE 40 Dual Tank Single Pump Installation Example Approximate Cut Location Rotate Fitting to Point to the Left Side of Machine To Rinse Valve Assembly To Bottom of Tank 2 To Bottom of Tank 1 To Recirculation on Tanks To Injection Point Fill 1 Fill 2 ...

Page 33: ...he rear of the machine and connect the rinse port of the pump plumbing Secure with the supplied hose clamps and zip ties CONNECT PUMP RECIRCULATION OUTLET TO TANK 1 Connect the pump recirculation outputs to tank one and two recirculation ports with 1 2 hose Secure with the supplied hose clamps CONNECT PUMP TO INJECTION POINT 1 Connect the pump output to the injection point on the mixer with 1 2 ho...

Page 34: ... tank Secure with the supplied hose clamps 2 Route the hose to the rear of the machine 3 Determine an appropriate location in front of the skid lower cross tube to install the rinse tee 4 Cut the hose and install the rinse tee Secure with the supplied hose clamps 5 Connect the rinse tee to pumps one and two Secure with the supplied hose clamps CONNECT PUMP RECIRCULATION OUTLET TO TANK 1 Connect th...

Page 35: ...ute the hose down the side of the cage Secure the hose to the cage using the supplied zip ties THREE TANKS WITH TWO PUMPS AND SHARED CHEMICAL PLUMBING INSTALLATION NOTE Refer to Figure 6 on page 51 for a plumbing schematic for three tanks with two pumps FIGURE 42 Three Tank with Two Pump and Shared Chemical Installation Example To Rinse Tee ToRecirculation on Tank 1 To Injection Point ToRecirculat...

Page 36: ...ront of the skid lower cross tube to install the rinse tee 4 Cut the hose and install the rinse tee Secure with the supplied hose clamps 5 Connect the rinse tee to pumps one and two Secure with the supplied hose clamps CONNECT PUMP RECIRCULATION OUTLET TO TANK 1 Connect the pump one recirculation output to tank one port with 1 2 hose Secure with the supplied hose clamps 2 Connect the pump two reci...

Page 37: ...A 33 INSTALLATION FIGURE 43 Four Tank with Two Pump Installation Example To Rinse Tee ToRecirculation on Tank 1 To Injection Point ToRecirculation on Tank 3 To Injection Point Fill 1 Fill 2 From Below Machine Fill 1 Fill 2 ...

Page 38: ...hose to the rear of the machine 3 Determine an appropriate location in front of the skid lower cross tube to install the rinse tee 4 Cut the hose and install the rinse tee Secure with the supplied hose clamps 5 Connect the rinse tee to pumps one and two Secure with the supplied hose clamps CONNECT PUMP RECIRCULATION OUTLET TO TANK 1 Connect the pump one recirculation output to tank one port with 1...

Page 39: ...lied nut 4 Install the power wire on the bottom stud and secure with the supplied nut 5 Locate the skid ground stud FIGURE 45 Ground Stud Location 6 Install the ground wire on the stud 7 Route and secure the chassis cable to the rear of the machine along the left side of the skid frame IMPORTANT Do not secure the cable to the machine chassis to prevent damage if the skid is removed 8 Locate the ma...

Page 40: ...t the pump ECU cable P N 115 2500 017 to the chassis cable P N 115 2500 016 2 If using two pumps connect the second pump ECU cable 3 Locate the CAN end cap connector that is supplied with the chassis cable 4 Plug the CAN end cap connector to the unused round connector on the pump ECU cable located on the right pump if two pumps are installed 5 Connect the remaining open connectors of the Pump ECU ...

Page 41: ...ED STATUS INDICATORS The ICD Sidekick Pro integrated motor control node displays the status of the injection pump with the following node status indicators FIGURE 1 LED Status Indicators Flow Switch State CAN Status High Current Power Logic Power Cal Switch State Calibration Switch ...

Page 42: ... metal object is passed by the calibration switch sensor Code ID Description Recommended Actions 523152 31 Invalid pump state Verify the communication setup shutdown alarm 523154 9 Lost communication Verify the communication setup shutdown alarm 16 Target flow too high 1 Reduce the equipment speed 2 Reduce the target application rate 18 Target flow too low 1 Increase the equipment speed 2 Increase...

Page 43: ...libration for the correct data entry 2 Calculate the volume per minute for the application and verify the rate is within the range of the injection pump 18 Off rate low Check for Fouled pump check valves Air leaks on the injection pump inlet Air in the chemical Plugged inlet strainer Chemical too thick to flow through the pump Calculate the volume per minute for the application and verify the rate...

Page 44: ...dent Installation Manual 523189 7 Injection pump fault Return pump to a local Raven dealer for service 16 Invalid pump calibration Adjust the flow correction offset 524025 31 Security failure Cycle the device power Code ID Description Recommended Actions ...

Page 45: ...Agitation Pump Flush 115 2500 017 Cable Chassis Injection Case 115 2500 016 Pump Seal Kit 117 0159 987 Valve Check 1 2 with Bleed Hole 333 0011 100 Pressure Transducer 422 0000 090 Pump Sidekick Pro ICD 5 to 200 oz min 063 0173 769 Pump Sidekick Pro ICD 1 to 40 oz min 063 0173 768 Item Description Raven Part Number Mixer 3 with 3 Check Valve Flanged 063 0173 698 Mixer 4 with 3 Check Valve Flanged ...

Page 46: ...ual 3 Full Port Manifold Check Valve 333 0011 105 Strainer 1 2 MNPT Polypropylene 20 Mesh 333 9000 060 Valve 3 Way Poly 1 2 NPT 334 0001 037 Fitting 3 Way Ball Valve 3 4 NPT 334 0001 068 Valve 3 Way Poly 1 2 NPT Continuous Flow 334 0001 054 Item Description Raven Part Number ...

Page 47: ...ase Trident Support Tubes 116 0159 823 Weldment Injection Case Trident Tank Base Frame 116 0159 826 Weldment Injection Case Trident Pump Mount 116 0159 827 Item Description Part Number ICD Sidekick Pro Injection for Case Trident Installation Manual 016 0171 675 Plumb to Chemical Tank Plumb to Point of Injection Check Valve Pump Calibrator Only P N 063 0173 260 Pump Flow Monitor Sensor P N 063 0173...

Page 48: ...CHAPTER 5 44 ICD Sidekick Pro Injection for Case Trident Installation Manual ...

Page 49: ...CHAPTER 6 P N 016 0171 675 Rev A 45 CHAPTER6SYSTEM DIAGRAMS ELECTRICAL Drawings start on the next page ...

Page 50: ...CHAPTER 6 46 ICD Sidekick Pro Injection for Case Trident Installation Manual FIGURE 1 Single Pump Electrical Diagram ECO RELEASED DATE REV DRAWING NO 31457 A 054 7120 007 ...

Page 51: ...P N 016 0171 675 Rev A 47 SYSTEM DIAGRAMS FIGURE 2 Dual Pump Electrical Diagram ECO RELEASED DATE REV DRAWING NO 31457 A 054 7120 007 ...

Page 52: ...CHAPTER 6 48 ICD Sidekick Pro Injection for Case Trident Installation Manual INJECTION PUMP FIGURE 3 Direct Injection Pump ECO RELEASED DATE REV DRAWING NO 31457 A 054 7120 007 ...

Page 53: ...P N 016 0171 675 Rev A 49 SYSTEM DIAGRAMS PLUMBING FIGURE 4 Two Tank One Pump Injection Plumbing ECO RELEASED DATE REV DRAWING NO 31457 A 054 7120 007 ...

Page 54: ...CHAPTER 6 50 ICD Sidekick Pro Injection for Case Trident Installation Manual FIGURE 5 Two Tank with Two Pump Injection Plumbing ECO RELEASED DATE REV DRAWING NO 31457 A 054 7120 007 ...

Page 55: ...P N 016 0171 675 Rev A 51 SYSTEM DIAGRAMS FIGURE 6 Three Tank with Two Pump Injection Assembly ECO RELEASED DATE REV DRAWING NO 31457 A 054 7120 007 ...

Page 56: ...CHAPTER 6 52 ICD Sidekick Pro Injection for Case Trident Installation Manual FIGURE 7 Four Tank with Two Pump Injection Assembly ECO RELEASED DATE REV DRAWING NO 31457 A 054 7120 007 ...

Page 57: ...P N 016 0171 675 Rev A 53 SYSTEM DIAGRAMS ...

Page 58: ...CHAPTER 6 54 ICD Sidekick Pro Injection for Case Trident Installation Manual ...

Page 59: ...ndicators 37 O Overview Injection System Components 5 P Plumbing Installation 16 Plumbing Installation Four Tank with Two Pumps 32 Plumbing Installation Three Tank with Two Pump 31 Plumbing Installation Two Tank with One Pump 28 Plumbing Installation Two Tanks with Two Pumps 29 Pump Mounting 12 Pump Plumbing 21 R Replacement Parts 41 Rinse Plumbing 22 S Support Tube Installation 9 System Cleanout ...

Page 60: ...INDEX 56 ICD Sidekick Pro Injection for Case Trident Installation Manual ...

Page 61: ...er s responsibility The Return Materials Authorization RMA number must appear on the box and all documentation including proof of purchase must be included inside the box to be sent to Raven Industries WHAT WILL RAVEN INDUSTRIES DO Upon confirmation of the warranty claim Raven Industries will at our discretion repair or replace the defective product and pay for the standard return freight regardle...

Page 62: ... claim and send it to Raven Industries for final approval The freight cost to Raven Industries will be the customer s responsibility The Return Materials Authorization RMA number must appear on the box and all documentation including proof of purchase must be included inside the box to be sent to Raven Industries In addition the words Extended Warranty must appear on the box and all documentation ...

Reviews: