background image

P/N 016-0171-493 Rev. I

125

Tools Menu

7

Differential

Important:

If a SmarTrax assisted steering system is connected to the Envizio Pro field computer, set the correction 
source to internal before making changes to the Envizio Pro internal receiver.

Note:

If the Envizio Pro is not able to detect the source or type of differential corrections received from 
the an external GPS receiver, or if corrections are routed from the internal GPS receiver through a 
Raven SmarTrax system or TM-1 Tilt Module, the Differential screen will be replaced by the 
Default Differential screen. Refer to the Default Differential section on page 131
 for more 
information on using the differential settings displayed on this screen.

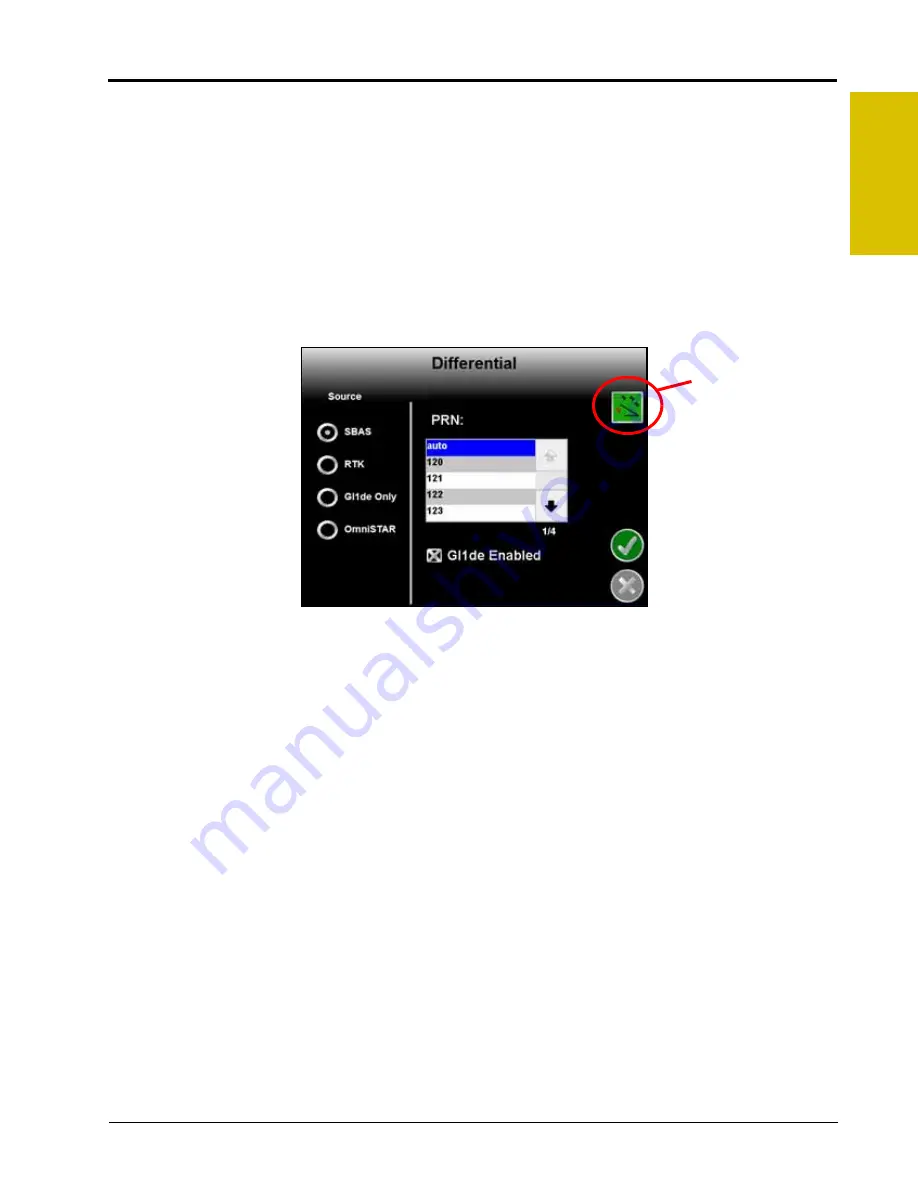
Select the Differential icon from the GPS menu to set up the internal receiver for the desired GPS correction 
source. Generally, the SBAS (WAAS/EGNOS) option is selected by default.

Note:

Touch the ‘Auto Detect’ button on the GPS Health screen if a Raven receiver is connected directly 
to the ‘GPS Receiver/DGPS’ port on the chassis interface or main interface cables. If the field 
computer detects a Raven receiver, the field computer can be used to select the differential source 
and PRN of the external receiver.

If GPS is routed through an assisted steering system such as the Raven SmarTrax, the receiver 
cannot be configured with the field computer.

Elevation Mask

The elevation mask sets the minimum elevation of a satellite above the horizon which the field computer may 
use for differential correction. This value is displayed in degrees above horizontal.

Touch the Elevation Mask icon in the upper, right corner of the Differential screen and use the on-screen 
keypad to modify the elevation mask setting. The default value for the elevation mask is 4.0.

The current elevation mask value is displayed on the GPS Health screen.

Elevation Mask

Summary of Contents for Envizio Pro

Page 1: ...Envizio Pro and Envizio Pro II Installation and Operation Manual P N 016 0171 493 Rev I 4 16 15 E24690 Copyright April 16 2015 ...

Page 2: ...y modifications or repairs made outside our facilities nor damages resulting from inadequate maintenance of this system As with all wireless and satellite signals several factors may affect the availability and accuracy of wireless and satellite navigation and correction services e g GPS GNSS SBAS etc Therefore Raven Industries cannot guarantee the accuracy integrity continuity or availability of ...

Page 3: ......

Page 4: ...n Screen Guidance 5 Internal DGPS Receiver Options 5 Optional Features 7 Front Panel 8 Resistive Touch Screen Technology 8 Icon Based Operation 8 USB File Transfer 9 Rear Panel 10 Care and Use 11 Technical Specifications 12 Updates 14 Chapter 3 Installation 15 Overview of the Installation Process 15 Kit Contents 16 Mounting the Field Computer 17 Cable Platforms and Connections 18 Generation 1 Cabl...

Page 5: ...l Setup and Setup Wizards 37 Overview 37 Initial Setup 37 Startup 38 Touch Screen Calibration 39 Initial Setup Wizard 40 Setup Wizards 42 Setup Wizard Menu 42 Product Section Setup Wizard 43 Using the Product Section Setup Wizard 43 Product Control Setup Wizard 44 Using the Product Control Setup Wizard 45 AutoBoom Setup Wizard 49 Using the AutoBoom Setup Wizard 49 Chapter 6 Basic Operation 51 Over...

Page 6: ... Maps 86 Using Prescription Maps 87 System Alarms 87 Alarms Area 88 Audible Alarms 88 Chapter 7 Tools Menu 89 Accessing and Navigating the Tools Menu 89 Wizard Menu 90 System Menu 90 GPS Menu 90 Computer Menu 90 Vehicle Menu 91 Show All 91 Navigation 91 On Screen Keyboard 92 System Menu 93 Control Interface 94 Product Control Options 94 Boom Master and System Options 97 Serial Port Configuration 9...

Page 7: ... 117 NH3 Configuration 117 Dual Flow Percent 118 Low Pressure 118 Low Tank or Bin 118 Low Limit 118 Low Supply Alarm 118 Max Pressure Alarm 119 Off Rate Percent 119 Current Alarms 119 Section Assignments 119 AutoBoom 120 Steering 120 GPS Menu 120 Reverse Sensing 121 GPS Health 122 Differential 125 Default Differential 131 Output 131 Source 133 Tilt Sensor 134 Drift Shift 134 Computer Menu 135 Disp...

Page 8: ...3 CAN Switch Box 163 AccuBoom Setup 164 On Override 164 Aggressiveness 165 Master Pressure 166 Turn Off Percent 166 Look Ahead 167 Enable Zero Speed Override Popup 167 Enabling AccuBoom 167 AccuBoom Modes 169 On Screen Switch Box 171 Using Zone Maps 172 Loading a Field Boundary 172 AccuBoom Mapping Tools 173 On Screen Tools 173 Creating an AccuBoom Zone Map 174 AccuBoom Zone Map Examples 176 Chapt...

Page 9: ...190 Boom Cal 190 Meter Cal 191 Valve Cal 194 Valve Cal 2 195 Flow Cal Dual Loop Control Mode 195 Sgain Pressure System Gain Dual Loop Control Mode 195 Rate Cal 196 Tiered Boom Settings 197 Granular Applications 199 Boom Cal 199 Spreader Constant 199 Verification of Spreader Constant 200 Product Density 200 Rate Cal 200 Spinner RPM 201 Additional Calibration Data 202 Entering Tank Volume or Bin Lev...

Page 10: ...Configuration 212 Using the Weather Station 213 Appendix E Updating CAN Nodes via the Envizio Pro 215 Appendix F Updating the On board DGPS Receiver 217 Required Components 217 Receiver Information 218 Updating the On Board DGPS Receiver 218 Appendix G Tank Fill Monitor Calibration 221 Overview 221 Tank Fill Calibration 221 Tank Fill Operation 222 Appendix H Blockage Monitoring Sensors 223 System ...

Page 11: ...Console Connection 238 Console Power 239 Remote Tank Console Operation 239 Using the Tank Console To Adjust Settings 242 Troubleshooting 244 Appendix J Serial Console Interfaces 245 Console Connection 245 Serial Control Setup and Configuration 246 Section and Guidance Width Configuration 246 AccuBoom Configuration 248 Operation 249 Hopper Contents 249 Area Covered Coverage Mapping Information 250 ...

Page 12: ...Table of Contents P N 016 0171 493 Rev I ix Field Review Mode Tools 259 A B Path Tools 260 Field Boundary Tools 263 Alarms 264 AccuBoom 264 On Screen Tools 265 AutoBoom 266 AutoBoom Status Indicator 266 ...

Page 13: ...Table of Contents x Envizio Pro and Envizio Pro II Installation and Operation Manual ...

Page 14: ... Write down the selected settings for each configured control channel in the spaces provided Write down the calculated calibration values in the spaces provided Units US Acres SI Hectares Turf 1000 Square Feet Speed Sensor SP1 Wheel Speed SP2 Radar Speed Cal Control Channel 1 Control Channel 2 Control Channel 3 Control Channel 4 Control Type Valve Type Section Widths Boom Cal 1 5 9 13 2 6 10 14 3 ...

Page 15: ...r Hectare TU Volume per 1 000 Square Feet GPK Gallons per 1 000 Square Feet Metric Numbers mm Millimeters lb acre Pounds per Acre cm Centimeters kg ha Kilograms per Hectare Fluid Ounces Conversion Formula Liters Conversion Formula Pounds Conversion Formula Liquid Area 1 U S gallon 128 fluid ounces 1 square meter 10 764 square feet 1 U S gallon 3 785 liters 1 hectare 2 471 acres or 10 000 square me...

Page 16: ...dealer When operating the machine after installing the Envizio Pro field computer observe the following safety measures Be alert and aware of surroundings Do not operate the field computer while under the influence of alcohol or an illegal substance Remain in the operator s position in the machine at all times when the field computer is engaged Determine and remain a safe working distance from oth...

Page 17: ...ions When installing hydraulics or performing diagnostics maintenance or routine service ensure that precautions are taken to prevent any foreign material or contaminants from being introduced into the machine s hydraulic system Objects or materials that are able to bypass the machine s hydraulic filtration system will reduce performance and possibly damage the hydraulic valves Electrical Safety A...

Page 18: ...ceiver to simplify console installation and allow the system to be transferred to other vehicles over the growing season This manual provides information for the following Envizio Pro series field computers Envizio Pro Envizio Pro II FIGURE 1 Versatile Envizio Pro or Envizio Pro II Field Computers Note Envizio Pro series field computers are also capable of interfacing with various Raven control sy...

Page 19: ...ol system Raven CANbus Control The Envizio Pro field computers are capable of controlling up to four products or control channels through product control nodes connected to a CANbus system The field computer automatically adjusts the application rate of each product according to the speed of the vehicle width and status of programmed sections and a programmed target rate With the optional variable...

Page 20: ...ontour and Straight Line guidance patterns In addition the field computer can output GPS information and simulated radar speed to an external Raven light bar See Chapter 5 Startup Initial Setup and Setup Wizards for more information regarding guidance patterns and the Guidance screen Internal DGPS Receiver Options Both the Envizio Pro and Envizio Pro II offer options for an internal Differential G...

Page 21: ...bscription OmniSTAR subscription services provide an alternative differential source which broadcasts corrections from a worldwide array of reference sites Note Contact OmniSTAR for details and subscription information Slingshot GS and Satellite GS GS subscription services offer a decimetric correction source delivered via either a satellite based correction network or over a wireless network via ...

Page 22: ...trol system for complete crop input control OmniSeed automatic seeder control system for products applied from an air cart AutoBoom automatic boom height management systems SmarTrax series automatic assisted steering systems TM 1 Tilt Module offers tilt corrected DGPS guidance over rough and hilly terrain Slingshot Field Hub for communication and GPS corrections delivered via a cellular service pr...

Page 23: ...creen functionality places menus and options literally at the operator s finger tips Icon Based Operation Operation of the field computer can be done at a glance due to the icon based interface Easily recognizable icons allow the operator to quickly select features or use functions without diverting attention from other important operations NOTICE Failure to close a job before turning the console ...

Page 24: ...e purchased at many retail locations or a local Raven dealer FIGURE 3 4 GB USB Flash Drive P N 524 0002 065 Note Install the USB flash drive only when transferring files Do not start the field computer with a flash drive connected or leave the drive inserted during normal operation For additional information on the available memory resources on specific consoles refer to the Technical Specificatio...

Page 25: ...eld computer with the various components and hardware for the specific control system FIGURE 4 Envizio Pro Rear Panel Features and Connectors Note Envizio Pro field computers without an internal DGPS receiver will not feature an antenna port The part number serial number and hardware revision of the field computer are located on the tags located on the back of the console Please have this informat...

Page 26: ... or other liquids Store the computer in a dry environment when not in use Mount the field computer securely and route cables to prevent tripping hazards and to keep the wires from pinching or breaking When temperatures are expected to be 10 F 12 C or lower remove the field computer from the vehicle and store it in a climate controlled environment Always remove the power connections for the field c...

Page 27: ...n 16 51 cm Weight 3 68 lbs 1 67 kg Environmental Operating Temperature 32 F to 158 F 0 C to 70 C Storage Temperature 4 F to 185 F 20 C to 85 C Power Operating Voltage 9 VDC to 28 VDC Reverse Polarity Protected Ports USB 2 1 on front 1 on back Ethernet 1 Back Amp 2 Back Mounting Plate Arm Vesa Plate with RAM Mounting Arm Screws Provided 10 32 x 1 2 Long Description Part Number Hardware Revision Ava...

Page 28: ...Lo 6 DGPS Transmit 5 DGPS Receive To External Devices 7 DGPS CTS 8 DGPS RTS 6 DGPS Transmit To External Devices 9 Console Transmit 10 Console Receive 7 Auxiliary Receive 11 RS232 Ground 8 Auxiliary Transmit 12 Console CTS 9 Auxiliary CTS 13 Console RTS 10 DGPS Receive Corrections In 14 12 V Ignition 15 12 V Switched 11 Auxiliary RTS 16 Battery Positive 12 RS232 Ground 13 Not Used 14 Radar Out Auxi...

Page 29: ... and the overall service we provide We appreciate the opportunity to see ourselves as our customers see us and are eager to gather ideas on how we have been helping or how we can do better To serve you best please send an email with the following information to techwriting ravenind com Envizio Pro and Envizio Pro II Installation and Operation Manual P N 016 0171 493 Rev I Any comments or feedback ...

Page 30: ...and necessary hardware For additional instructions on installing optional hardware with the field computer refer to the instructions provided with the optional component s Instructions for building a CAN Controller Area Network system can be found in Chapter 4 CAN Networking and Diagnostics Basic installation of the Envizio Pro field computer is as follows 1 Review kit contents 2 Mount the field c...

Page 31: ...g Kit includes Hardware 117 0171 132 1 OmniSTAR XP HP Authorization Codeb b OmniSTAR or GS activation and subscription must be purchased separately if not included with the kit 077 0180 081 1 Envizio Pro Installation and Operation Manual 016 0171 148 1 Envizio Pro Quick Reference Guide 016 0171 149 1 Envizio Pro II with SBAS Envizio Pro without GPS Receiver Components Part Number 117 0171 382 117 ...

Page 32: ...3 P N 016 0171 493 Rev I 17 Installation FIGURE 1 Envizio Pro Kit Contents Drawing Number 054 2040 004 ...

Page 33: ...the machine s cab Route all cables to avoid tripping hazards and protect the cable from kinking or breaking during operation To mount the Envizio Pro or Envizio Pro II field computer Note If the CAN Switch Box will be installed with the Envizio Pro field computers use the mounting hardware provided with the CAN Switch Box Refer to the CAN Switch Box Installation and Operation Guide for mounting in...

Page 34: ...io Pro to power FIGURE 3 Generation 1 Main Interface Cable Connection Diagram 1 Route the conduit with red and white leads to a clean controlled power source such as a clean power bus bar or junction box NOTICE Please review the Raven CANbus Network Installation Manual for installation instructions for the specific cable platform being installed with the field computer prior to beginning installat...

Page 35: ...ore than one amp is required to power a device connected to the orange wire install a relay to switch the higher currents FIGURE 4 Relay P N 415 1001 009 Terminals CAUTION Even when the field computer is powered off the computer will draw a small current from the battery Connect the red wire to a controlled power source or if the machine will not be in use for an extended period of time remove pow...

Page 36: ...ce cable P N 115 0172 001 CAN Switch Box kit P N 117 5020 001 Note Contact a local Raven dealer for switch box options Refer to the Raven CANbus Network Installation Manual for additional cabling information for the generation 2 cable platform FIGURE 5 Generation 2 Cable Connection Diagram Drawing Number 054 5000 001 Note The CAN Switch Box is not used with the optional Raven OmniRow system ...

Page 37: ...he Speed Cal section on page 187 for additional assistance with speed sensor types and speed calibration values If the chassis interface cable P N 115 0172 001 is installed and the internal DGPS receiver will be used for DGPS reception the Internal GPS Receiver Output and GPS Receiver DGPS port connectors must be connected together DGPS Antenna Note To enable the guidance capabilities of the field...

Page 38: ...he Internal GPS Receiver Output and GPS Receiver DGPS port connectors must be connected together FIGURE 7 Envizio Pro and Envizio Pro II Antenna Options for Internal DGPS Receivers Note The Envizio Pro II requires an MBA 6 helix antenna P N 063 0172 651 for use with RTK GS or OmniSTAR correction sources with the internal GPS receiver Connecting External DGPS Receiver Systems 1 Follow installation ...

Page 39: ...ster on off and the field computer mapping feature If the boom sense wire is properly connected the vehicle master on off switch also toggles the product coverage mapping based on a 12V signal detected on this wire Generation 1 Cabling Connect the spade connector on the main interface cable P N 115 0171 746 labeled Ext Switch external switch to the machine master switch FIGURE 8 Main Interface Cab...

Page 40: ...stallation materials for instructions on installing AccuBoom on the machine Note When used with a CAN product control system AccuBoom requires a boom speed node with program D or newer for proper AccuBoom functionality AccuBoom Master Switch The AccuBoom master switch option will allow AccuBoom to toggle coverage mapping and section information as reported by the AccuBoom node To enable the AccuBo...

Page 41: ...er from the location of the GPS antenna FIGURE 10 Reported GPS Position Error Due to Side Hill The Raven TM 1 Tilt Module compensates for any tilt of the vehicle from a level field condition To supply tilt compensated GPS signal the Raven TM 1 Tilt Sensor receives a raw DGPS signal from the DGPS receiver and outputs a tilt corrected signal to guidance devices or controllers If connected directly t...

Page 42: ...draulically or by mechanically turning the steering wheel to guide the vehicle along a guidance path displayed on the field computer Guidance screen See the Source section on page 133 to configure the Envizio Pro to use an optional SmarTrax system Serial Console FIGURE 11 Envizio Pro Gen 1 Cable Platform with Serial Control Console The Envizio Pro may be connected to a Raven serial control console...

Page 43: ...draulic valve and hoses CANbus Network Connection Envizio Pro field computers are capable of controlling up to four product nodes or control channels with required activation keys on a CANbus system The field computer will automatically scan for CAN product control planter control AccuBoom AutoBoom SmarTrax boom sense and speed nodes connected through the CAN connection See Chapter 4 CAN Networkin...

Page 44: ...ct control nodes or control channels can be connected to the Envizio Pro control system for any combination of liquid granular chemical injection or spinner control applications The diagrams in this chapter show different hardware configurations for use with Envizio Pro series field computers Some diagrams show optional features which may not apply to each system These features and components are ...

Page 45: ...Chapter 4 30 Envizio Pro and Envizio Pro II Installation and Operation Manual FIGURE 1 Envizio Pro Dual Product Liquid Granular CAN Control System ...

Page 46: ... 31 for detailed instructions on readdressing the product nodes Contact a local Raven dealer for more information on required activation keys for controlling up to four products using the Envizio Pro field computers To view a list of nodes currently detected on the CANbus network 1 Select the Information icon in the upper right corner of the Home screen 2 Touch the icon on the About Envizio Pro sc...

Page 47: ...l product motor control planter control etc 1 Select the Information icon in the upper right corner of the Home screen 2 Touch the icon on the About Envizio Pro screen to display the CAN Diagnostics screen 3 Touch the button to begin readdressing the product control nodes 4 When prompted to cycle power on the first product node disconnect the logic power from the product node to be controlled as P...

Page 48: ... without resetting the CANbus system Note Refer to the Product Control Setup Wizard section on page 44 for assistance recalibrating the product control nodes Retry CAN Communication If a node currently connected to the CANbus system is not displayed on the CAN Diagnostics screen touch the button to start the CAN system If the node still does not appear on the CAN Diagnostics screen the CANbus syst...

Page 49: ... which the node is providing to the field computer Each control channel must be configured separately via the Tools Menu Hardware Summary Select a node from the list displayed on the CAN Diagnostics screen and touch this icon to view detailed node hardware information if available The hardware summary screen provides node operating information that may be helpful when contacting technical support ...

Page 50: ...ave been received on Raven consoles sporadically losing communication with one or more CAN nodes The most likely causes for this problem are 1 Corroded and or open connections in the circuit 2 Computer and or CAN node logic power and grounds connected to a dirty power source dirty power is defined as any circuit with a variable load that exceeds 1 ampere This is especially true of circuits loaded ...

Page 51: ...Chapter 4 36 Envizio Pro and Envizio Pro II Installation and Operation Manual ...

Page 52: ... field computer displays an alert regarding an authorization code after starting the console contact a local Raven for assistance Refer to the Special Features Registration section on page 138 for instructions on entering the authorization code The initial setup wizard will require the following vehicle information Desired language and display units for operation Guidance width width of boom or im...

Page 53: ... on page 42 for a detailed description of the other available wizards Startup The Envizio Pro field computer will take several seconds to power up and initialize the user interface DGPS reception and the other features of the system During startup the field computer will display the following prompt Ignore this prompt to allow the field computer to startup normally Note To launch the touch screen ...

Page 54: ...touch the screen to begin re calibration of the touch screen The first calibration target will appear Note The operator has approximately seven seconds to touch the screen to begin the calibration process 2 Touch the center of the target Note Each of the four following targets will require the operator to touch the center of the target 3 After all of the calibration targets have been completed tes...

Page 55: ...tings or region selections 2 If desired configured the time zone by selecting the Time Zone icon in the upper right corner of the Region screen Refer to the Time Zone Settings section on page 137 for details 3 Touch the Next icon proceed with the initial field computer setup 4 The Control Interface screen will be displayed Select the Product Control option desired for interfacing with the control ...

Page 56: ...tool bars pull type sprayers planters or air seeders with the air cart towed behind the seed drill Refer to the Trailed Implement Tractor Setup section on page 144 for assistance with the trailed implement configuration Trailed Implement with Tow Between This option has been designed for seeder implement configurations with the air cart towed between the tractor and seed drill Refer to the Trailed...

Page 57: ...l display the available setup wizards which may be used to complete the initial setup of the field computer Note Depending upon previous options selected during the initial setup wizard completion of some wizards may be required before the field computer is ready for operation Only setup wizards which apply to the system will be displayed in the Setup Wizard Menu For example if a Glide Series Auto...

Page 58: ...he on screen keypad to enter the section width 4 Touch the Next icon to accept the entered value and advance to the next section to the right Note To skip a section enter a value of zero as the section width 5 Repeat step 3 and step 4until the widths have been entered for all sections 6 Touch the Next icon on the last Section Width screen to advance to the Configure Sections screen 7 If desired to...

Page 59: ...djust the fore aft and left right offsets for each individual section Refer to Manually Configure Sections section on page 151 Note The offset distances represent the offset from the DGPS antenna to the center of the selected section 10 Select the Auto or Manually Configure buttons and then touch the Next icon to return to the Setup Wizard Menu screen Product Control Setup Wizard The product contr...

Page 60: ...culating the Calibration Values for instructions on refining the speed cal value Note The GPS speed over CANbus feature is only available with specific Raven speed sense nodes This feature utilizes NMEA speed over ground data transmitted over the CAN network which eliminates the need for a separate external speed sensor The test speed and distance values are not required to complete initial setup ...

Page 61: ...mation on the available application types 6 Touch the Next icon to proceed to the Valve Calibration screen 7 Select the type of control valve which will be used on the first control channel Touch the Reset Valve Cal button to let the field computer insert the recommended initial calibration value Raven Industries recommends the following valve calibration values for initial system setup These valu...

Page 62: ...e information from the tag for future reference as the tags may fade or be lost during operation Density of product 1 granular products Refer to Product Density section on page 200 for details on the product density required for the control system Spinner cal spinner control nodes Refer to the Spinner RPM section on page 201 for information on calculating the spinner cal value necessary for spinne...

Page 63: ...e product control channel is available in the CANbus control system the display will return to the Setup Wizard Menu If additional product control channels are available the field computer will automatically restart the Product Control Setup Wizard for each channel in sequence Repeat step 4 through step 12 to configure remaining control channels and complete the Product Control Setup Wizard 13 Aft...

Page 64: ... settings during the initial setup The AutoBoom setup wizard may require the following information Pressure Set PowerGlide Plus Sensor Height and Sensor Height Offsets UltraGlide PWM Frequency and Minimum Pressure Percent Speed Sensitivity Stability Factor Using the AutoBoom Setup Wizard Refer to the CAN AutoBoom Calibration Operation Manual for more information regarding setup and use of the Glid...

Page 65: ...Chapter 5 50 Envizio Pro and Envizio Pro II Installation and Operation Manual ...

Page 66: ... After the initial startup the field computer will automatically startup to the Home screen The Home screen offers access to the following features of the Envizio Pro field computer Note The Envizio Pro should be properly shutdown before turning the power off on the field computer Home screen Guidance patterns Shutting down Using the guidance screen Starting jobs Start or Resume Job Access the Too...

Page 67: ...ne whether the receiver is operating in RTK fixed or float modes The RTK shield will display Green to indicate a fixed RTK position This mode indicates that the receiver has a full RTK position fix and is providing sub inch corrections The GPS Health screen will display a value of 4 for the differential mode when operating in RTK fixed mode Yellow to indicate that the receiver is operating in RTK ...

Page 68: ...e field computer Green if communication is okay Yellow if an error condition has been encountered Red if wireless communication is not available Touch the shield icon to display the Wireless Status screen Refer to the Appendix C Wireless Communications Remote Service for more information Information Touch the information icon in the upper right corner of the home screen to display the software and...

Page 69: ... displayed The Home screen displays Job in progress during an active job and the Shutdown icon is replaced by the Stop icon 3 Touch the Stop icon to close the currently active job Note Touching the Start icon with a job in progress will return to the Guidance screen of the active job To begin a new job first touch the Stop icon to close the job in progress before selecting the Start icon NOTICE Fa...

Page 70: ... job started on the Envizio Pro Note To ensure field computer memory resources are available Raven recommends performing file maintenance periodically to remove unused job files from the memory on the console Refer to Chapter 8 Software Updates and File Maintenance for more information A job file allows the operator to Create and save new field boundary and coverage maps and other information for ...

Page 71: ...e of the following steps may not be required to begin all jobs 1 Touch the Start icon on the Home screen The Start Job Verify Settings screen will be displayed Note Settings and features displayed on this screen may not be accessible while a job is in progress Verify that all settings are correct and all nodes connected to the CANbus are detected by the control system before beginning the job If t...

Page 72: ...tup section on page 61 to enable or disable the AutoBoom feature Direction of Travel The last direction of travel detected by the field computer is displayed on the Start Job Verify Settings screen If the direction of travel indicator displays incorrectly touch the indicator to manually toggle the last detected GPS direction Note The direction of travel indicator is also displayed on the GPS Healt...

Page 73: ...To Resume an Existing Job Select the existing job file from the list and touch the Accept icon to return to the Verify Settings screen When the Guidance screen is displayed coverage maps from the existing job will be displayed on the Guidance screen To Start a New Job On the Select Job screen touch the Create New icon The New Job Enter Name screen is displayed Use the on screen keypad to enter the...

Page 74: ...ws Disabled Feature is available or CANbus node is communicating but optional features are not enabled for this system Enabled Feature is available or CANbus node is communicating and optional system features are enabled Node Not Detected The CANbus node is currently not detected by the field computer If selected the name of the selected zone map will be displayed in the zones field Product Setup ...

Page 75: ... mode must be set using the product control switches on the switch box The field computer will display the selected mode for each product Product Name The currently selected product name is displayed on the Product Name button Touch the Product Name button to display the Start Job Select Product screen Select a product name from the displayed list or create a new name by touching the Create New ic...

Page 76: ...ection on page 154 for assistance with transferring maps onto the Envizio Pro AutoBoom Setup If an optional AutoBoom system is detected on the CANbus the field computer will display the AutoBoom setup screen before accessing the Guidance display and features Review the AutoBoom Calibration and Operation Manual for detailed operation of this feature with the Envizio Pro field computers ...

Page 77: ...e screen If the reverse direction icon is not displayed on the Guidance screen touch the GPS Status Indicator and touch the direction of travel icon along the right side of the screen to manually toggle the displayed vehicle course 1 On Screen Light Bar The on screen light bar illuminates to represent the vehicle s location with respect to the displayed guidance path The center square displays gre...

Page 78: ...ough the zoom levels as desired 8 Guidance Pattern Touch the icon displayed in this area to toggle between the available guidance patterns See the Using Guidance Patterns section on page 63 for more information on using specific patterns 9 Menu Guidance screen views path tools and options and AccuBoom mapping features are all accessible through the Menu See the Menu section later in this chapter f...

Page 79: ... steering systems available for use with the Envizio Pro field computer The Enhanced Last Pass is well suited to provide guidance for irregular swaths due to irregular field boundaries well heads or waterways etc Note The Last Pass guidance pattern is designed to function in areas with a single well defined continuous coverage or as applied map If the coverage map displays multiple coverage areas ...

Page 80: ...computer records points along the driven path until the operator sets the B point The field computer then connects the recorded points and displays the Fixed Contour path After the A and B points are set the field computer is able to use the programmed guidance width and the original path to project additional contour paths for the rest of the coverage area As long as the Fixed Contour pattern is ...

Page 81: ...rrently this pattern does not require that the entire circumference of the field is driven before beginning guidance however better results are achieved by driving further along the guidance line See the A B Path Tools section on page 73 for additional assistance when using the A B guidance line tools and features with the Pivot pattern Product Control Features In addition to guidance features of ...

Page 82: ...lled section labels displayed in amber signify that AccuBoom control of the section is enabled but AccuBoom has toggled the section off 6 Swath Number During straight line pivot and fixed contour guidance patterns the number of the current swath is displayed in this area When in Last Pass mode this area displays LAST 7 Menu Guidance screen views path tools and options and AccuBoom mapping features...

Page 83: ... need to be reset when refilling bins Refer to the Tank Volume or Bin Level section on page 113 for details on calibrating the ultrasonic bin level sensor when the product bins are empty Product Rate Display The field computer displays rate information for each enabled product in the upper right corner of the Guidance screen The following information appears in the Product Rate Display Name of eac...

Page 84: ...o view and setup additional settings for each product touch the green arrow to display the Product Control Configuration screen Refer to the Product Control section on page 99 for more information on product control configuration Application Information The Application Information displays the following information for the selected product Area per hour Pressure or fan speed if an optional pressur...

Page 85: ...played on the screen check that the correct product node or control channel is selected Control Mode Use the control mode to set the mode of operation for the product control valve Select Off to turn off product control for the selected product Manual to control the actual application rate manually Automatic to allow the field computer to control product application rates automatically Note If a C...

Page 86: ... rate Note The INC DEC switch on the CAN Switch Box offers the same functionality as the on screen rate bump buttons in both the manual and automatic control modes On Screen Pressure or Fan Speed display If an optional pressure transducer or fan speed sensor have been installed and configured the field computer can display the monitored values on the Guidance screen Select the Enable On Screen Pre...

Page 87: ...e job in progress will continue in the background Note that some Tools Menu screens may not be accessible while a job is in progress Guidance Views The down field and bird s eye views are the primary screens used while a job is in progress These views seamlessly integrate guidance and navigation information with rate control information This minimizes the amount of time which the operator must foc...

Page 88: ...Note The A B Line must be stored on the field computer internal memory to be able to access and load the guidance path Be sure to transfer all necessary files to the field computer before beginning a job Names or descriptions of A B Lines stored on the field computer cannot begin with a space Setting A B Points To create a new A B line the operator must set A and B points The following icons and t...

Page 89: ...dance screen Select the A B Tools icon to access additional tools for use with the current A B line Select the Reset A B Line icon to clear the displayed path If the displayed path will need to be recalled in the future be sure to save the current path before selecting reset Touch the Save A B Line icon to save the displayed path Once saved an A B line may be recalled at any time or loaded into ot...

Page 90: ...ght Line Fixed Contour or Pivot patterns 2 Select the Menu icon in the lower right corner of the display and select the Edit Nudge icon to display the In Job Nudge Settings screen Note Touch the Reset Nudge button at the bottom of the Nudge Settings screen to reset any adjustments to the path displayed on the Guidance screen 3 On the Nudge Settings screen select the Enabled radio button to display...

Page 91: ...xed Contour or Pivot patterns 2 Select the Menu icon in the lower right corner of the display and select the A B Tools icon The following nudge icons are available in the Menu Touch the Nudge Right icon to move the displayed guidance path to the right The distance which the path will be nudged is determined by the user defined value for the active nudge Touch the Nudge Left icon to move the displa...

Page 92: ...le location Touch the marker to access marker information or delete the field marker Note Field markers are independent of job information and will be displayed for subsequent jobs in the area of the field marker Marker Information Touch the base of the marker and select the Information icon to display the Marker Information screen This screen displays the marker name current distance to the marke...

Page 93: ...rlaps Switch product Pan Lock The pan lock feature locks the current view in field review mode When the pan lock is disabled the display will automatically scroll to the vehicle indicator as the indicator moves out of the current view Disable the pan lock to always display the vehicle indicator while in field review mode When the pan lock is enabled the display is locked to the current view regard...

Page 94: ...ed upon the selected product If only one product has been enabled the product is always selected and the Select Product icon will not appear on the Field Review screen If additional products are enabled for the current job touch the Select Product icon to cycle through the enabled products For Example Control channel 1 is currently selected Touch this icon to cycle the Field Review screen to chann...

Page 95: ... be recorded per job If the optional AccuBoom automatic section control system is enabled a field boundary will also create a basic zone map of the current field Refer to Chapter 9 Using AccuBoom for more information on field boundaries with the AccuBoom system or contact a local Raven dealer for more information about the Raven AccuBoom system Zone Maps If the optional AccuBoom automatic section ...

Page 96: ...n in the Menu A list of job files or boundaries stored on the field computer is displayed Select the desired boundary to load into the current job Note Field boundaries exported from the Envizio Pro will be named either using the job file name entered when the job was started or the Zone Map name set for the map created during the job Shapefile boundaries may be renamed on a PC or laptop computer ...

Page 97: ...ote that the field computer draws a straight line from the boundary starting point to the vehicle s current location when closing a boundary Boundary Tools Once a field boundary has been completed the following tools will be available through the Menu on the Guidance screen Touch the Boundary Tools icon to display additional boundary tools available for the current job Touch the Delete Boundary ic...

Page 98: ... of all job features 1 Touch the Menu icon in the lower right corner of the guidance display 2 Select the Drift Shift icon 3 Use the fine and coarse nudge arrows on the screen to adjust the field features displayed to the actual vehicle location As the job features are adjusted the cumulative nudge applied in each direction is displayed in the lower right corner of the display 4 Touch the Menu ico...

Page 99: ...ettings 1 Touch the Menu icon in the lower right corner of the guidance display 2 Select the Drift Shift icon 3 Touch the Drift Shift icon displayed in the lower right corner of the display to access the Drift Shift Settings screen Use the following features to set the reference point or shift the coverage features Set Drift Correction Now With the vehicle positioned at the actual reference point ...

Page 100: ...Maps with too many zones may yield undesired results or limit performance of the field computer To help limit the number of zones within a map use the equipment or Guidance width as a guide The smallest zones on the map should be no smaller than the width of the equipment applying the product For example if the boom on a sprayer is 90 feet 27 m wide for each swath zones within the prescription map...

Page 101: ...tion map to the product controlled by the first product node Note To remove a prescription map touch the Prod1 area of the button to display the Product Setup screen Touch the Rate button and enter a value 2 A list of available prescription maps is displayed on the Start Job Select Rx Map screen Select the name of the prescription map to apply to the selected product and then touch the Accept icon...

Page 102: ... on the screen The display will center the location touched on the screen and display the prescription rate in the lower left corner System Alarms Important warning and alert information is immediately displayed on the screen in the Alarms area The Alarms area displays icons representing the portion of the system which requires the operator s attention In addition to visual alarms the operator may...

Page 103: ...icon to view all current alarm conditions Hiding the Alarms Area Once the operator has reviewed any alert information the Alarms area can be hidden to resume operation 1 To hide the Alarms area touch the green check mark icon 2 If the alarm condition still exists an Alarm icon appears on the screen until the alarm condition has been cleared Touch this icon to re display the Alarms area 3 For help ...

Page 104: ...e by selecting the Tools icon on the Home screen The Tools menu contains the following submenus Wizard System GPS Computer Vehicle Note Verify that the field computer is setup correctly for the job vehicle and application prior to starting an actual job application See the Product Control section on page 99 to enter a test speed and check settings while the vehicle remains stationary ...

Page 105: ...adjust the internal GPS receiver or to enable the field computer to receive DGPS from an external receiver The GPS menu also contains screens to review the status of GPS reception set message outputs for the internal DGPS receiver only or select the PRN Computer Menu The Computer menu sets display and feature settings of the field computer Access the Computer menu to change the display brightness ...

Page 106: ...rm any changes to a screen Touching the Accept icon will save those settings and proceed to the next screen Touch the Cancel icon to exit the current screen without saving any changes made on a screen If the Cancel icon is displayed in gray the cancel feature is currently unavailable Like the Accept icon the Next icon accepts changes and proceeds to the next screen in a setup procedure Touch this ...

Page 107: ...seconds 2 Drag drag to the diacritic character in the popup displayed 3 Release the touch to enter the selected character Note Diacritic symbols are only available if the language selected on the Envizio Pro contains these characters Shift Caps Lock The keyboard displays the character set that will be entered in the character field when any of the keys are selected To shift the character set to lo...

Page 108: ...entry field The displayed text or characters will be entered in the selected text field on the previous screen Touch the key to return to the previous screen without entering the keyed text or characters System Menu The System menu contains the options for setting up how the Envizio Pro will interface with the product control hardware The System menu also contains setup screens for the optional Ac...

Page 109: ... a disc plow or rake With this option selected the Envizio Pro will only provide guidance for field operations Raven Serial Console This option is used when the field computer is connected to another Raven product control console such as a Raven SCS 440 or SCS 460 connected to the Console port on the interface cable In this configuration the field computer will monitor and display application info...

Page 110: ...for a multi section planter implement Refer to the AccuRow Calibration Operation Manual for additional set up and operation information CAN Planter Control Select CAN Planter Control if the field computer will be interfacing with an optional Raven OmniRow system The OmniRow system allows the field computer to control seed population rate and offers AccuRow automatic row or planter section shut off...

Page 111: ...rfacing with an optional Raven SmartYield Pro CANbus yield monitoring system to monitor and log yield and moisture data during harvest operations Refer to the SmartYield Pro Calibration Operation Manual for additional information OmniSeed Select the OmniSeed option if the field computer will be interfacing with the optional Raven OmniSeed system to provide seed rate control for an air seeder syste...

Page 112: ...d as the product control option the list of available boom master options is replaced by the following CAN AccuBoom options AccuBoom Combo Node Do not select the AccuBoom Combo Node option if an optional AccuBoom system has not been installed on the CANbus If an AccuBoom Combo node P N 063 0172 714 is present on the CANbus select this option The following option will be available in the AccuBoom O...

Page 113: ... section on page 135 to adjust the brightness of the external light bar via the field computer interface Weather Station Select this option to connect an optional WatchDog Sprayer Station to the Envizio Pro field computer Depending upon the current system and connected controllers the weather station may be connected to either COM2 Console or COM3 Light Bar ports on the interface or chassis cablin...

Page 114: ...reen to cycle through detected product nodes or control channels The Product Control Configuration screen contains several of the calibration numbers which the field computer requires to provide product control Access the product control configuration to adjust the following settings for the product control system Application type Speed sensor type and cal Valve type and cal Product control node c...

Page 115: ... to meter application from equipment with a dual bed Gran Granular 3 Dry or granular product application using a dual encoder configuration to meter application from equipment with a dual bed Gran Granular 4 An air seeder system on which a seed gate or segmented meter roller is used to control seed for active sections before the seed has entered the air system Most air seeder control systems will ...

Page 116: ... AccuFlow HP boost pump Select this option to allow the operator configure specific boost pump control features for field operations AccuFlow HP Select the AccuFlow HP option if controlling a Raven AccuFlow HP Plus system with the Vortex cooler for anhydrous ammonia applications Note Select the AccuFlow HP option only if an AccuFlow HP Plus system will be controlled by the field computer Contact a...

Page 117: ...icle remains stationary The test speed is useful for troubleshooting the CAN and product control systems Note A speed cal must be entered to allow the test speed feature to function The test speed area displays the current test speed Touch this area to enter a test speed Note The test speed will clear if the field computer receives a pulse from the actual speed sensor To keep the test speed from d...

Page 118: ... the field computer adjust the valve control response for slight differences between control valves and is required for product control Raven Industries recommends the following calibration values for initial system setup These values are good starting points and will generally yield adequate results however the valve cal should be refined for the individual control valves installed on the specifi...

Page 119: ...e valve a 200 millisecond burst at a full 12 V to open the fast valve from the closed position before resuming product rate control A zero value will disable this feature Sgain Pressure System Gain Dual Loop Control Mode Only The Sgain value may be used when controlling a liquid application system using a PWM control valve Use this value to adjust how aggressively the application system responds t...

Page 120: ...andby pressure 7 Return to the Feature Settings screen and disable the dual loop control feature before resuming product application in the standard control mode Valve Advance Standard or Fast Valve This feature allows the operator to set the amount of time in seconds which the control valve will remain open after boom sections are toggled off while in automatic rate control mode A value of 1 9 me...

Page 121: ...ion Screen section on page 107 for more information on the PWM values configured using the manual calibration mode Calibration Assistant The calibration assistant allows the operator to increase or decrease the PWM output using on screen controls and set the PWM minimum maximum frequency and preset values based upon observed operation To use the calibration assistant mode toggle the vehicle master...

Page 122: ...alibration process PWM Calibration Screen In the manual calibration and calibration assistant modes the PWM Calibration screen will display with the following options or settings available Information Touch the blue Information icon to display a brief explanation of the settings and options available on the PWM Calibration screen Max PWM Enter a Max PWM value to set the maximum desired RPM or hydr...

Page 123: ...se the standby pressure value sets the pressure which the system will maintain in the product lines when the master or all boom sections are toggled off Note The standby pressure setting is only accessible when controlling products in liquid control modes with a boom pressure transducer detected by the field computer Refer to the Feature Settings section on page 114 for details If the system press...

Page 124: ...libration for details on settings used with the OmniSeed feature Meter Cal Spinner Cal or Product Density The flow meter calibration meter cal value can be found on the tag attached to the flow meter Review the Meter Cal section on page 191 Note Copy the information from the tag for future reference as tags may fade or be lost during operation If operating in a granular application mode the Produc...

Page 125: ...uct control nodes begin to control the flow rate Note A value of zero must be entered when using a close type valve such as a Fast Close or PWM Close valve A zero value must also be entered when programming a standard valve with an injection system Pump or Fan Cal The pump or fan cal is used to calibrate the field computer to the specific fan granular or pump liquid on the machine Enter the number...

Page 126: ...reader constant anytime the gate height of the machine is adjusted Refer to Appendix A Calculating the Calibration Values for assistance calculating the spreader constant Rate Bump The rate bump value sets the increment by which the target rate will increase or decrease when using the Rate Bump buttons on the Guidance screen Each product node or control channel must be programmed with the desired ...

Page 127: ...rring prescription maps Note Enabling the Zero Rate Shut Off feature will affect all control channels Prescription Rx Look Ahead Distance Enable the Use Look Ahead Distance option on the Rx Settings screen to set look ahead values in units of distance rather than time for changing the prescription map rate control zones Note The vehicle must travel at a constant speed while using the look ahead di...

Page 128: ... more information on configuring the AccuBoom feature for liquid or granular product application control Note Refer to the AccuRow or OmniRow Calibration and Operation Manual for additional information on configuring the optional AccuRow automatic planter section control feature when controlling planter systems Volume and Area Settings The volume area Settings screen allows the operator to program...

Page 129: ...ied in that field Total Volume and Area The total volume and total area displays on the Volume Area screen can be reset independently of the field volume and field area displays For example reset the total volume and total area to keep records of the total volume of product applied and the total acreage covered Feature Settings From the Home screen touch the Tools Menu icon and select the Product ...

Page 130: ...f a carrier product is not set as product 1 the low pressure alarm will not function If the off rate alarm is triggered frequently during injection applications in ratio rate mode access the volume per minute display on the control console and verify that the target flow rate is within the application range for the pump The ratio rate calibration value is entered as the ratio of injected chemical ...

Page 131: ... is turned off Refer to the Preset PWM section on page 108 for information on the standby pressure value Note To enable the standby pressure feature the product control system must have a PWM valve controlling a liquid application system and a pressure transducer connected to the control node If these requirements are not met the console will automatically disable the standby pressure feature When...

Page 132: ...te that the chemical tank is empty or the pump is unable to prime or inject product Enter a value between 0 and 100 for the percentage of error allowed between the flow switch and pump encoder before a flow alarm will be displayed For example set this value to 100 to disable the flow error cal alarm or 0 to display an error any time the flow switch and pump encoder do not match The default value f...

Page 133: ...ct at the pressure transducer location If the product pressure falls below the programmed the field computer will display an alert Note The product control valve will stop closing when the Low Pressure setting is reached Low Tank or Bin Enter the tank or bin volume at which alarms area will activate indicating that a product is running low Low Limit The Low Limit value sets the minimum volume per ...

Page 134: ...ia applications The pressure alarm may be set between 0 to 250 PSI 0 to 1724 kPa Enter a value of zero to disable the maximum pressure alarm condition Off Rate Percent Enter the percentage at which the Off Rate alarm will activate The Off Rate alarm activates when the actual rate differs from the target rate by the programmed value for longer than five seconds The off rate alarm percent value will...

Page 135: ...ormation Steering If an optional assisted steering system has been installed the Steering icon will be displayed in the System menu Touch this icon to access the Steering Settings screen For more detailed installation and calibration Information refer to the SmarTrax Calibration and Operation Manual GPS Menu The GPS menu displays available options for the DGPS source The GPS menu contains the DGPS...

Page 136: ... the field computer may occasionally require the operator to manually override the current direction of travel during field operations Review the GPS Health section on page 122 and the Direction of Travel Indicator section on page 124 before starting a job to ensure that the operator can toggle the direction of travel if necessary The reverse sensing feature is not displayed if a SmarTrax terrain ...

Page 137: ...nto and used to determine correction The field computer requires a minimum of 5 satellites to provide differential correction DGPS Displays the source of differential correction being used Note If using the e Dif correction source with the Envizio Pro internal receiver the DGPS field will display AUTO Version The firmware version of the DGPS receiver This information may not be available in all co...

Page 138: ...tellites currently locked and used to determine differential Touch a satellite displayed in the constellation to display information about each satellite in the constellation Note To view the satellite constellation be sure to set the GSA message to 1 Hz from an external DGPS receiver If a Raven automatic steering system is connected the satellite constellation and individual satellite information...

Page 139: ...rmware version receiver model and the type of GPS receiver on board the field computer This information will be required when unlocking additional features of the GPS receiver or when activating GS Satellite corrections AutoDetect GPS Touch the AutoDetect GPS button on the GPS Health screen to allow the Envizio Pro to attempt to automatically detect GPS information coming from an external device T...

Page 140: ...urce Generally the SBAS WAAS EGNOS option is selected by default Note Touch the Auto Detect button on the GPS Health screen if a Raven receiver is connected directly to the GPS Receiver DGPS port on the chassis interface or main interface cables If the field computer detects a Raven receiver the field computer can be used to select the differential source and PRN of the external receiver If GPS is...

Page 141: ...osition input for guidance systems Note The NovAtel GL1DE feature is only available on Envizio Pro II field computers with the dual frequency GPS receiver Visit the NovAtel web site for a full description and additional information on the NovAtel GL1DE feature www novatel com GLONASS Authorization An optional Global Navigation Satellite System GLONASS authorization key is also available to enhance...

Page 142: ...ttings are configured correctly to ensure that RTK corrections are used by the on board receiver RTK Mode Select the format of the correction messages sent from the RTK correction source The default setting is RTCM v3 0 Baud Rate Select the baud rate at which the correction messages are transmitted from the RTK correction source The default baud rate setting is 115200 Network Select the network fr...

Page 143: ...satellite frequency and rate settings only when instructed by an OmniSTAR technician Custom Frequency The Custom Frequency button displays the current satellite frequency used with OmniSTAR corrections Custom Rate The Custom Rate button displays the current message rate for OmniSTAR corrections Signal Strength Displays the signal strength of the selected satellite Subscription Status The subscript...

Page 144: ...st set the correction source to Internal before the following information will be available Be sure to move the vehicle to a location with a clear view of the sky before contacting a local Raven dealer for subscription assistance Expiration The time until the current subscription will expire is displayed in days and hours Contact a local Raven dealer for subscription information Mode This field wi...

Page 145: ...lingshot GS If the Slingshot GS correction service is selected for differential corrections through the Slingshot wireless network the Differential screen will display the following options Accuracy Warning The accuracy warning value sets the allowable horizontal accuracy for field operation When the field computer determines the position solution meets the set value the solution will be considere...

Page 146: ...GPS Status Icon as outlined in the GPS Status section on page 52 The Default Differential selection also allows the field computer to identify and display potential GPS error conditions during field operations Important Potential error conditions must be verified and addressed on the external receiver or the source setting must be set to Internal to access the internal GPS receiver settings Output...

Page 147: ...Baud Rate of the message strings sent from the built in receiver Note Some GPS or Assisted Steering components may require specific Baud Rate settings Simulated Radar Output Touch the Next icon displayed on the GPS Output screen to view the simulated radar output from the field computer These settings may be used to help set up an external device to receive GPS speed signal output from the interna...

Page 148: ...ore making changes to the Envizio Pro internal receiver To output DGPS signal from the built in receiver to an optional TM 1 Tilt Sensor or SmarTrax controller select the Internal GPS Receiver Via Tilt or SmarTrax option Note The GPS Output Baud must be set to 19 200 before selecting the Via TM 1 or SmarTrax option see the External Light Bar TM 1 Tilt Module and SmarTrax section on page 132 Do not...

Page 149: ...ws the operator to manually correct for GPS drift over the course of a field operation or to recalibrate the position of field features if the job is resumed at a later date or time Note It is necessary to stop the vehicle while nudging job features When enabled the drift shift feature will automatically pan and zoom onto the current vehicle location to allow the operator to adjust the position of...

Page 150: ...s the display mode brightness language light bar and display units are modified through the Computer menu Features available with a USB flash drive such as software updates and file maintenance are also accessed via the Computer menu Display The Display settings screen allows the user to change settings for the field computer screen display and the on screen light bar ...

Page 151: ...hich the field computer will provide guidance Select between the coarse normal and fine adjustments The example light bar displays the units and measurements used for each setting External Light Bar The brightness of an external light bar controlled by the field computer may be adjusted using the External Light Bar slider on the Display screen Note The External Light Bar adjustment will only displ...

Page 152: ...d system AutoBoom Pressure The units used to display pressure of an optional AutoBoom system are also selected on this screen Select between pounds per square inch PSI or kilo pascals kPa Time Zone Settings Touch the Time Zone icon in the upper right corner to view and modify time zone settings The default selections will allow the field computer to automatically configure the time zone and daylig...

Page 153: ...ration If CE 6 0 is not listed in the enabled features list contact a local Raven dealer or the Raven Technical Support Center for assistance The Raven dealer will require the Machine ID and Validation Code information displayed at the bottom of the Special Features Registration screen to generate the authorization code To Activate a Special Feature 1 Obtain a registration code from a local Raven ...

Page 154: ... code has been accepted The node activation key will not be displayed on the Special Features Registration screen Check the CAN Diagnostics screen or test the control system to verify that the special feature s purchased are accessible To Authorize Internal DGPS Receiver Features 1 From the Envizio Pro II home screen touch the Tools Menu blue button and select the Source icon from the GPS menu 2 O...

Page 155: ...ce a week and storing or backing up these files on a home or office PC See Chapter 8 Software Updates and File Maintenance for details on using the File Maintenance feature Note Depending upon the size of the completed job s file maintenance may take several minutes to complete When interfacing with a planter control or yield monitor system a typical job of 200 acres should take less than 5 minute...

Page 156: ...normal operation speeds near this range It is recommended to disable the low speed mode if the normal operation speeds for field operations will be above 1 5 mph 2 4 km h consistently Guidance Width Use the on screen keypad to enter the guidance width in inches centimeters for the boom implement or header The guidance width should be entered as the width of the boom implement or header which actua...

Page 157: ...d sprayer a harvester or combine or an implement mounted to a tractor 3 point hitch See the Self Propelled or Mounted Implement section on page 142 for details on configuring implements using this implement type Trailed Implement Select this option to configure implements such as anhydrous tool bars pull type sprayers planters or air seeders with the air cart towed behind the seed drill Refer to t...

Page 158: ... Touch the current fore aft value displayed on the Raven Offsets Setup screen 2 Use the keypad to enter the measured fore aft value in inches centimeters If the boom or implement is in front of the GPS antenna select the Implement in Front option Left or Right Offset The left right offset is the distance from the GPS antenna to the center line of the boom or implement Note The left right offset mu...

Page 159: ...tion 1 Touch the drop down selection in the upper left corner of the screen and select the tractor type which will be used with the control system 2 Review the following definitions of the offsets necessary to complete the tractor setup process These values are critical for performance of the field computer and product or implement control system Measure carefully and enter the offset values as ac...

Page 160: ...y behind a tractor such as a pull type sprayer anhydrous tool bar or planter Refer to the Trailed Implement with Tow Between Setup section on page 146 to configure an implement such as an air seeder with the air cart towed between the seed drill and the tractor 1 If the standard Trailed Implement option is selected as the implement type the Offsets will display after the Tractor Offsets Setup scre...

Page 161: ... definitions of the offsets for the trailed implement setup These values are critical for performance of the field computer and product or implement control system Measure carefully and enter the offset values as accurately as possible to help ensure the best results Hitch to Axle The first value on the Cart Dimensions screen should be measured from the tractor hitch pin to the air cart pivot poin...

Page 162: ...sed only to review the current section configuration Note The reference point for measuring the section left right and fore aft offsets depends upon the implement type selected prior to configuring the section configuration Self propelled or mounted Implement The reference point is the antenna position Offsets must be measured from the antenna to the midpoint of each section Trailed Implement The ...

Page 163: ...wn arrow buttons to setup the number of sections for the vehicle or implement Touch the Next icon to proceed to the Section Width screen Note To utilize AccuBoom automatic boom section control plumbing on the vehicle or implement must allow for individual section control If the equipment is not capable of controlling individual sections set the number of sections to 1 and enter the overall boom or...

Page 164: ...ance to the Configure Sections screen This screen allows the operator to configure the section labels set the switch assignments for each section and to configure the location for each section on the machine or implement 5 Touch the Configure Section Labels button to edit the section labels displayed on the field computer if desired 6 Select the Section Mapping button to reconfigure sections to se...

Page 165: ...gured with the desired label 4 Touch the Accept to return to the Configure Sections screen Section Mapping The Envizio Pro field computer allows the operator to customize the section to switch mapping to the operator to quickly control multiple sections using a single switch This feature also allows the operator to use a standard 10 section switch box to control an implement with more than 10 sect...

Page 166: ...oint usually the center of the implement wheel base Offsets must be measured from the implement pivot point to the midpoint of each section Trailed Implement with Tow Between The reference point is the rear hitch of the tow between implement Offsets must be measured from the rear hitch to the midpoint of each section Review the Offsets and Implement Type Selection section on page 142 for details o...

Page 167: ...w profile Profiles save the following settings GPS Antenna Height and Offsets Swath Width Section Widths and Configuration Show All The Show All icon in the upper right corner of the screen displays the Tools Menu overview screen Touch this icon to display the System Vehicle Computer and GPS menus and the individual pages accessible in each menu on one screen Touch the Show All icon to display the...

Page 168: ... modified Make sure to save the files to the correct folder on the USB drive before attempting to load files back onto the Envizio Pro field computer Depending upon the size of the completed job s file maintenance may take several minutes to complete A typical job of 200 acres should take approximately 5 minutes Larger fields and coverage maps with multiple sections or rate change zones could take...

Page 169: ...format requires specialized software to view the shapefiles on a home or office PC Shapefiles consist of four separate files each with the same file name A file with the shp shx prj and dbf file extensions are all essential for the shapefile format to function correctly To save memory on the field computer the Envizio Pro only generates if selected the printable bitmap and shapefile reports when f...

Page 170: ...he right side of the screen to setup the required file structure For more information regarding the file structure on the USB drive refer to the File Structure section on page 158 3 Select the type of file on which the file maintenance operation will be performed 4 Press the Configure File Output icon 5 Check the configuration setup Report A report file includes rate area covered and other basic o...

Page 171: ...le type touch the transfer to or transfer from field computer icon below the list of file types For example if the operator selects Job Files and the from Field Computer the Job Files screen will display similar to the following 7 Use the following icons to perform the desired file maintenance actions Transfer from Field Computer Transfer to Field Computer File Types Scroll List of Available Files...

Page 172: ...e from the field computer or the right icon to delete all files of the selected type currently saved on the field computer Note The Delete button will not affect any files on the flash drive To remove files from the flash drive use the PC s file browser i e Windows Explorer to remove delete or copy files from the flash drive Touch this icon to manually initiate upload of a selected file currently ...

Page 173: ...ld computer Global Data Information not specific to individual job files is stored in the Global Data folder Profiles The pfl files contained within the Profiles folder contain configuration information for each profile The field computer creates one pfl file for each saved profile Profile files are used by the field computer OS and are not viewable Work Orders Job information for each job transfe...

Page 174: ...eports or archive job information Review the Performing File Maintenance section on page 155 for more information on exporting a job data package to a connected USB flash drive Reference Ref Maps Folder Reference maps may be transferred to the field computer for use during harvest operations using the Raven SmartYield system Reference maps are generally the coverage or as planted maps with populat...

Page 175: ...refer to the user help information for your specific browser or operating system 1 Locate the latest Envizio Pro update Note Verify that the correct product and software version is displayed at the top of the release notes before proceeding 2 Select View to review the software release notes for the new software version The release notes page may have important information about the software update...

Page 176: ...n available USB port 5 Double click on the exe file and if prompted select Run to display self extractor prompt 6 Select the Browse button and then locate the flash drive in the Browse For Folder prompt 7 Select the primary directory or root disk to extract the software update file To successfully update the Envizio Pro the update files cannot be placed in any sub folders or directories The Unzip ...

Page 177: ...Tools menu icon and touch the Updates icon located in the Computer Menu 3 Insert the USB flash drive with the extracted software update into and available USB port on the field computer A list of the available updates will appear on the screen Important The EnvizioPro_NoCanDemo update is for demonstration purposes only Do not select this option for normal operation applications 4 Select the softwa...

Page 178: ...tion CAN Switch Box If a Raven CAN Switch Box or the Raven Switch Pro switch box is installed with the field computer the section switches must be in the Accu position to allow AccuBoom control for the assigned sections If the section switches are in the On or Off position the AccuBoom system will treat the section as manually overridden and will not automatically turn the section on or off based ...

Page 179: ...e control channel on the CANbus system Touch the cycle product icon in the upper right corner of the screen to cycle to the next available control channel and configure the AccuBoom control feature for the next product controlled with the field computer On Override Touch the On Override button and use the up or down arrows to increase or decrease the override time for the AccuBoom feature Note The...

Page 180: ...the look ahead time has passed For example if the turn on look ahead value is set to 5 seconds and AccuBoom detects an unapplied area 5 seconds ahead of a boom section AccuBoom toggles that section on and will ignore subsequent commands to turn that section off until the section has entered the unapplied area For sections at the end of larger booms or where sharp turns or aggressive maneuvering is...

Page 181: ...luctuate slightly when sections activate it is recommended to set this value above the minimum desired boom pressure to ensure adequate pressure to maintain the spray pattern Off Pressure Set the pressure at which the field computer will shut off all AccuBoom controlled sections and disable automatic section control All AccuBoom controlled sections will be overridden off until the boom pressure ri...

Page 182: ... cause overlaps skips or undesirable product application in some areas Generally these settings should not exceed 5 seconds and a value between 1 to 2 seconds will yield the best results Use Look Ahead Distance Enable the Use Look Ahead Distance option on the AccuBoom Configuration screen to set look ahead values in units of distance rather than time Note The vehicle must travel at a constant spee...

Page 183: ...ections Leaving this option blank will disable AccuBoom Once the Enable AccuBoom option is selected the AccuBoom screen will appear similar to the following 4 Leave the Enable Zone Map option deselected to use Standard AccuBoom section control only See the AccuBoom Modes section on page 169 for more information on the AccuBoom modes Touch the Accept icon and skip to step 7 if Standard AccuBoom is ...

Page 184: ...odes The available modes for operating AccuBoom are Standard AccuBoom Mode In jobs using Standard AccuBoom mode zone maps cannot be created or loaded Automatic section control is based upon the coverage map only As sections enter previously applied areas AccuBoom will automatically turn that section Off When the section leaves the previously applied area AccuBoom automatically turns the section ba...

Page 185: ...ld Boundaries Field boundaries within an AccuBoom enabled job automatically create a zone map based upon the completed boundary A field boundary recorded without the AccuBoom feature enabled can be converted to an AccuBoom field boundary later See the Loading a Field Boundary section on page 172 for details Note A job file can be saved with any number of spray or no spray zones but a job file may ...

Page 186: ... toggle all sections currently set to automatic control Tapping the master switch indicator will toggle any sections currently in the automatic mode to the selected status Tap the automatic mode will toggle those sections back to automatic while leaving any manually controlled sections to the assigned mode Double tap the master switch icon to toggle all section switches to the selected status Sect...

Page 187: ...dary within a zone mapping enabled job To load a standard field boundary into an AccuBoom enabled job 1 Touch the Menu icon in the lower right corner of the Guidance screen 2 Select the Zone Mapping Tools icon 3 Select the Load Field Boundary icon A list of available field boundaries currently saved on the field computer will display 4 Select the name of the desired field boundary and touch the Ac...

Page 188: ... a no spray zone Touch the Record Spray Zone icon to begin recording points along a spray zone boundary The area inside of the completed boundary will become a spray zone Touch the Record Field Boundary icon to create a new AccuBoom field boundary With the zone mapping mode enabled AccuBoom will assign a minimum of three implement widths outside of the completed boundary as a no spray zone On Scre...

Page 189: ...ting an AccuBoom Zone Map The following is an example of recording an AccuBoom field boundary in the zone mapping mode Other zone features may be recorded using the same procedure by using the buttons and tools as described in the AccuBoom Mapping Tools section on page 173 1 On the Guidance screen access the Menu and select the AccuBoom Boundary Tools icon 2 Select the Record Field Boundary button...

Page 190: ...hicle with respect to the feature being recorded and then touch the Accept icon 4 The Guidance screen will re appear and the field computer will begin recording the feature at the selected Reference Point On the Guidance screen a Pause and End icon appear for the feature currently being recorded 5 Begin driving along the boundary while keeping the Reference Point aligned with the field boundary A ...

Page 191: ...AccuBoom map and close the AccuBoom tools menu Note Zone features created while recording a field boundary will not appear until the Save and Close icon is selected from the AccuBoom Tools Menu AccuBoom Zone Map Examples The following screens are examples of AccuBoom maps displayed on the field computer FIGURE 1 Field Review Mode While Recording a Boundary FIGURE 2 Field Review Mode with Completed...

Page 192: ...oom FIGURE 3 Guidance screen in Down Field View with Completed Field Boundary FIGURE 4 Field Review Mode with Completed AccuBoom Field Boundary and No Spray Zone Spray Zone No Spray Zone Field Boundary Field Boundary Spray Zone No Spray Zones ...

Page 193: ...Chapter 9 178 Envizio Pro and Envizio Pro II Installation and Operation Manual ...

Page 194: ...em Note If the Function Disabled screen appears when the AutoBoom icon is selected troubleshoot the AutoBoom node See Chapter 11 Troubleshooting or the CAN Troubleshooting section in Chapter 4 CAN Networking and Diagnostics for help troubleshooting the node There are two AutoBoom systems that can be controlled by the Envizio Pro PowerGlide Plus PowerGlide Plus AutoBoom utilizes gauge wheels to mai...

Page 195: ...in will require slower AutoBoom application speeds AutoBoom Operation Once properly calibrated operation of the AutoBoom feature with the Envizio Pro is as easy as toggling the feature on and enabling height control for each boom AutoBoom must be both On and Enabled for each boom before the system will manage boom height The field computer does not require an active job to enable the AutoBoom feat...

Page 196: ...ent is only Enabled for the left boom AutoBoom will not adjust the height of the right boom The AutoBoom On Right Enabled indicator displays when AutoBoom is On and boom height management is only Enabled for the right boom AutoBoom will not adjust the height of the left boom The AutoBoom On Enabled indicator displays when AutoBoom is On and boom height management is Enabled for both booms AutoBoom...

Page 197: ...Chapter 10 182 Envizio Pro and Envizio Pro II Installation and Operation Manual ...

Page 198: ...and re connect CAN node s not detected No power to CAN node s Verify that there is 12 volt power and ground to the CAN node s logic power Weak or dirty power to the CAN node s Verify that the 12 volt power to the CAN node is coming from the switch relay that is connected to the battery Water in CAN node s Do not direct any pressure or wash stream directly at the CAN node s to prevent water and moi...

Page 199: ...s through a relay or switched power source Issue Possible Cause Solution Previous settings have been lost Settings data deleted from memory Review Chapter 7 Tools Menu or Chapter 8 Software Updates and File Maintenance for data information Poor CAN connections See the CAN Troubleshooting section on page 34 for more information Issue Possible Cause Solution Section numbers do not turn green remain ...

Page 200: ... on the Time Zone Settings screen are correct Tools Menu Computer menu Time Zone Issue Possible Cause Solution Gaps displayed in coverage map Section widths not set correctly Check sections widths and section center values Guidance and section width not the same Set guidance width and section width to the same value Cannot achieve target rate Driving too fast for vehicle Speed may exceed capabilit...

Page 201: ...rting a job without a GPS signal Make sure a GPS receiver is connected to the field computer and that the receiver is powered up then select Auto Detect Make sure the correct GPS Source is selected Tools Menu GPS menu Source No Differential Differential GPS has not been detected by the field computer Check the GPS receiver to make sure that it has the differential correction function Contact the m...

Page 202: ...re any section switches are turned OFF before powering the console ON 2 In the System menu touch the Product Control icon and touch the Speed button 3 Touch the Distance button and then reset the odometer display to 0 using the keypad Sensor Type Setting Used with Recommended Speed Cal Values English Metric Radar GPS External Raven GPS Receiver 785 199 Internal DGPS Receiver 812 206 GPS Speed over...

Page 203: ... formula where CSC Corrected Speed Cal OSC Old Speed Cal speed cal number used to drive the test distance and D the field computer Distance reading Round to the nearest whole number For Example Assume that the field computer odometer reads 5000 980 after a known 1 mile distance has been driven using an initial speed cal value of 598 152 or The Corrected Speed Cal value is 631 155 6 Touch the Speed...

Page 204: ...NM Number of Magnets used and D the Distance Measured For Example The distance measured between starting and stopping marks is 1200 and six magnets are installed The Adjusted Speed Cal is 800 Speedometer Drive Speed Sensor 1 In the System menu touch the Product Control icon and then select Speed Touch the Distance button and use the keypad to enter 0 as the distance displayed on the field computer...

Page 205: ...match the distance driven use the new values and redo the calculation and repeat step 5 Liquid Applications Use the following formulas to help calculate the boom or implement section widths for either broadcast or band applications Boom Cal For liquid sprayers the boom cal value is the width of the individual boom sections Calculate the width of each section by measuring the spacing between spray ...

Page 206: ...page 196 to verify that the desired flow rate is within the range specified for the installed flow meter Flow Meter Service and Maintenance Periodic maintenance of the flow meter may help to extend the effective service life of the flow meter or internal components If the flow meter does not register the applied product volume properly the following steps will be necessary to service the flow mete...

Page 207: ...mended to help extend the service life and accuracy of the flow meter Review the Flow Meter Service and Maintenance section on page 191 to service the flow meter as necessary Before calibrating the flow meter 1 It is recommended to perform the flow meter calibration with clean water only Clean out the supply tank and flush the product lines with clean water Refill the tank with clean water 2 On th...

Page 208: ... touch the Tools Menu icon 3 Select the Product Control icon from the System menu 4 On the Product Control Configuration screen touch the Volume Area Settings button 5 Use the on screen keypad to enter a value of 0 and touch the Accept icon 6 Empty the applicator tank under normal operating conditions 7 Return to the Total Volume displayed on the field computer and read the new value The total vol...

Page 209: ...PWM close or standard motor control valve Valve Speed Digit This value controls the response time of the control valve motor If the valve speed setting is too fast the valve will over correct and the system can start to oscillate The following valves have specific values Standard Control Valve This valve has a range of values from 1 to 9 with 1 being slow and 9 being fast Fast and Fast Close Contr...

Page 210: ... necessary to enter a zero in front of the value If the system adjusts to rate control changes too slowly increase the flow gain digit s to increase the system response rate If the system overshoots or oscillates around the desired flow rate decrease the flow gain digit s to help stabilize the system Dead Band Digit The last or right most digit in the flow cal value is the dead band digit The dead...

Page 211: ...ation Pressure 30 PSI Target Application Rate 20 GPA Target Speed 5 2 MPH and Nozzle Spacing 20 inches Using the calculated Nozzle Volume per Minute of 0 35 at an Application Pressure of 30 select a tip that is capable of these application specifications Contact a local sprayer supply dealer for available nozzles or spray tips Verifying Flow Rate Limits The target rate for a field application also...

Page 212: ... 80 of the full flow volume for the boom tier tips To access the Tiered Boom Settings screen 1 Touch the Tools Menu icon from the Home screen 2 Select the Product Control icon from the System submenu 3 Touch the Calibration Settings button and select the Tiered Boom Settings button on the screen Note The tiered boom feature is not available in a granular control mode Be sure that the configuration...

Page 213: ...ulated and with the Percent Tier Disable set to 10 tier 1 and 2 will switch to only tier 2 when the target rate decreases to 27 GPM 102 2 L min So for rates in gallons per minute 30 GPM 10 of 30 GPM 30 GPM 3 GPM 27 GPM or for rates in liters per minute 113 6 L min 10 of 113 6 L min 113 6 L min 11 3 L min 102 3 L min In operation as the volume per minute decreases the following boom tier switching ...

Page 214: ...r constant is Where SC the Spreader Constant L Length of belt travel in inches per 1 revolution of the encoder GH Gate Height in inches GW Gate Width in inches For Example Given a Length of belt travel of 13 inches a Gate Height of 7 inches and a Gate Width of 15 inches Enter 228 as the Spreader Constant if the field computer is set to display English units Metric Rate Display For Rates displayed ...

Page 215: ...al Volume and AW the Actual Weight unloaded and CSC the Corrected Spreader Constant For Example Using an Old Spreader Constant 228 797 Total Volume 2000 lbs 4400 kg and an Actual Weight Unloaded 1950 lbs 4290 kg English The new Spreader Constant is 234 Metric Repeat this procedure until the weight of the metered materials equals the total volume value Product Density The density of the current pro...

Page 216: ...ble of controlling spinner applications is connected to the CANbus Check the CAN control node and install a node that is capable of spinner control Meter Cal The machine should be configured with a magnetic pickup coil mounted near the bolt heads on the spinner Calculate the meter cal by multiplying the number of pulses bolt heads per revolution by 10 For Example If the number of pulses per revolu...

Page 217: ...on screen keypad to enter the volume or level of product normally used to fill the tank or bin 4 Touch the Accept icon to save the entered volume The entered value will be displayed in the Reset Tank or Reset Bin button 5 When refilling the tank or bin touch the reset button to reset the tank or bin level quickly Low Tank Alarm The field computer may be set to display or sound or an alarm when the...

Page 218: ...Sensor Extension Cable 1 Enter a speed cal of 9999 by touching the Speed button on the Product Control screen 2 Zero the odometer by entering a zero value in the Distance button 3 With a small jumper wire or paper clip short between the 10 o clock and 6 o clock sockets with a short no short motion Each time contact is made the distance total should increase by increments of 1 or more 4 If the dist...

Page 219: ...ton and note the total volume for each product node connected to the CANbus 3 Turn the boom and master switch On 4 With a small jumper wire or paper clip short between the 2 o clock and 6 o clock sockets with a short no short motion Each time contact is made the total volume number should increase by increments of 1 or more 5 If the total volume value does not increase remove the section of cable ...

Page 220: ...otely control the field computer With a Slingshot Field Hub help is just a touch away Via the Field Hub the field computer can also be used to keep up to date with the latest weather forecasts or crop prices from Internet web sites while still managing product application Note For instructions on installing and setting up the Slingshot Field Hub refer to the Field Hub Installation Guide provided w...

Page 221: ...ield computer This icon is also displayed if wireless communication is unavailable or has been lost Communication OK The status of wireless communication is good and no errors or alarms are present Communication Error An error has occurred with wireless communication or during a file transfer Communication Lost or Unavailable This icon will be displayed if the registration process has not been suc...

Page 222: ...llow them to view and control the field computer and product control system Note If an error code is displayed in place of the remote service code wait a few seconds for the Field Hub to receive correct data and the error should be cleared automatically Do not initiate remote service while an error code is displayed If the error message does not clear after several seconds contact a local Slingsho...

Page 223: ...tion is unavailable Refer to the Performing File Maintenance section on page 155 to export a Slingshot data package using the File Maintenance feature Jobs exported to a USB flash drive may then be uploaded to the Slingshot web site using a home or office computer Registration The Registration tab is used to register the Field Hub with the Slingshot web site and activate the various features of wi...

Page 224: ...ingshot site To test wireless access 1 Wait for the field computer to automatically search for available files for transfer This process may take up to five minutes 2 If the Remote Service feature was enabled during registration select the Remote Service tab and touch the Enable Remote Service button 3 If a remote service session is enabled successfully touch the button now labeled Disable Remote ...

Page 225: ...er will prompt the operator to upload job files each time a job is closed When the operator stops a job operation the field computer will provide a prompt and allow the operator to upload the latest job file or to wait This option may be preferable if jobs are frequently stopped and resumed to minimize data usage and ensure that only the completed job file is uploaded to the Slingshot server Disab...

Page 226: ...information being recorded to the report includes Temperature Relative Humidity Dew Point Barometric Pressure Wind Speed Wind Direction Wind Gust The Envizio Pro may only read information from one specific model of weather station This unit is the WatchDog Sprayer Station Model 3349SS P N 117 0171 138 manufactured by Spectrum Technologies Inc This system may be ordered through any Raven dealer For...

Page 227: ... into the Envizio Pro Note Refer to the Special Features Registration section on page 138 for additional assistance with obtaining the activation key and entering the authorization code Weather Station Configuration To view weather information collected by the weather station 1 Touch the Tools Menu icon on the Home screen 2 Select the Weather Station icon from the Computer menu to display the Weat...

Page 228: ...g the Weather Station If weather station logging is enabled during an active job the Envizio Pro will periodically record current weather conditions for the application report To view current conditions or other weather station information during an active job 1 Touch the Menu icon in the lower right corner to access the in job menu 2 Select the Weather Station icon to display the Weather Station ...

Page 229: ...Appendix D 214 Envizio Pro and Envizio Pro II Installation and Operation Manual ...

Page 230: ...upload on the root of the USB flash drive e g G canupload used with the field computer If the update files are downloaded from the Raven web site the required file structure will be created when the files are extracted To Update CAN Nodes Important Do not remove power or unplug any cabling connections during the node update process It is recommended to start the machine and keep the engine running...

Page 231: ... displays the firmware version to which each node will be updated if the update is applied 6 Touch the Accept icon to start the update Note If the field computer cannot communicate with the selected node the CAN Update Program will display an error Troubleshoot the node and retry the update 7 The field computer begins communicating with the selected node to update If communication is successful th...

Page 232: ...d read the firmware update procedure before starting the process Contact a local Raven dealer for more information or additional assistance with any part of the firmware update Required Components Envizio Pro field computer with an on board receiver serial number starting with BZZ or BFN Home or office PC or laptop with Microsoft Windows operating system and the WinLoad utility Straight through se...

Page 233: ...e subscription Refer to the Special Features Registration section on page 138 for assistance with entering an activation code 1 Touch the Tools Menu icon on the Home screen and select the GPS menu 2 Touch the Differential icon and select GS Satellite to display the GS Satellite information 3 Copy the PAC Code displayed 4 Visit the Slingshot Store at the web address below and purchase the desired G...

Page 234: ...on to display the field computer Home screen 11 Touch the Shutdown red button on the Home screen Do not press and hold the power button to shutdown the field computer at this time 12 On the PC or laptop open the downloaded firmware update folder and locate the WinLoad application 13 Click on the Settings option in the upper left corner of the WinLoad window and select the COM Settings option 14 In...

Page 235: ... the WinLoad application and restart the field computer 24 Verify that the firmware update was applied successfully a Touch the Tools Menu blue button from the field computer Home screen b Select the Health icon from the GPS menu Check that the version displayed on the GPS Health screen is the new firmware version 25 Touch the Accept icon to return to the main Tools Menu display 26 Reset the NMEA ...

Page 236: ...duct tank Tank Fill Calibration To access the pressure cal fan cal and metered weight settings from the Home screen 1 Touch the Tools Menu icon and select the Product Control icon from the System menu 2 Touch the Volume Area Settings button CAUTION The tank fill monitoring system does not control or automatically shut off the tank refilling equipment Do not leave the machine or refilling system un...

Page 237: ...tem measure and monitor the actual volume of product transferred to the tank and automatically update the tank volume available for application To use the tank fill system during a field operation Note If the system has not been calibrated already touch the Configure button and refer to the Tank Fill Calibration section on page 221 to set up the fill system 1 Use the product rate display area in t...

Page 238: ...nce screen The field computer may be connected to two separate sensor loops with up to 120 sensors per loop to monitor seed or product flow at various locations on the implement depending upon the level of system monitoring desired Blockage Node Detection If the blockage system is installed and correctly connected to the field computer the blockage node should display on the CAN Diagnostics screen...

Page 239: ...oved from the blockage monitoring system Enable options for sensor loop 1 and 2 Enable option for the audible alarm feature for the blockage monitor Section Assignments The Section Assignments button allows the operator to configure the sensor loops connected to the control for each implement section Refer to the Configure Sensor Loops section on page 225 information on the sensor section setup pr...

Page 240: ...ement section Note Only enter values for the number of configured sections on the drill Leave the value at zero for any unused sections Do not count any sensor more than once If a sensor is used for multiple sections count the sensor for the section most frequently used and do not count the sensor for the remaining section s 3 After the sensor loops are configured for each implement section touch ...

Page 241: ...chine operator locate and address equipment blockages Touch the section selection drop down to display detailed information for each sensor loop for the selected section Blocked When a blockage is detected in loop 1 or loop 2 the sensor number s which detect an obstruction or blockage will be displayed in this area Check these sensor locations for obstructions in the line to clear the blockage con...

Page 242: ...dditional blockage alerts will still be received by the field computer and product control features will be unaffected Setting the Sensitivity Refer to the following table to set and adjust the sensitivity setting for each loop for a specific seeding operation The best obstruction and blockage detection is achieved when the sensitivity is set as high as possible without encountering a constant ale...

Page 243: ...e 4 Decrease the sensitivity by 3 to 5 units at a time until the field computer no longer indicates blockage conditions Note Do not decrease the sensitivity value below the initial value Check the indicated sensor locations and clear any obstructions and repeat the above procedure if the sensitivity value is decreased below the initial setting ...

Page 244: ...k Console The OmniSeed system also features a remote tank console that may be used while performing catch tests during meter priming and calibration Refer to the Remote Calibration Console section on page 238 for additional information on using the tank console with the Envizio Pro field computer Optional Ultrasonic Bin Level Sensors The OmniSeed system is capable of utilizing optional ultrasonic ...

Page 245: ...iSeed Calibration Procedures To access the pressure cal fan cal and metered weight settings from the Home screen 1 Touch the Tools Menu icon and select the Product Control icon from the System menu 2 Next touch the Calibration Settings button to display the Calibration Settings screen ...

Page 246: ...detected in the air seeder system before the field computer displays an alert Pressure 1 and 2 Display The current pressures detected by the pressure transducers on each product are displayed in the bottom half of the Pressure Cal screen Enable Bin Pressure Alarm Select the bin pressure alarm option to allow the field computer to sound an audible alarm if any of the bin pressures fall below the se...

Page 247: ...tch and all section switches are in the off position 2 Place the weight box below the appropriate bin to avoid dumping product on the ground 3 Touch the Start button on the Metered Weight screen and toggle the master switch and at least one section switch to the on position 4 Continue dispensing product until a sufficient weight is in the weight box or the weight box is full 5 Press the Stop butto...

Page 248: ...ction Setup Wizard FIGURE 1 OmniSeed Granular and Liquid Section Configuration Example To configure the seeder implement sections use the Manually Configure option on the Configure Sections screen When the section setup is complete for the seeder implement the Section Configuration screen should display an abstract layout of the seeder implement as shown in the figure below Example Granular Produc...

Page 249: ...ield operations To configure section assignments on the Envizio Pro 1 From the field computer Home screen select the Tools Menu icon 2 Select the Product Control icon from the System menu 3 Select the Section Assignments button to display the Section Assignments screen 4 Touch the indicator below each section to place a check mark to assign the product to the section or a red x to disable the prod...

Page 250: ...cation system using a 10 section switch box or to customize switch functionality to control multiple sections with one switch For Example Map liquid product sections 1 and 2 in the figure below to section switch 1 to control both liquid sections using the same section switch FIGURE 2 OmniSeed Section Numbering Air Seeder Drill 2 1 3 4 9 8 10 11 13 12 7 6 5 x x x x x x x x x x x x x x indicates the...

Page 251: ... off a If the LED is on and the bin is empty check the sensor inside the bin and clean as necessary b If the LED is still on adjust the sensitivity set screw until the LED extinguishes 2 Fill the bin to a level to cover the bin level sensor If the LED illuminates after the bin is filled no further adjustment is required It may be possible to fine tune the sensor for the specific crop however the f...

Page 252: ... The air cart bins must be empty to calibrate the bin level sensors 1 Touch the Tools Menu icon and select the Product Control icon from the System menu 2 Next select the Volume Area Settings button from the Product Control Configuration screen 3 Touch the Bin Level button to display the Bin Height Calibration screen 4 Use the on screen keypad to enter the height of the bin in inches centimeters w...

Page 253: ...using the console to calibrate the system Remove the remote tank console and console cable and replace the dust cap when storing or operating the air cart To connect the remote tank console 1 Carefully insert the round 4 pin connector on the calibrator cable to the 4 pin port on the back of the tank console Be sure to line up the keyway on both the port and connector before securing the connector ...

Page 254: ... catch test and enter the cal weight all while observing operation of the air cart to ensure proper operation of the OmniSeed system Priming To accurately calibrate the OmniSeed system for operation the metering rollers must be primed and the meter RPM set prior to performing the catch test The operator may prime the metering rollers using the remote tank console To prime the metering rollers Note...

Page 255: ...to the Bin Calibration screen press the Back key To return to the Bin Selection screen press Back Prev and Exit Catch Test To perform a catch test and determine the cal weight for seeding operations perform the following procedures Note Place the weight box below the appropriate bin to avoid dumping product on the ground The metering rollers will not stop automatically Do not leave the remote tank...

Page 256: ...ion process Cal Weight The Metered Weight Page will display automatically at the end of the catch test procedure This screen displays the number of metering roller revolutions detected during the catch test and allows the operator to enter the weight of product dispensed to calibrate the OmniSeed system To enter the cal weight value 1 Use the Left and Right keys to move the cursor below the bin ca...

Page 257: ...select the desired bin and press the Enter key 2 Press the Setup key to display the current settings for the selected bin 3 The following settings will be available on the first settings screen Note Use the Next or Prev keys to move the cursor between the screen options Pressing the Prev key on the decimal shift option will return to the bin calibration screen Press the Next key on the cal weight ...

Page 258: ...essible if the valve type for the selected product bin is set to PWM or PWM close Refer to the Valve section on page 103 for detailed information on valve type selections The following settings are displayed on the second settings screen Note Use the Next or Prev keys to move the cursor between the screen options Pressing the Prev key on the PWM frequency option will return to the previous setting...

Page 259: ...circuit Issue Possible Cause Solution Check air cart node or CAN communication Power ground issue with air cart node s Check the power and ground connections on air cart nodes Check CANbus system connections and reconnect nodes No nodes have been found Verify power to node and CAN connection Nodes not powered or faulty logic power connection Check CANbus system connections and reconnect nodes CAN ...

Page 260: ...alibrator Zurf console the Envizio Pro is capable of performing AccuBoom automatic section control features during field operations An AccuBoom control node is not required to enable the AccuBoom feature on the field computer in this configuration Console Connection Connect the COM2 connector on the field computer interface P N 115 0171 746 or chassis interface P N 115 0171 926 cable with the Cali...

Page 261: ...rol console Any changes to the spread width value on the console will immediately affect the section width on the field computer 1 From the field computer Home screen touch the Tools Menu icon 2 Select the Guidance Width icon within the Vehicle submenu 3 Use the on screen keypad to enter the desired swath or spread width in inches centimeters The field computer uses the programmed guidance width t...

Page 262: ...fsets icon from the Vehicle submenu 5 Touch the Fore Aft value on the Offsets Setup screen and use the on screen keypad to enter the calculated total offset value Note The values entered for the fore aft value must be entered in the same units as shown above the fore aft offset value GPS Antenna Spread Distance from Chart Antenna Spinner Offset Distance measured Spreader ...

Page 263: ...ccuBoom Configuration screen 3 Enable the Use Look Ahead Distance option at the bottom of the screen by touching the box until a check is displayed 4 Touch the Off Look Ahead button and use the up or down arrows to set the off look ahead value to the spread distance value determined from the appropriate spread chart 5 Touch the green check mark to return to the AccuBoom Configuration screen 6 Touc...

Page 264: ...he upper right corner of the Guidance screen Hopper Contents The current hopper content volume registered by the Calibrator Zurf console will be displayed in the hopper content volume display on the field computer Guidance screen For volume displays with the LH5000 or Amatron use the standard bin volume features as explained in Tank or Bin Indicator section on page 67 Area Covered Target Rate Actu...

Page 265: ... the field computer records coverage area based upon GPS coordinate data The coverage area in a field may then be output from the field computer on an application report for use on a home or office PC Note No field or total volume information is recorded by the field computer while interfacing with the serial control console Automatic Variable Rate If the single product variable rate key P N 077 0...

Page 266: ...the Accept icon the Next icon accepts changes and proceeds to the next screen in a setup procedure Touch this icon where it appears to access more settings or to continue a setup procedure The last screen in a setup procedure should display the Accept icon Touch the Previous icon to return to the last screen displayed during a setup procedure or wizard The Up icon where it appears increases displa...

Page 267: ...a previous job or to return to the Guidance screen if a job is already in progress Touch this icon to access the Tools Menu The Tools Menu is only available from the Home screen Refer to Chapter 7 Tools Menu for information about settings and using the Tools Menu If a job is in progress the End Guidance icon will appear on the Home screen Touch this icon to the end the active Guidance session When...

Page 268: ...g sub inch corrections The GPS Health screen will display a value of 4 for the differential mode when operating in RTK fixed mode Yellow to indicate that the receiver is operating in RTK float mode This mode indicates that the receiver is not able to provide a full RTK position lock due to the distance from the base station visibility of the sky time of day or interference around the base station ...

Page 269: ...ional AccuBoom or AutoBoom systems The GPS Menu contains screens to setup the internal GPS receiver or to enable the field computer to use signal from an external receiver The GPS menu also contains screens to review the status of GPS reception set message outputs for the internal DGPS receiver only setup an optional TM 1 Tilt Module or select the PRN The Computer Menu sets display and feature set...

Page 270: ...r all files of the selected type currently saved on the field computer Select the left icon to export the Slingshot data package for a selected job file to the connected USB flash drive or the right icon to export data packages for all job files currently stored on the field computer Select the left icon to delete a selected file from the field computer or the right icon to delete all files of the...

Page 271: ...ther troubleshooting steps If a node is still not detected additional troubleshooting or readdressing the CANbus may be required Refer to the CAN Troubleshooting section on page 34 or Readdressing Product Nodes section on page 31 for additional information Touch this icon to update CAN nodes via the field computer Review Appendix E Updating CAN Nodes via the Envizio Pro for more information on obt...

Page 272: ... skip swaths in an irregular pattern is necessary Refer to the Using Guidance Patterns section on page 63 for more information on using Guidance patterns Guidance Screen The following icons and tools are displayed on the Guidance screens The Vehicle Arrow represents the vehicle s position in the field The Vehicle Arrow may also be used to toggle coverage mapping if the correct master switch option...

Page 273: ... will display off if all sections are in the manual off position Sections or master switch is on If the master switch is toggled on the control system will not automatically shut off sections or rows On the Guidance screen the master switch icon will display on if all sections are in the manual on position The On Off icon will be displayed if at least one section is in the manual on position and a...

Page 274: ...seed rate section group or row is enabled and active the corresponding liquid section will remain on If available touch the Plant icon to toggle the on screen switch box to the AccuRow Override control screen Use the switches on this screen to manually override seed rate control sections groups or rows To allow AccuRow to automatically control section status set all section switches to the automat...

Page 275: ...y either map on the Guidance and Field Review screens If both a prescription map and a zone map will be used the operator may toggle which map to display on the guidance and field review screens by selecting the toggle maps icon To toggle the displayed map touch The view zone map icon to view the loaded zone map The view prescription map icon to display the loaded prescription map on all guidance ...

Page 276: ...nce path along a heading Touch this icon and use the displayed keypad to enter a heading between 0 and 359 with 0 being due North A B Path Configuration The following tools are available in the Menu when a compatible A B Line is displayed on the Guidance screen Select the A B Tools icon to access additional tools for use with the current A B Line Select the Reset A B Line icon to clear the display...

Page 277: ...g the Nudge Feature On Screen Nudge Enabled The following icons will be displayed on the Guidance screen if the on screen nudge controls option is set to Enabled Touch the Nudge Right icon to move the displayed guidance path to the right The distance which the path will be nudged is determined by the user defined value for the Active Nudge Touch the Nudge left icon to move the displayed guidance p...

Page 278: ...undary icon to begin recording a new field boundary While a field boundary is being recorded the Pause and End Field Boundary icons are displayed on the Guidance screen Pause Resume and End Boundaries The following icons will appear on the Guidance screen while a field boundary is being recorded Touch the Pause Boundary icon to pause recording of the field boundary Use this feature when the vehicl...

Page 279: ...e enabled Select the zone mapping tools to display AccuBoom and zone map tools available for the current job Tools displayed in this menu may only appear if certain map features are present within the current job Read the descriptions of the following tools for more information regarding when the tool or feature is available While editing zone maps the Home button is replaced with the Accept butto...

Page 280: ...c Resume While Paused a Resume button will replace the Pause and End buttons on the Guidance screen Touch this button to resume recording the paused zone feature Stop When finished recording a Zone or Boundary touch the Stop button to close Zone or Boundary Note The field computer will draw a straight line from the starting point of the feature to the machine s current location when closing the zo...

Page 281: ...he AutoBoom On Disabled indicator is displayed when the AutoBoom feature is On but boom height management is not enabled The AutoBoom On Left Enabled indicator displays when AutoBoom is On and boom height management is only Enabled for the left boom AutoBoom will not adjust the height of the right boom The AutoBoom On Right Enabled indicator displays when AutoBoom is On and boom height management ...

Page 282: ...187 Spinner Cal 109 Spinner RPM 201 Spreader Constant 111 Valve Cal 194 Valve or Flow Cal 103 CAN Controller Area Network Connections 27 Troubleshooting 34 186 CAN Diagnostics 30 98 CAN Nodes Diagnostics 30 Off line Errors 34 Readdressing 31 Retry CAN Communication 32 Version Information 31 CANbus Diagnostics 29 Care and Use 11 Computer Menu 135 Applying Software Updates 162 Demo Mode 140 Display ...

Page 283: ...finitions viii J Job Error Messages 185 Job Files 55 Jobs AccuControl Setup 59 AutoBoom Setup 61 Product Setup 59 Resume an Existing Job 58 Setting up a Job 56 Start a New Job 58 Starting a Job 56 K Kit Contents 16 M Master Pressure 166 Menu 72 Meter Cal 109 191 Mounting the Field Computer 17 N Node Version Information 31 O Overview of the Installation Process 15 P Performing File Maintenance 155 ...

Page 284: ... Menu Computer Menu 135 Special Features Registration 138 GPS Menu 120 Navigation 91 Show All 152 System Menu 93 Tilt Sensor 134 Vehicle Menu 141 Touch Screen Calibration 39 Troubleshooting 183 Coverage Map Issues 185 General Issues 183 Job Issues 184 Setup Issues 184 U Updates 14 138 160 Special Features Registration 138 Time Zone Settings 137 Updating 215 Using Guidance Patterns 63 Using Zone Ma...

Page 285: ...Index 270 Envizio Pro and Envizio Pro II Installation and Operation Manual ...

Page 286: ...ndustries Do Bring the defective part and proof of purchase to your Raven dealer If the dealer approves the warranty claim the dealer will process the claim and send it to Raven Industries for final approval The freight cost to Raven Industries will be the customer s responsibility The Return Materials Authorization RMA number must appear on the box and all documentation including proof of purchas...

Page 287: ...aven Industries will be the customer s responsibility The Return Materials Authorization RMA number must appear on the box and all documentation including proof of purchase must be included inside the box to be sent to Raven Industries In addition the words Extended Warranty must appear on the box and all documentation if the failure is between 12 and 24 months from the retail sale How Can I Get S...

Reviews: