Use and maintenance manual RBV 808 - RBV 810
Page 55
Rev.1 14/02/18
EN
Controls and use
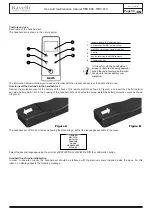
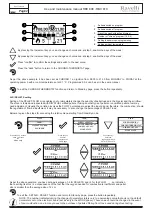
Description of the handheld set:
The handheld set is shown in the picture below:
The information below will allow you to become familiar with the product and achieve the best performance.
How to insert the batteries in the handheld set:
Remove the protective cover of the battery on the back of the remote control as shown in Figure A, and insert the 3 batteries (mini
pen style battery AAA 1.5V) in the housing of the handheld set and observe the poles. Install the battery protective cover as shown
in figure B
The handheld set, after a short screen showing the Ravelli logo, will list the languages available in the menu.
Select the desired language using the scroll keys and confirm your selection with the confirmation button.
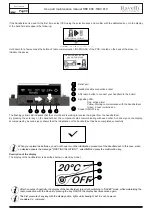
Handheld touch radio initialization
In order to operate correctly, the handheld set should be interfaced with the electronic board installed inside the stove. For this
reason, on display appears the following message:
User’s manual HANDHELD TOUCH RADIO
User’s manual HANDHELD TOUCH RADIO
Pag.18
Pag.19
Vers. 01 of:07.04.14
Vers. 01 of:07.04.14
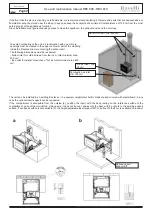
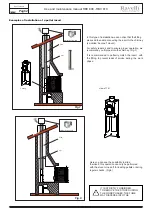
Examples of installation of a pellet insert
In this type of installation we can notice that the fitting
was used to enable connecting the insert to the chim
-
ney (so-called “bayonet” mount).
For safety reasons and to ensure proper operation, we
recommend you fit pipes into the chimney. (Fig.7)
It is recommended to perfectly match the insert with
the fitting, to prevent leaks of smoke during the work
phase.
Fig.7
Fig.8
Exploded view of T fit
Protection from rain
Wiring
Connect the power cord to the back of the stove and then to a wall socket. The I/O switch in the figure
should be set to I to power the stove. If voltage is not supplied check the state of the fuse installed in
the box below the switch (4A fuse). During the periods of inactivity, we recommend you disconnect the
power cord of the stove.
Preliminary Operations
NEVER INSERT INTO THE TANK OTHER KIND OF FUEL OTHER FROM THE PELLETS
COMPLYING WITH THE SPECIFICATIONS BELOW
The handheld set is shown in the picture below:
Description of the handheld set:
The information below will allow you to become familiar with the product and achieve the best performance.
How to insert the batteries in the handheld set:
Remove the protective cover of the battery on the back of the remote control as shown in Figure A, and insert the 3 batteries
(mini pen style battery AAA 1.5V) in the housing of the handheld set and observe the poles. Install the battery protective cover
as shown in figure B
The handheld set, after a short screen showing the Ravelli logo, will list the languages available in the menu.
Select the desired language using the scroll keys and confirm your selection with the confirmation button.
1
Increase button “UP” (selection key)
2
Decrease key “DOWN” (selection key)
3
ON/OFF or reset from “Sleep” mode key.
4
Display
5
Key for accessing the MENU and back
6
Confirmation key
1
2
5
6
4
3
Figure A
Figure B
Here you can see the possibility to slide
the insert; this operation can only be performed
with the stove turned off for loading pellets or during
regular checks. (Fig.8)
IT IS STRICTLY FORBIDDEN
TO REMOVE THE STOVE DURING
THE WORK PHASES; THE FUME
MAY DISPERSE INTO THE
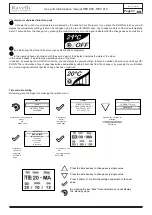
In “Sleep” mode, the handheld set
screen is obscured, keeping however
active the radio communication with
the stove to reduce battery con-
sumption.
T fitting with
inspection ash
collector cap
Flue
Protection from rain
Pipe
Flue
Pipe
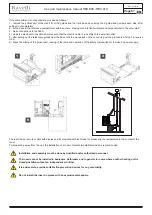
What to check befor turning on the stove
Make sure you have removed all parts that pose the risk of burns from the combustion chamber or glass (various instructions or
stickers).
Before turning on the stove, make sure you have fitted the grate on the support base and check that the door and the ash drawer
are properly close.
How to load the pellets
Fuel supply consists in the insertion of pellets from the top of the stove, by opening the door. During pellet loading prevent the pel
-
let bag from coming into contact with hot surfaces.
User’s manual HANDHELD TOUCH RADIO
User’s manual HANDHELD TOUCH RADIO
Pag.18
Pag.19
Vers. 01 of:07.04.14
Vers. 01 of:07.04.14
Examples of installation of a pellet insert
In this type of installation we can notice that the fitting
was used to enable connecting the insert to the chim
-
ney (so-called “bayonet” mount).
For safety reasons and to ensure proper operation, we
recommend you fit pipes into the chimney. (Fig.7)
It is recommended to perfectly match the insert with
the fitting, to prevent leaks of smoke during the work
phase.
Fig.7
Fig.8
Exploded view of T fit
Protection from rain
Wiring
Connect the power cord to the back of the stove and then to a wall socket. The I/O switch in the figure
should be set to I to power the stove. If voltage is not supplied check the state of the fuse installed in
the box below the switch (4A fuse). During the periods of inactivity, we recommend you disconnect the
power cord of the stove.
Preliminary Operations
NEVER INSERT INTO THE TANK OTHER KIND OF FUEL OTHER FROM THE PELLETS
COMPLYING WITH THE SPECIFICATIONS BELOW
The handheld set is shown in the picture below:
Description of the handheld set:
The information below will allow you to become familiar with the product and achieve the best performance.
How to insert the batteries in the handheld set:
Remove the protective cover of the battery on the back of the remote control as shown in Figure A, and insert the 3 batteries
(mini pen style battery AAA 1.5V) in the housing of the handheld set and observe the poles. Install the battery protective cover
as shown in figure B
The handheld set, after a short screen showing the Ravelli logo, will list the languages available in the menu.
Select the desired language using the scroll keys and confirm your selection with the confirmation button.
1
Increase button “UP” (selection key)
2
Decrease key “DOWN” (selection key)
3
ON/OFF or reset from “Sleep” mode key.
4
Display
5
Key for accessing the MENU and back
6
Confirmation key
1
2
5
6
4
3
Figure A
Figure B
Here you can see the possibility to slide
the insert; this operation can only be performed
with the stove turned off for loading pellets or during
regular checks. (Fig.8)
IT IS STRICTLY FORBIDDEN
TO REMOVE THE STOVE DURING
THE WORK PHASES; THE FUME
MAY DISPERSE INTO THE
In “Sleep” mode, the handheld set
screen is obscured, keeping however
active the radio communication with
the stove to reduce battery con-
sumption.
T fitting with
inspection ash
collector cap
Flue
Protection from rain
Pipe
Flue
Pipe
What to check befor turning on the stove
Make sure you have removed all parts that pose the risk of burns from the combustion chamber or glass (various instructions or
stickers).
Before turning on the stove, make sure you have fitted the grate on the support base and check that the door and the ash drawer
are properly close.
How to load the pellets
Fuel supply consists in the insertion of pellets from the top of the stove, by opening the door. During pellet loading prevent the pel
-
let bag from coming into contact with hot surfaces.
ITALIANO
DEUTSCH
ENGLISH
FRANCAIS
DANSK
NEDERLANDS
ESPANIOL
Summary of Contents for RBV 808
Page 2: ......
Page 171: ...DATE WORK PERFORMED MAINTENANCE...

