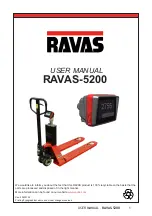
background image

• 

Use the specific Li-ion charger and observe the specified charging conditions when 

charging the battery.

• 

Avoid influences of high temperature and keep away from fire.

• 

Do not deform, modify or disassemble the battery.

• 

Do not connect the (+) and (-) terminals with metal objects.

• 

Do not put the battery in (sea) water.

• 

Do not throw with the battery to avoid strong shocks.

• 

When a battery leaks, the battery should directly be wrapped up properly and treated as 

recyclable resource.

• 

When, due to leaking from the battery, liquid gets into your eyes, immediately clean the 

affected area with water without rubbing your eyes, and seek medical advice immediately.

• 

The charging of the battery will be stopped automatically. When due to what cause the 

battery is not fully charged after 8 hours (LED of the charger doesn’t become green), 

immediately unplug the battery from the holder to stop charging. Battery or charger does 

not work properly, exchange battery or charger.

• 

Storing and/or using the battery outside the given temperature range may have a 

negative effect on the lifetime and/or the performance of the battery.

• 

Do not longer use a battery with leakages, deformation or when any other abnormalities 

occur.

• 

Battery should be charged in a dry surrounding.

2.1 Lithium Ion Battery (standard)

Charging can be carried out at any time regardless of the amount of charge remaining, but 

you should fully charge the battery at the following moments:

• 

The battery is not fully charged at the time of delivery!

 The battery can be used 

after fully charging with the specific Li-ion charger. The LED on the battery charger will 

become green when fully charged. Note: Before using the weighing system, be sure that 

the battery is fully charged.

• 

After the battery has become completely empty. An empty battery will get broken (loss of 

capacity) when not directly fully charged.

Important Safety Information

DANGER

WARNING

WARNING


USER MANUAL

 – 

RAVAS-5200


5

Summary of Contents for 5200

Page 1: ...product is 100 recyclable on the basis that the parts are processed and disposed of in the right manner More information can be found on our website www ravas com Rev 20200102 Printing Typographical e...

Page 2: ...nstructions or from negligent operation or assembly even if this is not expressly stated in this instruction manual In light of our policy of continuous improvement it is possible that details of the...

Page 3: ...are PT 16 5 6 Net weighing reset tare two options 17 5 6 1 Option 1 17 5 6 2 Option 2 17 5 7 Activate and edit ID Code 18 5 8 Adding print clear memory send data 20 5 8 1 Add weight to subtotal 20 5 8...

Page 4: ...m must be approved in writing by the supplier prior to any work being completed It is the sole responsibility of the purchaser to train their own employees in the proper use and maintenance of this eq...

Page 5: ...r to stop charging Battery or charger does not work properly exchange battery or charger Storing and or using the battery outside the given temperature range may have a negative effect on the lifetime...

Page 6: ...harging after repeated use and after time has passed If the operating time that the battery can be used becomes shorter and shorter it has probably reached the end of its life Note For replacement or...

Page 7: ...ck The power supply to the system takes place through an exchangeable battery pack With a completely charged battery pack the total weighing time is about 25 hours for a Li ion battery for a system wi...

Page 8: ...anging battery 4 1 Low battery indication RAVAS 5200 An exchangeable battery pack supplies power to the RAVAS 5200 When the voltage level of the battery pack is running low the battery indicator will...

Page 9: ...nd a smart charger After charging for at least 8 hours the charger will shut off when the battery pack is completely full The red LED on the adapter will change to green once the battery is fully char...

Page 10: ...5 Use 5 1 Use accurate weighing USER MANUAL RAVAS 5200 10...

Page 11: ...ng it is necessary to check whether the system is unloaded and free If the indicator does not determine the zero point automatically it must be done manually using the 0 key Wrong way of lifting the l...

Page 12: ...is unloaded while setting a new zero Out of level Make sure the pallet truck is horizontal Bad calibration No calibration has been saved Scale 1 or reference scale Weight indication Active ID s Custo...

Page 13: ...messages Whenever a weighing was not done correctly the weight will turn red and the error is displayed Error Out of level Level switch measures scale is 3 out of level Overload The system has been o...

Page 14: ...et Tare Gross weight 5 5 1 Net weighing automatic tare 1 2 3 4 EXPLANATION Net 1 Tare 2 Gross 3 1 2 3 The indicator is set to zero The NET sign shows that the tare weight is activated Tare 25kg shows...

Page 15: ...ws the net value of the load weight The gross weight is displayed again NOTE for OIML approved RAVAS 5200 the tare will be erased automatically when the weight returns to gross zero For the next weigh...

Page 16: ...ears Select the desired Preset Tare field If the preset tare you select is empty you have to enter the tare value Confirm with Enter Name your Preset Tare value The NET sign shows that the tare weight...

Page 17: ...ghing mode and is ready for the next weighing NET sign is gone In the tare field None is active 5 6 1 option 1 5 6 2 option 2 Press the preset tare button Select none NOTE For OIML approved RAVAS 5200...

Page 18: ...ress the ID field On the left side of the button you can activate the ID fields only the active ID fields will be visible on the printout If you press on the right side of the button an ID entry field...

Page 19: ...fter entering one or more ID codes select your preferred ID and press the back button Press the back button to return to the weighing mode Your active ID codes will now be showed on the print out or w...

Page 20: ...8 1 Add weight to subtotal If preferred you can select a total memory The weight is added Load scale Press the key The weight has been added to the selected total memory Select your preferred total me...

Page 21: ...Load scale Press the printer key The indicator is now printing The weight is printed and the indicator is ready for the next weighing 5 8 4 Send WiFi First a new weight must be on the display Press t...

Page 22: ...d press the settings symbol Press Print Total to get a total print out of the selected total register The indicator is printing your receipt If this is shown the connection is lost The weight will be...

Page 23: ...you want to reset the active total memory after printing press OK Press Clear if you wish to erase all information in this total register Or go back if you don t wish to change the register Change the...

Page 24: ...bol The basic weight symbol is green This means that piece counting has not been activated Press the pcs symbol This symbol now turns green to indicate that piece counting is activated 5 9 1 Activate...

Page 25: ...Manual piece weight Enter the piece weight and confirm with Enter The number of pieces are shown in the display 5 9 2 Enter piece weight manually For entering the piece weight manually or calculating...

Page 26: ...ill be added or removed from the scale e g 2 Confirm with Enter Note the weight difference should be at least 5 10 kg Press 5 9 3 Calculate piece weight Select Sample PCS weight W1 MAIN 3 4 Automatica...

Page 27: ...er will start automatically As long as the image of the USB stick is green data are being transferred Once the image is white again the transfer has finished When the USB stick is connected to your PC...

Page 28: ...5200 28 5 11 Change the time and date Press arrow down Press on the arrow up down Press the user settings symbol Select User menu Select the parameter you wish to change For this example we change th...

Page 29: ...USER MANUAL RAVAS 5200 29 Enter the correct hour Change the cursor to the next value by pressing on the When you are finished press Enter 7 8...

Page 30: ...Button Functions Select the button you wish to change For this example we take the print button Select Function Check the boxes of the actions you want to happen after pressing the Printer button When...

Page 31: ...r menu Select the button you wish to move Printer button for this example If a button is not in use because in this example the printer is installed after delivery The default location is None Select...

Page 32: ...on the indicator they are back Follow the following steps if you wish to always hide the buttons Go into the user menu Select Display settings The checkbox for Key Functions is checked meaning the bu...

Page 33: ...ormat hh mm 3 Gross weight displays the gross weight For example 233 5 kg or 136 5 lb 4 Net weight displays the net weight For example 233 5 kg or 136 5 lb 5 Tare weight displays the tare weight For e...

Page 34: ...3 5 7 6 4 Press the settings symbol Now press User Menu The information of the last weighing is shown on the display By pressing Prev you switch to weighings performed prior to the last weighing Pres...

Page 35: ...his is to avoid damage to electronics and load cells The bearings of the wheels non polyurethane and the pivoting points of the levelling bar of the loading wheels must be cleansed and greased regular...

Page 36: ...after which it can be imported in a spreadsheet program on a PC From the app you can enter the ID of an operator or device enter tares automatically or manually zero the weighing system Date and time...

Reviews: