background image

4 | How to work with the unit

Operating instructions

17 / 112

4.4

Interacting with the unit

NOTICE

Incorrect operation of the display

The display could be damaged if you operate it with a sharp object.

1. Only operate the unit with your fingers.

4.4.1

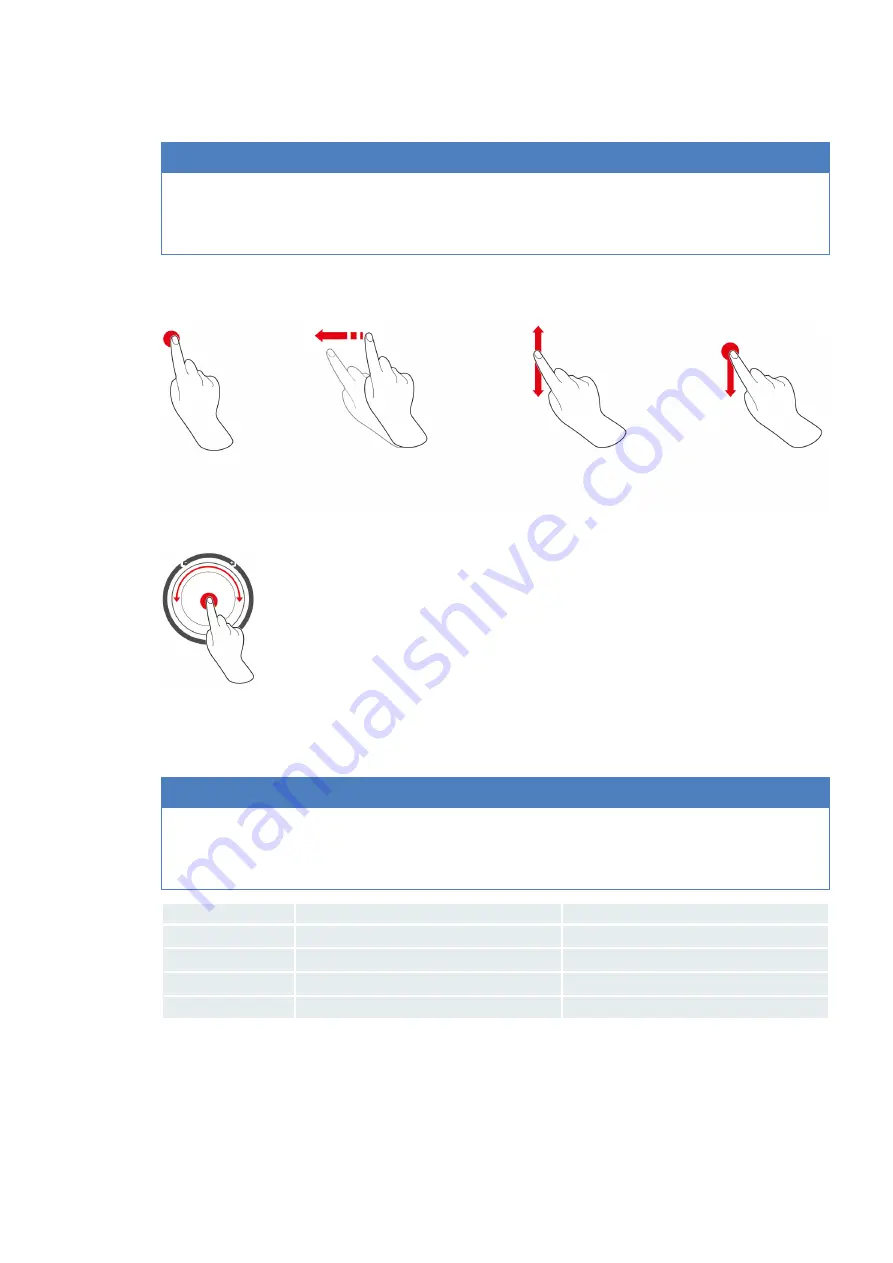
Moves

You can operate your unit with a few simple moves.

Press

Swipe

Scroll

Drag-and-drop

4.4.2

Central dial

Instead of the Moves [

}

 17], you can modify settings by turning the central dial. Confirm actions by pressing the

central dial.

4.5

Maximum load sizes

NOTICE

High load sizes could damage the unit

If you exceed the maximum load size, this may damage the unit.

1. Only load the unit with the maximum load sizes stated here

Model

Max. load size [kg]

Max. load per level

6-1/1

30 kg

15 kg

6-2/1

60 kg

30 kg

10-1/1

45 kg

15 kg

10-2/1

90 kg

30 kg

Summary of Contents for iCombi Pro 10-1/1

Page 1: ...iCombi Pro Operating instructions...

Page 2: ......

Page 3: ...3 Start screen 15 4 3 1 Favourite 16 4 3 2 Date time status 16 4 4 Interacting with the unit 17 4 4 1 Moves 17 4 4 2 Central dial 17 4 5 Maximum load sizes 17 4 6 Opening and closing the cooking cabi...

Page 4: ...nd information 44 6 2 Steam 45 6 2 1 Cooking climate and temperature range 45 6 2 2 Cook food in steam 45 6 3 Combination of steam and convection heat 46 6 3 1 Cooking climate and temperature range 46...

Page 5: ...ture format 71 13 2 4 Programme view 71 13 3 Light 71 13 3 1 Display brightness 72 13 4 Sound 72 13 4 1 Master volume 72 13 4 2 Loading calls for action 72 13 4 3 Program step end 72 13 4 4 End of coo...

Page 6: ...14 Kitchen management 80 14 1 Profile and rights management 80 14 1 1 Create new profile 80 14 1 2 Activate profile 81 14 1 3 Transfer profile to other units 82 14 1 4 Delete profile 82 14 2 Hygiene...

Page 7: ...95 17 5 Problem resolution 96 17 5 1 Error messages heating steam generator 96 17 5 2 Error messages for gas units 96 17 5 3 Error messages heating hot air 97 17 5 4 Error messages moisture 97 17 5 5...

Page 8: ...ns and warranty services on this page RATIONAL assumes no liability for damage caused by unauthorised technical changes 1 3 Target group This document is intended for staff working in large and commer...

Page 9: ...ions DANGER If you see the signal word DANGER you are being warned about situations that lead to serious injury or death WARNING If you see the signal word WARNING you are being warned about situation...

Page 10: ...12 Operating instructions 2 The iCombi Pro Model 10 1 1 Model 6 2 1 Model 10 2 1 Model 6 1 1 Control panel Display Central dial USB port Air filter Cooking cabinet Cooking cabinet door Door handle Han...

Page 11: ...sources e g grill plates or deep fat fryers near the unit n During operation ensure that the floor surrounding the unit is dry and non slip Safety instructions before use n Make sure the unit is at a...

Page 12: ...moving mobile oven racks Hot food can otherwise spill out n To prevent material damage due to improper use of accessories Use only original RATIONAL accessories Use only the VarioSmoker to smoke food...

Page 13: ...sparks and increase the risk of an explosion Close the shut off valve on the gas line Leave the building and contact your gas supplier or the fire services 3 2 Personal protective equipment n When wo...

Page 14: ...n installation in the installation manual enclosed Before working with the unit for the first time 1 Clean the unit and accessories before using the unit for the first time Click here for more informa...

Page 15: ...e start screen as you wish n Manual operating modes 43 n Favourite 16 n Intelligent modes 27 If you press one of these buttons all intelligent cooking processes categorised as intelligent modes will b...

Page 16: ...flash drive connected This symbol shows that you have connected a USB flash drive to the unit Network connection This symbol shows that your unit is connected to a LAN network If there is a network er...

Page 17: ...mple moves Press Swipe Scroll Drag and drop 4 4 2 Central dial Instead of the Moves 17 you can modify settings by turning the central dial Confirm actions by pressing the central dial 4 5 Maximum load...

Page 18: ...If the unit is in operation hot steam may surge out of the cooking cabinet The fan wheel is slowed down Closing the cooking cabinet door 1 Press the cooking cabinet door firmly 4 7 Loading the unit 1...

Page 19: ...ontainers that contain hot food and that are not covered hot food can spill over You may scald yourself if you touch hot food 1 Cover containers filled with hot liquids or hot food during transport in...

Page 20: ...ort trolley lock is released 9 Release the locking brakes on the transport trolley 10 Take the transport trolley away from the unit to its storage location 11 Close the cooking cabinet door Make sure...

Page 21: ...is ensures that the mobile oven rack or mobile plate rack remains securely in the cooking cabinet 8 Apply the parking brakes of the transport trolley 9 Press the lever on the transport trolley back to...

Page 22: ...ork carefully with it 1 Always wear protective gloves when working with the hot core probe 2 After use insert the core probe into the holder provided NOTICE The core probe is hanging out the cooking c...

Page 23: ...d as possible Whole fish 1 Insert the core probe up to the handle into the thickest point of the food Make sure that the tip of the core probe does not protrude into the abdominal cavity of the fish V...

Page 24: ...u touch hot components or come in contact with hot water 1 Wear protective gloves while working with the hand shower CAUTION Germ formation in the water pipe If you do not use the hand shower daily ge...

Page 25: ...ress the lever the stronger the water stream will be 2 After use let the hand shower slowly retract into the housing CAUTION Make sure that the hose of the hand shower is clean before letting it retra...

Page 26: ...The ball valve is open Dripping fat can now be collected in the fat collecting container Replace the fat collecting container CAUTION The outside of the unit the drain and the fat collecting container...

Page 27: ...ters such as the cooking cabinet temperature climate air speed and cooking time will be regularly adjusted so that your desired result is achieved If required you can intervene in the cooking process...

Page 28: ...eces of poultry n If you would like to prepare small pieces of poultry select the cooking path Pan fry n If you need short post production times for grilled chickens select the cooking path Overcrust...

Page 29: ...ou would like to prepare boiled or cooked sausages in artificial or natural casings Char Siu Select this cooking path if you would like to prepare Chinese Char Siu Cochinita pibil Select this cooking...

Page 30: ...at low temperature Select this cooking path if you want to fry pieces of meat with crackling or skin at low temperatures Also select this cooking path if you want to cook food overnight or if you are...

Page 31: ...d like to prepare breaded fish fillets or breaded fish Saut Select this cooking process if you want to saut fish Braise Select this cooking process if you want to braise fish Braise Chinese style Sele...

Page 32: ...vegetable casseroles paella or gratinated stuffed vegetables Baked potatoes Choose this cooking process if you want to prepare baked potatoes from whole potatoes with the Potato Baker Baking Convenie...

Page 33: ...o prepare Japanese Itamenmono Potato gratin Select this cooking process if you want to prepare au gratin potatoes or other potato casserole dishes Dumplings Select this cooking process if you want to...

Page 34: ...eesecake Croissant Select this cooking path if you would like to prepare croissants or pastries that need to be steamed before baking Eclairs Select this cooking path if you would like to prepare deli...

Page 35: ...urger buns or raisin rolls 5 2 7 Finishing Serving container Select this cooking path if you would like to heat up cooked chilled food in containers to a temperature suitable for consumption Heat thro...

Page 36: ...the name of the intelligent cooking process The desired cooking process will be displayed 5 3 2 Starting intelligent cooking process In this section the potato gratin cooking process will be used to...

Page 37: ...o crisp the food at the end of the cooking process select a lower searing level The very high searing temperatures safely kill the bacteria on the exterior of the food This means that food is cooked p...

Page 38: ...ant to cook food using low temperature cooking the core temperature is up to 10 C lower than in other cooking methods If you are cooking poultry always ensure a hygienic core temperature of at least 7...

Page 39: ...ss The surface of the food is humidified the steam condenses and you get crispy crusts on rolls and optimal oven operation The higher the selected level the more humidity will be added to the cooking...

Page 40: ...y started once the desired cooking result has been achieved If you are cooking food of different sizes plan a longer hold phase so that all the pieces of food reach the desired core temperature Well m...

Page 41: ...fat has accumulated during cooking replace the container before starting the Crisping option This prevents the build up of unnecessary smoke during crisping If the food does not have the desired crus...

Page 42: ...ll appear 5 7 Arrange intelligent cooking paths In the iCookingSuite you can either arrange the intelligent cooking paths alphabetically or according to the frequency of use 1 To arrange the intellige...

Page 43: ...umidity and cooking cabinet temperature as follows 1 Press and hold the button After 10 seconds the current cooking cabinet temperature will be displayed 2 To revert to the set parameter values releas...

Page 44: ...baking food the cooking cabinet will be cooled If you switch from baking to grilling the cooking cabinet will be heated Air speed With this additional function you can set the speed of the fan wheel...

Page 45: ...ress the button The unit is heating up 3 Set the desired cooking cabinet temperature 4 To cook food with the cooking time press the button 5 Set the cooking time 6 To cook the food with the core tempe...

Page 46: ...bination of steam and hot air 1 Press the button in the menu bar 2 Press the button The unit is heating up 3 Set the desired steam saturation 4 Set the desired cooking cabinet temperature 5 To cook fo...

Page 47: ...60 C for another 30 minutes 6 4 2 Cook food in convection heat 1 Press the button in the menu bar 2 Press the button The unit is heating up 3 Set the desired cooking cabinet temperature 4 To cook food...

Page 48: ...6 Manual cooking 48 112 Operating instructions 1 Press and hold the button The cooking process is cancelled The start screen will appear...

Page 49: ...n finished according to the final dish Sous vide cooking is particularly suitable for the following uses n Cook and chill Produce your dishes centrally in a production kitchen and then deliver the dis...

Page 50: ...production periods such as in the afternoon or in non service periods This means you can make full use of your unit for up to 24 hours a day And if you cook food overnight you can also save energy by...

Page 51: ...Finishing is particularly ideal when you need to serve many plates at the same time e g at conferences weddings or catering events n Finishing in industry catering Container Finishing is ideal when yo...

Page 52: ...eparation order of the dishes For you this means that you always have everything under control without checking or monitoring therefore achieving high efficiency in your food production Time axis scal...

Page 53: ...ss this button 5 To save your changes press the button 6 If you want to increase or decrease the core temperature or increase or decrease the cooking time either turn the central setting wheel or pres...

Page 54: ...path is highlighted with and added to the shopping cart 6 To add programmes from the programming mode to the shopping cart press the button All saved programmes are displayed 7 Scroll through the list...

Page 55: ...the iProductionManager 1 Press the button 2 To add intelligent cooking paths to the shopping cart press the button All intelligent cooking paths are displayed 3 Scroll through the list and press the d...

Page 56: ...red shelf level For better orientation the shelf level where you want to place the ticket is highlighted in blue As a further help the time is shown on the ticket If the shelf level is marked in yello...

Page 57: ...h operating mode It is checked whether the cooking chamber humidity levels match Both manual operating modes and intelligent cooking paths are tested for their compatibility You can only combine cooki...

Page 58: ...n the tickets are closed The positioning of the tickets with regard to one another are maintained The positioning of the tickets can be moved on the time axis 10 4 4 Time optimisation You can have tic...

Page 59: ...you have already placed in iProductionManager automatically optimised by your iCombi Pro so that the dishes are optimally cooked in terms of energy The device utilisation can therefore be optimised an...

Page 60: ...ut this planning not only at the current time but also in the future To do this place tickets in front of the positioning aid or behind it When you start the iProductionManager the positioning aid ind...

Page 61: ...New planning The positioning aid slides on the left edge of the display The scaling of the time axis changes from the current time in the description to minutes You can now place tickets regardless of...

Page 62: ...a The iProductionManager is not currently processing any tickets When tickets are processed a message appears informing you that all tickets must be cancelled before planning starts 1 Press the butto...

Page 63: ...Intelligent modes Shopping cart Sorting by date of creation Favourites Sort alphabetically 11 1 Create manual programme 1 Press the button in the menu bar 2 Press the button New element 3 Press the bu...

Page 64: ...Cabinet temperature n Cooking time n Core temperature n Delta T cooking n Air speed n Humidification Convection n Cooking cabinet humidity n Cabinet temperature n Cooking time n Core temperature n De...

Page 65: ...enu bar 2 Press the button New element 3 Press the button You will be asked what you want to program 4 Select one of the following options n Cooking mode n Mode and cooking method n Cooking methods On...

Page 66: ...king process are marked with the following symbol 3 Adjust the cooking parameters as required 4 To save your changes press the button The individual cooking steps will be displayed again 5 To give the...

Page 67: ...th and added to the shopping cart 8 To check the shopping cart press the button All chosen intelligent cooking paths and programmes are displayed 9 To delete an item from the shopping cart press the b...

Page 68: ...art an intelligent cooking path press the desired programme The programme immediately starts up All cooking steps are displayed 2 To send an intelligent cooking path to the iProductionManager press th...

Page 69: ...ess 2 NOTICE The action cannot be reversed Press the button Change current process The cooking parameters of the ticket are accepted and displayed in the manual operating mode Convert an intelligent c...

Page 70: ...on of setting options is assigned to each category which can be changed using simple gestures 17 or the central dial 17 13 1 Favourites All settings that you have marked as favourites are displayed in...

Page 71: ...the desired time The time is automatically adopted Toggle 24h 12h 1 Select 12 to set the 12 hour format and 24 to set the 24 hour format 13 2 3 Temperature format Here you can set whether the tempera...

Page 72: ...me is immediately adjusted 13 4 2 Loading calls for action Here you can set which sound or melody you would like to sound when you want to either load the unit or ask it to perform an action You can c...

Page 73: ...the overview Your setting will be displayed 13 5 cooking system 1 Press the button 2 Press the button Cooking system 13 5 1 Information on unit model Here you can see which model your unit belongs to...

Page 74: ...e button Cooking 13 6 1 Primary country cuisine In the primary country cuisine cultural eating habits are translated into intelligent cooking paths The cooking parameters of these intelligent cooking...

Page 75: ...iProductionManager 1 Press the button Number of racks 2 Select the desired value from 0 10 on the scale The setting is immediately adopted 13 6 6 Order of racks Here you can set if the order of racks...

Page 76: ...unit to perform a forced cleaning process This means that you can ensure that cleaning and hygiene regulations are observed when the unit is in shift operation Click here for more information Cleanin...

Page 77: ...ally want to delete the programs 2 To confirm the action press the button A message will confirm that all programs have been deleted 13 8 4 Export and import profiles Export profiles a You have create...

Page 78: ...ected a USB flash drive with the unit 1 Press the button Export basic unit settings The basic unit settings are saved on the USB stick Import basic unit settings 1 Connect a USB stick on which the alr...

Page 79: ...n your unit If you have connected your unit to ConnectedCooking and activated the Download software updates automatically function software updates will be made available to you automatically Click he...

Page 80: ...ies If you forget the password you can no longer access the settings In this case please contact your RATIONAL service partner You will return to the profile overview 6 To assign a language to the pro...

Page 81: ...tton Cooking parameter rights 2 To allow the user profile to change the cooking parameters during cooking press the button touchable 3 To prevent the user profile from changing the cooking parameters...

Page 82: ...es are loaded onto the USB stick 4 Connect the USB stick that contains the downloaded profiles to another unit 5 Press the button 6 Press the button User administration 7 Press the button Profile impo...

Page 83: ...dCooking 85 1 Press the button 2 Press the button ConnectedCooking 3 Next to Automatically transfer HACCP data press the button ON HACCP data will now be automatically transferred when a cooking proce...

Page 84: ...re connecting the network cable 1 Unscrew the protective cover 2 Thread the individual parts of the protective cover onto the network cable 3 Plug the network cable into the network connection 4 Screw...

Page 85: ...ips and tricks from our professionals and a variety of application videos at connectedcooking com 14 4 1 Connect unit with ConnectedCooking When you connect your unit to ConnectedCooking the following...

Page 86: ...tton ON 4 Press the button 5 Press the button Service 6 Press the button Software update info 7 Press the button Start installation The software update is carried out and the unit is restarted Softwar...

Page 87: ...damage to the eyes Wear tight fitting protective glasses and chemical safe protective gloves while cleaning the unit n Keep the cooking cabinet door closed during the automatic clean Corrosive cleani...

Page 88: ...ving light dirt and scale resulting from use of the unit at up to 200 C n Active Green cleaner tablets medium Eco Normal Suitable for removing dirt and scale resulting from cooking processes including...

Page 89: ...the cooking cabinet temperature 3 Select the desired cleaning programme 88 4 Open the cabinet door 5 Remove all containers racks and trays from the cooking cabinet 6 WARNING Danger of chemical burns...

Page 90: ...Press the button Forced cleaning 4 To activate the forced cleaning process press the button ON 5 To set how long you would like to pass before you receive a reminder to clean the unit press the butto...

Page 91: ...except the automatic clean turn off the unit from the power supply n Clean your unit daily even if you only use the manual steam mode n Do not clean the accessories trays inside the unit when using a...

Page 92: ...ukewarm water a mild cleaning agent and a soft cloth 5 Let the glass panels of the cooking cabinet door dry completely Clean LED covers Once you have cleaned the glass panels of the cooking cabinet do...

Page 93: ...burns Wear a mask and chemical protective gloves for reliable protection when handling descaler Place the steaming nozzle in descaler B 6 Leave the steaming nozzle in the descaler until the scale is d...

Page 94: ...with a lockable control panel you have to unlock the lockable control panel and open the cover before cleaning the control panel Before you clean the display you can lock it This prevents accidentally...

Page 95: ...function is opened and displays the appropriate help content 17 3 Telephone help ChefLine We offer a telephone consulting service to answer any questions you have about applications or recipes Quick...

Page 96: ...of the water quantity is incorrect Yes Service 13 The water level in the steam generator is not recognised correctly Only the convection mode is available at the moment Service 20 8 The temperature p...

Page 97: ...rror report Cause Cooking possible Service 20 1 The temperature probe is defective No Service 28 1 The temperature limit of the steam generator has been exceeded No Service 28 2 The temperature limit...

Page 98: ...rror occurred in the water level recognition during the automatic clean No 17 5 6 Error messages Care Error report Cause Cooking possible Service 40 The quantity of care liquid required by the iCareSy...

Page 99: ...on the CPU is not initialised Set the date and time Yes Service 51 The battery is defective Yes Service 52 1 The cooking cabinet lighting is not working correctly Yes Service 52 2 The cooking cabinet...

Page 100: ...essage will be displayed that the air filter needs to be replaced 1 Insert the screwdriver in the recesses of the air filter cover 2 Remove the air filter cover 3 Pull out the air filter 4 Slide the n...

Page 101: ...et 1 Open the cabinet door 2 Pull the cooking cabinet door gasket out from the groove and dispose of it 3 Moisten the retaining lips of the new gasket with soapy water 4 First press the corners of the...

Page 102: ...d injure you 1 Carefully move units over thresholds and inclinations CAUTION Units and Combi Duos on castors can tip over when transported or moved If your unit is on castors or your Combi Duo is on a...

Page 103: ...19 Transport Operating instructions 103 112 5 Once you are finished with cleaning the kitchen carefully slide the unit back into place and apply the parking brakes...

Page 104: ...missioning and disposal 20 1 Decommissioning Contact your RATIONAL Service Partner if you would like to decommission the unit 20 2 Disposal Old units contain recyclable materials Dispose of old units...

Page 105: ...s IPX5 Environmental conditions 10 40 C Airborne sound emission 70 dBA Frequency and max transmission power WLAN 2 4 GHz 19 5 mW 21 3 Models and version names The model names and the version on the mo...

Page 106: ...making available on the market of radio equipment n Directive 2006 42 EU on machinery n Directive 2014 30 EU on the harmonisation of the laws of the Member States relating to electromagnetic compatibi...

Page 107: ...e limits for a Class A digital device pursuant to part 15 of the FCC Rules These limits are designed to provide reasonable protection against harmful interference when the equipment is operated in a c...

Page 108: ...ConnectedCooking Register the unit without smartphone 85 Register with smartphone 85 Continuous operation 38 Control panel Clean central dial 94 Cleaning 94 Cooking cabinet climate Combination of stea...

Page 109: ...ral dial 17 Moves 17 P Performing maintenance yourself 100 Pierce 39 Preheat 40 R Replace air filter 100 Replace gasket 101 Reset core probe 39 Residual time 40 Rinse 88 Cleaning programs 88 Roast 39...

Page 110: ......

Page 111: ......

Page 112: ...RATIONAL UK Limited Siegfried Meister Stra e 1 86899 Landsberg am Lech Tel 49 0 8191 3270 Fax 49 0 8191 21735 info rational online com rational online com 20 045 V 05 MDS heju 04 20 EN GB RATIONAL AG...

Reviews: