background image

30

such as dust mask, non-skid safety shoes, hard hat, or hearing protection used for appropriate 

conditions will reduce personal injuries. 

c)   Prevent unintentional starting. Ensure the switch is in the off-position before connecting to 

power source and/or battery pack, picking up or carrying the tool. 

Carrying power tools with 

your finger on the switch or energising power tools that have the switch on invites accidents.


d)   Remove any adjusting key or wrench before turning the power tool on. 

A wrench or a key left 

attached to a rotating part of the power tool may result in personal injury.


e)   Do not overreach. Keep proper footing and balance at all times. 

This enables better control of 

the power tool in unexpected situations.


f)    Dress properly. Do not wear loose clothing or jewellery. Keep your hair, clothing and gloves 

away from moving parts. 

Loose clothes, jewellery or long hair can be caught in moving parts.

g)   If devices are provided for the connection of dust extraction and collection facilities, ensure 

these are connected and properly used. 

Use of dust collection can reduce dust-related


hazards.

4)   POWER TOOL USE AND CARE 

a)   Do not force the power tool. Use the correct power tool for your application. 

The correct 

power tool will do the job better and safer at the rate for which it was designed. 

b)   Do not use the power tool if the switch does not turn it on and off. 

Any power tool that cannot 

be controlled with the switch is dangerous and must be repaired.

c)   Disconnect the plug from the power source and/or the battery pack from the power tool 

before making any adjustments, changing accessories, or storing power tools. 

Such 

preventive safety measures reduce the risk of starting the power tool accidentally.


d)   Store idle power tools out of the reach of children and do not allow persons unfamiliar with 

the power tool or these instructions to operate the power tool. 

Power tools are dangerous in 

the hands of untrained users.


e)   Maintain power tools. Check for misalignment or binding of moving parts, breakage of parts 

and any other condition that may affect the power tool’s operation. If damaged, have the 

power tool repaired before use. 

Many accidents are caused by poorly maintained power tools.


f)    Keep cutting tools sharp and clean. 

Properly maintained cutting tools with sharp cutting edges 

are less likely to bind and are easier to control. 

g)   Use the power tool, accessories and tool bits etc. in accordance with these instructions, 

taking into account the working conditions and the work to be performed. 

Use of the power 

tool for operations different from those intended could result in a hazardous situation.


5)  SERVICE

a)   Have your power tool serviced by a qualified repair person using only identical replacement 

parts. 

This will ensure that the safety of the power tool is maintained.

Summary of Contents for LR135NM

Page 1: ......

Page 2: ...Instrucciones en Espa ol Instru es no Portugu s Instructions in English...

Page 3: ...ra 2 Interruptor de encendido apagado 3 Almohadilla para lijar 4 Papel de lija 5 Salida para el polvo 6 Caja de recolecci n de polvo No todos los accesorios ilustrados o descritos est n incluidos en e...

Page 4: ...e el uso real de la herramienta el ctrica puede diferir del valor declarado en funci n de los modos en que se utilice la herramienta de acuerdo a los siguientes ejemplos y otras variaciones de uso Si...

Page 5: ...bajo limpia y bien iluminada Las zonas desordenadas u oscuras son m s propensas a los accidentes b No utilice herramientas el ctricas en atm sferas explosivas por ejemplo en presencia de l quidos gase...

Page 6: ...extracci n de polvo e instalaciones para su recogida aseg rese de que est n conectados y se utilizan correctamente La recogida de polvo puede disminuir los peligros asociados al polvo 4 Uso y cuidado...

Page 7: ...vicio a La reparaci n de la herramienta debe realizarla un especialista cualificado utilizando nicamente piezas de recambio id nticas De este modo se garantiza que se mantiene la seguridad de la herra...

Page 8: ...o dos Utilice protecci n para los ojos Utilice una m scara contra el polvo Doble aislamiento Advertencia Los productos el ctricos no deben tirarse junto a los residuos dom sticos Depos telos en un pu...

Page 9: ...n de polvo 5 que est dise ada para recoger el polvo Inserte la caja de recolecci n de polvo en la salida trasera de polvo de la lijadora Despu s tire de la caja de recolecci n de polvo y aseg rese de...

Page 10: ...mina la mayor parte de materiales y el grano fino le permite realizar los mejores acabados en cualquier tipo de lijado El estado de la superficie que debe lijar determinar qu grano ser el m s adecuado...

Page 11: ...no deben tirarse junto a los residuos dom sticos Depos telos en un punto de reciclaje Consulte a las autoridades locales o los comercios minoristas si necesita informaci n sobre reciclaje GARANT A Es...

Page 12: ...Tipo de designaci n LR135NM La designaci n PPS de la herramienta significa lijadora manual Funci n Eliminar el material de una superficie usando un medio abrasivo Cumple con las siguientes directivas...

Page 13: ...13...

Page 14: ...S135G 2 10 1 11 7993X201 PPS135G 2 11 1 12 7993X201 PPS135G 2 12 1 13 7993X201 PPS135G 2 13 1 14 7993X201 PPS135G 2 14 1 15 7993X201 PPS135G 2 15 1 16 7993X201 PPS135G 2 16 1 17 7993X201 PPS135G 2 17...

Page 15: ...ES 1 Punho 2 Bot o Ligar Desligar 3 Base da lixadeira 4 Folha de lixa 5 Sa da dos detritos 6 Recipiente de recolha de detritos Nem todos os acess rios ilustrados ou descritos est o inclu dos no modelo...

Page 16: ...durante a utiliza o da ferramenta el trica pode diferir do valor apresentado dependendo da forma como se usa a ferramenta de acordo com os exemplos seguintes e de outras varia es na utiliza o da ferra...

Page 17: ...s el tricas com fio assim como s ferramentas el tricas a bateria sem fio 1 Seguran a da rea de trabalho a Mantenha a rea de trabalho limpa e bem iluminada reas obstru das ou escuras potenciam os acide...

Page 18: ...rga nem joias Mantenha o cabelo roupa e luvas afastados das pe as em movimento As roupas largas as joias ou os cabelos compridos podem ficar presos nas pe as m veis g Se houver dispositivos extratores...

Page 19: ...ra outros trabalhos que n o os recomendados pode levar a situa es de perigo 5 Repara o a Certifique se de que as repara es da sua ferramenta el trica s o realizadas por um profissional qualificado e q...

Page 20: ...rote o nos olhos Use uma m scara de prote o contra o p Isolamento duplo Aviso Os res duos dos produtos el tricos n o devem ser eliminados juntamente com os res duos dom sticos Por favor recicle sempre...

Page 21: ...lixadeira est equipada com um recipiente d e recolha de detritos 5 cuja fun o precisamente a recolha de detritos Insira o Recipiente de Recolha de Detritos na sa da posterior da lixadeira De seguida p...

Page 22: ...e do material e as lixas mais finas permitir lhe o o melhor acabamento em qualquer trabalho de lixamento O estado da superf cie a lixar determinar qual a lixa adequada ao trabalho Se a superf cie for...

Page 23: ...eparada PROTE O DO MEIO AMBIENTE Os equipamentos el tricos n o devem ser depositados com o lixo dom stico Se existirem instala es adequadas deve recicl los Consulte a sua autoridade local para tratame...

Page 24: ...eira Tipo Designa o LR135NM PPS designa o de maquinaria representativa de Lixadeira Fun o Remove o material das superf cies utilizando uma lixa m dia Em conformidade com as seguintes Diretivas 2006 42...

Page 25: ...25...

Page 26: ...S135G 2 10 1 11 7993X201 PPS135G 2 11 1 12 7993X201 PPS135G 2 12 1 13 7993X201 PPS135G 2 13 1 14 7993X201 PPS135G 2 14 1 15 7993X201 PPS135G 2 15 1 16 7993X201 PPS135G 2 16 1 17 7993X201 PPS135G 2 17...

Page 27: ...COMPONENT LIST 1 Handle 2 On off switch 3 Sanding pad 4 Sanding paper 5 Dust outlet 6 Dust collection Box Not all the accessories illustrated or described are included in standard delivery 1 2 4 5 6...

Page 28: ...ant on the following examples and other variations on how the tool is used How the tool is used and the materials being cut or drilled The tool being in good condition and well maintained The use the...

Page 29: ...power tool Distractions can cause you to lose control 2 ELECTRICAL SAFETY a Power tool plugs must match the outlet Never modify the plug in any way Do not use any adapter plugs with earthed grounded...

Page 30: ...ned b Do not use the power tool if the switch does not turn it on and off Any power tool that cannot be controlled with the switch is dangerous and must be repaired c Disconnect the plug from the powe...

Page 31: ...on manual Wear ear protection Wear eye protection Wear dust mask Double insulation Warning Waste electrical products must not be disposed of with household waste Please recycle where facilities exist...

Page 32: ...d with a Dust Collection Box 5 which is designed for collect dust task Insert the Dust Collection Box into the rear dust outlet of sander Then pull the Dust Collection Box and make sure it is tightene...

Page 33: ...er grit sold separately for finishing the surface Note Always continue sanding with each grit until the surface is uniform WORKING HINTS FOR YOUR SANDER 1 Your sander is useful for working on wood met...

Page 34: ...product has been manufactured to the highest standards It is guaranteed against faulty materials and workmanship for at least 24 months from purchase Please keep your receipt as proof of purchase If...

Page 35: ...on Palm Sander Type Designation LR135NM PPS designation of machinery representative of Palm Sander Function Remove surface material using an abrasive medium Complies with the following Directives 2006...

Page 36: ...36...

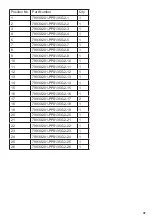
Page 37: ...S135G 2 10 1 11 7993X201 PPS135G 2 11 1 12 7993X201 PPS135G 2 12 1 13 7993X201 PPS135G 2 13 1 14 7993X201 PPS135G 2 14 1 15 7993X201 PPS135G 2 15 1 16 7993X201 PPS135G 2 16 1 17 7993X201 PPS135G 2 17...

Page 38: ......

Page 39: ......

Page 40: ......

Reviews: