background image

10

EN

 12.  BLADE SHARPENING AND SHARPENER ADJUSTMENT

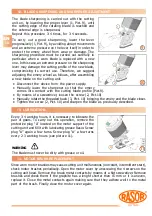
The  blade  sharpening  is  carried  out  with  the  cutting

unit  on,  by lowering  the  proper  lever (1, Pict.  9), until
the  cutting  edge  of  the  rotating  blade  is  reached  and

the  external  edge  is  sharpened.

Repeat  this  procedure 3-4  times,  for  3-4 seconds.
To  carry  out  a  good  sharpening,  lower  the  lever

progressively (1, Pict. 9), by avoiding abrupt movements

and an extreme pressure on the lever itself, in order to
protect  the  emery  wheel  from  wear  or  damage.  The

sharpening  procedure  must  be  carried  out  carefully  in

particular  when  a  worn  blade  is  replaced  with  a  new

one. In this case, an extreme pressure on the sharpening
lever may damage the cutting profile of the new blade,

compromising  its  correct  use.  Therefore,  we  suggest

adjusting the emery wheel as follows, after assembling
a  new  blade on  the cutting  unit:

·

Disconnect  the  device  from  the  power  supply.

·

Manually  lower  the  sharpener  so  that  the  emery

comes  into  contact  with  the  cutting  blade  profile  (Pict.9).

·

By means of a  screwdriver, loosen the  screw (2, Pict.10)

·

Manually rotate the threaded bush (3, Pict. 10) bringing the emery and the blade closer.

·

Tighten the screw (2, Pict. 10) and  sharpen the  blade as previously described.

9

2

3

 13.  LUBRICATION

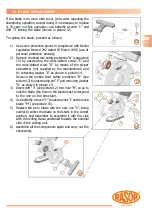
Every 3-4 working hours, it is necessary to lubricate the

pair  of  gears.  To  carry  out  this  operation,  remove  the

protective plug “A”  located on the motor  support of the
cutting unit and fill it with lubricating grease Rasor. Screw

plug  “A”  again  a  few  turns.  Screw  plug  “A”  a  few  turns

every  2-3  working hours  (see  picture  11).

The blade must never be dirty with grease or oil.

11

WARNING

A

1

 14.  MOTOR BRUSH REPLACEMENT

Since worn motor brushes may cause cutting unit malfunctions (non-start, intermittent start),
check motor brushes periodically. Open the motor cover by unscrewing the 4 screws on the

cutting unit head. Remove the brush metal contacts by means of a flat screwdriver. Remove

brushes and check them: if the graphite has a lenght shorter than 15 mm or it is uneven,
replace it. Close the metal contacts again making sure that they adhere well to the metal
part of the brush. Finally close the motor cover again.

10

Summary of Contents for D 86PS

Page 1: ...USE MANUAL English CUTTING UNIT MOD D 86PS ED 1 02 09 ...

Page 2: ...ing partners Spinelli and Ciminaghi For more than sixty years it has been producing automatic cutting systems cutting units for textile applications and electric and pneumatic cutters Initially considered as a point of reference for cutting systems in the textile applications the Rasor products are nowadays widely used in other fields chemical automotive nautical and sport sectors and in furniture...

Page 3: ...l the feed cable of the machine It must never be replaced by the user If necessary contact professionally qualified staff KEEP THE WORKING AREA ALWAYS IN ORDER The workplace must always be kept in order and well lightened liquids or oil traces must not be present ALWAYS USE CUTTING UNITS D 86PS PROPERLY Use the cutting units only to carry out the works they have been designed for do not use them i...

Page 4: ...t work in case of rain In case of damage or malfunction cutting unit D 86PS must not be used until the Customer Care Technical Service has repaired them The original configuration of the cutting unit must not be changed at all On receiving the machine make sure the supply corresponds to what has been ordered In case of non compliance immediately inform Rasor Also make sure the cutting unit has not...

Page 5: ...ust not be removed at all even if the machine is resold Always refer to the serial number written on the plate itself when contacting the manufacturer Several safety warnings are printed on a card which is applied to the cutting unit feeding cable such warnings must be strictly followed by everyone dealing with the machine The company is not to be held responsible for damage to property or acciden...

Page 6: ...es on materials with thickness up to 2 5 cm A sharpener assembled on the cutting unit head allows whetting the blade at any moment without disassembling it After carrying out this operation it is possible to start cutting again A high power motor perfectly balanced with a high number of revolutions and totally free of maintenance reduces the vibrations to the minimum thus making the cutting unit c...

Page 7: ... wet or damp materials to cut plastic metal and wooden materials It is forbidden to use cutting unit D 86PS for purposes different from the above mentioned ones 5 TECHNICAL FEATURES The technical data are only indicative and they can be changed without notice 86 mm with hard metal counter blade 850 rev min about 25 mm Single phase 90 W 1 A 2 400 Kg 3 200 Kg 1 5 mt LUX 200 2 5 m s 2 0 55 C 10 95 wi...

Page 8: ...e electric plug is connected Always pay attention to the electric cable position to prevent it from being cut or damaged by the blade It is allowed to assemble cutting unit D 86PS on machines O E M on condition that their original structure is not modified Otherwise the intervention must be certified by Rasor Firstly make sure that the lines are able to feed the cutting unit correcltly in complian...

Page 9: ...down It is not compulsory for the Teflon base to touch the machine table 2 Lay the material to be cut 3 Connect the cutting unit to the electric feeding see picture 6 3 Put the material on the cutting foot see picture 7 4 Adjust the front mobile protection according to the thickness of the material to be cut see picture 7 5 Enable the switch once it has been enabled it lights with a green light se...

Page 10: ...cutting blade profile Pict 9 By means of a screwdriver loosen the screw 2 Pict 10 Manually rotate the threaded bush 3 Pict 10 bringing the emery and the blade closer Tighten the screw 2 Pict 10 and sharpen the blade as previously described 9 2 3 13 LUBRICATION Every 3 4 working hours it is necessary to lubricate the pair of gears To carry out this operation remove the protective plug A located on ...

Page 11: ... supplied by the manufacturer and by extracting washer E as shown in picture 14 Remove the mobile front safety protection B see picture 13 by unscrewing pin F and removing washer G as shown in picture 14 3 Insert drift 3 see picture 12 into hole H so as to lock the blade the hole on the blade must correspond to the one on the structure 4 Use butterfly wrench 1 to unscrew nut L and remove blade M s...

Page 12: ...7CPL FEEDING CABLE WITHOUT PLUG T 107600 DRIFT LOCKING THE BLADE S 868300 SHARPENER PIN SW108200 COUNTERBLADE FIXING SCREW T102904 COVER SWITCH WITHOUT LIGHT T 107900 LUBRICATING GREASE S 868400 SIMPLE SHARPENER UNIT T100102 MOTOR COVER WITH SLOT T102904L COVER SWITCH WITH LIGHT SERIES 2008 T 861300 COMPLETE ROTOR 220 V S 8684CPL COMPLETE SHARPENER UNIT T100200 MOTOR COVER FIXING SCREW T 103400 SH...

Page 13: ...18CPL T 8655 CPL T 106000 S 863601 T 106300 T 101500 T 101700 T 104300 T 101801 T 861300 V220 230 T 861301 V110 T 861302 V48 T 864900 T 105000 T 100201 T 102001 T 101200 T 100102 T 101600 T 100700 T 100900 T 100800 T 102201 T 100900 T 103400 S 869000 SW 1059CPL T 105300 86 PHSS T 104000 S 8684CPL T 106100 T 107500 T 107900 T 1027 CPL T 107600 T 101000 dal 1946 T 102701 SW 1029S SW 1037S S 867800 S...

Page 14: ...ssembly failure caused by external agents failure caused by lack of maintenance or neglicence blades and parts subject to wear WARRANTY FORFEITURE In case of arrearage or other breaches of contract Whenever changes or repairs are carried out on our cutting units without our prior authorization Whenever the serial number is tampered with or cancelled Whenever the damage is caused by improper use ba...

Page 15: ...ording to workmanlike standards We declare that the above mentioned goods comply with the standards in force concerning safety and hygiene at work that can be applied to the material itself according to art 6 of the Italian legislative decree No 81 08 the above mentioned goods are not included in the goods indicated in annex IV art 4 paragraph 1 letter a Italian Law No 459 of 24 July 1996 1 Catego...

Page 16: ...Authorized dealer Stamp ...

Reviews: