

IV. Assign Names to Server Ports
Using the Local User Console
1.
If not already attached, connect a keyboard, mouse, and
monitor to Dominion KX. On the local user console OSD, log on
with the default username/password of
admin/raritan
(or your
new username/password if you have already changed these
default values).
2.
Press the
F5
key on your keyboard to activate the
Administrative Menu
3.
Press
↑↑,, ↓↓,,
or type
5
to select Option
5 Channel
Configuration
and press
ENTER.
4.
Press
↑↑
or
↓↓
to select a server port to rename, and press
ENTER.
When the highligh turns green, type a new name (up to
20 characters) to identify the server connected to that port. Press
ENTER
when finished to save the new name.
5.
Press
ESC
to exit the menu.
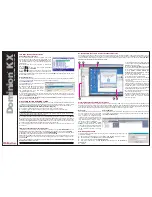
Using a Web Browser
1.
On any workstation with network connectivity to your Dominion KX, and with Java Runtime Environment
(JRE) 1.4.x or later installed, launch KX Manager in a Web browser by typing:
http://IP-ADDRESS/admin
where IP-ADDRESS is the IP address that you
designated in Section II-7.
2.
The Dominion KX Manager applet will load
and launch. Log on with the default
username/password of
admin/raritan
(or your
new username/password if you have already
changed these default values).
3.
In the left panel of the screen, find the server port that you want to change. Click on the server icon, right-
click on it, and click
Properties
on the shortcut menu. Type a new name (up to 20 characters) to identify that
server. Press
ENTER
when finished.
Please see the
Dominion KX User Guide, Chapter 3: Administrative Functions
for additional information
and instructions on using KX Manager.
1.
The Navigator displays any known Dominion
units in a single view. Click
Connection > New
Profile
to create new entries.
2.
Click on
Synchronize Mouse
to converge
the mouse pointers displayed in KVM windows.
If your mouse pointers fail to converge, be sure
to review
Section I: Prepare Devices and
Network for Remote Operation
to correctly
configure your managed server.
3.
The Toolbar provides easy access to the
most frequently-used tools and features.
4.
Double-click on a server port to establish
access to, and BIOS-level control of, the serv-
er’s KVM ports.
- Double-clicking another server port on the
same Dominion unit will switch your session to
that server. If your Dominion hardware supports
multiple simultaneous remote server connec-
tions, you can right-click on a port and click
New
Connection
to open additional sessions.
5.
The Status Bar provides real-time informa-
tion on connection parameters.
6.
When connected to a KVM console port, key-
strokes and video signals are transmitted in
real-time, exactly as if you were connected
directly to the server.
1
2
3
4
5
6
VII. Maximize Remote KVM Performance
Dominion KX’s dynamic video compression algorithms maintain usability of KVM consoles under varying bandwidth environments. Your
Dominion unit can optimize its output not just for the corporate LAN, but also for lower-bandwidth WAN and dial-up connections. By adjusting
color depth and limiting video output, Dominion KX offers the optimal balance between video quality and system responsiveness in any band-
width constraint. Familiarize yourself with the following parameters to adjust performance options even further.
VIII. Change Password
For security reasons, Raritan recommends that you reset the default Admin password as soon as
possible after installation.
1.
Double-click on the Dominon KX icon in the MPC or RRC Navigator and log on to the unit.
2.
On the
Tools
menu, click
Update,
and then click
User Password.
3.
Type your current password in the
Old Password
field.
4.
Type your new password in the
New Password
field and retype it in the
Confirm New
Password
field.
5.
Click
OK.
Color Calibration
Some video cards output non-standard signal levels. Perform a color calibration upon inital
setup to optimize transmitted color for accuracy using the Video menu. On the RRC menu bar,
click
Video > Calibrate Color.
Noise Filter
Video cables can generate electrical noise on
a monitor that cannot be seen by the naked
eye. Your Dominion unit reduces the band-
width it consumes by intelligently ignoring
extraneous signal noise. Setting the noise fil-
ter too high can prohibit Dominion from cor-
rectly transmitting screen changes; setting it
too low can use too much bandwidth.
On the menu bar, select
Video > Video
Settings
to adjust the Noise. The default
value of
2
works for most environments; set to
1
or
0
for more responsive video or to
5
or
7
for low bandwidth connections (including
modem).
V. Connect Remotely Using MPC or RRC
Raritan Multi-Platform Client (MPC) and Raritan Remote Client (RRC), Raritan’s graphical interfaces, allow you
to remotely access the target devices connected to Raritan's Dominion and IP-Reach units. Please note that
RRC works only with MS Internet Explorer (IE), and MPC loads automatically in any other Web browser.
Install and Launch RRC (on a Windows Computer using IE)
1.
Log on to any Windows-based computer with network access to your Dominion KX.
2.
If you are using Windows NT, 2000, XP, or 2003, ensure that you are not a "restricted" user.
3.
Launch Microsoft IE.
Note: An IE default security setting of Medium is sufficient. Also, please ensure that your IE security settings
allow the download and execution of ActiveX controls.
4.
In the URL text field of your Web browser, type the IP address you assigned in step II-7 and press
ENTER.
5.
After RRC launches, a device tree of all automatically-detected Raritan devices found on your subnet is
displayed on the left side of the screen. If you do not find your Dominion unit listed by name, create an icon
manually by selecting
New Profile
on the
Connection
menu. Type a Description, specify Connection Type,
type the Dominion’s IP Address and click
OK.
These values can be edited later.
6
In the Navigator panel on the left side of the screen, double-click on the icon that corresponds to your
Dominion unit.
Install and Launch MPC (on All Other Platforms)
To launch MPC from any browser except IE running on a Windows PC, type
http://IP-ADDRESS
into your
browser's address line, where IP-ADDRESS is the IP address you assigned in step II-7 and press
ENTER.
To launch MPC from a Windows PC running IE, type
http://IP-ADDRESS/mpc
into the IE URL text field, where
IP-ADDRESS is the IP Address you assigned in step II-7, and press
ENTER.
Please note that the MPC applet will launch in a new window that does not contain the IE Menu bar, Tool bar,
Scroll bar, or Address bar. You can work in this window and toggle to other open windows using the key com-
mand
ALT+TAB.
You can also install MPC as a standalone applet, described further in the
Raritan Multi-Platform Client and
Raritan Remote Client User Guide.
Note: Regardless of browser, you must allow pop-ups from the Dominion’s IP address in order to launch MPC.
Dominion
®
KX
Quick Installation and Setup Guide
VI. Remotely Access and Control Connected Servers
After logging on to the Dominion KX unit, use the MPC or RRC Navigator on the left side of the MPC or RRC screens to select and connect to
a port. Please note that the RRC screen shown below differs slightly from the MPC screen, which has a Message panel below the Navigator
panel; the Message panel displays a simplified events log. For more detailed instruction on MPC or RRC use, please see the
Raritan Multi-
Platform Client and Raritan Remote Client User Guide.