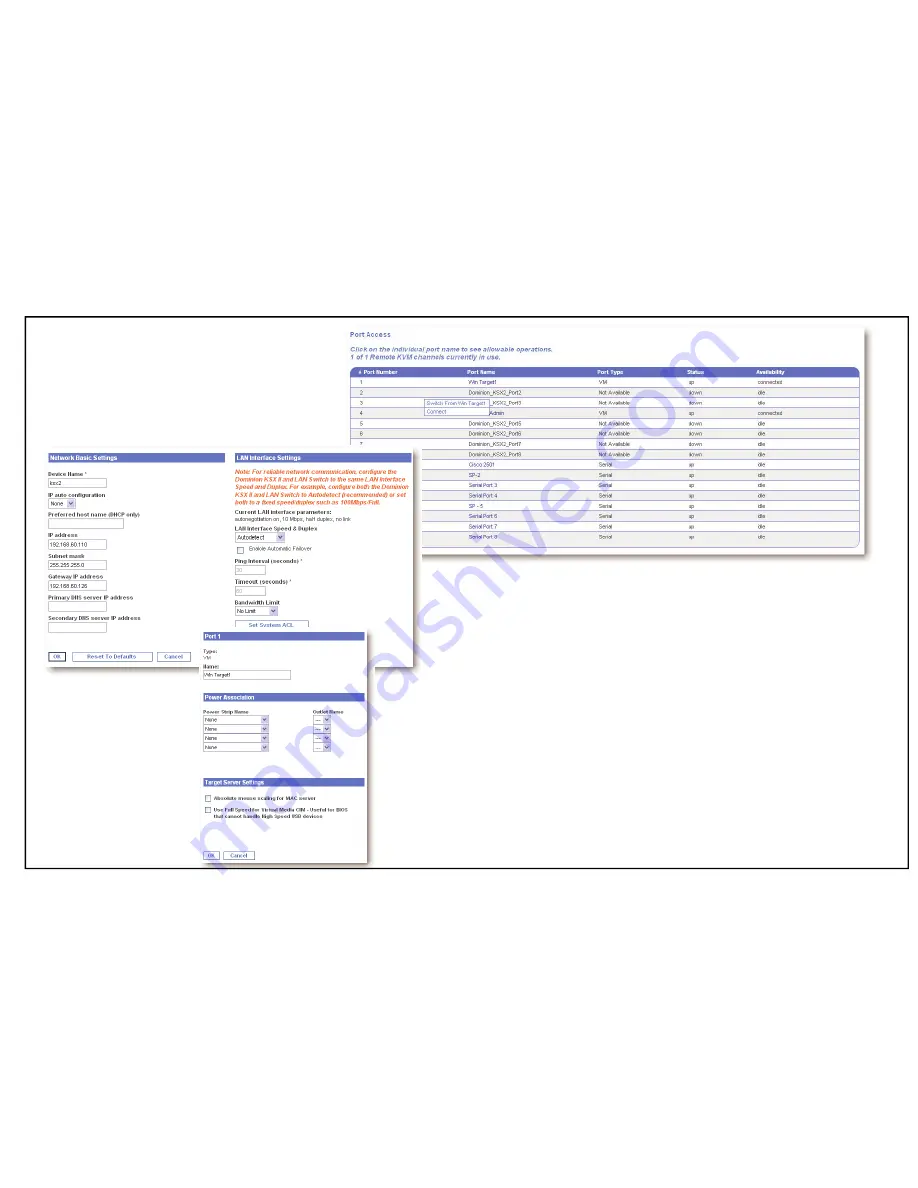
B. Assign an IP Address
1. Select Device Settings > Network Settings. The Network Basic Settings page opens.
2. Specify a meaningful Device Name for your Dominion KSX II unit; up to 16 alphanumeric
and special characters, no spaces.
3. Select the IP configuration from the IP auto configuration drop-down list:
•
None (Static IP). This is the recommended option because the Dominion KSX II is an
infrastructure device and its IP Address should not change. This option requires that
you manually specify the network parameters.
•
DHCP. With this option, network parameters are assigned by the DHCP server.
4. If you select an IP configuration of None (static IP), type the TCP/IP parameters for your
Dominion KSX II unit: IP address, Subnet mask, Gateway IP address, Primary DNS
server IP address, and (optional) Secondary DNS server IP address.
C. Name Target Servers
1. Connect all target servers (if you have not
already done so).
2. Select Device Settings > Port Configuration.
The Port Configuration page opens.
3. Click on the Port Name for the desired target
server. The Port Page opens.
4. Type a name (up to 32 alphanumeric and
special characters).
5. Click
OK.
6. Repeat for all target servers.
Switching between Target Servers
Dominion KSX II provides the ability to switch from one target server to
another. This feature is available in the Dominion KSX II Remote Con-
sole and MPC.
1. While already using a target server, access the Dominion KSX II
Port Access page.
2. Click the Port Name of the target you want to access now. The Port
Action menu is displayed.
3. Select the Switch From option from the Port Action Menu. The Vir-
tual KVM Client window opens to the new target server selected.
Disconnecting a Target Server
1. From the Port Access page, click the Port Name of the target you
are accessing. The Port Action menu is displayed.
2. Click Disconnect from the Port Action menu.
VIII. For Additional Information
Contact Raritan Technical Support by telephone (732) 764-8886, fax
(732) 764-8887, or email [email protected], Monday through Friday 8:00
AM to 8:00 PM Eastern Time. For more information about the Dominion
KSX II and the entire Raritan product line, refer to the Raritan User
Manuals & Quick Setup Guides CD ROM or Raritan’s Website http://
www.raritan.com/support/productdocumentation.
V. Create Users and Groups
User Groups are used with local and remote authentication (via RA-
DIUS or LDAP). It is a good idea to define User Groups before creat-
ing individual users, because when you add a user, you must assign
that user to an existing user group.
VI. Launching the KSX II Remote Console
1. Log on to any workstation with network connectivity to your Do-
minion KSX II unit and Java Runtime Environment v1.4.2_2 or
higher installed (JRE is available at http://java.sun.com/). JRE
version 1.5 is recommended for optimum performance; version
1.6 is also supported but has not been fully tested.
2. Launch a supported web browser such as Internet Explorer (IE) or
Firefox.
3. Type the IP address that you assigned to your Dominion KSX II
unit. The default IP address is https://192.168.0.192. The login
page opens.
4. Type your username and password. The default username is
admin and the default password is raritan.
5. Click
Login.
Connecting to a Target
1. From the Port Access page, click the Port Name of the KVM target
you want to access. The Port Action Menu is displayed.
2. Select Connect from the Port Action menu. A Virtual KVM Client
window opens to the target server connected to that port.
VII. Access and Control Targets Remotely
The Dominion KSX II Port Access page provides a list of all Dominion
KSX II ports, the connected target servers, their status,
and availability.
January 2008


