8
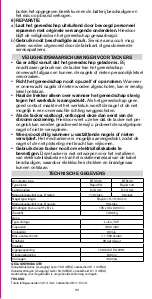
Type, Voltage
Li-Ion, 7.2 V
Capacity
1300 mAh
Charging time
90 minutes
Shots per charge, max
≈ 1500 shots
Stapling speed, max continuous
20 shots/minute
Charger
Input
100-240V, 50-60Hz
Output
8.4V DC
Current
1000 mA
NOISE EMISSION
A-weighted sound pressure level LpA=79.3 dB(A), uncertainty K=3 dB(A)
A-weighted sound power level LwA=90.3 dB(A), uncertainty K=3 dB(A)
Recommendation for the operator to wear hearing protection.
VIBRATION
Vibration total value=1.214 m/s2 , uncertainty K=1.5 m/s2
The declared vibration total value has been measured in accordance with a standard test method and
may be used for comparing one tool with another.
The declared vibration total value may also be used in a preliminary assessment of exposure.
WARNING
The vibration emission during actual use of the power tool can differ from the declared total
value depending on the ways in which the tool is used.
It’s needed to identify safety measures to protect the operator that are based on an estimation
of exposure in the actual conditions of use (taking account of all parts of the operating cycle
such as the times when the tool is switched off and when it is running idle in addition to the trigger
time).
ASSEMBLY
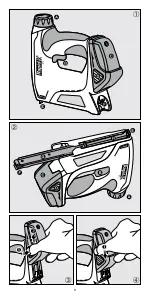
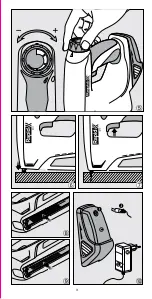
DEFINITIONS (Figure 1, 2 and 10)
: Power adjustment knob
: Trigger
: Battery pack
: Unlocking buttons
: Safety yoke
: Magazine latch
: Rail
: Magazine
: Socket
: Charging point
: Charger
: LED
REMOVAL AND CONNECTION OF THE BATTERY
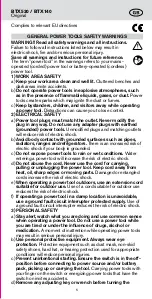
1. To remove the battery , press the unlocking buttons and slide the battery out of the machine
(Figure 3).
2. To connect the battery; slide it in the other direction until the connection clicks (Figure 4).
LOAD STAPLES/BRADS INTO THE MAGAZINE
1. Press the magazine latch to unlock it from the tacker body.
2. Slide the rail backwards.
3. Insert staples/brads strip as shown in figure 8 and 9.
4. Close the magazine by pushing the rail frontward until locking.
REMOVE STAPLES/BRADS FROM THE MAGAZINE
1. Press the magazine latch to unlock it from the tacker body.
2. Slide the rail backwards.
3. Remove the staples/brads from the magazine.
4. Close the magazine.
OPERATION
STAPLING/NAILING
1. Make sure the tool is in good working condition.
2. Turn the power adjustment knob to adjust the penetration depth of staples/brads to your need
(Figure 5).
3. Firmly press the safety yoke against the work piece until it is pushed in a few millimeters (Figure
6).
4. Briefly press the trigger and then release again (Figure 7).
5. Trigger is locked as long as you do not press safety yoke against the work piece, thus preventing
accidental operation.
OPERATING INSTRUCTIONS OF CHARGER
Do not use the tool whilst charging process.
1. Remove the battery out of the tool.
2. Connect the charging point of the charger into the socket of the battery (Figure 10).
3. Connect the charger to the mains.
→
The LED on the charger will turn red during the charge
(Figure 10).
4. When the battery is fully charged, the LED of the charger will turn green (Figure 10).
5. Disconnect the plug out of the socket and unplug the charger from the mains.
Charge only at ambient temperature between 10°C and 50°C.
During the process of charging, the charger can become warm: this is normal.
Do not store the battery in locations where the temperature may exceed 50°C.
NOTE: For better performance press the tool against the work piece.
NOTE: In case of a jammed staple or brad, read the maintenance section.
DO NOT re-fire the tool
in order to clear the jam as this may damage the tool.
Summary of Contents for BTX530
Page 2: ...2...
Page 3: ...3...
Page 64: ...64 BTX530 BTX140 1 a 2 a...
Page 65: ...65 3 a 4 a...
Page 66: ...66 5 a...
Page 103: ...103 1 2 e 3...
Page 104: ...104 off 4...
Page 105: ...105 5 130 C 265 F 6...
Page 123: ...123 EU 1 2 BTX530 BTX140...
Page 124: ...124 GFCI GFCI 3 4...
Page 125: ...125 5...
Page 126: ...126 130 C 265 F 6 BTX530 BTX140 Rapid 53 Rapid 140 6 14 mm 6 14 mm 112 66 Rapid T8 15 30 mm 66...
Page 128: ...128 10 5 10 C 50 C 50 C 1 2 3 4 5 6 7 1 2 3 4 Rapid 2012 19...
Page 129: ...129...
Page 130: ...130...
Page 131: ...131...


