Rangemaster RSXS21 User Manual & Installation & Service Instructions Download Page 3

1

• 

Before you plug the appliance into the 

mains, clean the inside of the appliance 

using warm water and bicarbonate of soda, 

then dry thoroughly.

• 

Check that no parts of the appliance are 

damaged, especially parts of the cooling 

system, pipes or leads. If damage has 

occurred, 

DO NOT

 install the appliance; 

you should contact a qualified service 

engineer or return the appliance to its 

place of purchase.

• 

If the accessories inside the appliance have 

been disturbed during transit, reposition 

them in accordance with the instructions.

• 

Make sure that the electrical supply to your 

plug socket is correct for this appliance 

– the required information is on the data 

badge of the appliance.

• 

Once the appliance is installed, cleaned 

and dry, it is ready to be plugged in and 

switched on.

Safety


n

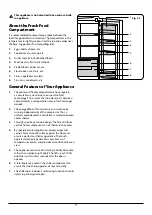
The data badge is located inside the 

appliance (refrigeration compartment).


n

WARNING: Use potable (drinking) water 

with this appliance.


n

WARNING: Keep this appliance clear of 

any obstruction.


n

DO NOT damage the refrigerant circuit. 

If it does become damaged, DO NOT use 

the appliance.


n

WARNING: DO NOT use mechanical 

devices (such as hairdryers) to defrost 

this appliance.


n

If your appliance uses R600a as a 

refrigerant (this information will be 

provided on the label of the cooler) you 

should take care during transportation 

and installation to prevent the cooler 

elements from being damaged. R600a is 

an environmentally friendly and natural 

Icon

Type

Meaning

WARNING

Serious injury or death risk

Dangerous voltage risk

FIRE

Fire risk

CAUTION

Injury or property damage risk

IMPORTANT

Operating the system correctly

RISK OF ELECTRIC 

SHOCK

1.  Before You Start

Thank you for buying this appliance. We hope 

that it provides a stylish yet practical solution 

to your cooling needs. We hope that this 

handbook supplies you with all the information 

you require. If there is anything you are unsure 

of please contact us (see ‘Warranty’ section for 

Customer Care’s details).


n

WARNING: This appliance must be 

earthed.


n

Please leave the appliance to stand 

for at least six hours. This will allow 

the cooling system to settle following 

transportation.


n

Always make sure a qualified person 

installs this appliance.


n

This appliance is designed for domestic 

use only. Using it for any other purpose 

could invalidate any warranty or liability 

claim.


n

Children aged from 3 to 8 years are 

allowed to load and unload refrigerating 

appliances. Children are not expected to 

perform cleaning or user maintenance 

of the appliance, very young children 

(0-3 years old) are not expected to 

use appliances, young children (3-8 

years old) are not expected to use 

appliances safely unless continuous 

supervision is given, older children (8-

14 years old) and vulnerable people can 

use appliances safely after they have 

been given appropriate supervision 

or instruction concerning use of the 

appliance. Very vulnerable people are 

not expected to use appliances safely 

unless continuous supervision is given.

Summary of Contents for RSXS21

Page 1: ...Fridge Freezer RSXS21 User Guide Installation Service Instructions Due to our policy of continual improvement we reserve the right to change specifications without prior notice U111351 03A...

Page 2: ...11 Touch Display Prevention Safe Mode 12 Operating Your Fridge Freezer 12 4 Food Storage Tips 19 Food storage 19 Tips on Storing Fresh Food 20 Tips on Freezing Food 21 5 Food Storage Table 22 6 Cleani...

Page 3: ...0a is an environmentally friendly and natural Icon Type Meaning WARNING Serious injury or death risk Dangerous voltage risk FIRE Fire risk CAUTION Injury or property damage risk IMPORTANT Operating th...

Page 4: ...crape ice off the surface of this appliance Only use implements which are fit for this purpose such as plastic scrapers and use carefully to avoid damaging the lining of the appliance The cooling syst...

Page 5: ...order to avoid a hazard This appliance is not intended for use at altitudes exceeding 2000 m Electrical Safety n WARNING When positioning the appliance ensure the supply cord is not trapped or damaged...

Page 6: ...ArtNo 000 0019 Do not bin logo Packaging materials protect your machine from damage that may occur during transportation The packaging materials are environmentally friendly as they are recyclable Th...

Page 7: ...ect your fridge freezer to the mains electricity supply using an extension lead Do not use damaged torn or old plugs Do not pull bend or damage the cord Do not use plug adapter This appliance is desig...

Page 8: ...basket 10 Freezer bottom basket 11 Adjustable Feet 12 Even Circ 13 Ionizer 11 A 2 4 4 1 4 4 6 9 10 7 5 7 8 3 3 10 9 B 13 12 2 About Your Refrigerator Fig 2 1 Features include Touch Screen Electronic D...

Page 9: ...n compartments and vegetables remain fresh for longer periods 2 The energy efficient fan maintains air circulation by running independently of the compressor Thus a uniform and balanced air circulatio...

Page 10: ...nology Fig 2 3 No frost refrigerators have a different operating system to static refrigerators In normal static fridges the humidity entering the fridge due to opening the door and the humidity inher...

Page 11: ...urally occurring problem Ionizer Fig 2 7 Ionizer spreads negative ions which neutralize particles of unpleasant smell and dust in the air By removing these particles from the air in the refrigerator I...

Page 12: ...d in the deep freeze compartment until it has completely cooled It will thaw already frozen food which may then rot When purchasing frozen food make sure it has been stored under appropriate condition...

Page 13: ...ay mode 10 Night sensor 11 Child lock 12 Low voltage warning 13 Alarm 14 Screensaver button 15 Zone 2 right freezer button 16 Mode button 17 Cooler button 18 qdrink mode button 19 Zone 1 left freezer...

Page 14: ...mpartments For example the time may initially be set for 5 minutes If your drinks have not cooled sufficiently after this time you may set a further 5 or 10 minutes cooling time n While this mode is a...

Page 15: ...temperature n For super freezing zone1 compartment should be selected preferably SC SUPER COOL Fridge compartment Purpose To cool and store a large quantity of food in the fridge compartment To quickl...

Page 16: ...eensaver mode will switch on after 10 seconds When the screensaver is active only the s saver icon is illuminated To activate Fig 3 8 the screensaver press and hold the s saver button for 3 seconds A...

Page 17: ...iday activate holiday mode To activate holiday mode press the mode button until the holiday mode symbol and H are illuminated Holiday mode will be active for these configurations Table 3 1 WHILST IN H...

Page 18: ...at required storage temperature To set the chiller to freezer To use the zone 1 compartment as a freezer press the zone1 button for 3 seconds to set the temperature of the bottom left compartment to 1...

Page 19: ...ymbol will be displayed To deactivate Fig 3 14 the child lock press and hold the cooler and zone 2 buttons simultaneously for 5 seconds Alarm n If an alarm light illuminates you must contact an author...

Page 20: ...larly in order to utilize any of bottom compartments used as cooler as freezers again press and hold the related compartment button for 3 seconds n IMPORTANT If the Zone1 compartment will be converted...

Page 21: ...hould package meat products and clean any leakages on the shelves Do not put food in front of the air flow passage Consume packaged foods before the recommended expiry date NOTE Potatoes onions and ga...

Page 22: ...extends food life Some foods like onions garlic bananas and root vegetables are better stored at room temperature than in the fridge Melon pineapples and bananas can go directly into the freezer after...

Page 23: ...fe to eat Take food from the freezer to defrost when needed Defrosted food cannot be refrozen unless it is cooked Do not put too much fresh food into the freezer at once This could go beyond the freez...

Page 24: ...ve the leaves cut the heart into pieces and leave it in water with a little lemon juice for a while 10 12 Eggplant Aubergine Cut into pieces of 2cm after washing 10 12 Corn Clean and pack with its ste...

Page 25: ...3 4 5 8 190 200 C Phyllo dough 2 3 1 1 5 5 8 190 200 C Pizza 2 3 2 4 15 20 200 C Dairy products Preparation Maximum storage time months Storage conditions Packet Homogenized Milk In its own packet 2 3...

Page 26: ...amp housing and other electrical components The appliance should be cleaned regularly using a solution of bicarbonate of soda and lukewarm water Clean the accessories separately by hand with soap and...

Page 27: ...you are experiencing a problem with your appliance please check the following before contacing the after sales service Your appliance does not operate Check if There is power The plug is connected to...

Page 28: ...of the appliance will result in a waste of energy 4 Drinks or other liquides should be covered when inside the appliance If left uncovered the humidity inside the appliance will increase therefore th...

Page 29: ...ns and heater cores and at least 5 cm away from electrical ovens If your fridge freezer is placed next to a deep freezer there must be at least 2 cm between them to prevent humidity forming on the out...

Page 30: ...28 Door removal and access...

Page 31: ...29...

Page 32: ...30...

Page 33: ...31...

Page 34: ...32...

Page 35: ...33...

Page 36: ...e ventilation clearance of at least 100 mm is required at the top of your appliance The distance between the appliance and back wall must be a minimum of 50 mm Fig 8 1 Any units placed above the appli...

Page 37: ...ot connect your fridge freezer to the mains electricity supply using an extension lead Do not use damaged torn or old plugs Do not pull bend or damage the cord This appliance is designed for use by ad...

Page 38: ...e to cover left middle and bottom See step 2 Starting on the right hand side use a screwdriver to gently remove from the white bracket Gently release from the middle bracket Then again gently release...

Page 39: ...3 Step 4 Check the kick plate brackets are not damaged If damaged replace with new ones Starting from the left secure the kick plate to the bracket Ensure the fixings are aligned Step 2 Assembly of t...

Page 40: ...INBOARD 8 7 6 5 4 3 2 1 10 9 8 7 6 5 4 3 2 1 PL509 DOOR HANDLE LED REFRIGERATOR LED LEFT INDOOR RIGHT INDOOR LED DEFROST 1 SENSOR COOLER SENSOR SERPANTIN SENSOR DOOR SWITCH 4 DOOR SWITCH 3 DOOR SWITCH...

Page 41: ...you find on the rating plate of the appliance See the link www theenergylabel eu for detailed information about the energy label INFORMATION FOR TEST INSTITUTES Appliance for any EcoDesign verificati...

Page 42: ...40 910 1850 1019 758 750 800 7 1136 5 1625 1 1157 8 140o 120 o 140o 120 o...

Page 43: ...l Recommended temperature setting for optimised food storage C These settings shall not contradict the storage conditions set out in Annex IV Table 3 Freezing capacity kg 24 h Defrosting type auto def...

Page 44: ...l Recommended temperature setting for optimised food storage C These settings shall not contradict the storage conditions set out in Annex IV Table 3 Freezing capacity kg 24 h Defrosting type auto def...

Page 45: ...l Recommended temperature setting for optimised food storage C These settings shall not contradict the storage conditions set out in Annex IV Table 3 Freezing capacity kg 24 h Defrosting type auto def...

Page 46: ...l Recommended temperature setting for optimised food storage C These settings shall not contradict the storage conditions set out in Annex IV Table 3 Freezing capacity kg 24 h Defrosting type auto def...

Page 47: ...arted from the date of purchase of this product Any cosmetic damage to the appliance must be reported within 30 days of delivery Please note that AGA Rangemaster Limited have appointed Pacifica to adm...

Page 48: ...Clarence Street Royal Leamington Spa Warwickshire CV31 2AD England...

Reviews: