background image

18

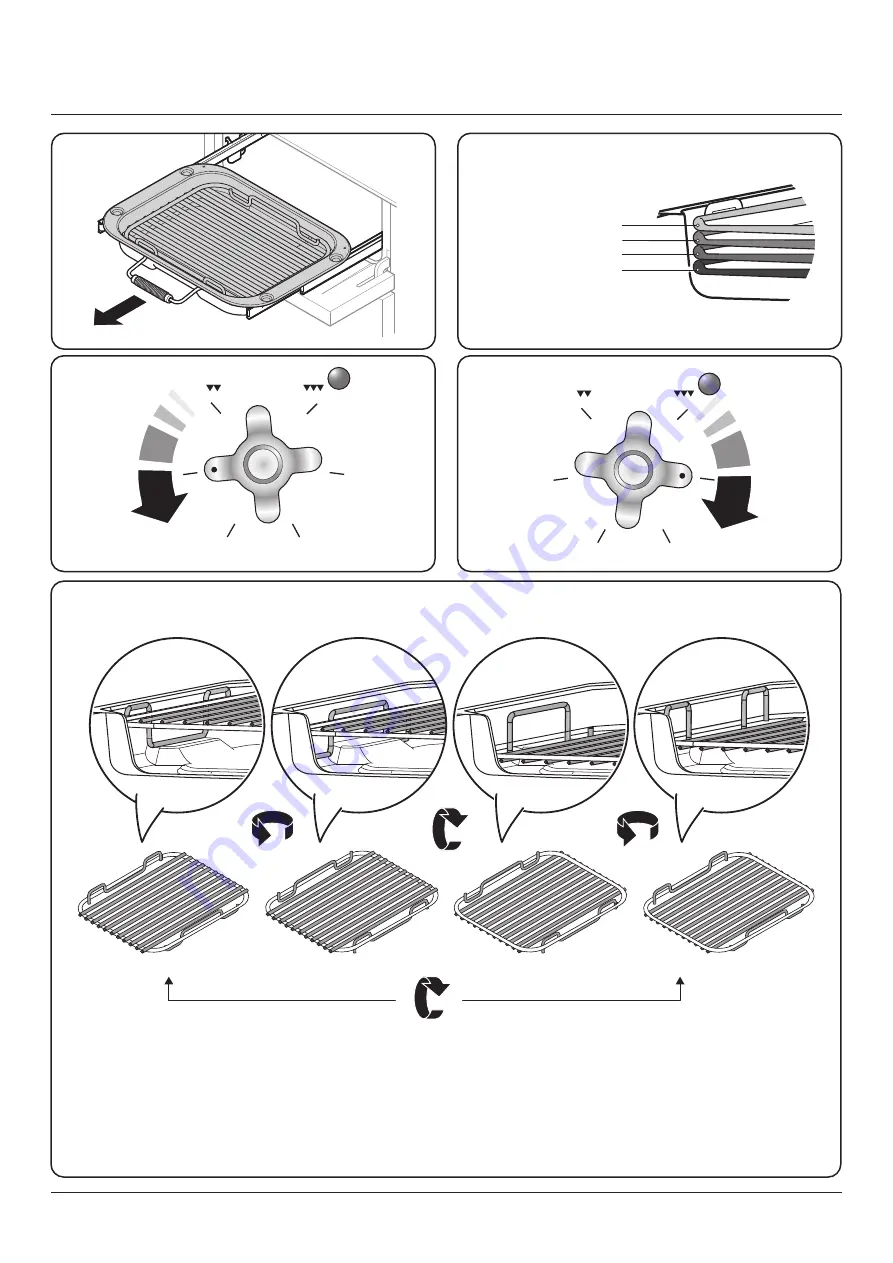
Nearest to the element

Middle High

Middle Low

Furthest from the element

3.  Using the Glide-out Grill™

180o

180o

180o

180o

Nearest to the element

Middle Low

Middle High

Furthest from the element

Four grill height positions

Four grill height positions


refer to 

Fig. 3.5

0

1

2

3

3

2

1

To switch on both elements

Fig. 3.1 

Fig. 3.2 

0

1

2

3

3

2

1

To switch on the right half element

Fig. 3.3 

Fig. 3.4 

Fig. 3.5 

Cooking suggestions 
1. 

Nearest to the element – Toast, streaky bacon.

2. 

Middle high – cheese on toast, welsh rarebit, courgette slices, back bacon. 

3. 

Middle low – fish fillets, vegetable skewers. 

4. 

Furthest from the element – whole fish, thick pork chops, chicken breasts, chicken or beef skewers.

NOTE: 

A short term cooking process has to be supervised continously.

DocAUS.020-0004 - Overview - 110DF - Elan

Summary of Contents for Elise 110 Induction

Page 1: ...Elise 110 Induction U110983 05 USER GUIDE INSTALLATION INSTRUCTIONS...

Page 2: ...acted via e mail Facebook Twitter message or Instagram comment 4 We cannot guarantee your kitchen will be professionally photographed 4 Any photographs received and professional photographs taken will...

Page 3: ...s 14 Operating the Ovens 14 Multi function Oven Functions 15 Accessories 16 Telescopic Oven Shelf right hand oven 17 3 Using the Glide out Grill 18 4 Cooking Tips 19 5 Cooking Table 20 6 Cleaning your...

Page 4: ...ii...

Page 5: ...ng Care should be taken to avoid touching heating elements Children less than 8 years of age shall be kept away unless continuously supervised CAUTION A long term cooking process has to be supervised...

Page 6: ...e rating T105 Read the instructions before installing or using this appliance This appliance is heavy so take care when moving it The cable size and type should be suitable for the Electrical Load of...

Page 7: ...pen or install a powered cooker hood that vents outside Prolonged intensive use of the appliance may call for additional ventilation for example opening a window or more effective ventilation for exam...

Page 8: ...of the surface unit to direct contact and may result in the ignition of clothing make sure that you position the handles away from the edge of the hotplate NEVER leave the hotplate unattended at high...

Page 9: ...ceramic surface is very strong a sharp blow or sharp falling object e g a salt cellar might cause the surface to crack or break Fig 1 5 WARNING Should a crack appear in the surface disconnect the app...

Page 10: ...d clean the hob with caution as some cleaners can produce noxious fumes if applied to a hot surface DO NOT leave the hob unattended Care should be taken to not allow your cookware to boil dry It will...

Page 11: ...n is already warm DO NOT place warm food in the oven to be timed DO NOT use a timed oven that is already warm Use dry oven gloves when applicable using damp gloves might result in steam burns when you...

Page 12: ...pplied to a hot surface NEVER use paint solvents washing soda caustic cleaners biological powders bleach chlorine based bleach cleaners coarse abrasives or salt DO NOT mix different cleaning products...

Page 13: ...se and the quantity of food affects the setting required Higher settings are required for larger quantities of food Pots and pans should have thick smooth flat bottoms Fig 2 2 This allows the maximum...

Page 14: ...uction hob functions Pan detector H Residual heat indicator Child lock L1 L2 L3 Low temperature setting P Power boost setting Pan Detector n IMPORTANT After use switch off the hob element by its contr...

Page 15: ...tain a temperature of about 94 C ideal for simmering bring the pan to the boil and then select L3 to keep soups sauces stews etc at an optimal simmer The maximum time this setting can be used is 2 hou...

Page 16: ...A and B can be bridged creating an area ideal for use with an induction griddle supplied Note The griddle should comprise of an induction friendly flat bottom large enough to cover zones A and B of t...

Page 17: ...n please ensure that the grill pan and cradle are fully returned into the grill chamber The grill pan door MUST remain open n Accessible parts may be hot when the broiler is in use Young children shou...

Page 18: ...ed cooking temperatures for a fan oven are generally lower than those for a non fan oven Operating the Ovens Multi function Oven The multi function oven has two controls a function selector and a temp...

Page 19: ...e top and base elements It is particularly suitable for roasting and baking pastry cakes and biscuits Food cooked on the top shelf will brown and crisp faster than on the lower shelf because the heat...

Page 20: ...od cooking on it is easy to attend to because it is accessible when the door is open The maximum weight that can be held by the Handyrack is 5 5kg 12lb It should only be used with the supplied roastin...

Page 21: ...acket To remove the glide out runners Twist to unclip the base of the runners from the shelf supports Then unhook the runner from the top rung of the shelf support and remove Fig 2 27 To refit the gli...

Page 22: ...ch on both elements Fig 3 1 Fig 3 2 0 1 2 3 3 2 1 To switch on the right half element Fig 3 3 Fig 3 4 Fig 3 5 Cooking suggestions 1 Nearest to the element Toast streaky bacon 2 Middle high cheese on t...

Page 23: ...be pushed firmly to the back of the oven Baking trays with food cooking on them should be placed level with the front edge of the oven s wire shelves Other containers should be placed centrally Keep a...

Page 24: ...0 C 150 C for remainder Do not forget to include the weight of the stuffing For fresh or frozen pre packed poultry follow instructions on the pack Thoroughly thaw frozen poultry before cooking Cassero...

Page 25: ...unding the hot zone with a clean paper towel If a spill other than a sugary substance is on the hot zone do not clean until the unit has completely cooled down and then follow the instructions below C...

Page 26: ...l chamber sides Fig 6 4 and wipe the sides clean with a soft cloth and mild detergent n DO NOT put the side runners in a dishwasher Once you have finished hook the side rails back onto the sides of th...

Page 27: ...ove the cooker forward to gain access to the sides see the Moving the Cooker section under Installation Cook Clean Panels The ovens have side Cook Clean panels which have been coated with a special en...

Page 28: ...et Sides and plinth Painted surface Hot soapy water soft cloth Splashback rear grille Enamel or stainless steel Hot soapy water soft cloth Cream cleaner with care if necessary Control panel Paint enam...

Page 29: ...ooling fan This cooling fan is active when either the grill or the oven s are on Under certain conditions the cooling fan may remain active when the grill or oven s are switched off This is normal and...

Page 30: ...The oven is not cooking evenly Do not use a baking tray with dimensions larger than those specified in the section on General Oven Tips If you are cooking a large item be prepared to turn it round dur...

Page 31: ...other purpose could invalidate any warranty or liability claim Provision of ventilation This appliance is not connected to a combustion products evacuation device Particular attention shall be given...

Page 32: ...al height of the flue trim which is fitted to the cooker hob Surfaces of furniture and walls at the sides and rear of the appliance should be heat splash and steam resistant Certain types of vinyl or...

Page 33: ...ing the cooker around To help you there are two levelling rollers at the back and two screw down levelling feet at the front Remove the polystyrene base pack From the front tilt the cooker backwards a...

Page 34: ...gripping under the fascia panel and lifting the front of the cooker slightly Fig 8 6 Check behind the cooker to make sure that the electricity cable is not caught As you progress always make sure that...

Page 35: ...incorporating a double pole switch having a contact separation of at least 3mm in all poles n The cooker MUST NOT be connected to an ordinary domestic power point Access to the mains terminal is gaine...

Page 36: ...tighten the one retaining screws in the bottom to secure Fig 9 2 Fitting the Plinth Remove the three screws for the plinth mounts along the front bottom edge of the cooker Fig 9 3 Fasten the plinth us...

Page 37: ...ION UNIT HOB DISPLAY Earth N 6 N 4 L 2 L 3 On Terminal Block On Terminal Block On Terminal Block w br w br w br w br w br Code Colour w br White or brown Code Description 1 Left hand front element 2 L...

Page 38: ...ent positions viewed from the front of the cooker Code Description X01 Grill Front Switch X02 Grill Energy Regulator X03 Left Hand Grill Element X04 Right Hand Grill Element X05 Left Hand Oven Thermos...

Page 39: ...650mm Refer to Positioning the Cooker Ratings Max 1 85 kW Boost 2 5 kW Max 1 85 kW Boost 3 2 kW Max 1 85 kW Boost 2 5 kW Max 1 85 kW Boost 2 5 kW Max 1 15 kW Boost 2 0 kW Zone 2 Zone 1 Zone 3 Zone 4 Z...

Page 40: ...36 1092 650 DEPTH INCLUDING HANDLES 600 DEPTH EXCLUDING HANDLES 650 DEPTH INCLUDING HANDLES 600 DEPTH EXCLUDING HANDLES...

Page 41: ...y Consumption ECElectric cooking Wh kg 176 Zone 3 cm 21 Heating Technology Energy Consumption ECElectric cooking Wh kg 180 Zone 4 cm 18 Heating Technology Energy Consumption ECElectric cooking Wh kg 1...

Page 42: ...ght hand Efficiency Fuel type Electric Cavity type Fanned Power conventional kW Power forced air convection kW 2 5 Volume Litres 79 Energy consumption electricity conventional kWh cycle Energy consump...

Page 43: ...by persons or organisations other than those authorised to act on behalf of AGA Rangemaster Exceptions Items not included under the free 1 year guarantee include pan supports griddles wok rings bakin...

Page 44: ...cular appliance Clarence Street Royal Leamington Spa Warwickshire CV31 2AD England Consumer Services 44 0 1926 457628 Fax 44 0 1926 450526 E mail consumers agarangemaster co uk www rangemaster co uk F...

Reviews: