Rane SL3 Operator'S Manual Download Page 13

RANE SL4 FOR SERATO SCRATCH LIVE • OPERATOR’S MANUAL 2.4.4

13

Virtual Deck

The Virtual Deck 
shows everything 
about the speed 
and position of 
a track. As the 
vinyl rotates, so 
does the line on 
the label. The 
circular progress bar around the edge 
is a visual representation of the position 
within the song, and can be set to flash 
to warn you that the track is nearing its 
end. The time and remaining time are 
displayed in minutes and seconds. The 
pitched BPM (BPM with pitch adjustment 
multiplier added) is shown on the left of 
the Virtual Deck, and the turntable speed 
as a percentage pitch shift is shown on 
the right of the Virtual Deck. If the track 
has no BPM information, pitched BPM will 
not be shown.
  If you are playing regular vinyl, notice 
the Virtual Deck behaving strangely as 
Scratch Live attempts to decode the 
incoming signal. This will not cause any 
problems, but you may find it distracting. 
You can unload the currently loaded track 
using the Virtual Deck eject button.

TIP: Use the keyboard shortcut shift-
alt-arrow to unload a track from the 
Virtual Deck.

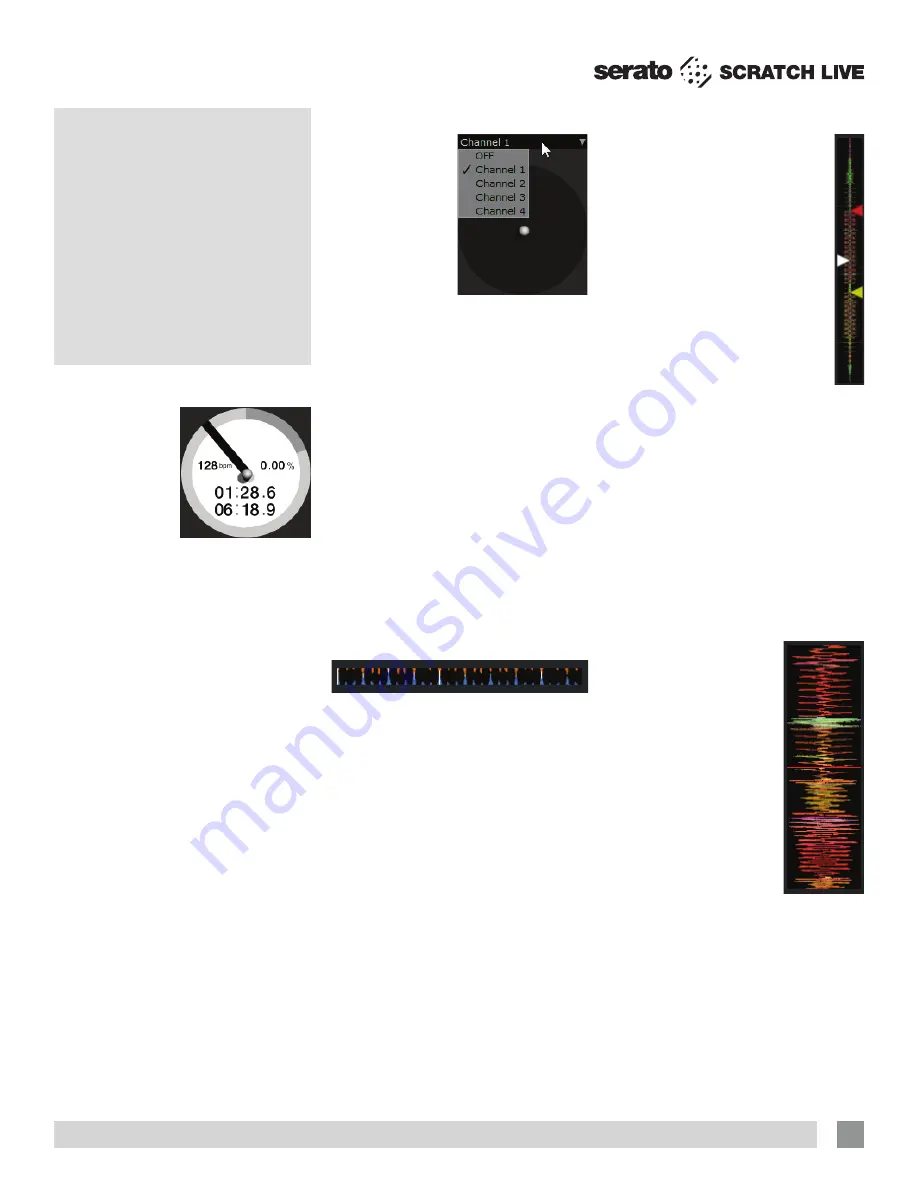
USB Sources & Analog Inputs

Each Virtual Deck 
in Scratch Live 
has a unique input 
/ output source, 
which you can 
change to suit the 
layout of your DJ 
setup.
  To set a USB 
Source in Scratch 
Live, click the USB Source dropdown box 
above the Virtual Deck.
  E.g: If a Virtual Deck has “Channel 1” 
selected, this means it is controlled by the 
turntable / CDJ plugged into Input 1 on 
the SL4, and the audio from Scratch Live 
will be sent to Output 1. The same applies 
to the other channels: 2, 3, and 4.
  You may want to change your display 
to 4-Deck Stack Mode to assign all the 
Decks at once. 

See “Display Modes” on 

page 15.

Visual Aids

When the track is playing several 
waveforms are displayed. Each shows a 
different aspect of the track being played.

Tempo Matching Display

The Tempo Matching display area 
provides a helpful tool for beat matching. 
Scratch Live detects the beats within the 
track, and places a row of orange peaks 
(for the track on the left side) above a 
row of blue peaks (for the track on the 
right side) in the Tempo Matching display 
area. When the two tracks are matched 
to the same tempo, the peaks will line 
up. The tempo display is aligned with the 
beginning of the bar, so the peaks keep 
their relative position as the track plays. 
This display does not show the relative 
timing of the beats, only the tempos of the 
tracks. The peaks will still line up when the 
tracks are playing at the same tempo, but 
are out of sync.

Main Screen 

Overview

Track Overview Display

This view provides a complete 
overview of the track waveform, 
and includes a marker to show 
the current position within the 
track. This view is useful for 
finding transitions within the 
track. The waveform is colored 
according to the sound spectrum 
– red representing low frequency 
bass sounds, green representing 
mid frequency sounds and blue 
representing high frequency treble 
sounds.
  You can jump to different 
positions within the track by clicking 
on the Track Overview display (disabled 
in ABS Mode). Grey lines behind the 
overview show the length of the track – a 
thin grey line every minute, and a thick 
grey line every 5 minutes. The overview 
will be filled when you load the track onto 
a Virtual Deck. On slower computers, 
you should disable 

Autofill overviews

 in 

the Library tab of the Setup screen. 

See 

“Preparing Your Files” on page 11 
and “AutoFill Overviews” on page 34.

Main Waveform Display

This view provides a close-
up of the track, including 
color coding to show the 
frequency of the sound; red 
representing low frequency 
bass, green representing 
mid-frequencies and blue 
representing high-frequency 
treble sounds. You can 
also switch to a three-band 
spectrum view by holding 
the ctrl key and clicking 
on the waveform. Click on 
the waveform to ‘scrub’ 
or make fine adjustments 
to your position within the track. This 
applies to INT Mode only, and may be 
useful if you wish to set cue points in 
your tracks without your turntables or CD 
players connected. The Main Waveform is 
zoomed around the current position in the 
track. 

See “Cue Points” on page 18 

and “Scratch Live Modes” on page 
16.

Summary of Contents for SL3

Page 1: ...2 COMPUTERS AND 4 DECKS USING YOUR FAVORITE MIXER RANE SL4 FOR SERATO SCRATCH LIVE OPERATOR S MANUAL 2 4 4 ...

Page 2: ...sidential installation This equipment generates uses and can radiate radio frequency energy and if not installed and used in accordance with the instructions may cause harmful interference to radio communications However there is no guarantee that interference will not occur in a particular installation If this equipment does cause harmful interference to radio or television reception which can be...

Page 3: ...l Copyright Notices 2013 Rane Corporation All rights reserved Scratch Live and the Scratch Live logo are trademarks of Serato Trademarked in the U S and other countries Licensed exclusively to Rane Corporation This software is based in part on the work of the Independent JPEG Group and uses libpng code copyright 2000 2002 Glenn Randers Pehrson The Scratch Live Control Tone the audio pressed on Scr...

Page 4: ... The Control Record 12 The Control CD 12 Vinyl Scroll 12 Set Auto BPM 12 The Offline Player 12 Main Screen Overview 13 Virtual Deck 13 USB Sources Analog Inputs 13 Visual Aids 13 Tempo Matching Display 13 Track Overview Display 13 Main Waveform Display 13 Beat Matching Display 14 Master Gain 14 33 45 Speeds 14 Tracking Indicator 14 Tap Tempo 14 Key Lock 14 Repeat 14 Censor 14 Eject 14 Autoplay 14 ...

Page 5: ...ratch Live Backup 28 Recording 29 Record Gain Knob 29 Sampling From Vinyl 29 Recording Your Mix 29 Recording Bit Depth 29 LiveFeed 30 Mixing With One Turntable Or CD Player 30 Two Computer Connection 31 Additional Setup 31 Hardware 32 USB Buffer Size Latency 32 Select Primary Decks 32 Flashing Deck Indicator 32 Recording Bit Depth 32 Updating Firmware 32 Sample Rate 32 Hardware Thrus 32 Playback 3...

Page 6: ...using Scratch Live Make sure you have good connections from the ground wires of your turntables to the grounding post of either your SL 4 or your mixer If you do not ground your turntables properly the control signal will be noisy and the tracking of the record position will be erratic 3 Ensure the SL4 is set to receive a phono level signal See step 2 of connecting the SL4 CD Player Setup Disable ...

Page 7: ...e a plug PUSH the button while turning the outer rim counterclockwise To attach a plug rotate it to fit into the supply and turn clockwise until it locks in place The power supply is regulated 7 5 volts DC 1 amp using a P6 type barrel plug Any substitute must meet these specifications 5 5mm 2 5mm USB Drivers The SL4 is a dual personality device When using Serato Scratch Live proprietary Serato Aud...

Page 8: ... Programs Serato Scratch Live Because the SL4 was connected prior to installing Scratch Live no extra hardware installation is required Additional Windows ASIO Drivers Once Scratch Live is installed any additional hardware that is connected will be recognized and the drivers will be automatically installed Starting Scratch Live Close all other programs on your Mac or PC When you load Scratch Live ...

Page 9: ...here on the record the needle is currently The Noise Threshold A threshold is a lower limit below which a process will not occur In the case of Scratch Live the noise threshold is the limit below which the input signal will not be interpreted as control signal in other words if it s below the threshold it is considered noise and ignored This setting is necessary because a stylus is very sensitive ...

Page 10: ...ng posts Next make sure that the SL4 isn t sitting next to a power source such as a power strip or power box and that the RCA cables connected to the SL4 aren t laying across other power conducting cables If you are still experiencing issues you might have to adjust the placement of your setup For example make sure bass bins aren t directly under the turntables for more calibration troubleshooting...

Page 11: ...your library to detect file corruption saves the waveform overview to an ID3 tag and calculates auto gain and BPM values How to Analyze Files To analyze files run Scratch Live with the SL4 disconnected On the left side of the main screen click the Analyze Files button to automatically build overviews for all the tracks in your library TIP You can drag and drop individual folders crates or files on...

Page 12: ...s 15 minutes long Scratch Live can be configured to work with records playing at either 33 RPM or 45 RPM depending on your preference The record has thin marks every minute and a thicker mark every 5 minutes when playing at 33 RPM These marks are to assist you when using needle dropping to move through the track These marks do not affect the playback of the track The mode will switch when it reach...

Page 13: ...w of orange peaks for the track on the left side above a row of blue peaks for the track on the right side in the Tempo Matching display area When the two tracks are matched to the same tempo the peaks will line up The tempo display is aligned with the beginning of the bar so the peaks keep their relative position as the track plays This display does not show the relative timing of the beats only ...

Page 14: ...eck the calibration in the setup screen NOTE It is normal for the tracking indicator to be red when cueing or scratching Tap Tempo For tracks with no BPM information there is a tap tempo button displayed where the BPM usually is in the song info area Pressing alt space bar activates the tempo tapper press alt space bar a second time to activate the tempo tapper on the Right Virtual Deck Tap the sp...

Page 15: ...buttons are located in the top left of the Main Screen The display modes are Library Mode Maximizes your library space by minimizing the Virtual Deck information displayed In Library Mode only the track information Virtual Deck mode track overview display and meter are displayed Use the space bar to toggle between Library Mode and your current display mode Classic Vertical Mode The two Primary Dec...

Page 16: ...ing stops starts scratching needle dropping rubbing and other turntablist techniques When you reach the end of the record using either REL or ABS modes Scratch Live automatically switches to INT mode This is known as Emergency Internal mode and prevents long tracks from stopping when you run out of record You can switch from Emergency Internal mode to ABS mode by lifting the needle and placing it ...

Page 17: ...he slider changes the slider range to 8 10 16 50 or 100 Temporary Cue There is a temporary cue point that can be used like the cue button on many DJ CD players Press ctrl I to set this temporary cue point on the Left Deck and ctrl K to set it on the Right Deck This temp cue point is shown in the main waveform as a white marker This cue point is not saved with the track and by default is set to the...

Page 18: ... Cue Points To change the color of a cue point click on the colored square and choose a new color from the drop down menu To name your cue point double click on the time field You can now edit and name this cue point to whatever you like You can also drag and drop cue points to change their order in the list If you wish to have the cue points sorted by time check Sort cues chronologically in the P...

Page 19: ...s laid out on screen ie if the onscreen buttons display 1 2 4 8 16 beat loops alt 1 triggers a 1 beat loop and alt 5 triggers a 16 beat loop Loop Roll Loop roll performs a standard auto loop but when the loop is turned off the playback position is returned to the position where it would be if it had not entered the loop much like censor The other difference between loop roll and standard auto loop...

Page 20: ...TIP Use the shortcut keys z slot 1 x slot 2 c slot 3 v slot 4 b slot 5 n slot 6 to trigger each sample respectively SP 6 Instant Doubles You can instant double from the Virtual Decks down to the SP 6 from the SP 6 up to the Virtual Decks and also between the sample slots themselves This means the position track gain and speed will match when you drag a track to from one location into another This ...

Page 21: ... slider there is an additional gain knob for each slot These allow you to fine tune the maximum gain volume of the loaded sample The gain adjustment will also be written to the track s ID3 tag meaning that it will be the same everytime you load it SP 6 Output Selector Use the master output selector button to choose where you wish to have the SP 6 output to 1 outputs through channel 1 2 outputs thr...

Page 22: ...ffects slots 1 to 3 meaning that the effected audio from slot 1 passes through slot 2 which is then passed through slot 3 Effects BPM Multiplier The Effects BPM Multiplier is used to adjust the effect time The effect time is set using the track s BPM value but by applying the Effects BPM Multiplier you can increase or decrease the effect time Deck Assign You can select which Deck the FX unit appli...

Page 23: ...hould update to show it has mapped the controls to one another To un assign a MIDI control click on the control in Scratch Live and press return on your computer keyboard While in MIDI assign mode controls which have MIDI inputs assigned show a green box indicator around them NOTE Once in MIDI assign mode Scratch Live controls will no longer respond directly to the mouse If you need to change a co...

Page 24: ...ato com for detailed documentation on how to use these controllers MIDI Devices Any connected MIDI device will be listed within the MIDI Device List in the MIDI panel of the Setup screen You are able to enable or disable any of these devices using the Enable MIDI Device checkbox Technical Information Scratch Live MIDI Control only supports Note On Off Standard 7 bit CC Control Change 14 bit CC RPN...

Page 25: ...es a search function to help you find files quickly and easily Enter text into the search box and Scratch Live will automatically find as you type To select which fields the search function will look through click on the left hand side of the search box The drop down menu shows which fields are currently being used Press esc or the x button on the right of the search box to clear the search TIP Us...

Page 26: ...r favorite vinyl or CDs select the song you want to insert after and click the Insert Track button Double click the inserted track fields and edit your information accordingly When exporting an m3u playlist see exporting below Inserted Tracks will not be present Export You can export each session as a data file using the Export button Select a session then choose your preferred file Format and cli...

Page 27: ... detected some corruption in the MP3 file If possible re encode the MP3 The track has been imported from the iTunes library The track has been imported from the iTunes library and Scratch Live has detected some corruption in the MP3 file Solution If possible re encode the MP3 The track cannot be found Most likely the file has been renamed or moved Tracks that are read only have a locked icon More ...

Page 28: ...brary and your hard drive sending them to the recycle bin use the shortcut ctrl shift delete If you are using iTunes playlists your files cannot be deleted this way You will need to delete them from within iTunes Copy Move Files Folders Scratch Live gives you the ability to copy and move files folders and crates between drives or to a new location on the same drive To copy or move your files and o...

Page 29: ...reen to open the Record controls 2 Choose the Input Source by clicking on the downward arrow icon to get the drop menu 3 Click the red record icon to start recording 4 The record icon flashes while recording and the display shows the elapsed recording time 5 Click the flashing record icon again to stop the recording 6 To save the recording type in a name for the recording and click the save icon 7...

Page 30: ...SB Channel 2 Gated x dB LiveFeed Rane SL4 USB Channel 3 LiveFeed Rane SL4 USB Channel 3 Gated x dB LiveFeed Rane SL4 USB Channel 4 LiveFeed Rane SL4 USB Channel 4 Gated x dB Load the desired LiveFeed file to either Deck The waveforms will start to build in the track overview and main waveform display as the input is recorded you can now use the recording as normal Performing a needle drop on the r...

Page 31: ...omputer to the unused USB port on the SL4 2 a Using four control sources Select a USB Source for a Virtual Deck that is not already being used on the first computer If the first DJ is using all four USB sources politely ask them to free up at least one channel for you to take over See USB Sources Analog Inputs on page 13 2 b Using two control sources Unassign the USB Source for the non playing Vir...

Page 32: ...nt hardware sample rate is displayed here You can choose between 48 kHz and 96 kHz using the Sample Rate Selection switch on the SL4 Setting this to 96 kHz will result in better quality audio although you will need to play 96 kHz audio files NOTE It is recommended on lower spec machines to use 48 kHz as using 96 kHz will put a greater strain on your CPU Hardware Thrus Select which channels are set...

Page 33: ...tion of side A of the control record This setting allows you to adjust the sensitivity of Vinyl Scroll so that you can control the amount of record movement required to move between tracks Drop To Absolute Position REL Mode This detects a deliberate repositioning of the needle and moves the playhead to the needle s absolute position as if it were in ABS mode Accidental skipping of the needle does ...

Page 34: ...for Scratch Live to read it Any changes made in Scratch Live to the file information of tracks in your iTunes library will not appear in iTunes until after you play the track Scratch Live cannot play files that have been protected by Digital Rights Management systems such as those previously sold through the Apple iTunes Music Store iTunes Plus files are DRM free iTunes is available for Mac and PC...

Page 35: ...heck this option to show the album art for your song next to the track information display on each Virtual Deck Plugins SP 6 Sample Player Use the check box to enable and disable the SP 6 sample player plugin The SP 6 is enabled by default DJ FX Use the check box to enable and disable the DJ FX plugin The DJ FX plugin is disabled by default Serato Playlists Use the check boxes to enable and disabl...

Page 36: ...d ctrl shift backspace Delete the file from your library and send to the recycle bin Note to iTunes users files in your iTunes library cannot be deleted this way ctrl shift Toggle the input reverse switch Toggle the Flashing Deck indicator between the Primary and Secondary Decks esc Clear search string if searching or exit Scratch Live SAMPLE PLAYER slot 1 slot 2 slot 3 slot 4 slot 5 slot 6 Load t...

Page 37: ...line store at www rane com if you are in the USA The first time I play a new track it takes a while to load Scratch Live has to read the entire file and create a file index overview the first time it is loaded This may take a few seconds for longer files After the first load it should load instantly See Preparing Your Files on page 11 I have a particular MP3 that won t play plays badly takes a lon...

Page 38: ...any control signal check your connections BAD TURNTABLE VIBRATION Bass is reaching the stylus Try to isolate the turntable from the speakers CD PLAYER INTO PHONO INPUT The SL4 is set to receive a phono level input Switch to the correct setting on the SL4 PHONO INTO LINE INPUT The SL4 is set to receive line level input Switch to the correct setting on the SL4 DUSTY NEEDLE Dust is preventing the sty...

Page 39: ...ections BAD RECORD BURN Your record is badly worn and Scratch Live is unable to track Swap sides or get new vinyl ASAP LEFT CHANNEL IS NOISE Left signal has been lost with a noisy loose connection RIGHT CHANNEL IS NOISE Right signal has been lost with a noisy loose connection TONEARM IS SLIGHTLY TOO LIGHT Susceptible to dust and vibration Adjust the tonearm Signals are summing to mono The left and...

Page 40: ...far as Scratch Live is concerned Please make sure this really is an audio file Unsupported file This MP3 contains mul tiple layers While scanning this file Scratch Live found frames belonging to multiple MPEG layers Scratch Live does not support MP3s containing frames from multiple layers some frames may output as silence Unsupported file This file is more than 2 GB in size Self explanatory At the...

Page 41: ...event that the equipment is modified without written consent of the manufacturer This declaration of conformity is issued under the sole responsibility of Rane Corporation Type of Equipment Professional Audio Signal Processing Brand Rane Model SL4 Immunity Results THD N 4 dBu 400 Hz BW 20 Hz 20 kHz Test Description Results Conditions RF Electromagnetic Fields Immunity 80 MHz 1000 MHz 1 kHz AM 80 d...

Page 42: ... or 3 in products repaired or serviced by other than authorized Rane repair facilities or 4 in products with removed or defaced serial numbers or 5 in components or parts or products expressly warranted by another manufacturer Rane agrees through the applicable authorized distributor to repair or replace defects covered by this limited warranty with parts or products of original or improved design...

Page 43: ... THE COUNTRY WHERE THE UNIT WAS PURCHASED OR if product was purchased in the U S AT THE RANE FACTORY IN THE U S If the product is being sent to Rane for repair please call the factory for a Return Authorization number We recommend advance notice be given to the repair facility to avoid possible needless shipment in case the problem can be solved over the phone UNAUTHORIZED SERVICE PERFORMED ON ANY...

Page 44: ...RANE SL2 FOR SERATO SCRATCH LIVE OPERATOR S MANUAL 2 4 4 PART 21312 ...

Reviews: