background image

OWNER’S MANUAL

13

SIXTY-FOUR

Software Controls

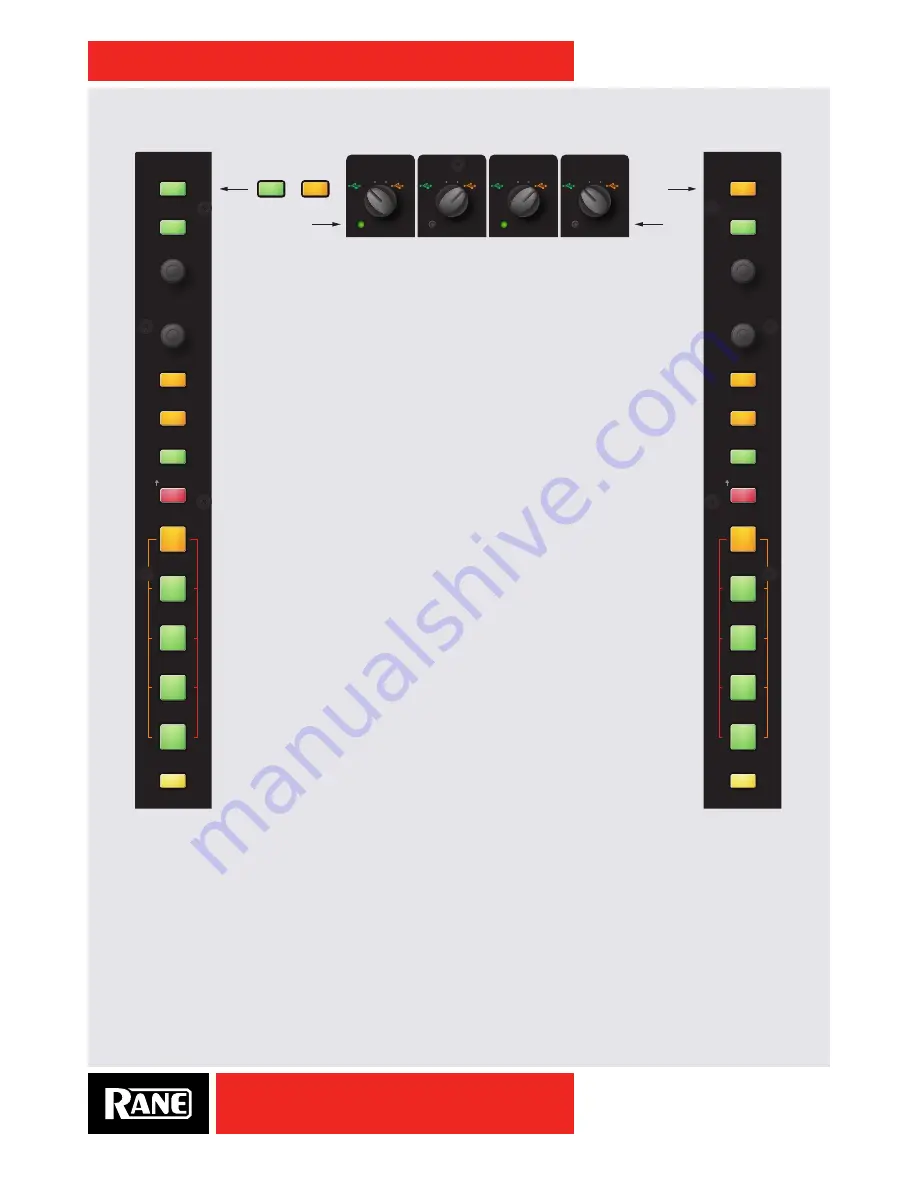
Control Assignment

Press the Deck 3 / 1 button to assign the left-hand controls to Deck 3 or 
Deck 1. Similarly, press the Deck 2 / 4 button to assign the right-hand 
controls to Deck 2 or Deck 4. The Control LED under each source selector 
shows the currently assigned Deck. The source selectors route Audio and 
MIDI to and from USB Port A or Port B. See "Source Selectors" on page 
11. MIDI button backlighting is independently maintained for each USB 
port and each deck. This way audio and MIDI assigned to one USB port do 
not interfere with audio and MIDI assignments on the other port.

Library Scroll and Load

The Tab button sets the cursor in the Serato DJ Crates column. Rotate the 
Scroll encoder to highlight the desired Crate then press the encoder down 
to select it. This crate selection puts the cursor in the song column. Turn 
the Scroll encoder to select a song and press the encoder down to load it. 
Library controls have fixed functions and are not affected by the selected 
MIDI Layer (see 

Layers

 below).

Auto Looping Controls

The LOOP encoder selects the auto loop length in Serato DJ. This can be 
adjusted while an auto loop is already looping. The Loop button performs an 
auto loop of the number of Bars selected. The Roll button performs a Loop 
Roll of the number of Bars selected. See 

Looping

 in the Serato DJ manual.

Slip

When Slip Mode is active you can manipulate the audio as normal (e.g., 
Scratch, Loop, Cues etc.). However, once you have finished, playback is 
returned to where it would be if you had not manipulated the audio.

Sync

Press to turn on and Sync a Deck. If Sync is already on, pressing Sync again 
re-syncs the Deck. Hold down the Shift button and press Sync to turn Sync 
off. See 

Sync

 in the Serato DJ manual.

3B

2B

4B

1B

3A

2A

4A

1A

LAYER 1

(CUE / LOOP)

(SAMPLES)

SYNC OFF

(CUE / LOOP)

(SAMPLES)

SYNC OFF

LAYER 2

LAYER 3

LAYER 4

LAYER 1

LAYER 2

LAYER 3

LAYER 4

SCROLL / LOAD

LOOP

SYNC

LAYER

SCROLL / LOAD

LOOP

ROLL

SLIP

LOOP

SYNC

LOOP

ROLL

SLIP

PH/CD 3

Port A

= green

Alternates strip control
assign to Deck 3 or 1.

Assign to
Deck 2 or 4.

Port A = green
Port B = orange

Port B

= orange

AUX

CONTROL

PH/CD 2 AUX

CONTROL

PH/CD 4 AUX

CONTROL

PH/CD 1 AUX

CONTROL

BANK

1

5

2

6

3

7

4

8

LAYER

5

1

6

2

7

3

8

4

DECK 3 / 1

3

1

2

4

TAB

DECK 2 / 4

TAB

BANK

Summary of Contents for SIXTY-FOUR

Page 1: ...OWNER S MANUAL SIXTY FOUR RANE SIXTY FOUR MIXER MANUAL ...

Page 2: ...sed to rain or moisture does not operate normally or has been dropped 15 The plug on the power cord is the AC mains disconnect device and must remain readily operable To completely disconnect this apparatus from the AC mains disconnect the power supply cord plug from the AC receptacle 16 This apparatus shall be connected to a mains socket outlet with a protective earthing connection 17 When perman...

Page 3: ...3 Cet appareil numérique de la classe B est conforme à la norme NMB 003 du Canada Copyright Notices 2013 Rane Corporation All rights reserved Serato DJ and Scratch Live are trademarks of Serato Trademarked in the United States and other countries This software is based in part on the work of the Independent JPEG Group and uses libpng code copyright 2000 2002 Glenn Randers Pehrson The Serato NoiseM...

Page 4: ...le 21 USB Audio 23 Shift Options 23 Ext Insert Options Menu 23 Filter Effect Options Menu 23 Flanger Effect Options Menu 23 Echo Effect Options Menu 24 Deck 1 4 Input Channel Options Menu 24 Main Mix Options Menu 24 Mixer Shift Functions 24 MIDI Start Stop 24 Nudge 24 BPM Adjust 25 DJ Swapping 25 Deck Swapping Controls 25 The DJ Handover Walkthrough 25 Enhancing Back to Back Mixing with the USB In...

Page 5: ...DJ will now copy to the Applications folder once this is finished you can unmount the disk image and launch Serato DJ Serato DJ Software Installation for Windows Before installing we recommend you download and install the latest Serato DJ version from serato com if it is newer than the version on the CD ROM that comes with your mixer 1 Insert the Serato DJ Installer CD ROM that came with your unit...

Page 6: ...ks and amplifiers Analog Inputs 1 Serato DJ has four virtual Decks 1 4 Decks 1 and 2 are typically used as the primary Decks and Decks 3 and 4 as secondary decks For DVS operation connect the corresponding analog inputs to the appropriate Decks and set the rear panel PH CD switches as required 2 For DVS playback set the selector switches to the appropriate USB playback channel for each Deck For ex...

Page 7: ...nal and rejection of hum and noise If your cable to the destination is less than 10 feet 3 meters you can often get away with an unbalanced cable See the RaneNote Sound System Interconnection at rane com for cable wiring recommendations Calibrating Serato DJ for Control Vinyl or CD Since Serato DJ is controlled by an analog signal there is no guarantee of what state that signal will be in by the t...

Page 8: ...above For optimal performance the inner ring should be as close to circular as possible Use the scope zoom slider to zoom in or out as necessary Use the scope L R balance and P A balance controls to adjust the shape of the inner ring The number in the top left corner of the scope view gives the current absolute position within the control record or CD The number in the top right corner is the curr...

Page 9: ...d at 48 kHz Deck input channel controls Pre fader Level 3 band isolator EQ low pass high pass sweep Filter with resonance adjustment Crossfader FlexFX and headphone Cue assigns Proprietary magnetic crossfader with a contour control Contour control for the channel faders Two Mic inputs Mic 1 includes a Phantom power switch Mic 2 includes a Mic Line level switch Controls On Off Level Pan Tone and Fl...

Page 10: ...m power available Mic 2 may be set for Mic or Line level input Stereo FlexFX Loop Return input is on a pair of unbalanced 1 4 TS jacks These inputs are automatically configured for mono when only one cable is connected to the left or right Return input The FlexFX Return input is normally used in combination with the FlexFX Send output to connect an outboard analog effects processor Mixer Outputs M...

Page 11: ...s 5 6 Routes audio and MIDI for Deck 2 only to from USB Port A Port A playback for Deck 4 USB audio slots 7 8 Routes audio and MIDI for Deck 4 only to from USB Port A Phono CD 3 PH CD switch on the rear panel Phono CD 1 PH CD switch on the rear panel Phono CD 2 PH CD switch on the rear panel Phono CD 4 PH CD switch on the rear panel Aux Input common to all selectors Port B playback for Deck 3 USB ...

Page 12: ... a smooth fade right Crossfader The magnetic crossfader is easily cleaned or field replaced See Fader Maintenance on page 32 Use the Crossfader assign switches to send each Deck to the A side B side or Post crossfader Adjust from a fast cut left to a smooth fade right with the Crossfader Contour control Headphone Cueing The Headphone monitor provides stereo or mono split cue operation When set for...

Page 13: ...ee Layers below Auto Looping Controls The LOOP encoder selects the auto loop length in Serato DJ This can be adjusted while an auto loop is already looping The Loop button performs an auto loop of the number of Bars selected The Roll button performs a Loop Roll of the number of Bars selected See Looping in the Serato DJ manual Slip When Slip Mode is active you can manipulate the audio as normal e ...

Page 14: ...ue point 6 Trigger 7 Loop 3 Trigger 7 Cue point 7 Trigger 8 Loop 4 Trigger 8 Cue point 8 MIDI Layer 2 Sample Player Fixed Layer 4 All Loops User Modifiable Trigger 1 Sample 1 Trigger 1 Loop 1 Trigger 2 Sample 2 Trigger 2 Loop 2 Trigger 3 Sample 3 Trigger 3 Loop 3 Trigger 4 Sample 4 Trigger 4 Loop 4 Trigger 5 Sample 5 Trigger 5 Loop 5 Trigger 6 Sample 6 Trigger 6 Loop 6 Trigger 7 Increment Sample B...

Page 15: ...signal Deck 1 Deck 2 Deck 3 Deck 4 Mic 1 and Mic 2 Session Input FlexFX Mix The Main Mix has these outputs Main Balanced XLR jacks Maximum output 8 volts rms Booth Balanced 1 4 TRS jacks Maximum output 8 volts rms Session Unbalanced RCA jacks Maximum output 4 volts rms S PDIF digital on one RCA jack Common to all Main Mix outputs Stereo or Mono default is stereo See Main Mix Options Menu on page 2...

Page 16: ... off this bypasses the internal effects 1 4 analog insert and the USB inserts What you hear in the Main Mix is a dry version of any signal assigned to the FlexFX Loop When On the signal is processed by any selected internal effect Ext Insert or USB insert This switch is an on off switch for the entire loop This switch is not an on off switch for the internal effects engine These effects are turned...

Page 17: ...t the high point of the sweep choose high frequency sync To sync to the BPM at the low point of the sweep choose low frequency sync The type of filter is selected in the menu on the mixer in the Filter Effect Options Menu on page 23 or in the Effects Screen on page 27 Operation of controls for the filter is defined in the Effects Parameter Table on page 20 FLANGER Effect Flanging is an audio effec...

Page 18: ... an enclosed space causing a large number of echoes to build up and then slowly decay as the sound is absorbed by the walls and air This is most noticeable when the sound source stops but the reflections continue decreasing in amplitude until they can no longer be heard The length of reverberation time is dependent on the size and acoustic character of a room The bar graph indicates the level of r...

Page 19: ...isplayed just following the BPM number Manually tapping a BPM forces the selection to Manual Pressing a FlexFX button with no other FlexFX button engaged with a BPM tagged song playing in Serato DJ on the same channel forces the clock source to S Serato DJ The mixer will continue to track the Serato DJ BPM until a new BPM is manually tapped or a new clock source is selected When one of S A or B is...

Page 20: ...signal with the minimum recirculation setting Setting the control to maximum or 10 results a Wet signal with maximum recirculation Adjusts the length of the recorded sample used by the echo Holding down the Shift button and turning the Time encoder adjusts the BPM Pressing the Echo button clears the echo Time range is 1 ms to 10920 ms Echo No feedback filter Recirculation is adjustable 0 70 Hold E...

Page 21: ...ay together and supports uninterrupted transitions between them USB audio is 32 bit floating point with a sample rate of 48 kHz USB Insert Send Main Mix Record x2 USB Ports Deck 1 Record Deck 3 Record Deck 4 Record Deck 2 Record USB 3 4 USB 1 2 USB 7 8 USB 9 10 USB 11 12 USB 5 6 USB Insert Return Deck 4 Playback Deck 1 Playback Deck 2 Playback Deck 3 Playback USB 1 2 USB 3 4 USB 5 6 USB 7 8 USB 9 ...

Page 22: ... 1 2 In USB audio record slots 3 4 In USB audio record slots 5 6 In USB audio record slots 7 8 In USB audio record slots 9 10 In USB audio record slots 11 12 Routed to either USB A or USB B depending on the Deck Input channel source selection Routed to either USB A or USB B Press A INSERT to route to USB A Press B INSERT to route to USB B Broadcast to both USB A and USB B at all times In either th...

Page 23: ...point of the sweep and the High sync Filters sync to BPM at the high point of the sweep Press any effect button or the Shift button to exit the menu Low pass Filter Low sync Low pass Filter High sync High pass Filter Low sync High pass Filter High sync Flanger Effect Options Menu The Flanger menu allows the choice of positive or negative feedback Move the Beat joystick up down to highlight the des...

Page 24: ... record source for USB audio slots 11 12 and the Main Out Mono on off To change the Record source move the Beat joystick up down to highlight the desired source then press the joystick down to keep the selection To set the Stereo Mono mode use the Beat joystick to highlight the Mono item and press the joystick to toggle Mono on or off Press any effect button or the Shift button to exit the menu Mi...

Page 25: ...rol between computers using the Source Select knobs Any of the four virtual decks can be swapped back and forth with a simple knob twist Nice and easy just the way we intended The DJ Handover Walkthrough Swapping between two DJs using the Sixty Four with Serato DJ is quick and seamless In the scenario below one DJ let s call him DJ A is already connected to the Sixty Four using either USB port A o...

Page 26: ...ol panel for Windows or Macintosh is updated with the mixer s settings Therefore when you connect to a different Sixty Four Mixer it s saved settings override your previous Control Panel settings Preferences Screen Select the Main Mix Mic 1 or Mic 2 as the USB 11 12 Record source Main Mix Out can be set to Stereo or Mono USB Port Status indicates the connection status of the two USB ports The Buff...

Page 27: ...ies near the Filter cutoff point by adding about 12 dB of gain Adding gain in a narrow peak around the cutoff frequency adds a zippy whistle effect to audio as the Filter is swept The default is 5 dB USB Record Source These controls select one of two sources for each input channel as the USB record source The PH CD source must be selected for DVS control When DVS is not used a record source may be...

Page 28: ...to worry about introducing noise in your mix from a floating Mic input To toggle Mic Bypass Mode hold the Shift button and press the Mic On button for the Mic section you wish to bypass That button will start flashing lightly indicating those audio controls are now bypassed and are only outputting MIDI changes The Mic On and FlexFX buttons as well as the Level Pan and Tone controls are affected by...

Page 29: ...P SYNC LAYER SCROLL LOAD LOOP ROLL SLIP LOOP SYNC LOOP ROLL SLIP NON PGM MIDI TONE TONE FLEXFX FLEXFX SHIFT CUE CUE EXT INSERT PH CD 3 AUX CONTROL CUE PH CD 2 AUX CONTROL CUE PH CD 4 AUX CONTROL MAIN MIX CUE PH CD 1 AUX CONTROL BOOTH PHONES SESSION OUT SESSION IN BALANCE PAN SPLIT CUE LEVEL A B MID LOW FILTER LEVEL LEVEL LEVEL PAN PAN HIGH LEVEL TIME DEPTH FLEXFX CROSSFADER FILTER FLEXFX BEAT BANK...

Page 30: ...esponding controls in the driver control panel MAIN OUT SEND PHONO GROUNDS MIC 1 MIC 2 SESSION AUX ANALOG INPUTS MIC INPUTS LEFT MONO 100 240V 50 60 Hz 15 WATTS LEFT RIGHT ACN 001 345 482 MADE IN U S A RANE CORP RIGHT RETURN SESSION FLEXFX LOOP LEFT RIGHT USB A USB B BOOTH OUT LEFT RIGHT IN IN OUT R L 1 3 R L 4 IN OUT S PDIF 2 PH CD PH CD OFF 48 PH CD PH CD R L MIC LINE SIXTY FOUR 70 71 72 73 21 3...

Page 31: ...kHz 32 bit floating point USB Audio Two independent ports Six Stereo Record Five Stereo Playback 48 kHz 32 bit floating point FlexFX Send Return Stereo unbalanced TS tip sleeve phone jacks Two Mic Inputs Balanced TRS XLR combination jacks Single knob High Low Tone Controls Mic 1 has a 48V Phantom Power on off switch Turn on for a condenser mic Mic 2 has a Mic Line level switch Choose Line to conne...

Page 32: ...st take the carrier off of the rails by removing one of the endblocks Clean the rails using a lint free cloth and alcohol Use a cue tip and alcohol to clean the carrier bearings 3 With the fader clean dry and assembled add a couple of drops of Teflon Multi use Lubricant to each rail of the fader 4 Move the carrier back and forth to distribute lubricant 5 Do not disturb the position of the small se...

Page 33: ...g the three white and blue wire connectors 8 Slide out the fader assembly completely 9 The channel faders are mounted in pairs Remove the four screws for each fader pair 3 1 or 2 4 10 The magnetic crossfader may be removed by the two screws at each end of the crossfader Reverse this procedure to re assemble Plug in all three cables before installing the screws Left white cable connects Decks 3 1 t...

Page 34: ... 4 8 6 10 0 2 4 8 6 10 0 2 4 8 6 10 0 2 4 8 6 OL 6 3 0 3 12 6 18 RIGHT LEFT MAIN CUE RIGHT LEFT RIGHT LEFT 6 OFF 6 OFF 6 OFF HIGH LOW 6 OFF 6 OFF 6 OFF HIGH LOW 6 OFF 6 OFF 6 OFF HIGH LOW 6 OFF 6 OFF 6 OFF HIGH LOW MAX MIN MAX MIN BPM START STOP NUDGE LAYER 1 CUE LOOP SAMPLES SYNC OFF CUE LOOP SAMPLES SYNC OFF LAYER 2 LAYER 3 LAYER 4 LAYER 1 LAYER 2 LAYER 3 LAYER 4 SCROLL LOAD LOOP SYNC LAYER SCRO...

Page 35: ... written consent of the manufacturer This declaration of conformity is issued under the sole responsibility of Rane Corporation Type of Equipment Professional Audio Signal Processing Brand Rane Model Sixty Four Immunity Results THD N 4 dBu 400 Hz BW 20 Hz 20 kHz Test Description Measurement Conditions RF Electromagnetic Fields Immunity 80 MHz 1000 MHz 1 kHz AM 80 depth 3V m 65 dB 1400 MHz 2700 MHz...

Page 36: ... THIS LIMITED WARRANTY SHALL BE THAT WHICH IS DESCRIBED TO THE ORIGINAL RETAIL PURCHASER BY THE AUTHORIZED RANE DEALER OR DISTRIBUTOR AT THE TIME OF PURCHASE Rane Corporation does not however warrant its products against any and all defects 1 arising out of materials or workmanship not provided or furnished by Rane or 2 resulting from abnormal use of the product or use in violation of instructions...

Page 37: ...chased in the U S AT THE RANE FACTORY IN THE U S If the product is being sent to Rane for repair please call the factory for a Return Authorization number We recommend advance notice be given to the repair facility to avoid possible needless shipment in case the problem can be solved over the phone UNAUTHORIZED SERVICE PERFORMED ON ANY RANE PRODUCT WILL VOID ITS EXISTING FACTORY WARRANTY FACTORY S...

Page 38: ...OWNER S MANUAL 38 SIXTY FOUR ...

Page 39: ...OWNER S MANUAL 39 SIXTY FOUR ...

Page 40: ...OWNER S MANUAL 40 SIXTY FOUR PART 21052 ...

Reviews: