background image

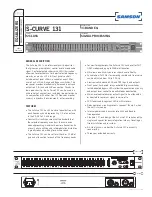
11. MICROPHONE INPUT JACK: 

PLUG ONLY THE RANE MICROPHONE INTO THIS JACK--THE DC

POWER SUPPLY VOLTAGE SUPPLIED BY THIS JACK COULD BE DAMAGING TO ANY OTHER

MICROPHONE When the mic is plugged in, the display responds to whatever the mic picks up; when
the mic is unplugged, the jack automatically switches the display to monitor the output of the equalizer
section (see Section IV-9).

12. RTA LEVEL CONTROL: 

Use this knob to adjust the microphone level (or line level when the

microphone is unplugged) to properly drive the display. This control is accurately calibrated in dB-SPL;

any display band whose LED is green has the sound pressure level indicated by this knob (only with the

mic plugged in).

RE 27 REAR PANEL

RE 14 REAR PANEL

6. GROUND LIFT SWITCH: 

This switch provides the ability to separate chassis ground and signal

ground. Normally, this switch should be in the LIFT position. If you are tempted to try movingthis switch
with your power amplifiers turned on or turned up, DON’T BE. ALWAYS TURN YOUR AMPLlFIER LEVELS
DOWN BEFORE CHANCING YOUR GROUNDS AROUND and then bring them up slowly.

1. PINK NOISE LEVEL ADJUST: 

Use a 1/8" inch screwdriver to adjust the output from the Pink Noise

generator from 0 to 1.2 volts (-4 dBm) to match the input level requirements of the mixer or other
equipment driven by the generator.

2. PINK NOISE OUTPUT JACK: 

This is an unbalanced 1/4" jack which supplies Pink Noise to selected

equipment

3. EQ INPUT JACK: 

This is an automatic balanced/unbalanced 1/4" input to the equalizer section. Use a

mono 1/4" plug for unbalanced operation, or a stereo 1/4" plug wired as shown in the diagram below for
balanced operation.

4. EQ OUTPUT JACK: 

This is the automatic unbalanced/floating output from the equalizer section. Use

a mono%” plug for unbalanced operation, or a stereo 1/4" plug wired as shown in the diagram below for
use with balanced equipment (Refer to Rane Note 102 for further information on Rane’s floating output
system.)

5. AC LINE CORD: 

Plug this into a 120 VAC power outlet with grounding pin.

4

Summary of Contents for RE 14

Page 1: ...RE 27 AND RE 14 OPERATING AND SERVICE MANUAL C O R P O R A T I O N...

Page 2: ...he AC mains disconnect device and must remain readily operable To completely disconnect this apparatus from the AC mains disconnect the power supply cord plug from the AC receptacle 16 This apparatus...

Page 3: ...he Rane factory before taking it anywhere for repairs We will help you to identify and locate any specific malfunctions possibly avoid needless shipment or instruct you as to the speediest method for...

Page 4: ...n reaches 4 dB below clipping 7 ANALYZER DISPLAY LEDs Each red LED lights up when response is too high in that band green LEDs light when response is within 3 dB or 1 dB of the selected curve yellow L...

Page 5: ...this switch with your power amplifiers turned on or turned up DON T BE ALWAYS TURN YOUR AMPLlFIER LEVELS DOWN BEFORE CHANCING YOUR GROUNDS AROUND and then bring them up slowly 1 PINK NOISE LEVEL ADJUS...

Page 6: ...equalizer with input s and output s and a realtime analyzer with mic input and pink noise output Another thing to keep in mind is that the analyzer display will automatically monitor the output of th...

Page 7: ...tor to split the RE 27 output to both left and right inputs of the amp or crossover NOTE If you have the good fortune to be using a Rane crossover AC 22 or AC 23 you need only connect the single RE 27...

Page 8: ...contain built in graphic equalizers provide separate inputs and outputs for thisequalizer BE SURE TO INSTALL THE BUILT IN EQUALIZER AS SHOWN TO BYPASS THE BUILT IN EQUALIZER OTHERWISE THINGS COULD GE...

Page 9: ...uld be balanced whenever possible 1 This set up using the Rane microphone provides the most expedient method to optimize stage monitor sound quality and also reduce feedback problems Feedback induced...

Page 10: ...iagram I I l 3 2 Dashed lines show temporary connections for pink noise test purposes only repeat this configuration for each microphone input channel When testing is completed connect the RE 27 or RE...

Page 11: ...hat you don t favor one section of the listening area 3 USE ENOUGH PINK NOISE VOLUME TO OVERRIDE BACKGROUND NOISE There s no need to run deafening pink noise levels to EQ a system Just be sure that no...

Page 12: ...esponse for the left and right channels If you are running stereo use two mic locations for each channel averaging in the same manner if there are differences 3 PINK NOISE RUN UP Turn down the mixer o...

Page 13: ...ents will be consistently set above or below the pink noise test settings the same amount at each performance make a note of these further adjustments to save future tweeking during performances For e...

Page 14: ...0kHz 0 3dB THD Noise less than 009 20 20kHz with 4dBm output IM Distortion less than 02 60 7kHz 4 l Maximum Gain 6dB 3 0dB with sliders centered Input Impedance 20k ohms Output Impedance 100 ohms Maxi...

Page 15: ...Pseudo random NMOS digitally synthesized 23 bit word length 1 min repetition rate Output level adjustable to 4dBm Response 16Hz to 20kHz 1 dB crest factor 4 0 Microphone Omnidirectional back electret...

Reviews: