
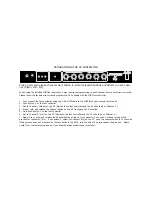

FRONT PANEL FEATURES AND CONTROLS
Channel switching:
The X2 incorporates 2 base channels with 3 modes of operation. Channel switching can be achieved by using either the front panel
push button, or the included 4-button MIDI foot controller. When using the front panel button simply push and release the channel select
button to scroll through the 3 modes. The amp defaults on the Clean channel, then press once for O.D., and press again for
Fry mode.
If the amp does not switch channels, it may require a reset by simplying turning the amp off for 5 seconds, than back
on.
When using the foot controller, first connect the cable to the MIDI IN on the rear panel then select the channel you want.
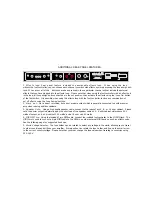
Master controls:
The front panel features two separate Master controls, one for each channel. These knobs control the level of volume for each channel.
Gain controls:
Each channel also features two separate Gain controls. On the clean channel, this knob will give you additional volume. The Overdrive
channel Gain control is used to control the amount of distortion and saturation.
Warning: The Fry channel was designed with extreme high gain. Do not run this channel with the Gain knob on full.
Recommended Gain setting is 6-7.
Density control:
This active EQ controls a specific preset low frequency, and allows you to dial in the amount of low end boost. This knob works great
with speaker cabinets using a 15
”
driver.
Bass control:
A passive bass control that adjusts the amount of low end frequencies in your tone.
Mid-Level/Mid-Sweep controls:
This is a parametric mid-section, which allows precise tone adjustment to a particular mid-range frequency. The Mid-level knob controls
the amount of cut or boosting to a specific frequency, and the Mid-sweep knob determines the frequency you will be cutting or boosting.
Treble control:
A passive tone control that adjusts the overall amount of upper mid-range to low treble frequencies for each channel.
Presence control: