


TECHNIQUES OF OPERATION
The best way to get acquainted with how
your winch operates is to make test runs
before you actually use it. Plan your test in
advance. Remember, you hear your winch,
as well as see it operate. Get to recognize
the sounds of a light steady pull, a heavy
pull, and sounds caused by load jerking or
shifting. Gain confidence in operating your
winch and its use will become second nature
with you.
The uneven spooling of cable, while pulling a
load, is not a problem, unless there is a
cable pileup on one end of drum. If this
happens reverse the winch to relieve the load
and move your anchor point further to the
center of the vehicle. After the job is done
you can unspool and rewind for a neat lay of
the cable.
When pulling a load where there is even a
remote chance of cable failure, place a blan-
ket, jacket or tarpaulin over the cable about
six feet behind the hook. This will slow the
snap back of a broken cable and could pre-
vent serious injury.
NOTE: The Ramsey level winder is an
available accessory for tightly respool-
ing unloaded cable onto the drum.
The Ram-Lok
®
semi-automatic clutch allows
rapid unspooling of the cable, from cable
drum, for hooking onto the load.
The Remote Rod-adapter shifter
is oper-
ated as follows:
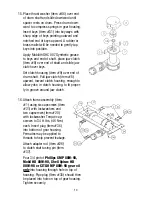
1.
TO DISENGAGE CLUTCH
, run the winch
in the reverse (reel out) direction until the
load is off the cable. Lift up knob and
pull out, lock in place. See warning label
located by shifter knob. The clutch is
now locked out and the cable may be
pulled off by hand.
2.
TO ENGAGE CLUTCH
, lift up knob then
release. See warning label located by
shifter knob. Run the winch in reverse
until the shifter knob snaps fully in or
until the cable drum starts turning. At
this point make sure the shifter knob is
all the way in. The plastic plug in top of
clutch housing may be removed, for
inspection of clutch to assure total
engagement. After the clutch is fully
engaged, the winch is ready for winching
in the cable.
The Air Shifter
is operated as follows:
1.
TO DISENGAGE CLUTCH
, run the winch
in the reverse (reel out) direction until the
load is off the cable. Apply 60-125 PSI to
inlet port fitting of air cylinder. Run winch
in the forward (reel in) direction to disen-
gage clutch.
2.
TO ENGAGE CLUTCH
, remove air pres-
sure from air cylinder. Run the winch in
reverse until the cable drum starts turn-
ing. The plastic plug in top of clutch
housing may be removed, for inspection
of clutch to assure total engagement.
After the clutch is fully engaged, the
winch is ready for winching in the cable.
The Manual T-Handle Shifter
is operated
as follows:
1.
TO DISENGAGE CLUTCH
, run the winch
in the reverse (reel out) direction until the
load is off the cable. Pull outward on the
T-handle, rotate it counter-clockwise 90°
and release. The clutch is now locked
out and the cable may be pulled off by
hand.
2.
TO ENGAGE CLUTCH
, pull outward on
the handle, rotate it clockwise 90° and
release. Run the winch in reverse until
the clutch handle snaps fully in or until
the cable drum starts turning. At this
point make sure the clutch handle is all
the way in. To confirm this, remove the
plastic plug on top of the clutch housing
to inspect the clutch for total engage-
ment. After the clutch is fully engaged,
the winch is ready for winching in the
cable.
5


