This document, including images, may not be reproduced partly or fully without the expressed written consent of National Products, Inc.
To see more mounting options, visit rammount.com
Phone: 1.800.497.7479
w w w. r a m m o u n t . c o m
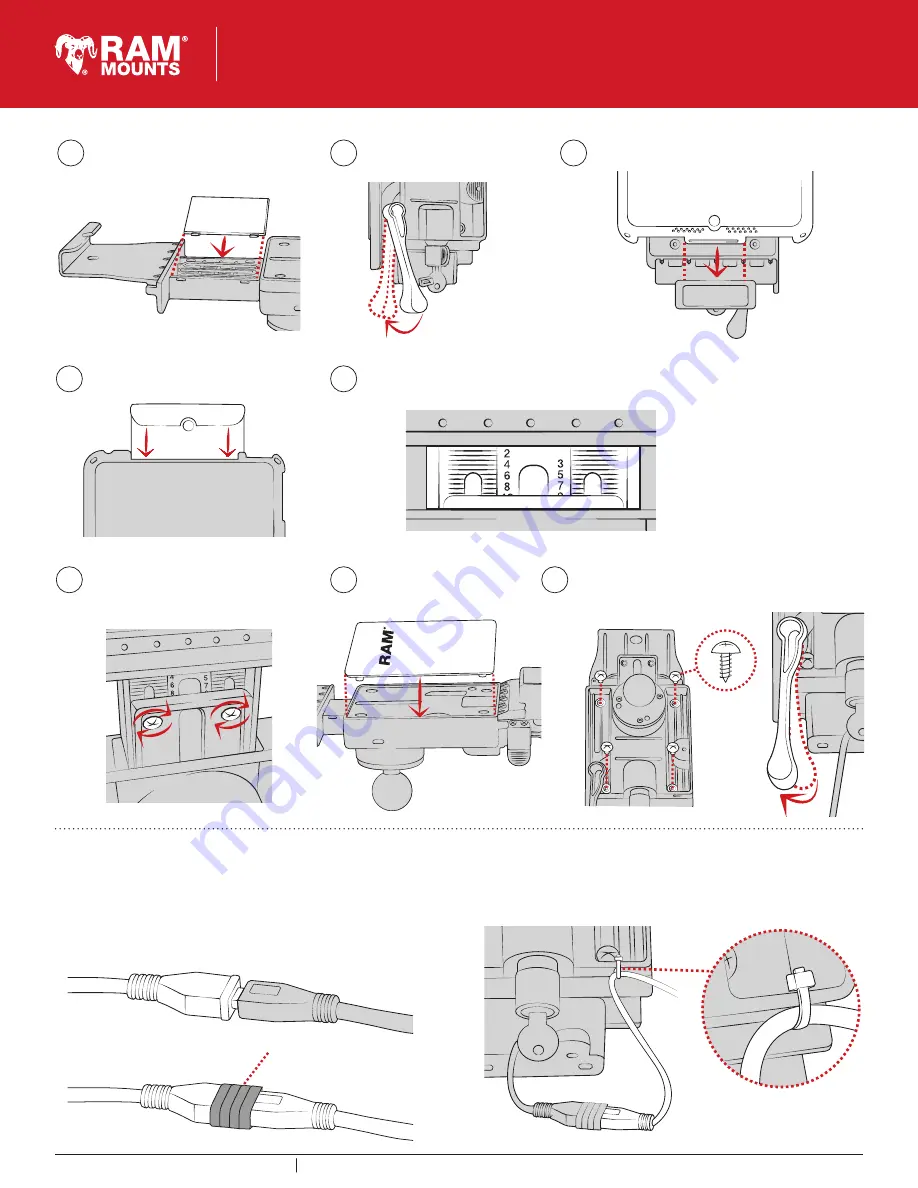
Secure using (J) screws on back of slide assembly. Lock
must be engaged to access all four holes as shown.
Position front cover over
vehicle dock assembly.
Remove your tablet. Set your top cup
to the appropriate setting using the
reference number from step 14. When in
place, fully tighten the (M) screws.
Cable Management
Insert Micro USB 2.0 cable into the GDS Dock’s Micro USB 2.0 receiver.
When plugged in, the tablet will detect the power source within two
seconds. User must supply a USB wall charger or cirgarette adapter
with appropriate charging specifications for the mounted device.
For open cockpit or outdoor use, it is recommended to apply
electrical tape to your USB connection.
Use cable tie to secure your USB cable to the slot behind vehicle
dock as shown.
Lack of, or improper use of wire retention/cable management,
may void warranty.
11
14
16
17
15
12
13
Electrical tape
10
TAB-LOCK™
GDS
®
Locking Vehicle
This document, including images, may not be reproduced partly or fully without the expressed written consent of National Products, Inc.
To see more mounting options, visit rammount.com
RPR-INS-GDS-DOCKL-V2
For recommended settings on
your specific tablet, visit
www.rammount.com/install
Place tablet with intelliSkin™ on bottom docking cup.
On the back of the top slide, review the numbers shown in the middle. Take note of the lowest
number that is fully visible. This reference will help you in the next step. In this example, the
lowest visible number is 8.
Press down on top cup to
secure over tablet.
Wedge top slide cover into top slide.
Using pressure, snap into place.
Pull lever to engage lock.


